 |
VOOZH | about |
|
VOOZH | about |
In this article, we’ll build a login system using React and Supabase, an open source Firebase alternative. Supabase provides a pre-made authentication UI as well as email and social integrations, making building an authentication system a breeze.
👁 Authenticate React App SupabaseWe’ll create a basic React component using the pre-built Supabase UI and add an authentication system to it. First, we’ll use email authentication, and then we’ll configure Google, Facebook, and GitHub Auth, respectively.
Jump ahead:
The Replay is a weekly newsletter for dev and engineering leaders.
Delivered once a week, it's your curated guide to the most important conversations around frontend dev, emerging AI tools, and the state of modern software.
Let’s start by creating our React project using Vite to make it faster. Run the following command in your terminal:
npm create vite@latest supabase-auth
I named my application supabase-auth, but you can name yours whatever you want. Now, head into your application and install the required dependencies by running the following code in your terminal:
npm install @supabase/supabase-js @supabase/auth-ui-react
As I mentioned, Supabase provides a pre-made authentication UI. Head to your App.jsx file and update its contents with the following code:
import "./index.css";
import { useState, useEffect } from "react";
import { createClient } from "@supabase/supabase-js";
import { Auth } from "@supabase/auth-ui-react";
import { ThemeSupa } from "@supabase/auth-ui-shared";

const supabase = createClient(
 import.meta.env.VITE_SUPABASE_URL,
 import.meta.env.VITE_SUPABASE_ANON_KEY
);
export default function App() {
 const [session, setSession] = useState(null);


 useEffect(() => {
 supabase.auth.getSession().then(({ data: { session } }) => {
 setSession(session);
 });
 const {
 data: { subscription },
 } = supabase.auth.onAuthStateChange((_event, session) => {
 setSession(session);
 });
 return () => subscription.unsubscribe();
 }, []);
 if (!session) {
 return (
 <div
 style={{
 width: "100vw",
 height: "100vh",
 display: "flex",
 justifyContent: "center",
 alignItems: "center",
 }}
 >
 <div>
 <Auth
 supabaseClient={supabase}
 appearance={{ theme: ThemeSupa }}
 providers={["google", "facebook", "github"]}
 />
 </div>

 </div>
 );
 } else {
 return (
 <div>
 <div>Logged in!</div>
 <button onClick={() => supabase.auth.signOut()}>Sign out</button>
 </div>
 );
 }
}
In the code above, I’ve added the following styles to center the Supabase Auth UI:
 <Auth
 supabaseClient={supabase}
 appearance={{ theme: ThemeSupa }}
 providers={["google", "facebook", "github"]}
 />
 </div>
I also changed the providers. If you delete the providers, the default version includes GitHub, Google, and Azure logins. But, we want to use Google, Facebook, and GitHub in that order, so we’ll change the providers as such. For all of these to work, we’ll create a Supabase client and pass the following values into it:
const supabase = createClient(
 import.meta.env.VITE_SUPABASE_URL,
 import.meta.env.VITE_SUPABASE_ANON_KEY
);
Since we built our application with Vite, we have to comply with how Vite handles environment variables. We create a .env file in our project and pass the required values, like VITE_SUPABASE_URL=myvalueissomevalue. Vite requires that all environmental variables start with VITE_ in definition and be imported as import.meta.env.VITE_… in the application. But, what about the Supabase URL and Anon Key?
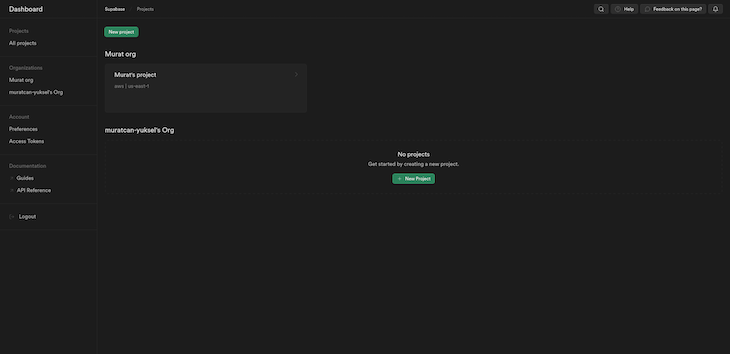
To use Supabase in our React application, we first need to create a project. If you go to the Supabase dashboard, you’ll see something similar to the following:
👁 Supabase Dashboard Configuration
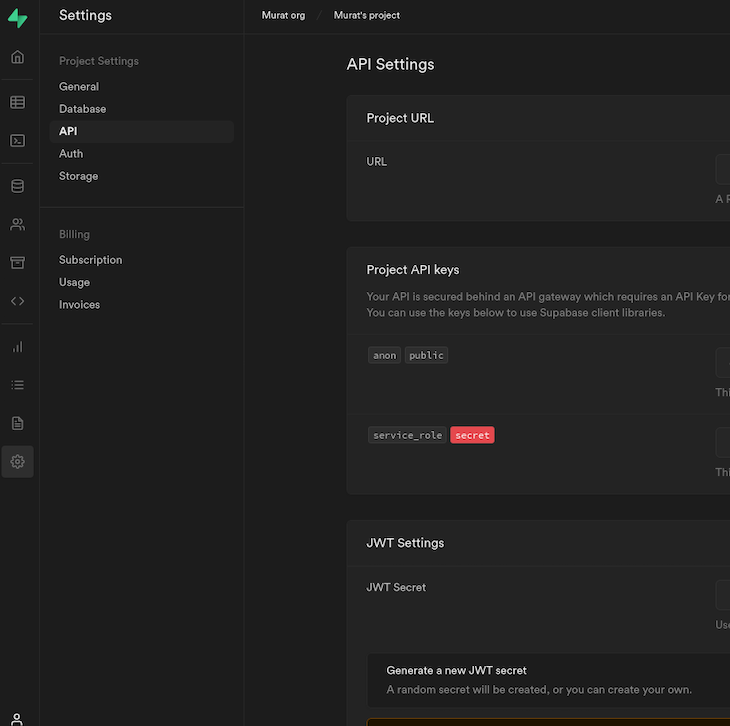
I already have a project, but you’ll need to create one via the New Project button. After creating the project, go into it, select Settings in the bottom left corner, then click API to see our URL and Anon Key:
👁 Supabase Settings URL Anon Key
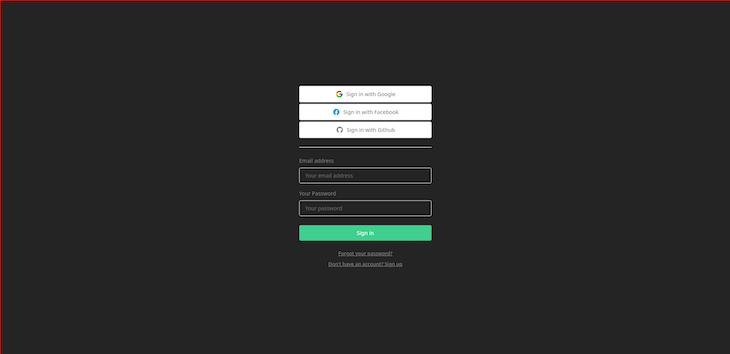
These are the values we have to pass in our .env file. Since we’ve passed the required values into the .env file, we can run npm run dev, which will start the development server at http://localhost:5173/. You should now see the following page:
👁 Start Supabase Development Server Localhost
Besides centering the Supabase Auth UI, we didn’t have to write a single line of CSS! At this point, we can use email login, but we can’t use the other options, like Google or GitHub. We need to configure these one by one. But first, let’s see what happens when we log in.
Notice there’s a sign-up functionality. When we click on Don’t have an account? Sign up, we’ll be able to create a new account and use it to log in. After creating and entering our credentials, we‘ll be directed to the following page:
Now, we see the Logged in! message and the Sign out button. I deliberately didn’t center these to show what they look like initially. You can just copy and paste the same centering functionality that we used with the homepage.
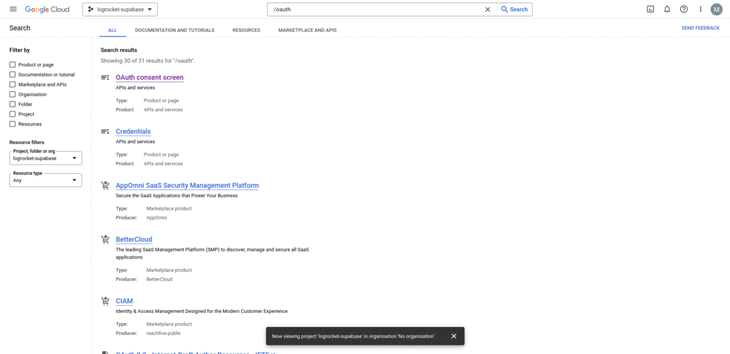
For my application to work with Google Auth, I need to go to https://cloud.google.com/, sign in, and create a new project. Inside of that project, I’ll search for OAuth and go to the OAuth consent screen.
From there, I’ll click on Credentials on the left sidebar. Once again, I’ll click to my application, where I’ll be prompted with my client ID and secret key. Be sure to copy these somewhere safe because we’ll use them again in a minute. To see the full workflow, you can refer to the gif below:
👁 Configure Supbase Google Auth
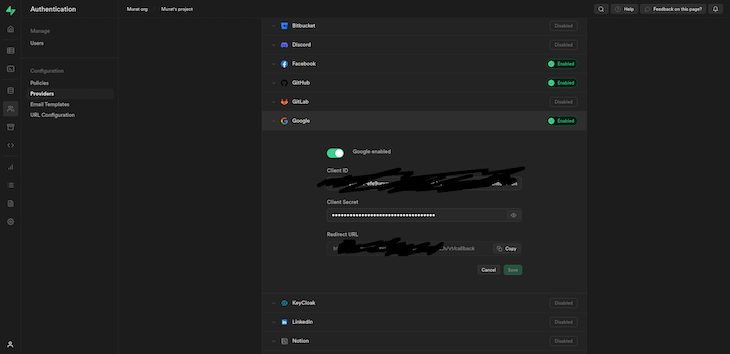
You’ll see the client ID and client secret on the right side. Now, I need to go back to Supabase, click on Authentication on the left side, and go to Providers. There, I’ll choose and enable Google, then pass the client ID and secret I just got from Google. I’ll also copy the redirect URL:
👁 Supabase Enable Google Providers Client ID
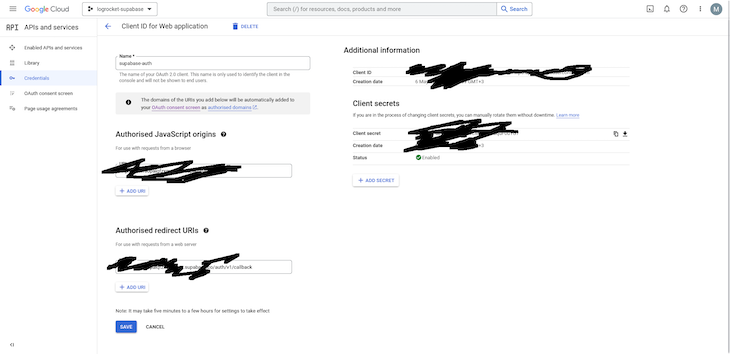
Once again, I’ll go back to my Google project. Remember the last step of the gif? On the left side, I’ll have to paste the redirect URL under the Authorized Redirect URLs. It should look something like https://mysupabaseapppsrszsdfgr.supabase.co/auth/v1/callback. Under the authorized JavaScript origins section, I’ll also paste the same link without anything after .co, so https://mysupabaseapppsrszsdfgr.supabase.co.
If this is confusing, please refer to the image again:
👁 Configure Supabase Authorized Redirect URL
Now, I can log into my application using Google Auth. Next, we’ll do the same thing, but for Facebook login.
Now that we know how the workflow goes, things should be much easier. First, we need to go to https://developers.facebook.com and create an app there. When creating the app, choose which platform you want to use, in our case, the web. On this page, we’ll also specify that we’re not building a game, either. Enter your app’s name. It will ask for your Facebook credentials, and you’re good to go.
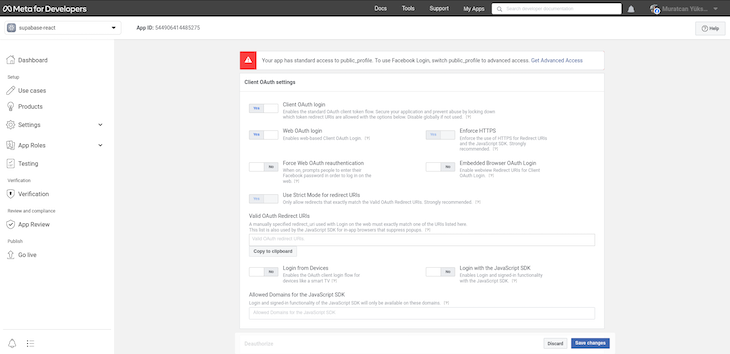
On the left sidebar, click to the Products section. Once it’s opened, we’ll configure Facebook login. Once again, we’ll paste our redirect URL from Supabase and save the changes:
👁 Configure Supabase Login Facebook Auth
We paste the redirect URL under the Valid OAuth Redirect URIs section. Now, we’ll click to the Settings section on the left sidebar, then click to Basic to go to basic settings. Here, we’ll copy our App ID and App secret:
👁 Copy App ID Secret Facebook Auth Supabase
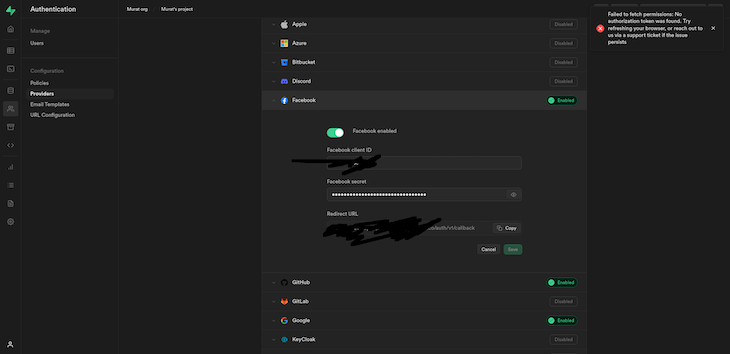
We know the drill from here. Go back to the Providers in your Auth section in Supabase, enable Facebook, and paste your credentials:
👁 Enable Facebook Providers Auth Supabase
With this last touch, we’ll be able to log into our app using Facebook, too. Now, let’s follow a similar pattern for GitHub so that developers can use our application seamlessly.
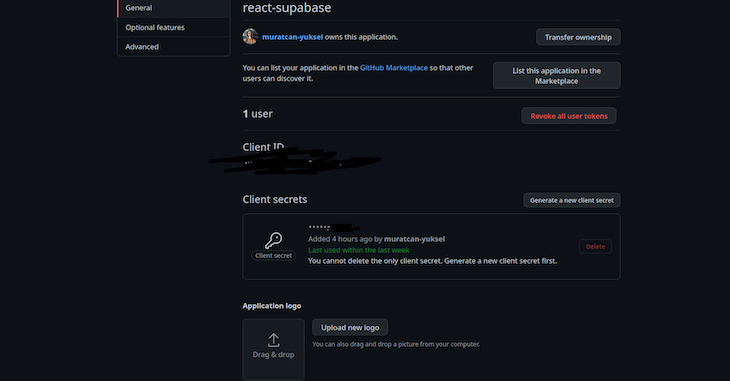
Head to https://github.com/settings/developers and create an application there, too. After that, go into the application and generate a new client secret. Like before, we’ll pass these into Supabase:
👁 Configure GitHub Auth Supbase New Client Secret
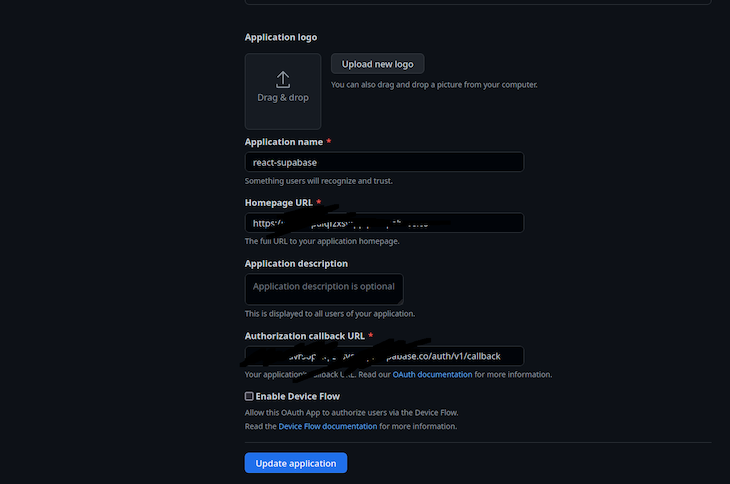
Remember our homepage and the redirect URL? We’ll paste them here as well. For reference, they should look something like https://mysupabaseapppsrszsdfgr.supabase.co/auth/v1/callback for the callback and https://mysupabaseapppsrszsdfgr.supabase.co for the homepage, respectively:
👁 Paste Homepage Redirect URL Github Auth
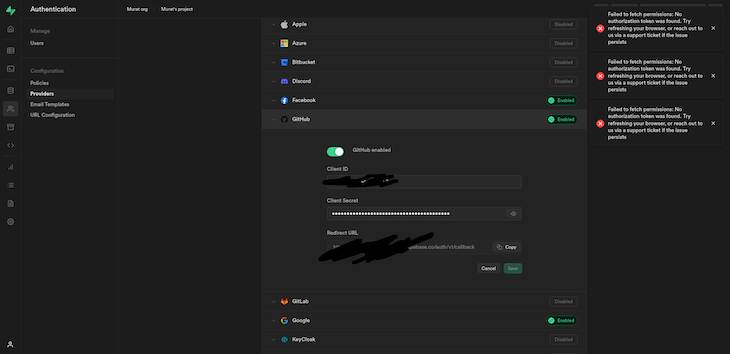
If we go back to our providers and add the credentials, we should also be able to log into our app using GitHub:
👁 Login Supbase App Github Auth
Now that our app is complete, you can go ahead and test it! In less than 15 minutes, we’ve created four different authentication functionalities. Supabase is a great tool for creating projects quickly, and it has an awesome free tier for your side projects. If you liked this article, be sure to let me know in the comments. All the best, and keep coding!
Install LogRocket via npm or script tag. LogRocket.init() must be called client-side, not
server-side
$ npm i --save logrocket

// Code:

import LogRocket from 'logrocket';
LogRocket.init('app/id');
// Add to your HTML:

<script src="https://cdn.lr-ingest.com/LogRocket.min.js"></script>
<script>window.LogRocket && window.LogRocket.init('app/id');</script>
Learn how to build a full React Native auth system using Better Auth and Expo — with email/password login, Google OAuth, session persistence, and protected routes.
Compare the top AI development tools and models of June 2026. View updated rankings, feature breakdowns, and find the best fit for you.
Learn how Bloom filters reduce database lookups for username availability checks while preserving correctness at scale.
Learn how to test Nuxt apps with Vitest, @nuxt/test-utils, runtime mocks, server route mocks, and Playwright e2e tests.
Would you be interested in joining LogRocket's developer community?
Join LogRocket’s Content Advisory Board. You’ll help inform the type of content we create and get access to exclusive meetups, social accreditation, and swag.
Sign up now