 |
VOOZH | about |
|
VOOZH | about |
Security is an essential feature in any web application to protect against unauthorized intrusions and data thefts. One way to secure your app is via authentication. Authentication helps control user access to parts of an application and determines the identity of users.
👁 Authenticating React Applications With Magic LinkAuthentication strategies for React applications include:
In this tutorial, we’ll walk through:
The Replay is a weekly newsletter for dev and engineering leaders.
Delivered once a week, it's your curated guide to the most important conversations around frontend dev, emerging AI tools, and the state of modern software.
Magic Links provide a way to authenticate users without a password. Developed by Fortmatic, a Magic Link is a link that is generated by the Magic SDK whenever a user signs up or logs into an application.
When a user signs up or logs in, the following occurs.
For the user, Magic Links eliminates the hassle of setting and remembering a secure password. It also saves you from having to store and manage user passwords and sessions in databases. It uses a blockchain-based key management system similar to SSH, so whenever a user signs up or logs in, it generates a public-private key pair that is subsequently used to authenticate requests made by the user.
To follow along with this tutorial, you’ll need the following.
To get started, we have to create a new React project. Open your terminal, and run:
npx create-react-app react-magic-tutorial
This creates a React project in the react-magic-tutorial directory. To run the app, go to the root of the directory and start the app by running the following commands.
cd react-magic-tutorial
npm start
Before we create the components for our React application, we need to set up the Magic service.
Log into Magic, get your test publishable API key to gain access to the magic service, and copy it. Create a .env file in the root directory of your application, open the file in your editor and paste the following.
REACT_APP_PK_KEY=API_KEY
Replace API_KEY with the key you copied, then go back to your terminal and install the Magic SDK.
npm install --save magic-sdk
Next, create a file to handle the Magic service:
mkdir service
cd service
touch magic.js
This creates a magic.js file in the service directory. Open the file in your editor and paste the following.
import { Magic } from 'magic-sdk';
const magic = new Magic(process.env.REACT_APP_PK_KEY);

export const checkUser = async (cb) => {
 const isLoggedIn = await magic.user.isLoggedIn();
 if (isLoggedIn) {
 const user = await magic.user.getMetadata();
 return cb({ isLoggedIn: true, email: user.email });
 }
 return cb({ isLoggedIn: false });
};

export const loginUser = async (email) => {
 await magic.auth.loginWithMagicLink({ email });
};

export const logoutUser = async () => {
 await magic.user.logout();
};
The magic variable initializes the magic service with your publishable API_KEY. The checkUser function accepts a callback cb as a parameter and checks whether the user is logged in. If the user is logged in, it gets the user metadata and passes it to the callback function. If the user is not logged in, it returns the callback function with the isLoggedIn property set as false.
The loginUser function takes the user email as a parameter and passes it to the magic.auth.loginWithMagicLink({ email }) function. This function is responsible for creating and sending the login link to the user and creating a user session. The logoutUser function logs the user out and destroys the session.
The next step is to create the components that we’ll need for our application:
Authenticate — A form component that allows the user to sign up or sign inDashboard — A component that displays whether or not authentication was successfulPrivateRoute — A wrapper component that checks whether the user is authenticated before rendering a component; otherwise, it redirects the user back to the signup/login pageApp — The main application component. It renders either the Authentication component if the user isn’t logged in or the Dashboard component if the user is logged in.We’ll be using React Contexts later to pass the user data to components rendered based on whether the user is authenticated or not. We’ll also be using React Router to handle routing.
To install React Router run the following command.
npm install react-router-dom
After installing, run the following commands.
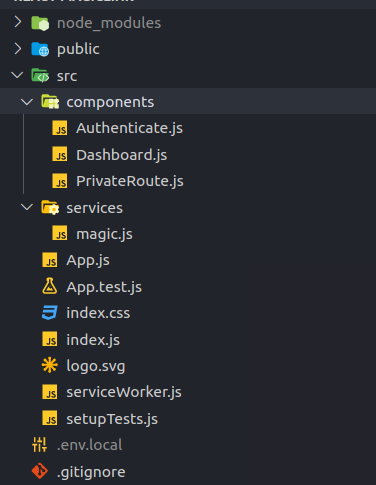
cd src
mkdir components
cd components
touch Authenticate.js DashBoard.js PrivateRoute.js
This creates a components directory with the components in the src directory. Your folder structure should look similar to the screenshot below.
We’ll use the React Bootstrap library to style the project. Run the following command to install the library.
npm install react-bootstrap bootstrap
Open the Authtentication.js folder and paste the following.
import React, { useState } from 'react';
import { useHistory } from 'react-router-dom';
import {
 Button,
 Form,
 FormGroup,
 FormLabel,
 FormControl,
} from 'react-bootstrap';
import { loginUser } from '../services/magic';
const Authenticate = () => {
 const [email, setEmail] = useState('');
 const [loading, setLoading] = useState('');
 const [error, setError] = useState(null);
 const history = useHistory();
 const handleSubmit = async (event) => {
 event.preventDefault();
 setLoading(true);
 if (!email) {
 setLoading(false);
 setError('Email is Invalid');
 return;
 }
 try {
 await loginUser(email);
 setLoading(false);
 history.replace('/dashboard');
 } catch (error) {
 setError('Unable to log in');
 console.error(error);
 }
 };
 const handleChange = (event) => {
 setEmail(event.target.value);
 };
 return (
 <div className="w-50 p-5 mt-5 mx-auto">
 <h1 className="h1 text-center">React Magic Form</h1>
 <Form onSubmit={handleSubmit} className="p-2 my-5 mx-auto">
 <FormGroup className="mt-3" controlId="formBasicEmail">
 <FormLabel fontSize="sm">Enter Email Address</FormLabel>
 <FormControl
 type="email"
 name="email"
 id="email"
 value={email}
 onChange={handleChange}
 placeholder="Email Address"
 />
 <p className="text-danger text-small">{error}</p>
 </FormGroup>
 <Button
 type="submit"
 size="md"
 className="d-block w-100"
 variant="primary"
 >
 {loading ? 'Loading...' : 'Send'}
 </Button>
 </Form>
 </div>
 );
};
export default Authenticate;
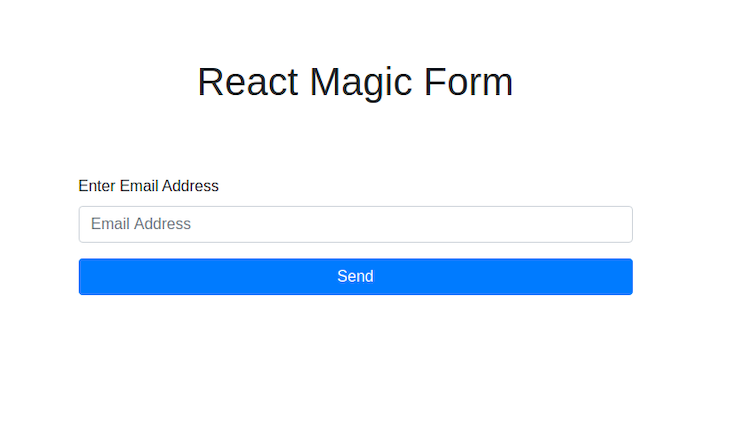
This component creates a form with a text field for an email address and a button to send the Magic link to the email the user inputs. When the user clicks the button, it runs the handleSubmit function, which validates the email address and calls the loginUser function from the magic.js service file.
The next component we’ll tackle is the Dashboard component. But first, let’s create a user context to pass down user data to our Dashboard component. In the src directory, run the following.
mkdir context
cd context
touch userContext.js
This creates a userContext file in the context directory. Open the file and input the following.
import { createContext } from 'react';
export const UserContext = createContext({ user: null });
The UserContext creates a context and sets the user property to be null by default. To learn more about context and how to effectively use them, read React’s documentation on context.
Open the Dashboard.js component file and input the following.
import React, { useContext } from 'react';
import { useHistory } from 'react-router-dom';
import Button from 'react-bootstrap/Button';
import { UserContext } from '../context/UserContext';
import { logoutUser } from '../services/magic';
const Dashboard = () => {
 const { email } = useContext(UserContext);
 const history = useHistory();
 const handleLogOut = async () => {
 try {
 await logoutUser();
 history.replace('/');
 } catch (error) {
 console.error(error);
 }
 };
 return (
 <div className="p-2">
 <div className="d-flex justify-content-end">
 <Button variant="primary" onClick={handleLogOut}>
 Sign Out
 </Button>
 </div>
 <h1 className="h1">User: {email}</h1>
 </div>
 );
};
export default Dashboard;
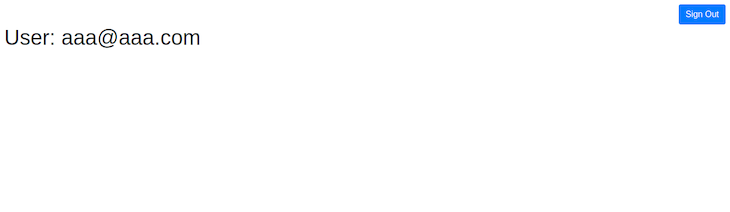
The Dashboard component displays the logged-in user email and a sign out button. The logged-in user is obtained from the context UserContext; we use the useContext hook to get the data we need from the UserContext.
When the user clicks the sign out button, it calls the handleLogOut function. The handleLogOut function calls the logoutUser function from the Magic service, which is responsible for destroying the user session and signing out the user.
After it does that, we redirect the user back to the sign up page using the useHistory hook of the react-router-dom package. The useHistory hook gives us access to the user’s session history and allows us to redirect the user to a point in history.
👁 User Email and Sign Out Button
Next, we create the PrivateRoute component. The PrivateRoute component allows us to create protected routes for our application — routes that the user can only access if they are logged in, such as the dashboard.
Open the PrivateRoute.js file and input the following.
import React, { useContext } from 'react';
import { Redirect, Route } from 'react-router-dom';
import { UserContext } from '../context/UserContext';
const PrivateRoute = ({ component: Component, ...rest }) => {
 const { isLoggedIn } = useContext(UserContext);
 return (
 <Route
 {...rest}
 render={(props) =>
 isLoggedIn ? <Component {...props} /> : <Redirect to="/" />
 }
 />
 );
};
export default PrivateRoute;
The PrivateRoute is a wrapper for the Route component of react-router-dom. It checks the user’s login status, isLoggedIn, which is fetched from the UserContext. If the login status is true, it renders the Component prop. If not, we use another react-router-dom component called Redirect, which redirects the user to a location — in this case, the authentication page.
After all this is done, we bring everything together in our App component. Open the App.js component in the root directory and input the following.
import React, { useState, useEffect } from 'react';
import {
 Switch,
 BrowserRouter as Router,
 Route,
 Redirect,
} from 'react-router-dom';
import Spinner from 'react-bootstrap/Spinner';
import { UserContext } from './context/UserContext';
import { checkUser } from './services/magic';
import Authenticate from './components/Authenticate';
import Dashboard from './components/Dashboard';
import PrivateRoute from './components/PrivateRoute';
const App = () => {
 const [user, setUser] = useState({ isLoggedIn: null, email: '' });
 const [loading, setLoading] = useState();
 useEffect(() => {
 const validateUser = async () => {
 setLoading(true);
 try {
 await checkUser(setUser);
 setLoading(false);
 } catch (error) {
 console.error(error);
 }
 };
 validateUser();
 }, [user.isLoggedIn]);
 if (loading) {
 return (
 <div
 className="d-flex justify-content-center align-items-center"
 style={{ height: '100vh' }}
 >
 <Spinner animation="border" />
 </div>
 );
 }
 return (
 <UserContext.Provider value={user}>
 <Router>
 {user.isLoggedIn && <Redirect to={{ pathname: '/dashboard' }} />}
 <Switch>
 <Route exact path="/" component={Authenticate} />
 <PrivateRoute path="/dashboard" component={Dashboard} />
 </Switch>
 </Router>
 </UserContext.Provider>
 );
};
export default App;
The first thing to note in the App component is the useEffect hoo. We use this to validate the user whenever the app renders or the isLoggedIn property of the user state changes. The validateUser function called the checkUser function of our Magic service, which checks to see whether the user is logged in. It accepts a callback, which is our setUser function, and sets the user state depending on what is returned by the checkUser function. If the isLoggedIn property is true, then the user is redirected to the dashboard. We use the UserContext.Provider to pass the user state to the sub-components of the application.
Our application has two routes: the / route, which renders the Authentication component (our default component), and the PrivateRoute mentioned earlier as a wrapper for the Route component, which will only render the Dashboard component if the user is logged in. The Switch component ensures that only one route is rendered at a time by checking the path of the Route component.
Now our application is ready. Start it up and test the authentication flow. After inputting the email address, a link should be sent to your email. When you click the link, it will direct you to go back to the application, which, after confirming the validity of the link, redirects you to the dashboard.
If you’re done playing around, you can sign out, which will take you back to the login page.
In this tutorial, we walked through how to secure your React application with Magic Links. The Magic service offers so much more beyond the scope of this article and supports integration with existing infrastructure. To expand your knowledge about Magic Links, I suggest reading the official documentation.
There is no one-size-fits-all when it comes to securing your applications. Magic is a viable alternative to the popular authentication strategies you’re likely used to.
You can find the repository for the application we built on GitHub.
Install LogRocket via npm or script tag. LogRocket.init() must be called client-side, not
server-side
$ npm i --save logrocket

// Code:

import LogRocket from 'logrocket';
LogRocket.init('app/id');
// Add to your HTML:

<script src="https://cdn.lr-ingest.com/LogRocket.min.js"></script>
<script>window.LogRocket && window.LogRocket.init('app/id');</script>
Build dynamic LLM routing in Next.js with OpenRouter, TanStack AI, task classification, model fallbacks, and cost-aware routing.
TSRX adds first-class control flow, conditional hooks, and scoped styles to React via a TypeScript compiler extension — no new framework required.
Learn how to build a full React Native auth system using Better Auth and Expo — with email/password login, Google OAuth, session persistence, and protected routes.
Compare the top AI development tools and models of June 2026. View updated rankings, feature breakdowns, and find the best fit for you.
Would you be interested in joining LogRocket's developer community?
Join LogRocket’s Content Advisory Board. You’ll help inform the type of content we create and get access to exclusive meetups, social accreditation, and swag.
Sign up now