 |
VOOZH | about |
|
VOOZH | about |
Astro recently announced support for MDX and Vite 3.0 in their release of Astro 1.0, two important integrations that put them at the top of their game for building static sites. Vite is an upgrade to their internal engine, providing fast builds and a better development experience, and MDX for extending Markdown capabilities that cater to interactive, text-based content.
👁 Build A Blog With Astro, Vite, And MDXIn this article, you’ll learn how to build a blog using Astro and MDX. We’ll cover:
The Replay is a weekly newsletter for dev and engineering leaders.
Delivered once a week, it's your curated guide to the most important conversations around frontend dev, emerging AI tools, and the state of modern software.
Astro is a powerful static site generator that lets you create highly performant websites using the JavaScript frameworks you know and love. Astro is static-first, with progressive enhancement, meaning that, by default, it ships zero JavaScript to the browser until required.
Vite is a next-gen JavaScript build tool that simplifies how frontend web applications are built and developed. Other popular JavaScript build tools, such as Webpack and Rollup, solve the problem of asset bundling and serving code locally during development.
However, Vite approaches the problem differently by leveraging native browser ES modules to load JavaScript code instantly in the browser. This way, no matter the number of dependencies or code added to your project, you still get instant builds.
MDX is a tool that lets you extend the capabilities of Markdown by leveraging the power of JSX. You can import and use interactive components such as charts, alerts, and more. You can even create reusable MDX components. MDX opens up new possibilities for creating written content.
Create a project using the Astro CLI by first running the following command in your terminal:
npm create astro@latest
Follow the step-by-step terminal prompts to finish the setup according to your preferences.
Once that’s done, cd into the project directory and run the command below to start an Astro dev server at http://localhost:3000:
npm run dev
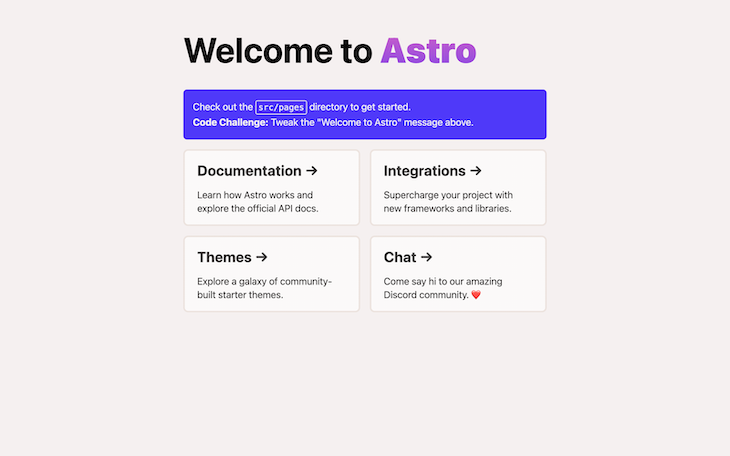
Open your browser and navigate to http://localhost:3000. You should see the following on your screen:
👁 Astro Homepage In The Localhost Browser
Now, install MDX using the command below, depending on your package manager:
# Using NPM
npx astro add mdx
# Using Yarn
yarn astro add mdx
# Using PNPM
pnpm astro add mdx
Accept all the prompts to complete the integration within your Astro application and restart your development server.
By default, Astro has support for Markdown files and can build routes/pages from Markdown files (.md) in the src/pages folder. But by adding the MDX integration, you can use .mdx files in the folder to generate pages in your app.
MDX doesn’t have any special syntax because it is just a combination of Markdown and JSX. You can write JSX, Markdown, JavaScript expressions, and import and export statements.
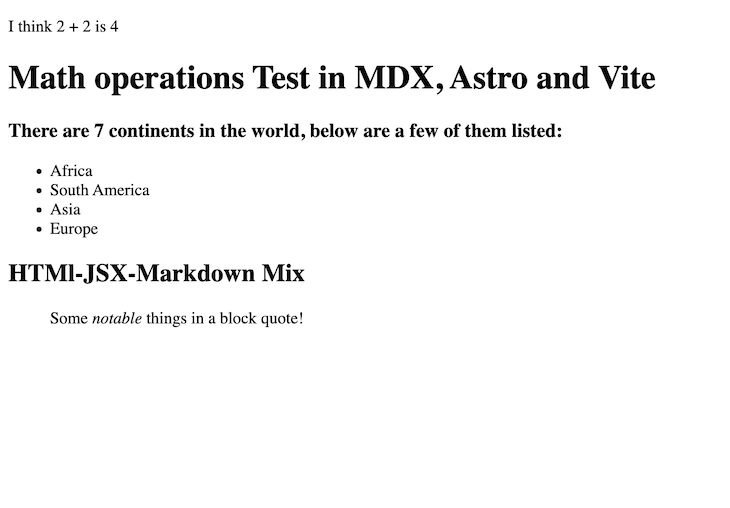
To get a feel for what writing MDX code is like, create a file in your project’s src/pages directory, give it whatever name you want, and end the file extension with .mdx. Then paste in the following block of code:
export const continents = ['Africa', 'South America', 'Asia', 'Europe']
I think 2 + 2 is {2+2}

# Math operations Test in MDX, Astro and Vite
### There are 7 continents in the world, below are a few of them listed:
<ul>
 {continents.map((continent) => (
 <li>{continent}</li>
 ))}
</ul>
## HTMl-JSX-Markdown Mix
<div>
 > Some *notable* things in a block quote!
</div>
When you navigate to the name of your page, you should see the following output in your browser:
👁 Math Operations Test In MDX, Astro And Vite
In this tutorial, we’re building a blog using MDX and Astro.
While creating the blog, you’ll:
blog and post pagesfrontmatter in Astro to pass data to Astro layoutsAstro.glob() method for displayNavigate to the src/layouts folder and create a new layout called PostLayout.astro and paste in the following code:
---
import BaseHead from "../components/BaseHead.astro";
import Header from "../components/Header.astro";
import Footer from "../components/Footer.astro";

const {
 frontmatter: { title, description, pubDate, image, author },
} = Astro.props;
---
<html lang="en">
 <head>
 <BaseHead title={title} description={description} />
 <style>
 .title {
 font-size: 2em;
 margin: 0.25em 0 0;
 }
 hr {
 border-top: 1px solid #ddd;
 margin: 1rem 0;
 }
 </style>
 </head>
 <body>
 <Header />
 <main>
 <article>
 <div class="article-head">
 <h1 class="title">{title}</h1>
 <em>Written by: {author}</em>
 </div>
 <div class="article-body">
 {image && <img width={720} height={360} src={image} alt="" />}
 Published on: {pubDate && <time>{pubDate}</time>}
 <hr />
 <slot />
 </div>
 </article>
 </main>
 <div class="footer-container">
 <Footer />
 </div>
 <style>
 html {
 min-height: 100vh;
 height: 100%;
 }
 body {
 height: 100%;
 }
 time {
 display: inline-block;
 margin-top: 10px;
 }
 </style>
 </body>
</html>
Let’s analyze the contents of the code block above.
First, there are a few component imports at the top of the file that don’t exist yet. We’ll get to create them soon:
BaseHead component is going to contain all the HTML <head></head> properties for the layoutHeader component will contain the navigation links at the top of the page for going between routesFooter component will contain the footer for the layout<slot/> component on line 37 is used to inject the rest of the text content from the Markdown file into the layoutAstro provides Markdown and MDX pages with a frontmatter property that can be used to define “metadata” that can describe the file.
In the PostLayout.astro file, the frontmatter prop passed by each Markdown/MDX file can be accessed to extract the metadata defined in the file. On line 8, the frontmatter property provided by Astro.props is then destructured to expose the variables for the template.
Now, let’s add the code for the missing imported components.
For each of the code blocks below, create the corresponding file in the components folder and paste in the code from the corresponding code block:
For Header.astro :
<header>
 <nav>
 <a href="/">Home</a>
 <a href="/blog">Blog</a>
 </nav>
</header>
<style>
 header {
 margin: 2em 4em 2em;
 }
 h2 {
 margin: 0.5em 0;
 }
</style>
For Footer.astro :
---
const today = new Date();
---
<footer>
© {today.getFullYear()} YOUR NAME HERE. All rights reserved.
</footer>
<style>
footer {
padding: 25px;
text-align: center;
}
</style>
And finally, for BaseHead.astro:
---
// Import the global.css file here so that it is included on
// all pages through the use of the <BaseHead /> component.
import "../styles/global.css";

const { title, description } = Astro.props;
---
<!-- Global Metadata -->
<meta charset="utf-8" />
<meta name="viewport" content="width=device-width,initial-scale=1" />
<link rel="icon" type="image/svg+xml" href="/favicon.svg" />
<meta name="generator" content={Astro.generator} />
<!-- Primary Meta Tags -->
<title>{title}</title>
<meta name="title" content={title} />
<meta name="description" content={description} />
There’s also a missing import: ../styles/global.css. Let’s quickly create the file and add styles to it.
In the src folder, create a styles folder with a file named global.css and add the following code:
/*
 The CSS in this style tag is based off of Bear Blog's default CSS. https://github.com/HermanMartinus/bearblog/blob/297026a877bc2ab2b3bdfbd6b9f7961c350917dd/templates/styles/blog/default.css
 License MIT: https://github.com/HermanMartinus/bearblog/blob/master/LICENSE.md
 */
body {
 font-family: Verdana, sans-serif;
 margin: auto;
 padding: 20px;
 text-align: left;
 background-color: #fff;
 word-wrap: break-word;
 overflow-wrap: break-word;
 line-height: 1.5;
 color: #444;
 width: 100%;
}
.article-head {
 margin-left: 4em;
 margin-bottom: 50px;
}
.article-body {
 max-width: 65ch;
 margin: 0 auto;
}
h1,
h2,
h3,
h4,
h5,
h6,
strong,
b {
 color: #222;
}
a {
 color: #222;
}
nav a {
 margin-right: 10px;
}
textarea {
 width: 100%;
 font-size: 16px;
}
input {
 font-size: 16px;
}
content {
 line-height: 1.6;
}
table {
 width: 100%;
}
img {
 max-width: 100%;
 height: auto;
}
code {
 padding: 2px 5px;
 background-color: #f2f2f2;
}
pre {
 padding: 1rem;
}
pre > code {
 all: unset;
}
blockquote {
 border: 1px solid #999;
 color: #222;
 padding: 2px 0px 2px 20px;
 margin: 0px;
 font-style: italic;
}
To test the layout, create a .mdx file and add some content. To do this, navigate to the pages folder, create a post folder, add the first blog post named first-post.mdx, and then paste in the code below. Feel free to tweak it and change the property values:
---
layout: ../../layouts/PostLayout.astro
title: "Astro, Vite and MDX test"
description: "Lorem ipsum dolor sit amet"
author: "Iniubong Obonguko"
pubDate: "20 Aug, 2022"
image: "https://images.unsplash.com/photo-1664380619395-a25d867b5fb9?crop=entropy&cs=tinysrgb&fit=max&fm=jpg&q=80&w=1080"
slug: "first-post"
---
## Story about Old days
In the olden days, Lorem ipsum dolor sit amet, consectetur adipiscing elit, sed do eiusmod tempor incididunt ut labore et dolore magna aliqua. Vitae ultricies leo integer malesuada nunc vel risus commodo viverra. Adipiscing enim eu turpis egestas pretium. Euismod elementum nisi quis eleifend quam adipiscing. In hac habitasse platea dictumst vestibulum. Sagittis purus sit amet volutpat. Netus et malesuada fames ac turpis egestas. Eget magna fermentum iaculis eu non diam phasellus vestibulum lorem. Varius sit amet mattis vulputate enim. Habitasse platea dictumst quisque sagittis. Integer quis auctor elit sed vulputate mi. Dictumst quisque sagittis purus sit amet.

## Conclusion
Morbi tristique senectus et netus. Id semper risus in hendrerit gravida rutrum quisque non tellus. Habitasse platea dictumst quisque sagittis purus sit amet. Tellus molestie nunc non blandit massa. Cursus vitae congue mauris rhoncus. Accumsan tortor posuere ac ut. Fringilla urna porttitor rhoncus dolor. Elit ullamcorper dignissim cras tincidunt lobortis. In cursus turpis massa tincidunt dui ut ornare lectus. Integer feugiat scelerisque varius morbi enim nunc. Bibendum neque egestas congue quisque egestas diam. Cras ornare arcu dui vivamus arcu felis bibendum. Dignissim suspendisse in est ante in nibh mauris. Sed tempus urna et pharetra pharetra massa massa ultricies mi.
The frontmatter is all the metadata property and values defined between
the triple dashes (—).
At the top of the .mdx file is where all the frontmatter data is defined:
layout property defines the layout of choice, which was created earlier in PostLayout.astrofrontmatter contain “metadata” that’ll be used by the layout to populate the pagefrontmatter is treated as text content for the blog and is passed into the <slot/> placeholder in the layoutOn your browser, go to https://localhost:3000/post/first-post and you should get a page similar to the one below:
👁 Example Gif Of Markdown Blog Post
Now, we’ll see how we can add interactive JavaScript-enabled components to our blog post.
For this, we’ll use an Astro components library called accessible-astro-components. To proceed, we first need to install the library. Do this by running the code below in your terminal under the projects folder.
npm i accessible-astro-components
Next, in the first-post.mdx file below the frontmatter definitions, import the Accordion and AccordionItem components:
import { Accordion, AccordionItem } from "accessible-astro-components";
Now, you can use Accordion anywhere in the file:
{/* first-post.mdx */}
{/* Rest of content at top */}
...
<Accordion>
 <AccordionItem header="First Item">
 <p>
 Lorem ipsum dolor sit amet consectetur adipisicing elit. Architecto quasi
 nobis optio? Qui in quo accusantium debitis sapiente obcaecati magnam
 incidunt sit. Molestiae exercitationem quibusdam quod veritatis laboriosam
 est tenetur.
 </p>
 <a href="#">Tab to me!</a>
 </AccordionItem>
 <AccordionItem header="Second Item">
 <p>
 Lorem ipsum dolor sit amet consectetur adipisicing elit. Architecto quasi
 nobis optio? Qui in quo accusantium debitis sapiente obcaecati magnam
 incidunt sit. Molestiae exercitationem quibusdam quod veritatis laboriosam
 est tenetur.
 </p>
 </AccordionItem>
</Accordion>
...
{/* Rest of content at bottom */}
The result is:
👁 Result Of Interactive Components In Our Astro Blog
You can also use components that are specifically made for other JavaScript frameworks, such as VueJS, React, and Svelte. You just need to set up the framework in your Astro app first and then import the desired component.
Refer to the official documentation here for how it’s done.
We need a blog page that will display all the blog posts in a grid.
But before we get to that, let’s first create a layout for the blog page under the /Layout folder and name it BlogLayout.astro. Then paste the following code into it:
---
import Header from "../components/Header.astro";
import BaseHead from "../components/BaseHead.astro";
const { title } = Astro.props;
---
<!DOCTYPE html>
<html lang="en">
 <BaseHead
 title="Blog Page"
 description="A page to display all our blog posts"
 />
 <body>
 <div class="layout">
 <h1>{title}</h1>
 <Header />
 <main>
 <slot />
 </main>
 </div>
 <style>
 body {
 margin: 0;
 background-color: #fff;
 width: 100%;
 }
 .layout {
 max-width: 1280px;
 margin: 0 auto;
 }
 </style>
 </body>
</html>
Next, go to the src/pages folder and create a blog.astro file and paste in the following code:
---
import BlogLayout from "../layouts/BlogLayout.astro";
import { Card } from "accessible-astro-components";
const posts = await Astro.glob("../pages/post/**/*.mdx");
---
<BlogLayout title="Blog">
 <section>
 <div class="container">
 <ul>
 {
 posts.map((post) => (
 <li>
 <Card
 url={"/post/" + post.frontmatter.slug}
 img={post.frontmatter.image}
 title={post.frontmatter.title}
 footer={post.frontmatter.author}
 >
 {post.frontmatter.description}
 </Card>
 </li>
 ))
 }
 </ul>
 </div>
 </section>
</BlogLayout>
<style lang="scss">
 ul {
 display: grid;
 grid-gap: 2rem;
 grid-template-columns: repeat(3, 1fr);
 list-style-type: none;
 }
</style>
Let’s analyze what’s happening in the code block above:
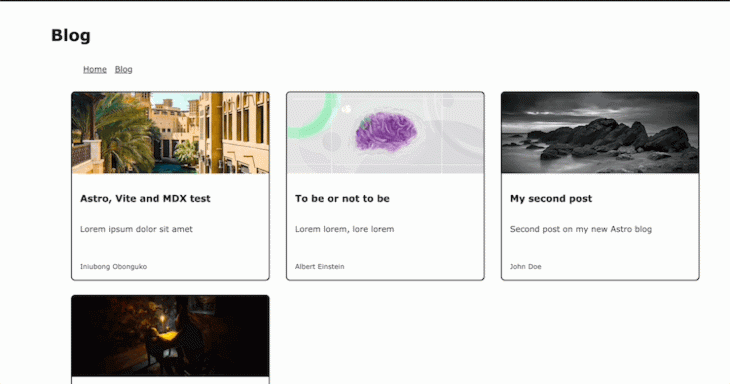
BlogLayout is being imported to be used as the layout for the pageCard component from the accessible-astro-components package is importedAstro global context and has the .glob() method, which can be used to load many local files into the static site setup. In this case, all the .mdx files contained in the /pages/post directory are being loaded and assigned to the posts variable.map method then loops through the values in the posts variable, renders a list, and assigns the necessary props to the Card componentslug property defined on the frontmatter property of the blog file is then used to build the URL for the card componentAdd one or two or more blog posts in the pages/post directory to populate the blog page.
Once done, the blog page should look like this:
Voila! The blog is now complete.
Creating interactive text-based content using Markdown syntax has never been easier. By following this tutorial, you’re on your way to creating a blog using Astro and MDX. Feel free to update the code from this tutorial with your own custom styling and extra features.
You can also learn more about all the cool features that Astro provides with their MDX integration from the official documentation site.
Namaste.
There’s no doubt that frontends are getting more complex. As you add new JavaScript libraries and other dependencies to your app, you’ll need more visibility to ensure your users don’t run into unknown issues.
LogRocket is a frontend application monitoring solution that lets you replay JavaScript errors as if they happened in your own browser so you can react to bugs more effectively.
👁 LogRocket Dashboard Free Trial BannerLogRocket works perfectly with any app, regardless of framework, and has plugins to log additional context from Redux, Vuex, and @ngrx/store. Instead of guessing why problems happen, you can aggregate and report on what state your application was in when an issue occurred. LogRocket also monitors your app’s performance, reporting metrics like client CPU load, client memory usage, and more.
Build confidently — start monitoring for free.
Learn how to build a full React Native auth system using Better Auth and Expo — with email/password login, Google OAuth, session persistence, and protected routes.
Compare the top AI development tools and models of June 2026. View updated rankings, feature breakdowns, and find the best fit for you.
Learn how Bloom filters reduce database lookups for username availability checks while preserving correctness at scale.
Learn how to test Nuxt apps with Vitest, @nuxt/test-utils, runtime mocks, server route mocks, and Playwright e2e tests.
Hey there, want to help make our blog better?
Join LogRocket’s Content Advisory Board. You’ll help inform the type of content we create and get access to exclusive meetups, social accreditation, and swag.
Sign up now