 |
VOOZH | about |
|
VOOZH | about |
Editor’s note: This article was last updated by Abhinav Anshul on 12 September 2024 to include new Supabase features like edge functions, advanced user authentication methods, real-time database functionality, and deployment guidance with environment variables for enhanced security.
👁 Build a full-stack app with Next.js and SupabaseWhen it comes to building and choosing frameworks for your next full-stack application, combining Next.js with Supabase is one of the best options to work with in my opinion.
Supabase is an open source Firebase alternative with a lot of powerful tools, including seamless authentication. As a developer, this is key to building a successful full-stack application.
Alongside authentication, Supabase comes with other features, such as a Postgres database, real-time subscriptions, and object storage. I believe that Supabase is one of the easiest backend-as-a-services to get started or integrate with.
In this article, we will learn how to build a full-stack app using Next.js and Supabase. We’ll talk about how to set up a Supabase project, configure the UI, and implement authentication and functionalities.
The concept of this app is for users to track and create workout activities based on specified parameters, edit these activities if there are any mistakes or necessary changes, and delete them if needed. Let’s get started!
The Replay is a weekly newsletter for dev and engineering leaders.
Delivered once a week, it's your curated guide to the most important conversations around frontend dev, emerging AI tools, and the state of modern software.
Next.js is one of the easiest and most popular ways to build production-ready React applications. Over recent years, Next.js has experienced significant exponential growth and many companies have adopted it to build their applications.
Supabase is a serverless, open-source alternative to Firebase built on top of the PostgreSQL database. It provides all the backend services needed to create a full-stack application.
As a user, you can manage your database from the Supabase interface, ranging from creating tables and relationships to writing your SQL queries and real-time engine on top of PostgreSQL.
Supabase comes with really cool features that make your full-stack application development even easier. Some of these features are:
auth.users table as soon as you create your database. When you create an application, Supabase will also assign a user and ID as soon as you register on the app that can be referenced within the database. For log in methods, there are different ways you can authenticate users such as email, password, magic links, Google, GitHub, and moreTo initiate our project in the terminal with the Next.js template, we will run the following command:
npx create-next-app nextjs-supabase
nextjs-supabase is our app’s folder name where we’ll encompass the Next.js app template.
We’ll need to install the Supabase client package to connect to our Next.js app later. We can do so by running either of the following commands:
yarn add @supabase/supabase-js
or
npm i @supabase/supabase-js
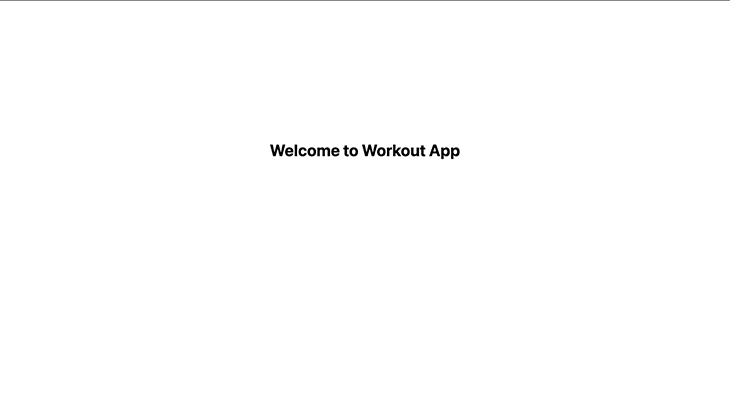
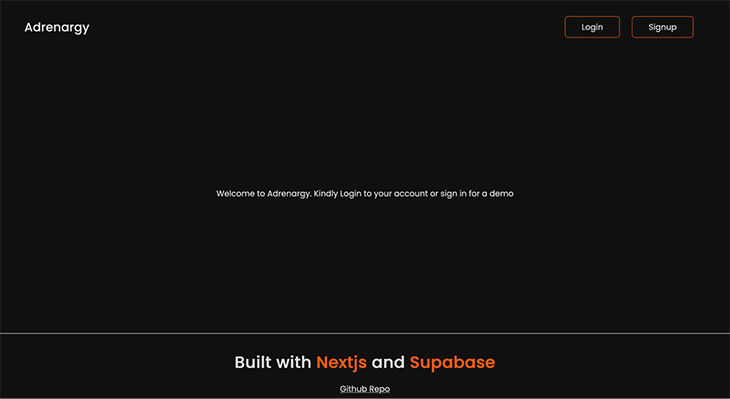
Once the app has finished setting up, open the folder in your favorite code editor. Now, we can remove the basic template in our src/app/page.tsx file and replace it with an h1 heading saying “Welcome to Workout App.”
After that’s done, run the command yarn dev in the terminal to start up your app at http://localhost:3000. You should see a page like this:
To be on the same page, these are various dependencies that we will be using in the project, make sure you are using the same version number to avoid running into bugs.
// package.json
"dependencies": {
 "@supabase/supabase-js": "^2.45.4",
 "date-fns": "^3.6.0",
 "next": "14.2.9",
 "react": "^18.3.1",
 "react-dom": "^18",
 "react-icons": "^5.3.0"
 },
 "devDependencies": {
 "@types/node": "^20",
 "@types/react": "^18",
 "@types/react-dom": "^18",
 "eslint": "^8",
 "eslint-config-next": "14.2.9",
 "typescript": "^5"
 }
To set up a Supabase project, visit app.supabase.com to sign in to the app dashboard using your GitHub account.
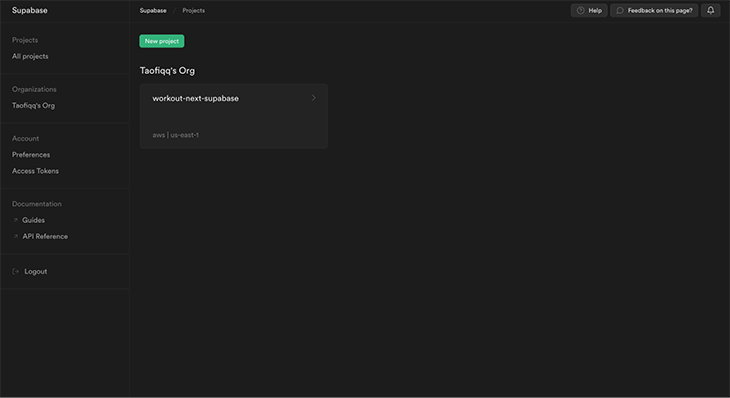
Once you log in, you can create your organization and set up a new project within it by clicking All Projects.
👁 All Projects And Organization Screen
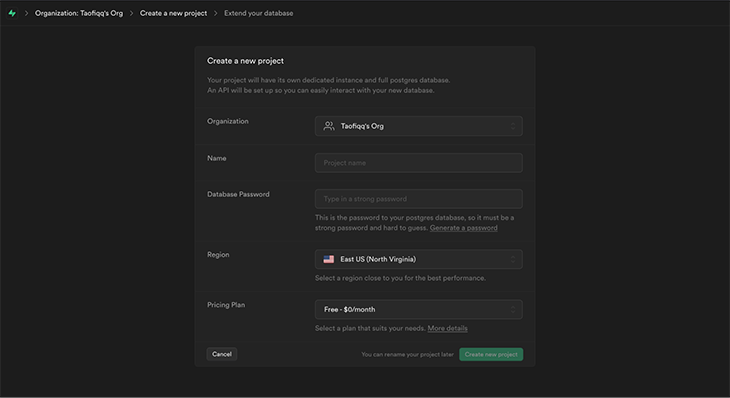
Click on New Project and give your project a name and database password. Click the Create a new project button; it will take a couple of minutes for your project to be up and running.
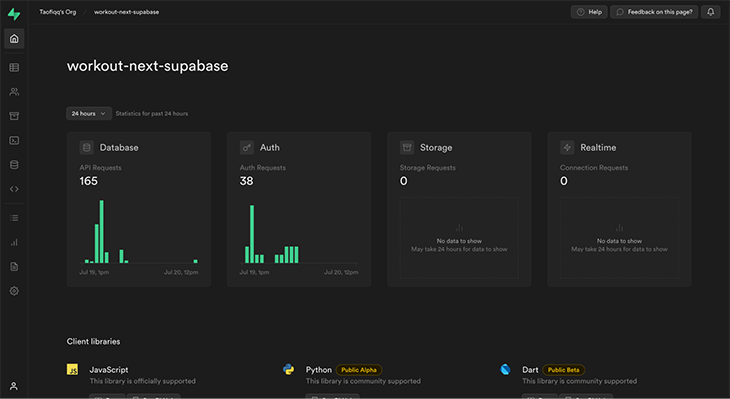
Once the project has been created, you should see a dashboard like this:
👁 Workout Next Supabase Dashboard
For this tutorial, I already created a project named workout-next-supabase.
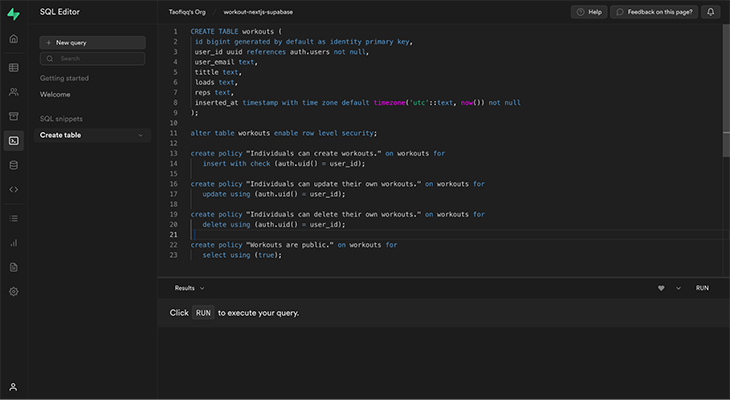
Now, let’s create our database table by clicking on the SQL Editor icon on our dashboard and clicking New Query. Enter the SQL query below in the editor and click RUN to execute the query.
CREATE TABLE workouts (
 id bigint generated by default as identity primary key,
 user_id uuid references auth.users not null,
 user_email text,
 title text,
 loads text,
 reps text,
 inserted_at timestamp with time zone default timezone('utc'::text, now()) not null
);

alter table workouts enable row level security;

create policy "Individuals can create workouts." on workouts for
 insert with check (auth.uid() = user_id);

create policy "Individuals can update their own workouts." on workouts for
 update using (auth.uid() = user_id);

create policy "Individuals can delete their own workouts." on workouts for
 delete using (auth.uid() = user_id);

create policy "Workouts are public." on workouts for
 select using (true);
This will create the workout table we’ll use to build our CRUD application.
Alongside creating a table, row-level permissions will be enabled to ensure that only authorized users can create, update, or delete the details of their workouts.
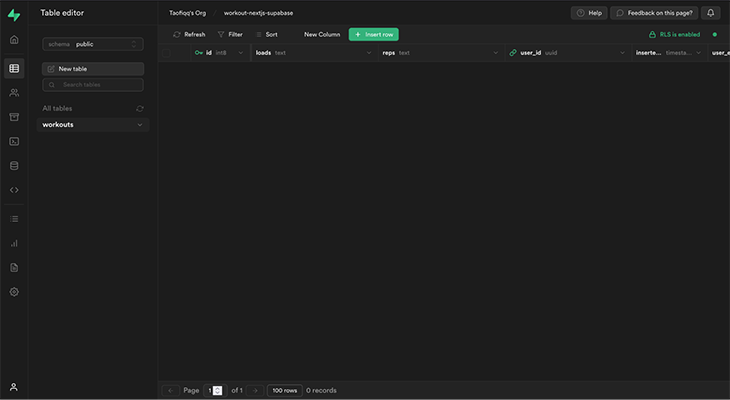
To check out how the workout table looks, we can click the Table Editor icon on the dashboard to see the workout table we just created.
For this application, we will have seven columns:
user_iduser_emailidtitleloadsrepsDate stampOnce our table and columns are set, the next step is to connect our Supabase database with our Next.js frontend application!
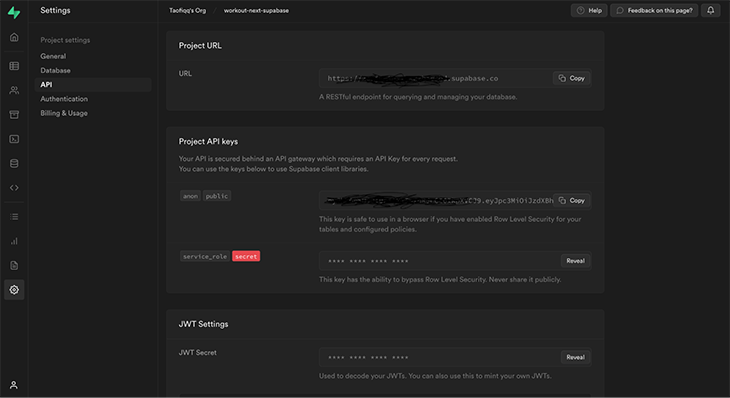
To connect Supabase with our Next.js app, we will need our Project URL and Anon Key. Both of these can be found on our database dashboard. Here, the anon Key is public and can be exposed to the public network tab without any security risk as Supabase does provide us “RLS” called the Row Level Security to prevent abuse and spam. To get these two keys, click on the gear icon to go to Settings and then click API. You’ll see these two keys show up like this:
To our advantage, Next.js provides inbuilt support for environment variables that allow us to create a .env.local file in the root of our project. This will load our environment variables and expose them to the browser by prefixing it with NEXT_PUBLIC. You can set all your keys here in the .env.local or just simply .env file.
Now, let’s create a .env.local file in the root of our project and include our URL and keys in the file.
.env.local

NEXT_PUBLIC_SUPABASE_URL= // paste your project url here
NEXT_PUBLIC_SUPABASE_ANON_KEY= // paste your supabase anon key here
N.B., Don’t forget to include
.env.localin yourgitignorefile to prevent it from being pushed to the GitHub repo (and available for everyone to see) when deploying.
Now let’s create our Supabase client file by creating a file called supabase.js at the root of our project. Inside the supabase.js file. We wil create this file at src/utils/supabase.js & we will write the following code:
// supabase.js
import { createClient } from "@supabase/supabase-js";

const supabaseUrl = process.env.NEXT_PUBLIC_SUPABASE_URL;
const supabaseKey = process.env.NEXT_PUBLIC_SUPABASE_ANON_KEY;

export const supabase = createClient(supabaseUrl, supabaseKey);
Here, we are importing a createClient function from Supabase and creating a variable called supabase. We call the createClient function and then pass in our parameters: URL ( supabaseUrl) and Anon Key (supabaseKey).
Now, we can call and use the Supabase client anywhere in our project!
First, we need to configure our app to look the way we want it to. We’ll have a navigation bar with the project name, and Login and Signup options when the app is first loaded. When a user signs up and logs in, we will display the navbar to have Home, Logout, and Create Workout buttons.
There will also be a footer on every page on the website.
To do this, we will create a component folder that’ll house the Navbar.js and Footer.js files. Then, inside the main layout.tsx component that is located at src/app/layout.tsx, we will wrap the {children} within the <Header /> and <Footer /> components:
// layout.tsx
import Navbar from "@/components/Navbar"
import Footer from "@/components/Footer"
import "./globals.css"

interface RootLayoutProps {
 children: React.ReactNode
}

export default function RootLayout({ children }: Readonly<RootLayoutProps>) {
 return (
 <html lang="en">
 <body>
 <Navbar session={session} />
 {children}
 <Footer />
 </body>
 </html>
 )
}
Now, our homepage should look like this:
To implement user authentication, we will initialize the user session using useEffect, and we will track if the user is authenticated:
// layout.tsx

"use client"
import "./globals.css"
import { useState, useEffect } from "react"
import { Session } from "@supabase/supabase-js"
import { supabase } from "@/utils/supabase"
import Navbar from "@/components/Navbar"
import Footer from "@/components/Footer"

interface RootLayoutProps {
 children: React.ReactNode
}

export default function RootLayout({ children }: Readonly<RootLayoutProps>) {
 const [session, setSession] = useState<Session | null>(null)

 useEffect(() => {
 const getSession = async () => {
 const {
 data: { session },
 } = await supabase.auth.getSession()
 setSession(session)
 }
 getSession()

 const { data: authListener } = supabase.auth.onAuthStateChange((_event, newSession) => {
 setSession(newSession)
 })

 return () => {
 authListener.subscription.unsubscribe()
 }
 }, [])

 return (
 <html lang="en">
 <body>
 <Navbar session={session} />
 {children}
 <Footer />
 </body>
 </html>
 )
}
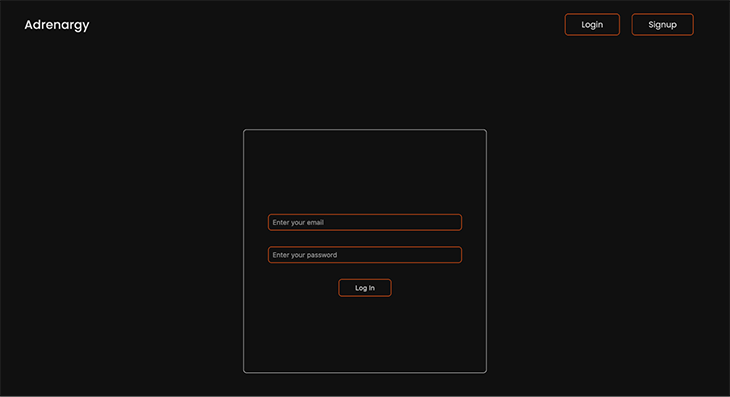
When a user loads the homepage of our app, we want to display a button to tell them to either log in or sign up. When the Login button is clicked, it should redirect the user to a page where the user can enter their email and password. If they are an existing user and the login details are valid, they will be redirected to the home page.
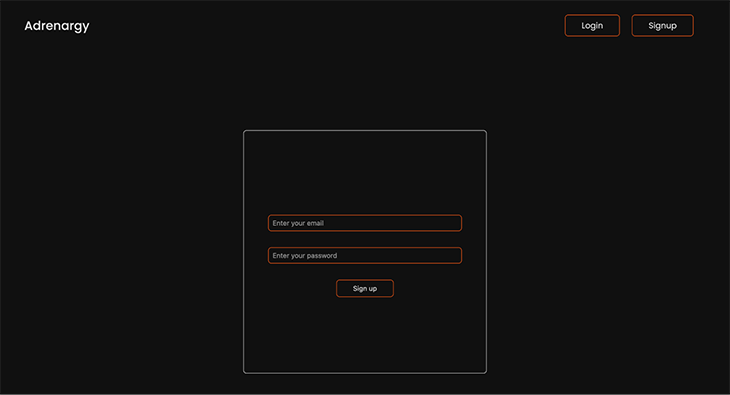
If the user has invalid credentials, an alert message will display to tell the user about the issue. They’ll be shown a sign up option instead.
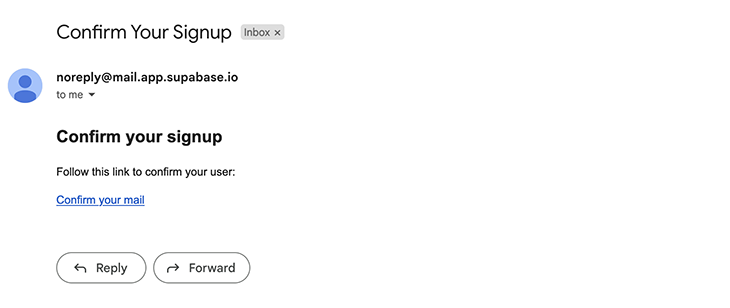
When the user signs up, a confirmation email will be sent to the email they entered. they’ll need to confirm their email by clicking on the link in the body of the email.
Now, when we click the Login button, we should be redirected to the user page to this page:
Now, we can click on the Sign up button and enter an email.
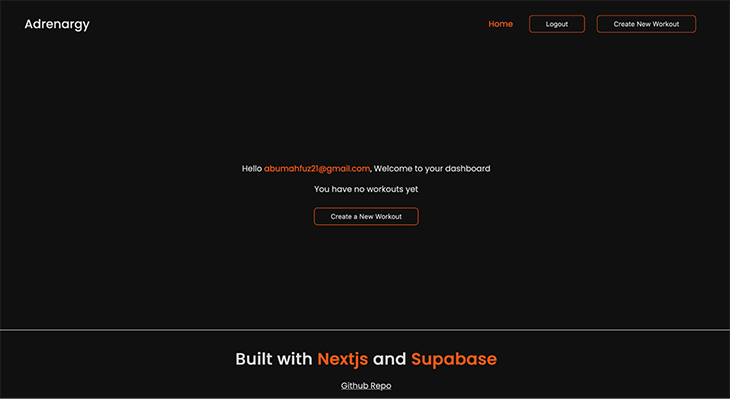
Once we click this, an email will be sent to confirm the email address. Upon confirming, it will log us in and we should see a page like this:
👁 Welcome Screen With No Workouts Yet
Notice that if we have not signed in, we are unable to see our activity dashboard, see a button to create a new workout, or log out. This was the authentication mentioned initially that’s provided to us by Supabase!
Now, we’ll dive into creating a user’s ability to create, modify, and delete their workouts.
We’ll need to fetch all the workouts we’ll be creating and render them on the homepage. We will do this inside the src/app/page.tsx file:
/* eslint-disable @typescript-eslint/no-explicit-any */
"use client"
import Head from "next/head"
import Link from "next/link"
import { useEffect, useState } from "react"
import styles from "../styles/Home.module.css"
import { supabase } from "../utils/supabase"
import WorkoutCard from "../components/WorkoutCard"

export default function Home({ session }: any) {
 const [data, setData] = useState<any[]>([])
 const [loading, setLoading] = useState(true)
 const [user, setUser] = useState<any>(null)

 useEffect(() => {
 // Fetch the current session and set the user
 const fetchUser = async () => {
 const {
 data: { session },
 } = await supabase.auth.getSession()
 setUser(session?.user)
 }

 fetchUser()
 }, [])

 useEffect(() => {
 if (user) {
 fetchWorkouts()
 }
 }, [user])

 const fetchWorkouts = async () => {
 try {
 setLoading(true)
 const { data, error } = await supabase
 .from("workouts")
 .select("*")
 .eq("user_id", user.id)

 if (error) throw error
 setData(data)
 } catch (error) {
 alert(error.message)
 } finally {
 setLoading(false)
 }
 }

 console.log({ user })

 const handleDelete = async (id: string) => {
 try {
 if (!user) return
 const { data, error } = await supabase
 .from("workouts")
 .delete()
 .eq("id", id)
 .eq("user_id", user.id)
 if (error) throw error
 fetchWorkouts()
 alert("Workout deleted successfully")
 } catch (error) {
 alert(error.message)
 }
 }

 if (user === undefined) {
 return <div className={styles.loading}>Welcome to Workout App.</div>
 }

 if (loading) {
 return <div className={styles.loading}>Fetching Workouts...</div>
 }

 return (
 <div className={styles.container}>
 <Head>
 <title>Nextjs x Supabase</title>
 <meta name="description" content="Generated by create next app" />
 <link rel="icon" href="/favicon.ico" />
 </Head>

 <div className={styles.home}>
 {!user ? (
 <div>
 <p>Welcome to Adrenargy. Kindly Login to your account or sign in for a demo</p>
 </div>
 ) : (
 <div>
 <p className={styles.workoutHeading}>
 Hello <span className={styles.email}>{user.email}</span>, Welcome to your dashboard
 </p>
 {data?.length === 0 ? (
 <div className={styles.noWorkout}>
 <p>You have no workouts yet</p>
 <Link href="/create">
 <button className={styles.button}>Create a New Workout</button>
 </Link>
 </div>
 ) : (
 <div>
 <p className={styles.workoutHeading}>Here are your workouts</p>
 <WorkoutCard data={data} handleDelete={handleDelete} />
 </div>
 )}
 </div>
 )}
 </div>
 </div>
 )
}
In this component, if there are no users, the dashboard will not be displayed. If there is a user logged in, we are checking with the getSession() API provided by Supabase:
useEffect(() => {
 // Fetch the current session and set the user
 const fetchUser = async () => {
 const {
 data: { session },
 } = await supabase.auth.getSession()
 setUser(session?.user)
 }

 fetchUser()
 }, [])
In that case the dashboard of workouts will appear. And if there are no workouts created, a text saying “You have no workout yet” and a button to create a new one will appear.
To render our created workouts, we have two states: workouts, an empty array, and a loading state that takes in a boolean value of true. We are using useEffect to fetch the workouts data from the database when the page is loaded.
The fetchWorkouts function is used to call the Supabase instance to return all the data from the workout tables in our database using the select method. The .eq() filter method is used to filter out and return only the data with the user id matching the current logged in user. Then, setWorkouts is set to the data sent from the database, and setLoading is set back to false once we fetch our data.
If the data is still being fetched, the page should display “Fetching Workouts…” and if the request made to our database returns the array of our workouts, we want to map through the array and render the WorkoutCard component.
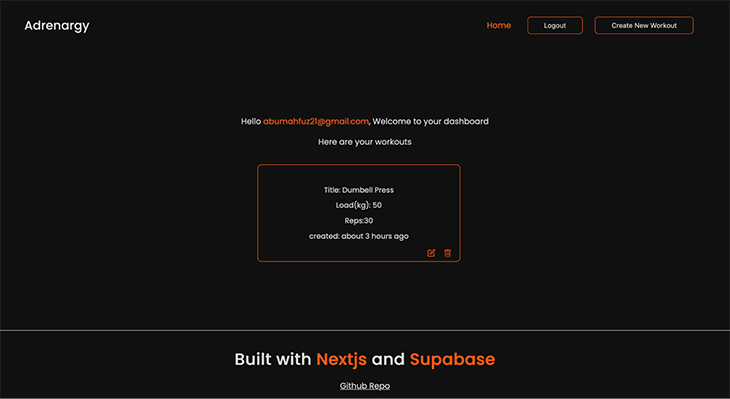
In the WorkoutCard component, we are rendering the workout title, load, reps, and the date and time it was created. The time created is being formatted using the date-fns library that you can check out here. We will see how our cards look when we start creating them in the next section:
// Workoutcard.js

"use client"
import Link from "next/link"
import styles from "@/styles/WorkoutCard.module.css"
import { BsTrash } from "react-icons/bs"
import { FiEdit } from "react-icons/fi"
import { formatDistanceToNow } from "date-fns"

const WorkoutCard = ({ data }) => {
 return (
 <div className={styles.workoutContainer}>
 {data?.map((item) => (
 <div key={item.id} className={styles.container}>
 <p className={styles.title}>
 {" "}
 Title: {""}
 {item.title}
 </p>
 <p className={styles.load}>
 {" "}
 Load(kg): {" "}
 {item.loads}
 </p>
 <p className={styles.reps}>Reps:{item.reps}</p>
 <p className={styles.time}>
 created:{" "}
 {formatDistanceToNow(new Date(item.inserted_at), {
 addSuffix: true,
 })}
 </p>
 </div>
 ))}
 </div>
 );
};

export default WorkoutCard;
Now that we’ve logged in, our dashboard is fresh and clean. To implement the ability to create a new workout, we will add the create folder with page.tsx React component inside the app folder and Create.module.css files in the global styles folder and add logic and styling respectively:
// app/create/page.tsx
/* eslint-disable @typescript-eslint/no-explicit-any */
"use client"
import { supabase } from "@/utils/supabase"
import { useState, useEffect } from "react"
import styles from "@/styles/Create.module.css"
import { useRouter } from "next/navigation"

const Create = () => {
 const initialState = {
 title: "",
 loads: "",
 reps: "",
 }

 const router = useRouter()
 const [workoutData, setWorkoutData] = useState(initialState)
 const [user, setUser] = useState<any>(null)

 const { title, loads, reps } = workoutData

 useEffect(() => {
 // Fetch the current session and set the user
 const fetchUser = async () => {
 const {
 data: { session },
 } = await supabase.auth.getSession()
 setUser(session?.user)
 }

 fetchUser()
 }, [])

 const handleChange = (e: React.ChangeEvent<HTMLInputElement>) => {
 setWorkoutData({ ...workoutData, [e.target.name]: e.target.value })
 }

 const createWorkout = async () => {
 if (!user) {
 alert("No user logged in!")
 return
 }

 const { data, error } = await supabase
 .from("workouts")
 .insert({
 title,
 loads,
 reps,
 user_id: user.id,
 })
 .single()

 if (error) {
 alert(error.message)
 } else {
 alert("Workout created successfully")
 setWorkoutData(initialState)
 router.push("/")
 }
 }

 return (
 <div className={styles.container}>
 <div className={styles.form}>
 <p className={styles.title}>Create a New Workout</p>
 <label className={styles.label}>Title:</label>
 <input
 type="text"
 name="title"
 value={title}
 onChange={handleChange}
 className={styles.input}
 placeholder="Enter a title"
 />
 <label className={styles.label}>Load (kg):</label>
 <input
 type="text"
 name="loads"
 value={loads}
 onChange={handleChange}
 className={styles.input}
 placeholder="Enter weight load"
 />
 <label className={styles.label}>Reps:</label>
 <input
 type="text"
 name="reps"
 value={reps}
 onChange={handleChange}
 className={styles.input}
 placeholder="Enter number of reps"
 />

 <button className={styles.button} onClick={createWorkout}>
 Create Workout
 </button>
 </div>
 </div>
 )
}

export default Create
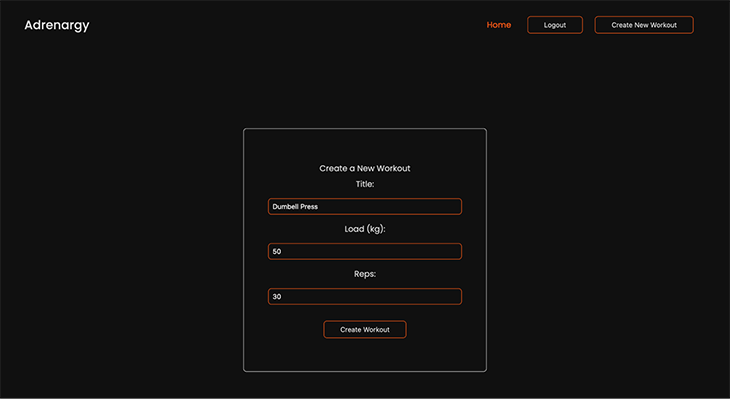
Here, the basic UI scope is that we will have a form to create a new workout. The form will consist of three fields (title, load, and reps) as we specified when creating our database.
An initial state object is defined to handle all these fields that were passed to the workoutsData state. The onChange function is used to handle the input field changes.
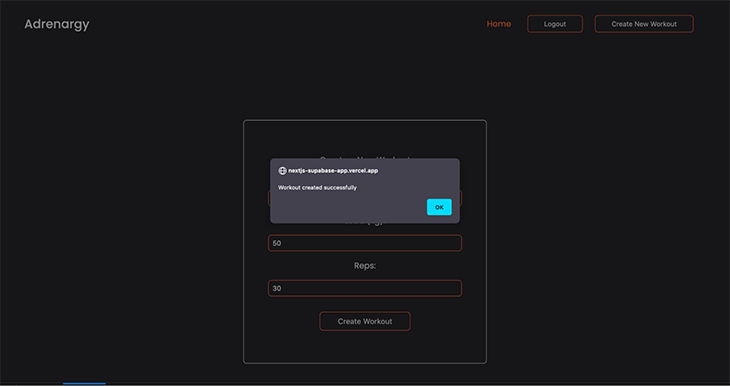
The createWorkout function uses the Supabase client instance to create a new workout using the initial state fields we defined and insert it into the database table.
Finally, we have an alert toast that informs us when our new workout has been created.
Then, we set the form data back to the initial empty string state once our workout has been created. After that, we’re using the router.push method to navigate the user back to the homepage.
👁 Workout Successfully Created
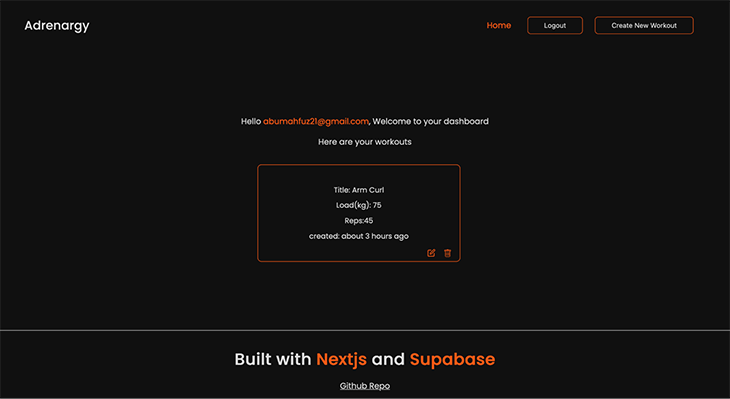
👁 Dashboard With Workouts Dumbell Press
To update a workout, we will create a folder called edit within our app folder that’ll hold our page.tsx file. We’ll create an edit link icon on our workout component card that links to this page. When the cards are rendered on the homepage, we can click on this edit icon and it will take us to the edit page of that particular card.
We will then fetch the details of the needed workout card to be updated from our workouts table by its id and the authorized owner of the card. Then, we’ll create a updateWorkout function to update our workout card details:
"use client"
import { useSearchParams, useRouter } from "next/navigation"
import { useEffect, useState } from "react"
import styles from "@/styles/Edit.module.css"
import { supabase } from "@/utils/supabase"

const Edit = () => {
 const [workout, setWorkout] = useState(null)
 const [user, setUser] = useState(null)
 const router = useRouter()
 const searchParams = useSearchParams()
 const id = searchParams.get("id")

 console.log({ id })

 useEffect(() => {
 // Fetch the user
 const fetchUser = async () => {
 const {
 data: { session },
 } = await supabase.auth.getSession()
 setUser(session?.user)
 }

 fetchUser()
 }, [])

 console.log({ user })

 useEffect(() => {
 const getWorkout = async () => {
 if (!id) return

 const { data } = await supabase.from("workouts").select("*").filter("id", "eq", id).single()
 setWorkout(data)
 }
 getWorkout()
 }, [id])

 const handleOnChange = (e) => {
 setWorkout({
 ...workout,
 [e.target.name]: e.target.value,
 })
 }

 const updateWorkout = async () => {
 const { title, loads, reps } = workout
 if (!user) {
 alert("User not authenticated")
 return
 }

 const { data } = await supabase
 .from("workouts")
 .update({
 title,
 loads,
 reps,
 })
 .eq("id", id)
 .eq("user_id", user.id)

 alert("Workout updated successfully")

 router.push("/")
 }

 return (
 <div className={styles.container}>
 <div className={styles.formContainer}>
 <h1 className={styles.title}>Edit Workout</h1>
 <label className={styles.label}>Title:</label>
 <input
 type="text"
 name="title"
 value={workout?.title}
 onChange={handleOnChange}
 className={styles.updateInput}
 />
 <label className={styles.label}>Load (kg):</label>
 <input
 type="text"
 name="loads"
 value={workout?.loads}
 onChange={handleOnChange}
 className={styles.updateInput}
 />
 <label className={styles.label}>Reps:</label>
 <input
 type="text"
 name="reps"
 value={workout?.reps}
 onChange={handleOnChange}
 className={styles.updateInput}
 />

 <button onClick={updateWorkout} className={styles.updateButton}>
 Update Workout
 </button>
 </div>
 </div>
 )
}

export default Edit
First, we create a state to store the workout card details that’ll be fetched from our table. Then, we extract the id of that card using the useRouter hook. The getWorkout function calls the Supabase client instance to filter the id of that workout card and returns the data (title, loads, and reps).
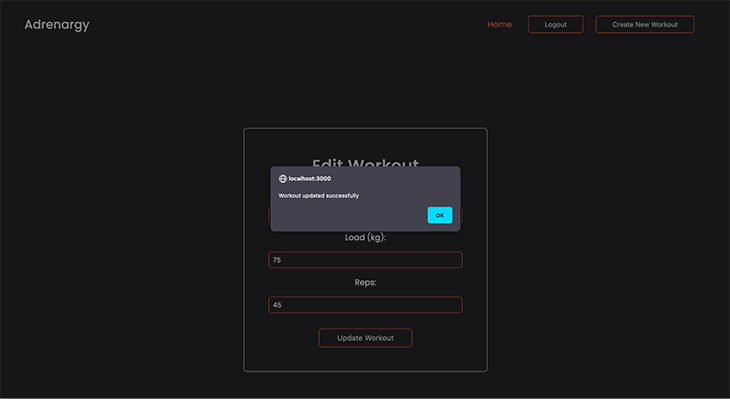
Once the workout card details have been returned, we can create our updateWorkout function to modify the details using the .update()function. Once the workout has been updated by the user and the Update workout button is clicked, an alert message is sent and the user will be redirected back to the homepage.
Let’s see how it works.
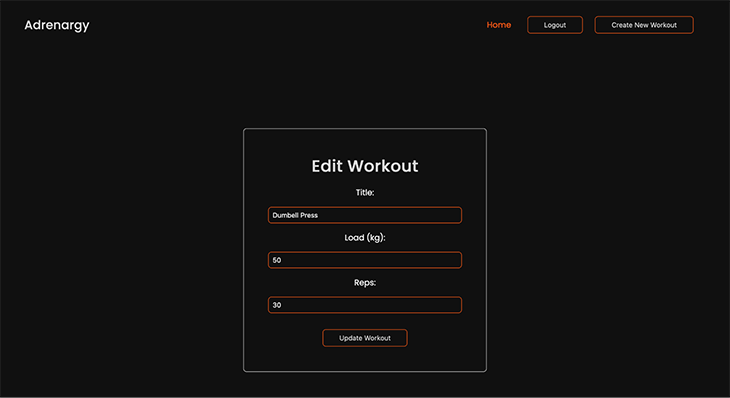
Click on the edit icon to go to the edit page. We’ll be renaming the title from “Dumbell Press” to “Arm Curl”:
To delete a workout on each card, we will create the handleDelete function that’ll take in the id as an argument. We’ll call the Supabase instance to delete a workout card using the .delete()function. This .eq('id', id) specifies the id of the row to be deleted on the table:
 const handleDelete = async (id) => {
 try {


 const user = supabase.auth.user();
 const { data, error } = await supabase
 .from("workouts")
 .delete()
 .eq("id", id)
 .eq("user_id", user?.id);
 fetchWorkouts();
 alert("Workout deleted successfully");
 } catch (error) {
 alert(error.message);
 }
 };
The eq('user_id', user?.id) is used to check if the card that is being deleted belongs to that particular user. The function will be passed to the WorkoutCard component in the root page.tsx file and destructured for usage in the component itself as follows:
"use client"
import Link from "next/link"
import styles from "@/styles/WorkoutCard.module.css"
import { BsTrash } from "react-icons/bs"
import { FiEdit } from "react-icons/fi"
import { formatDistanceToNow } from "date-fns"

const WorkoutCard = ({ data, handleDelete }) => {
 console.log({ data })
 return (
 <div className={styles.workoutContainer}>
 {data?.map((item) => (
 <div key={item.id} className={styles.container}>
 <p className={styles.title}>
 {" "}
 Title: {""}
 {item.title}
 </p>
 <p className={styles.load}>
 {" "}
 Load(kg): {" "}
 {item.loads}
 </p>
 <p className={styles.reps}>Reps:{item.reps}</p>
 <p className={styles.time}>
 created:{" "}
 {formatDistanceToNow(new Date(item.inserted_at), {
 addSuffix: true,
 })}
 </p>

 <div className={styles.buttons}>
 <Link legacyBehavior href={`/edit?id=${item.id}`} >
 <a className={styles.edit}>
 <FiEdit />
 </a>
 </Link>
 <button onClick={() => handleDelete(item.id)} className={styles.delete}>
 <BsTrash />
 </button>
 </div>
 </div>
 ))}
 </div>
 )
}

export default WorkoutCard
An alert toast will be displayed once the card has been deleted successfully and the user will be redirected to the homepage.
Now, we have to deploy our application to Vercel so anybody on the Internet can use it!
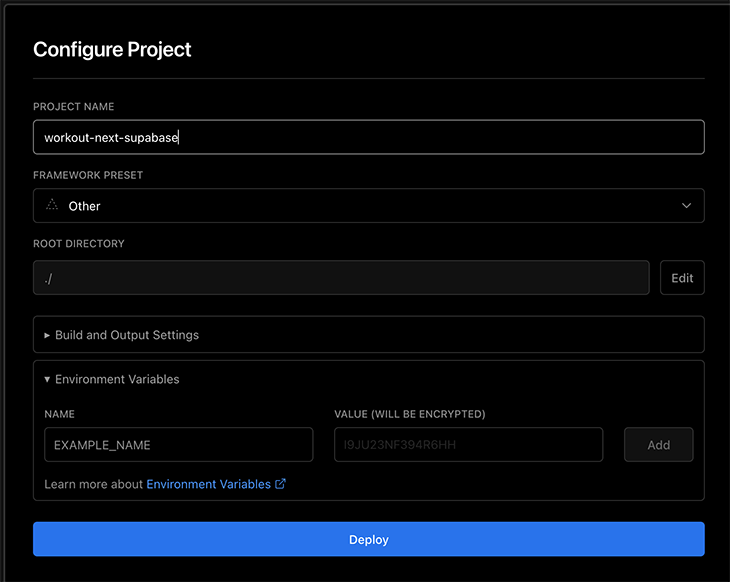
To deploy to Vercel, you must first push your code to your repository, log in to your Vercel dashboard, click on Create New Project, and click the repository to which you just pushed your code.
Enter the environment variables we created earlier alongside their values (NEXT_PUBLIC_SUPABASE_URL and NEXT_PUBLIC_SUPABASE_ANON_KEY) in the Environment Variable field and click Deploy to deploy your app to production.
And there we have it!
Thank you for reading! I hope this tutorial gives you the required knowledge needed to create a full-stack application using Next.js and Supabase.
You can customize the styling to your use case, as this tutorial majorly focuses on the logic of creating a full-stack application.
You can find the full repository of this project here. Read more about Supabase and Next.js.
Debugging Next applications can be difficult, especially when users experience issues that are difficult to reproduce. If you’re interested in monitoring and tracking state, automatically surfacing JavaScript errors, and tracking slow network requests and component load time, try LogRocket.
LogRocket captures console logs, errors, network requests, and pixel-perfect DOM recordings from user sessions and lets you replay them as users saw it, eliminating guesswork around why bugs happen — compatible with all frameworks.
LogRocket's Galileo AI watches sessions for you, instantly identifying and explaining user struggles with automated monitoring of your entire product experience.
The LogRocket Redux middleware package adds an extra layer of visibility into your user sessions. LogRocket logs all actions and state from your Redux stores.
👁 ImageModernize how you debug your Next.js apps — start monitoring for free.
TSRX adds first-class control flow, conditional hooks, and scoped styles to React via a TypeScript compiler extension — no new framework required.
Learn how to build a full React Native auth system using Better Auth and Expo — with email/password login, Google OAuth, session persistence, and protected routes.
Compare the top AI development tools and models of June 2026. View updated rankings, feature breakdowns, and find the best fit for you.
Learn how Bloom filters reduce database lookups for username availability checks while preserving correctness at scale.
Hey there, want to help make our blog better?
Join LogRocket’s Content Advisory Board. You’ll help inform the type of content we create and get access to exclusive meetups, social accreditation, and swag.
Sign up now