 |
VOOZH | about |
|
VOOZH | about |
GraphCommerce is a React frontend framework that allows developers to create ecommerce storefronts connected with Magento.
👁 ImageBy combining the ecommerce capabilities of Magento and the convenience of React, developers get access to many features such as:
In this tutorial, you will learn how to create an ecommerce store with GraphCommerce. You will discover where the PWA configuration and the payment methods are set up. Finally, you will create your own GraphCMS project and connect it to your GraphCommerce project. You can jump to any of these steps:
The Replay is a weekly newsletter for dev and engineering leaders.
Delivered once a week, it's your curated guide to the most important conversations around frontend dev, emerging AI tools, and the state of modern software.
The starter project for GraphCommerce is in the GraphCommerce GitHub repository under the examples folder.
To get the repository, start by cloning it:
git clone https://github.com/graphcommerce-org/graphcommerce.git
Once that’s done, you should have a folder called graphcommerce. To get the demo project, you should create a project beside your GraphCommerce one (not inside of it as you will be deleting the graphcommerce folder).
To create that folder, run the following command:
mkdir pwa-graphcommerce
Then, copy the starter project inside graphcommerce/examples/magento-graphcms/ into the folder you previously created. You can also delete the graphcommerce folder as you no longer need it.
cp -R graphcommerce/examples/magento-graphcms/. pwa-graphcommerce && rm -rf graphcommerce
With your new folder filled with all the necessary files, you can move inside of it.
cd pwa-graphcommerce
When inside your pwa-graphcommerce folder, you can create the .env necessary to run your application. You can copy it directly from the .env.example file supplied to you.
cp -R .env.example .env
You should also remove some of the unnecessary files and folders in your project.
rm CHANGELOG.md
rm -rf node_modules && rm -rf .next
Once you have finished step 1, you are ready to launch the application. To do so, you should install all the dependencies with:
yarn
Once the dependencies are installed, you need to also generate your client code based on your GraphQL schema and query documents. You can accomplish that by running the command:
yarn codegen
Finally, you can start your development server.
yarn dev
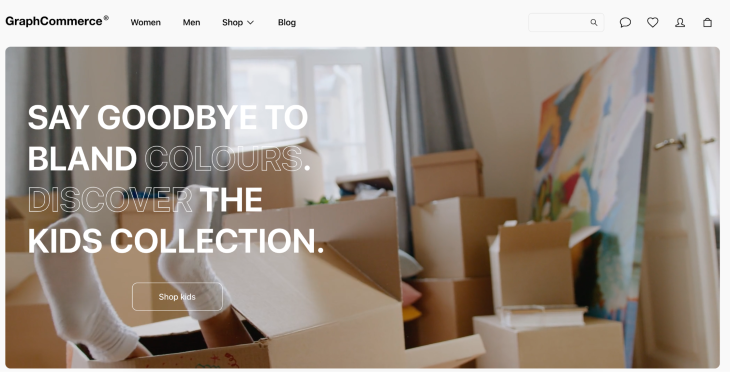
If you visit http://localhost:3000, you should see this:
Below are some things to note as you launch your GraphCommerce project.
The PWA functionalities are offered through the library next-pwa. When you start your development server, you should see this in the server log:
[next] > [PWA] PWA support is disabled
You can see the configuration in your next.config.js. Inside you should see:
const nextConfig = {
 ...
 pwa: {
 dest: 'public',
 disable: process.env.NODE_ENV === 'development',
 },
 ...
}
Remove the disable line to enable PWA support on your local server.
The GraphCommerce project offers 2 payments methods for you to use:
If you would like to remove one of them, you will need to remove it from your package.json first.
Finally, head into your pages/checkout/payment.tsx and remove their references in this file.
Your project is currently using a demo Magento and GraphCMS. You can change that by configuring the API Keys in the .env file. In this section, you will discover how to create your own GraphCMS and link it to your project.
To start with, register to Hygraph and clone the default starter project. To do it, go to this address to clone the project: https://app.hygraph.com/clone/caddaa93cfa9436a9e76ae9c0F34d257
Once created, you can get the necessary API endpoint from your Project Settings (the cog in the left-hand side navigation) and then in API Access. In this page, you will see the endpoints section. From there, you can copy the Content API endpoint.
Then, head to your .env file and replace the GRAPHCMS_URL demo URL with your new URL.
You will have to kill your server and regenerate the files with yarn codegen.
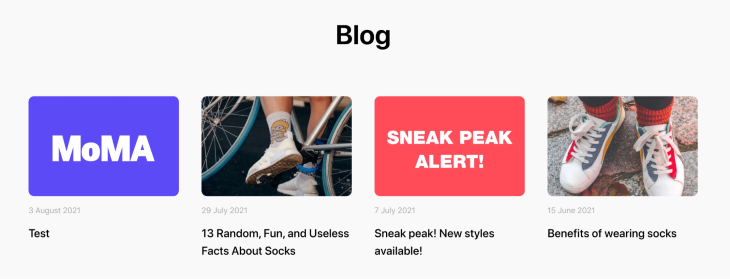
Once that is set up, you can change your content and see the changes reflected. For example, head to Content > Blogposts. Change the title of one of your posts to Test.
Once you go back to your app, you should see the changes reflected.
GraphCommerce is a frontend framework built in React. Its purpose is to offer a PWA for Magento 2 developers. With GraphCommerce, developers can create and customize their storefront quickly and easily.
In this tutorial, you learned how to set up and launched a GraphCommerce app using demo data. Then, you discovered how to create your own GraphCMS instance and link it to your GraphCommerce application. Enjoy testing out your new application.
Debugging Next applications can be difficult, especially when users experience issues that are difficult to reproduce. If you’re interested in monitoring and tracking state, automatically surfacing JavaScript errors, and tracking slow network requests and component load time, try LogRocket.
LogRocket captures console logs, errors, network requests, and pixel-perfect DOM recordings from user sessions and lets you replay them as users saw it, eliminating guesswork around why bugs happen — compatible with all frameworks.
LogRocket's Galileo AI watches sessions for you, instantly identifying and explaining user struggles with automated monitoring of your entire product experience.
The LogRocket Redux middleware package adds an extra layer of visibility into your user sessions. LogRocket logs all actions and state from your Redux stores.
👁 ImageModernize how you debug your Next.js apps — start monitoring for free.
TSRX adds first-class control flow, conditional hooks, and scoped styles to React via a TypeScript compiler extension — no new framework required.
Learn how to build a full React Native auth system using Better Auth and Expo — with email/password login, Google OAuth, session persistence, and protected routes.
Compare the top AI development tools and models of June 2026. View updated rankings, feature breakdowns, and find the best fit for you.
Learn how Bloom filters reduce database lookups for username availability checks while preserving correctness at scale.
Would you be interested in joining LogRocket's developer community?
Join LogRocket’s Content Advisory Board. You’ll help inform the type of content we create and get access to exclusive meetups, social accreditation, and swag.
Sign up now