 |
VOOZH | about |
|
VOOZH | about |
The Replay is a weekly newsletter for dev and engineering leaders.
Delivered once a week, it's your curated guide to the most important conversations around frontend dev, emerging AI tools, and the state of modern software.
Blockchain, Ethereum, DApps, smart contracts… If you are on the internet, chances are you’ve seen these words around somewhere, and probably without fully understanding what they are or how the tech behind them works. This article solves that for you.
👁 Building a DApp with Ethers.jsIn this tutorial, we will be learning some concepts of the blockchain, as well as learning how to build our first DApp with Ethers.js
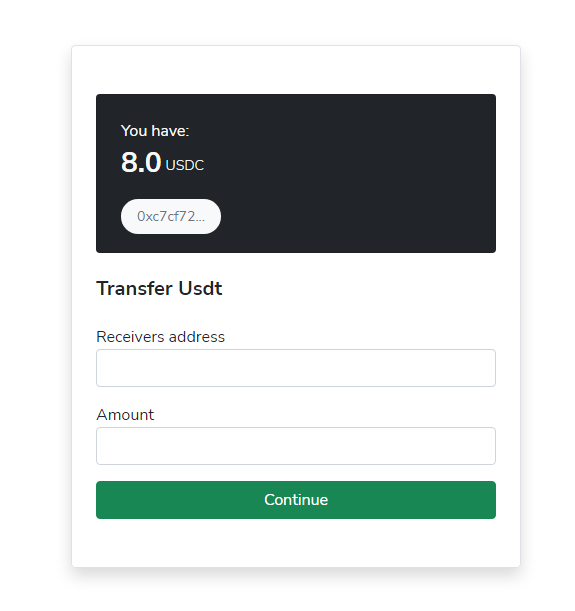
We will work on creating a DApp x Defi that displays our current USDT balance, allow us to transfer USDT to other wallets, and finally allows us to query our USDT transaction history.
The final output will look like this:
To follow along with this article, you will need:
This article is divided into three sections:
If you are already familiar with how the blockchain and DApps work, you can skip directly to the Getting started with Ethers.js section.
Wikipedia defines the blockchain as “a growing list of records, called blocks, that are linked together using cryptography.” You could think of the blockchain as a database, but unlike a primary database, the blockchain is decentralized — i.e., no central organization controls its activities.
Additionally, the blockchain is immutable, in the sense that any data stored on it cannot be modified after it has been created.
In 2009, Satoshi Nakamoto popularized the blockchain by creating the world’s first cryptocurrency, Bitcoin. Bitcoin being developed on the blockchain makes it the first peer-to-peer digital currency that is not controlled by the government or some organization. And some years after Bitcoin was introduced, 19-year-old Vitalik Buterin created Ethereum.
Ethereum is a decentralized, open source blockchain with smart contract and DApp development functionalities. Ethereum provides a platform for developers to create universal applications for exchanging information and services whose data cannot be manipulated or changed across the blockchain.
Apart from the Ethereum blockchain, Vitalik and his team also created a native cryptocurrency: Ether (ETH for short), which is similar to Bitcoin but is also used for running transactions on the blockchain, when interacting with DApps.
Smart contracts are programs that run on the Ethereum blockchain. You could think of smart contracts as a normal Ethereum account with some ether stored on it and can perform transactions over the Ethereum network. But unlike a normal account, smart contracts are not controlled by a user. They are rather programmed, deployed to the network, and perform tasks automatically.
Decentralized applications (DApps for short) are applications built to interact with the blockchain. In contrast to smart contracts, DApps do not explicitly exist on the blockchain; they are rather built to interact with smart contracts.
Now that you are up to speed with common blockchain terms, let’s dive right into creating our first DApp with Ethers.js
Ethers.js is a JavaScript library allowing developers to easily interact with the Ethereum blockchain and its ecosystem.
Ethers.js is available as an npm package and can be installed by running:
npm install --save ethers
Or including its CDN in an HTML document like below:
<script
 src="https://cdn.ethers.io/lib/ethers-5.2.umd.min.js"
 type="application/javascript">
</script>
If you are working with Node.js, you can import the Ethers package in your project with:
const { ethers } = require("ethers");
For an ES6 or TypeScript-based project, you can import it with:
import { ethers } from "ethers";
Otherwise, if you had included the CDN in your markup, there is no extra effort needed for importing, as the Ethers package is loaded automatically.
Some common terms you’ll come across while working with Ethers.js include:
MetaMask is a wallet for storing cryptocurrencies, and it also serves as a gateway to connecting to blockchain-based applications. If you haven’t already, head over to their download page to download the web extension for your preferred browser.
After setting up MetaMask, we have access to the global Ethereum API, which can be accessed via window.ethereum.
You can easily connect to MetaMask with Ethers.js by creating a new Web3 provider and passing the global Ethereum API (window.ethereum) as a parameter, like below:
const provider = new ethers.providers.Web3Provider(window.ethereum)
To try this out, create a new index.html file and add the following code:
<!DOCTYPE html>
<html lang="en">
 <head>
 <script
 src="https://cdn.ethers.io/lib/ethers-5.2.umd.min.js"
 type="application/javascript"
 ></script>
 <script>
 const provider = new ethers.providers.Web3Provider(
 window.ethereum,
 "any"
 );
 await provider.send("eth_requestAccounts", []);
 const signer = provider.getSigner();

 (async function () {
 let userAddress = await signer.getAddress();
 document.getElementById("wallet").innerText =
 "Your wallet is " + userAddress;
 })();
 </script>
 </head>
 <body>
 <div id="wallet"></div>
 </body>
</html>
In the code above, after including the Ethers.js CDN, we created a connection to MetaMask and assigned it to a constant variable provider, and afterward, we created a self-invoking asynchronous function which we’d used to get our connected MetaMask account.
Running the code will prompt a new MetaMask connection, like below, and once the connection is successful, you should see your wallet address displayed on the page:
👁 Ethers.js Wallet Address Dispaly
With the provider class, we have read-only access to the blockchain data, and with this, we can fetch the blockchain’s current state, read historic logs, and much more.
For example, we can use the asynchronous getBlockNumber() method to get the current mined block in the Ethereum blockchain:
const provider = new ethers.providers.Web3Provider(window.ethereum)
async function getCurrentBlock() {
 let currentBlock = await provider.getBlockNumber();
 console.log(currentBlock);
}

getCurrentBlock();

// returns 13344639
Or the getBalance() method, to get the amount of Ether available in a specified address:
const provider = new ethers.providers.Web3Provider(window.ethereum)

async function getBalance(wallet) {
 let balance = await provider.getBalance(wallet);
 // we use the code below to convert the balance from wei to eth
 balance = ethers.utils.formatEther(balance);
 console.log(balance);
}

getBalance("0xC7CF72918D9a7101D2333538686E389b15ad8F2E");
// returns 0.3
Visit here for a full reference of all methods available under the provider class.
Signing messages on the blockchain means creating digital signatures. These digital signatures are used to prove the ownership of an address without exposing its private key.
We can easily do this with Ethers.js by using the signMessage() method available on the signer class:
let mySignature = await signer.signMessage("Some custom message");
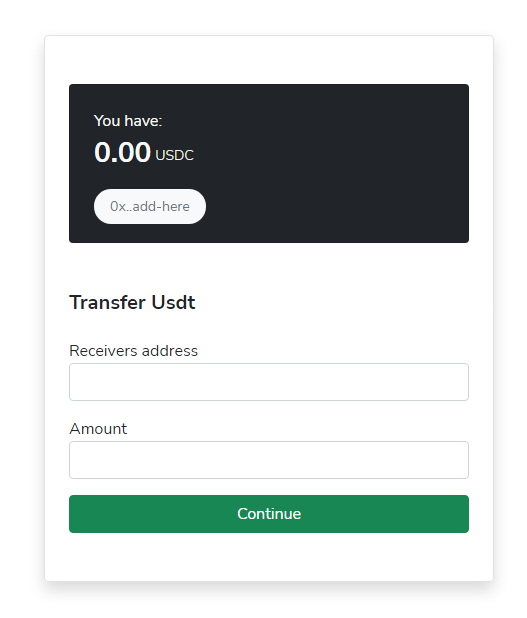
To get started, visit this GitHub repository and follow the instructions on the repository README to set up the project frontend branch on your local machine. This repository contains all the files we need in creating our DApp, as well as the markup code for the user interface, but no functionality added yet.
If you followed the installation process successfully and ran the index.html file, you should have an output similar to the image below:
To carry out any transaction in the Ethereum blockchain, we will be charged some ether, otherwise known as a gas fee. And, since this is a test project, we do not want to pay actual money to run transactions. To get free test ETH, open MetaMask, and change the network to ropsten test network, copy your wallet address, and finally, submit your wallet in ropsten faucet to get 0.3 free ETH.
Since we are building a DApp that lets us transfer USDC, we want to mint some for ourselves first, from our ETH balance. To do this, open up the /script/mint-usdc.js file and update it with the following content:
const provider = new ethers.providers.Web3Provider(window.ethereum, "any");

const usdc = {
 address: "0x68ec573C119826db2eaEA1Efbfc2970cDaC869c4",
 abi: [
 "function gimmeSome() external",
 "function balanceOf(address _owner) public view returns (uint256 balance)",
 "function transfer(address _to, uint256 _value) public returns (bool success)",
 ],
};

async function mintUsdc() {
 await provider.send("eth_requestAccounts", []);
 const signer = provider.getSigner();
 let userAddress = await signer.getAddress();
 const usdcContract = new ethers.Contract(usdc.address, usdc.abi, signer);

 const tx = await usdcContract.gimmeSome({ gasPrice: 20e9 });
 console.log(`Transaction hash: ${tx.hash}`);

 const receipt = await tx.wait();
 console.log(`Transaction confirmed in block ${receipt.blockNumber}`);
 console.log(`Gas used: ${receipt.gasUsed.toString()}`);
}
Next, save this file and run the mint-usdc.html file available in our root folder. Now if you click the Mint Now button on this page, this should prompt a new MetaMask request, and confirming this request will mint 10 USDC to our wallet as well as the transaction hash and gas fee used for the request printed in our console.
Now that we’ve minted some USDC, let’s go ahead and display it in the designated area in our markup. To do this, open /script/app.js and update it with the code below:
const provider = new ethers.providers.Web3Provider(window.ethereum, "any");

const usdc = {
 address: "0x68ec573C119826db2eaEA1Efbfc2970cDaC869c4",
 abi: [
 "function name() view returns (string)",
 "function symbol() view returns (string)",
 "function gimmeSome() external",
 "function balanceOf(address _owner) public view returns (uint256 balance)",
 "function transfer(address _to, uint256 _value) public returns (bool success)",
 ],
};

async function main() {
 await provider.send("eth_requestAccounts", []);
 const signer = provider.getSigner();
 let userAddress = await signer.getAddress();
 document.getElementById("userAddress").innerText = userAddress;

 const usdcContract = new ethers.Contract(usdc.address, usdc.abi, signer);

 let usdcBalance = await usdcContract.balanceOf(userAddress);
 usdcBalance = ethers.utils.formatUnits(usdcBalance, 6);
 document.getElementById("usdcBalance").innerText = usdcBalance;
}
main();
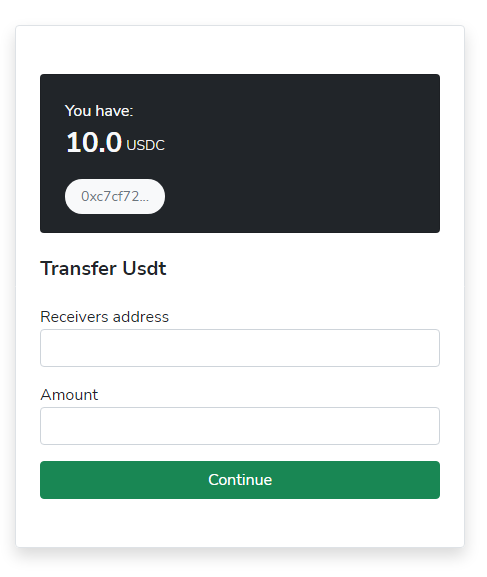
Here, we used the balanceOf() function available in the USDC ABI while passing our address. And just like it was mentioned in the getting started section, the balance will be returned in Wei, so we’d used the Ethers.js utility function to convert it from Wei to ETH and displayed the result in our div with an id of usdcBalance.
Now if we run index.html, we should see our USDC balance as well as our wallet displayed in their designated section, like below:
The final step is to add the transfer functionality. Open up script/transfer-usdc.js and update its contents with the code below:
async function transferUsdc() {
 let receiver = document.getElementById("receiver").value;
 let amount = document.getElementById("amount").value;
 let response;

 await provider.send("eth_requestAccounts", []);
 const signer = provider.getSigner();
 let userAddress = await signer.getAddress();

 const usdcContract = new ethers.Contract(usdc.address, usdc.abi, signer);

 try {
 receiver = ethers.utils.getAddress(receiver);
 } catch {
 response = `Invalid address: ${receiver}`;
 document.getElementById("transferResponse").innerText = response;
 document.getElementById("transferResponse").style.display = "block";
 }

 try {
 amount = ethers.utils.parseUnits(amount, 6);
 if (amount.isNegative()) {
 throw new Error();
 }
 } catch {
 console.error(`Invalid amount: ${amount}`);
 response = `Invalid amount: ${amount}`;
 document.getElementById("transferResponse").innerText = response;
 document.getElementById("transferResponse").style.display = "block";
 }

 const balance = await usdcContract.balanceOf(userAddress);

 if (balance.lt(amount)) {
 let amountFormatted = ethers.utils.formatUnits(amount, 6);
 let balanceFormatted = ethers.utils.formatUnits(balance, 6);
 console.error(
 `Insufficient balance receiver send ${amountFormatted} (You have ${balanceFormatted})`
 );

 response = `Insufficient balance receiver send ${amountFormatted} (You have ${balanceFormatted})`;
 document.getElementById("transferResponse").innerText = response;
 document.getElementById("transferResponse").style.display = "block";
 }
 let amountFormatted = ethers.utils.formatUnits(amount, 6);


 response = `Transferring ${amountFormatted} USDC receiver ${receiver.slice(
 0,
 6
 )}...`;
 document.getElementById("transferResponse").innerText = response;
 document.getElementById("transferResponse").style.display = "block";

 const tx = await usdcContract.transfer(receiver, amount, { gasPrice: 20e9 });
 document.getElementById(
 "transferResponse"
 ).innerText += `Transaction hash: ${tx.hash}`;

 const receipt = await tx.wait();
 document.getElementById(
 "transferResponse"
 ).innerText += `Transaction confirmed in block ${receipt.blockNumber}`;
 }
The code is pretty much self-explanatory. First, we got the required input (receivers wallet and amount) from our form, and after creating our contract, we checked if the entered address is a valid one and also if the user had a sufficient amount. And finally, using the transfer() method from our ABI, we initiated the transfer.
And our app is ready to go!
You can try it out by creating a new account on MetaMask and transferring some USDC to it.
Also, the full source code is available here on GitHub, in case you missed any step.
In this tutorial, we did not only learn about the blockchain, but we also learned how to create our first decentralized application (DApp) on the Ethereum blockchain using Ethers.js.
Client-side issues that impact users’ ability to activate and transact in your apps can drastically affect your bottom line. If you’re interested in monitoring UX issues, automatically surfacing JavaScript errors, and tracking slow network requests and component load time, try LogRocket.
👁 LogRocket Dashboard Free Trial BannerLogRocket lets you replay user sessions, eliminating guesswork around why bugs happen by showing exactly what users experienced. It captures console logs, errors, network requests, and pixel-perfect DOM recordings — compatible with all frameworks.
LogRocket's Galileo AI watches sessions for you, instantly identifying and explaining user struggles with automated monitoring of your entire product experience.
Modernize how you debug web and mobile apps — start monitoring for free.
TSRX adds first-class control flow, conditional hooks, and scoped styles to React via a TypeScript compiler extension — no new framework required.
Learn how to build a full React Native auth system using Better Auth and Expo — with email/password login, Google OAuth, session persistence, and protected routes.
Compare the top AI development tools and models of June 2026. View updated rankings, feature breakdowns, and find the best fit for you.
Learn how Bloom filters reduce database lookups for username availability checks while preserving correctness at scale.
Would you be interested in joining LogRocket's developer community?
Join LogRocket’s Content Advisory Board. You’ll help inform the type of content we create and get access to exclusive meetups, social accreditation, and swag.
Sign up now