 |
VOOZH | about |
|
VOOZH | about |
For many years, ESLint has been the de facto standard for linting JavaScript and TypeScript projects. This adoption guide explains why this is still the case for 2024.
👁 Eslint Adoption Guide: Overview, Examples, And AlternativesThis article covers the current version of ESLint, which was available at the time of writing in summer 2024 (v9.7). Therefore, only the concepts and features of v9 are described, which brings some major breaking changes compared to the previous versions.
If you want to use older versions without the most recent configuration flavor with flat config files, you can consult the official migration guide.
The Replay is a weekly newsletter for dev and engineering leaders.
Delivered once a week, it's your curated guide to the most important conversations around frontend dev, emerging AI tools, and the state of modern software.
ESLint is a configurable and extensible JavaScript linter for performing static code analysis. It helps you trace and solve problems in your source code without the need to execute it. Problems can be anything from potential runtime bugs, and bad coding practices, to code formatting issues.
As a software quality tool, ESLint aims to make code more consistent and robust. It checks your code with the help of assertions, so-called lint rules, regarding how your code should look or behave. For example, with the rule no-use-before-define, you can instruct ESLint to report violations when it encounters function calls before they are declared.
Further, the severity of violations can be specified for each rule to be a warning or error. Thereby, in a CI/CD pipeline, a linting step could fail for reported errors indicating a larger problem that needs to be investigated.
ESLint, with the help of parsers and plugins, can be configured to understand and lint TypeScript or JavaScript syntax extensions, like JSX, or the concepts of JavaScript frameworks like React or Vue.
The idea of ESLint arose due to the inadequacies of linting tools available at the time, such as JSCS, JSLint, and JSHint. These tools were somewhat rigid in their rule sets and configuration capabilities, making it difficult to adjust rules according to their specific project requirements.
Since ESLint’s initial version, rules have built the backbone of ESLint. They may offer suggestions on how to manually solve violations shown directly at the problematic code positions inside of code editors with markers and overlays.
Additionally, rules may provide fixes that enable ESLint to automatically resolve violations from CLI or your code editor; e.g., refactoring your arrow function to an implicit return variant.
In addition to a much better linting experience with broader tool and language support, another selling point of ESLint was and still is the pluggable architecture. It enables greater extendability and customizability than its competitors allowing developers to create and share custom rules and extend ESLint beyond its core functionality.
Evidence of ESLint’s rise over the years is that it was merged with JSCS, which was losing ground over time. Since its inception, ESLint has evolved significantly:
typescript-eslint to support TypeScriptWhen it comes to maintaining code quality and consistency in JavaScript projects, ESLint stands out as a premier tool. Adopting it into your projects can significantly enhance the DX, ensuring that your codebases remain clean, readable, and free of errors.
ESLint is shipped with many rules that can easily be tweaked to the requirements of a project. You can even add more rules with the help of community plugins. Further, parsers can be utilized to extend the functionality of ESLint.
Before we can delve into the core concepts and features of ESLint, we need to set up the ESLint workflow first.
In a folder with an existing package.json, you can run the following command to add ESLint to your dev project. ESLint is meant to be installed locally. With the following command, you can run an interactive installation guide that adds the default ESLint config:
# run at root level of your project
$ npm init @eslint/config@latest
You can also init your project with a shareable config. You can find many of them by performing a Github search. The naming convention is to begin custom configs with eslint-config-.
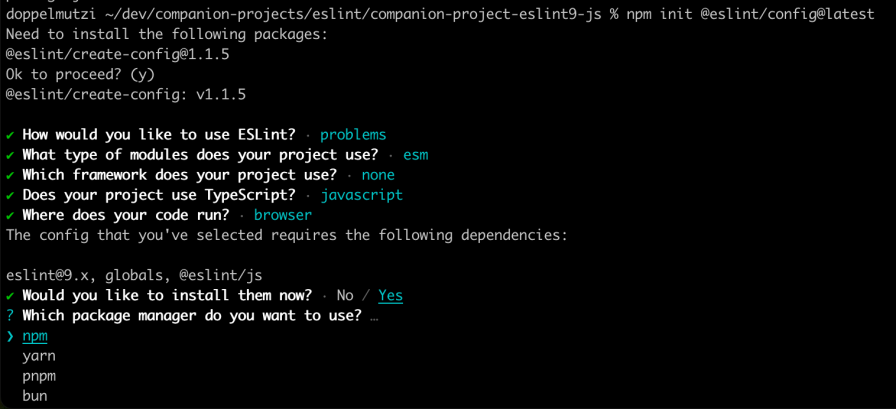
The installation wizard asks you a couple of questions about your current project setup:
👁 Interactive Eslint Installation Wizard Guiding User Through Project Setup
After completing the installation, ESLint created a config file with a file suffix depending on the type of module variant you chose. For ESM, you find an eslint.config.mjs in your working directory. As a convention, .mjs file prefix indicates that your projects work with ESM but eslint.config.js would have the same effect.
This so-called flat config for a vanilla JavaScript project looks initially like this:
// eslint.config.mjs
import globals from "globals";
import pluginJs from "@eslint/js";
export default [
 { languageOptions: { globals: globals.browser } },
 pluginJs.configs.recommended,
];
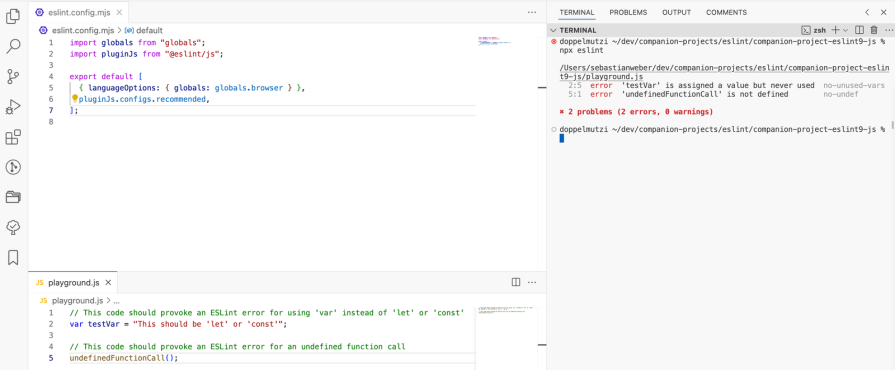
With this config above, the default ESLint JavaScript npm package @eslint/js is used with a browser environment (globals.browser) and all recommended JS rules. Let’s create a simple JavaScript file with some rule violations:
// playground.js
var testVar = "This should be 'let' or 'const'";
undefinedFunctionCall();
We leverage the ESLint CLI with npx from the same path where eslint.config.mjs is located:
$ npx eslint # all files recursively
$ npx eslint playground.js # specific file(s)
$ npx eslint *.js # ESLint supports globs
In this example, ESLint reported two errors due to violation of the rules no-unused-vars and no-undef:
👁 Two Errors Reported When Running Eslint Cli With Npx
The ESLint GitHub project is organized in a monorepo, and you can consult more configuration options by looking into the @eslint/js package. The above config adds all recommended rules, which all have a severity level of error. We will learn more about violation severity in a minute.
The following config demonstrates different variants of using the recommended rules:
export default [
 // ...
 // pull in all recommended rules
 pluginJs.configs.recommended,
 // all but different approach
 { rules: pluginJs.configs.recommended.rules },
 // all but override existing rules
 {
 rules: {
 ...pluginJs.configs.recommended.rules,
 // change the severity level
 "no-unused-vars": "warn",
 },
 }
];
The following snippet demonstrates that ESLint ships out-of-the-box JavaScript rules since you can use them without importing anything by knowing the name. However, this is not recommended:
import globals from "globals";
export default [
 { languageOptions: { globals: globals.browser } },
 {
 rules: {
 "no-unused-vars": "warn",
 },
 },
];
There are a wide variety of ways to integrate ESLint into tool chains, editors, and IDEs. If you want VS Code to highlight rule violations inside of your source files, you simply need to install the official ESLint extension:
👁 Eslint Extension For Vs Code Integration
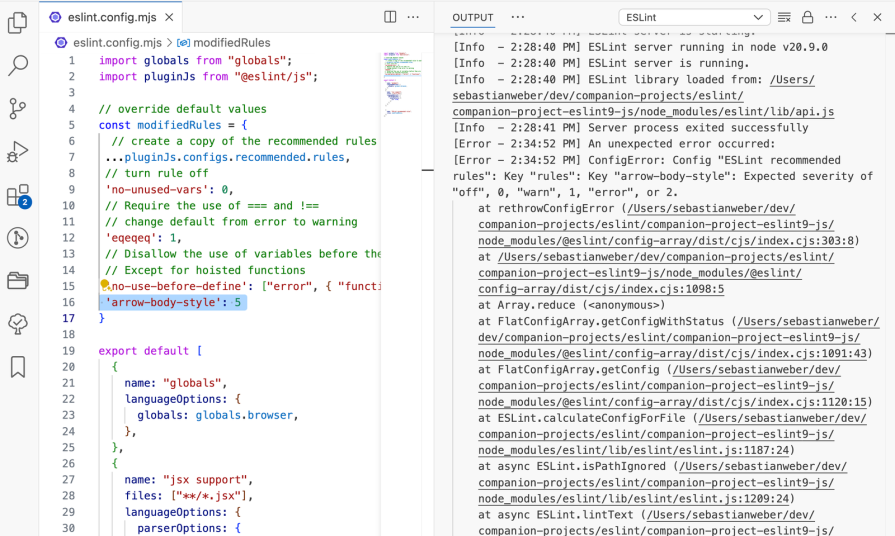
If you ever find yourself in a situation where the ESLint extension in VS Code does not respond to your configuration changes, one of the following options will usually help you.
First, take a look into VS Code’s output panel, select ESLint from the dropdown, and look for an error:
👁 Error In Eslint Output Shown In Vs Code Output Panel
Secondly, restart the internal ESLint server with the help of the command palette and execute ESLint: Restart ESLint Server.
With the interactive installation guide, if you select TypeScript, the config utilizes typescript-eslint to teach ESLint how to interpret TypeScript. You can also install TypeScript support manually. Make sure to install the correct version (≥ v8.0.0-alpha.10) that is compatible with ESLint v9 and flat config:
$ npm i -D eslint @eslint/js @types/eslint__js typescript [email protected] --force
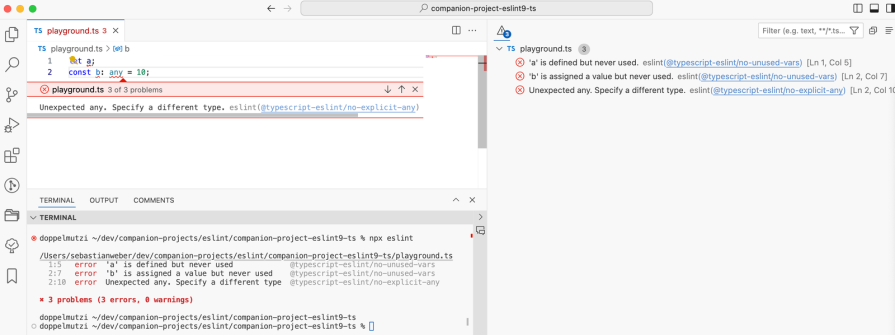
With the following config, you use the recommended JavaScript rules of ESLint in combination with the recommended TypeScript rules provided by typescript-eslint:
// eslint.config.mjs
import eslint from "@eslint/js";
import tseslint from "typescript-eslint";
export default tseslint.config(
 eslint.configs.recommended,
 ...tseslint.configs.recommended
);
The next screenshot shows that npx eslint as well as the VS Code ESLint extension both report JS and TS violations:
👁 Javascript And Typescript Violations Reported By Both Npx Eslint And Vs Code Eslint Extension
The previous section gave a hands-on insight into how ESLint is set up and used. In the following, I will go into the core concepts that you need to understand to use ESLint profitably.
With the new flat config concept, the whole project configuration is part of one single eslint.config.js(c|j|m) file. Previously, the configuration could be spread across several .eslintrc files and even be part of package.json, which led to complexity and confusion.
Typically your flat config file is slim, as ESLint comes with reasonable default values for projects. By default, ESLint searches for source files with the suffixes .js, .mjs, and .cjs. In what follows, the terms flat config and eslint.config are used synonymously. The latter is representative of all file extensions (.*js).
When you use typescript-eslint, out-of-the-box ESLint will lint .ts, .tsx, .mts, and .cts files. As another example, all files with prefix .cjs are treated as JS files using CommonJS modules. Further, ecmaVersion: "latest" is the default, so ESLint expects you to work with the most recent version of ECMAScript:
{
 files: ["**/*.cjs"],
 languageOptions: {
 sourceType: 'commonjs',
 ecmaVersion: 'latest'
 },
},
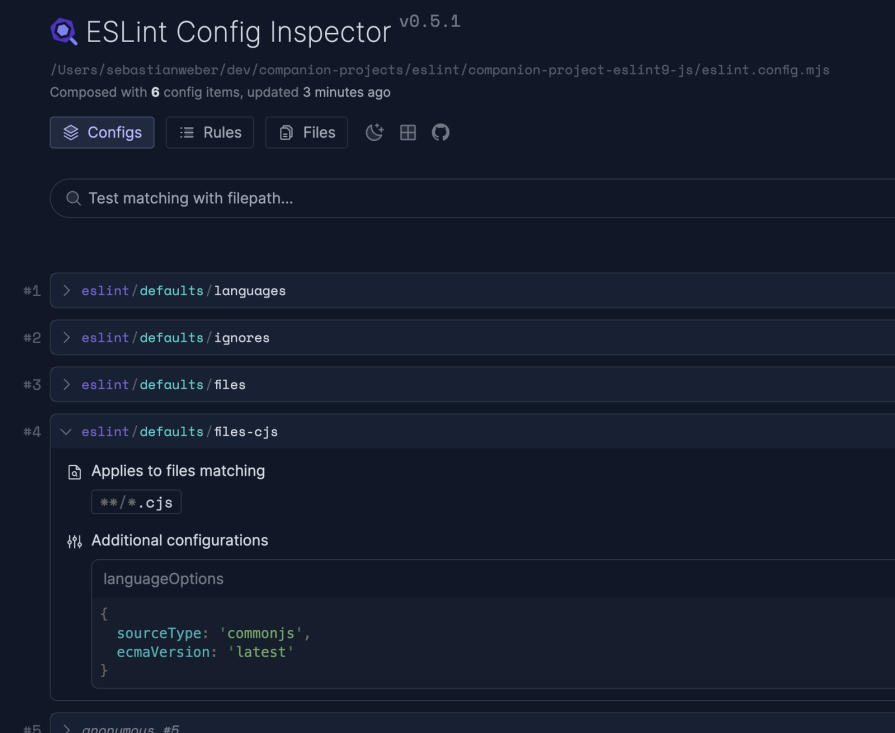
How do you know about these default values? ESLint ships a handy visual tool to inspect your eslint.config. With the ESLint Config Inspector, you learn how the configuration concept works. Similar to the CSS DevTools in browsers, where you can see how the styles come about, you find out what default values are applied or how rules get applied for different file globs:
👁 Demo Of Eslint Config Inspector In Use
This tool is valuable since the effective configuration object returned by eslint.config may not be apparent when simply looking at the file. This is especially true because you can import external configurations or generate parts of the configuration on the fly. You can run it with the following command:
$ npx @eslint/config-inspector
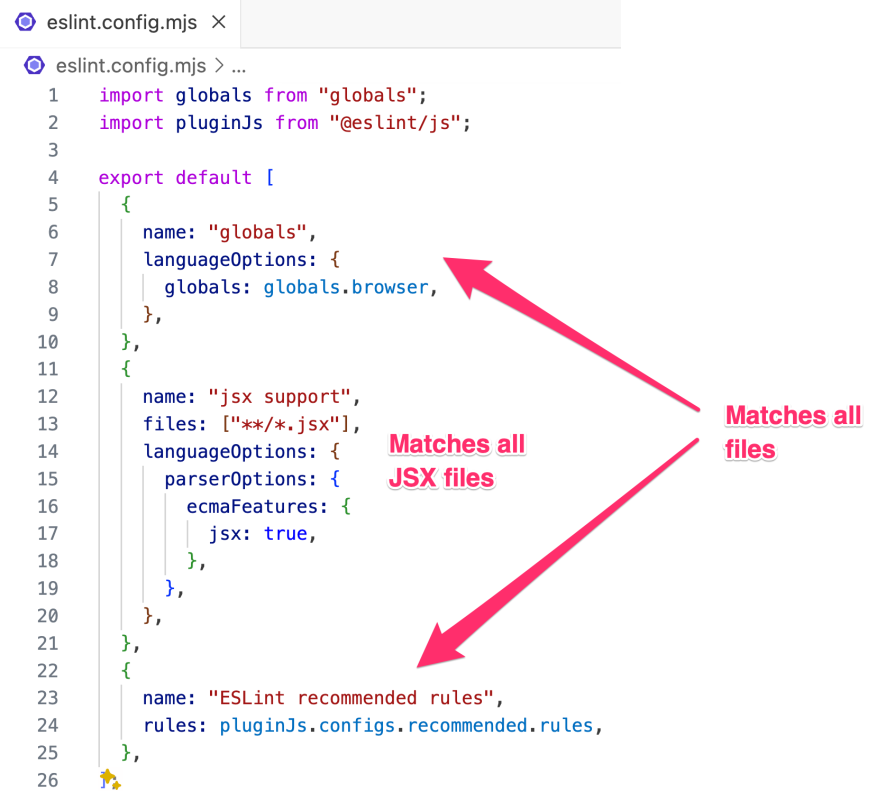
The concept of eslint.config is pretty straightforward, you have to return an array of config objects. Every config object adds either configuration for all files or a subset of files specified by a file glob. Consequently, multiple config objects can be composed to an overall configuration. If you skip the files property, the config object applies to all files:
👁 Multiple Config Objects Merged In One Configuration
ESLint takes care to merge all the config objects into one effective configuration. This can be traced with the help of the ESLint Config Inspector.
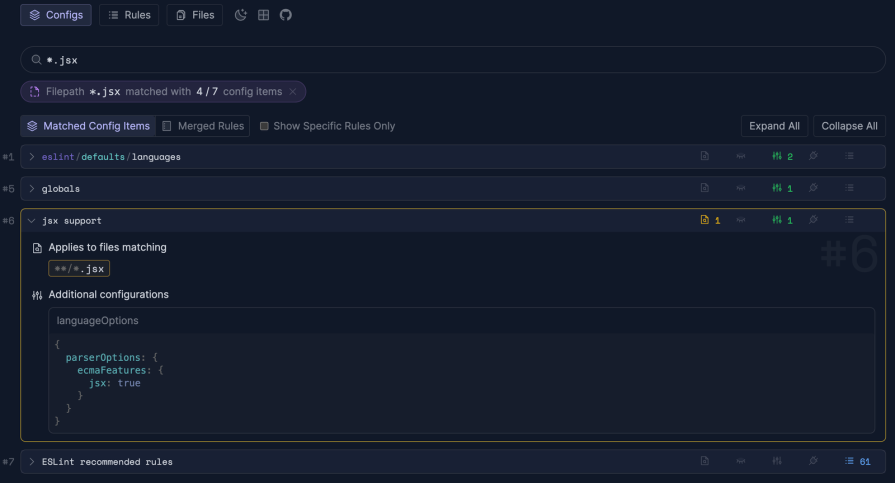
For files matching *.jsx, the languageOption is configured to interpret JSX files. Otherwise, ESLint does not understand how to handle JSX files. The optional name property is useful in combination with the Config Inspector to improve traceability:
👁 Using Optional Name Property With Config Inspector To Improve Traceability
The languageOptions property is where ESLint gets to know what module system, ECMAScript version, or language extension you want to use. In the previous example, we told ESLint how to interpret JSX files with languageOptions.parserOptions.ecmaFeatures.jsx property.
You can opt out of the latest ECMAScript version — e.g., ecmaVersion: 2015. ESLint also assumes that ESM is the way you handle JS modules in your project. Therefore, the default is sourceType: "module" for .js and .jsm files. Otherwise, you have to opt out (sourceType: "script"). For .cjs files, the default is sourceType: "commonjs".
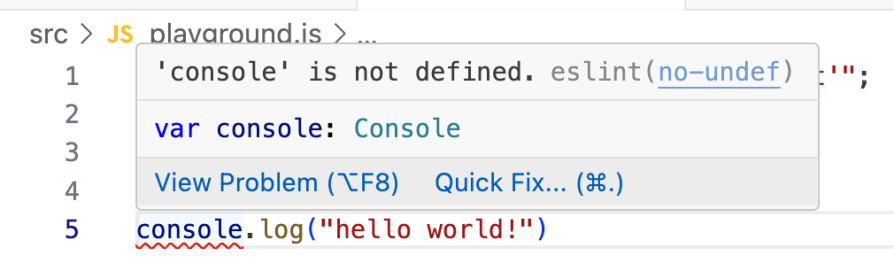
Another useful property is languageOptions.globals. In projects for the browser environment, ESLint needs to know global variables like window or console. Otherwise, ESLint incorrectly reports a no-undef error:
👁 Incorrect No Undef Error Reported By Eslint Without Knowing Global Variables
You can specify your project-specific global variables with languageOptions.globals. For browser projects, you can import globals, which is a JSON file holding predefined global identifiers:
import globals from "globals";
// ...
export default [
 {
 name: "globals",
 languageOptions: {
 globals: globals.browser,
 },
 },
 // ...
];
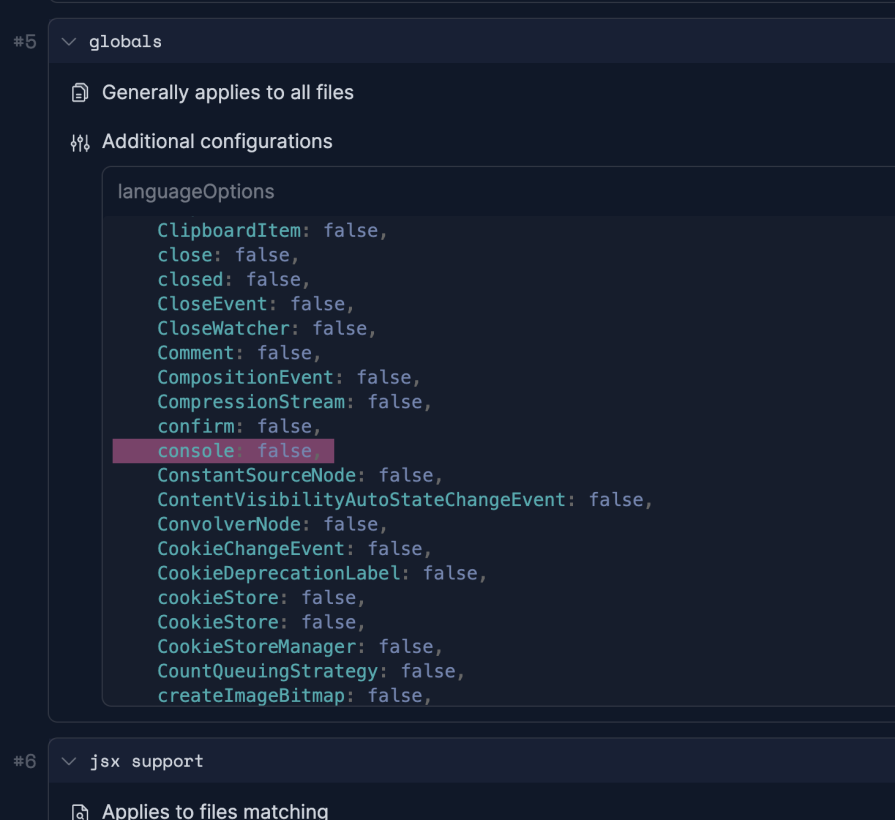
Again, you can utilize the Config Inspector to see all global variable names:
👁 All Global Variable Names Displayed In Config Inspector
You can read about all configuration capabilities in the official docs.
For many projects, starting with a predefined rule set as provided by @eslint/js is a good choice. These sets provide a broad coverage of common issues and, if required, stylistic preferences.
When you run ESLint, either via CLI or the background process inside your code editor, rule violations are reported. For every violation, ESLint shows the rule ID (e.g., no-undef) and a short violation explanation.
With that rule ID, you can easily navigate to the rule detail page from the rules reference. Alternatively, from the VS Code extension (or any other code editor integration), you can click on the provided link:
👁 Navigation To The Rule Detail Page From The Rules Reference Using Rule Id
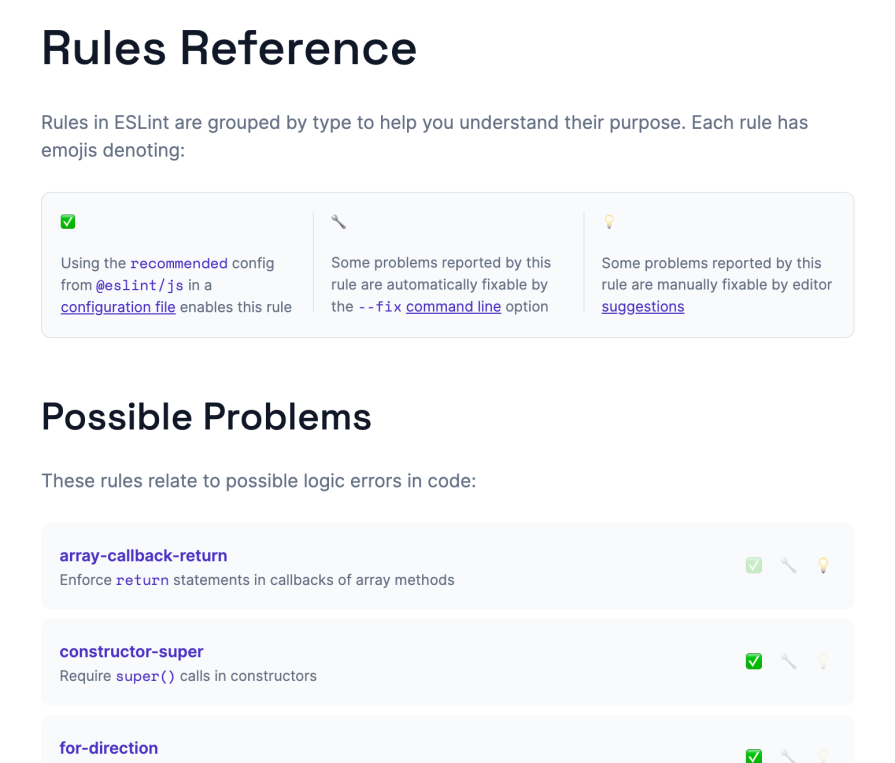
Every rule has an easy-to-read documentation page following the same structure, including a helpful TOC on the right:
👁 Eslint Rule Documentation Structure
The rule details are handy for multiple reasons:
The latter is relevant to finding out how to tweak the rule inside of eslint.config.
There’s an important concept called violation severities. Every rule has a default severity level. You can change the severity level for every rule in eslint.config. There are three levels of severity:
off or 0 — Turn a rule off; i.e., ESLint will not check for this particular rulewarn or 1 — A warning indicates a potential issue that, while not necessarily violating best practices or causing errors, might lead to confusion or less readable code. Warnings are meant to draw attention to something that might need review but most likely don’t break anything. Warnings don’t affect exit codes, meaning your CLI command will not be cancelederror or 2 — An error indicates a significant issue that likely violates best practices or could lead to bugs. Errors are considered serious and should be addressed promptly. The CLI process does not terminate but exits with status code 1To change a rule’s severity, set the rule ID equal to one of these values. The following example config demonstrates how to tweak different rules:
// eslint.config.js
import pluginJs from "@eslint/js";
// override default values
const modifiedRules = {
 // create a copy of the recommended rules to modify
 ...pluginJs.configs.recommended.rules,
 // turn rule off
 'no-unused-vars': 0,
 // Require the use of === and !==
 // change default from error to warning
 'eqeqeq': 1,
 // Disallow the use of variables before they are defined.
 // Except for hoisted functions
 'no-use-before-define': ["error", { "functions": false }]
}
export default [
 {
 name: "ESLint recommended rules with modifications",
 rules: modifiedRules,
 },
];
The last example, no-use-before-define, demonstrates how to look up the options in the documentation and change them according to your preferences.
Most lint rules fall into one of two to three categories:
The use of stylistic rules falls into the scope of tools such as Prettier, which solely deal with code formatting. ESLint’s stylistic rules (e.g., indent) may conflict with such dedicated formatters.
In October 2023, the ESLint team decided to deprecate all formatting rules, mainly for maintainability and architectural reasons. They have reserved the right to remove it from v10 onwards. You still have different options for combining ESLint with code formatting, as I will explain in the next section.
Later, we’ll discuss several options to use ESLint for code formatting.
You’ve already seen one variant to configure rules inside of eslint.config. Alternatively, to configure rules inside of a file, you can leverage configuration comments:
/* eslint no-unused-vars: "off" */
let unusedVariable;
/* eslint eqeqeq: "warn" */
"hello world!" == "hello world"
/* eslint no-use-before-define: ["error", { "functions": false }] */
let x = usedBeforeDefined();
function usedBeforeDefined() {
 return true;
}
It’s also possible to turn off rules with inline comments. This should only be used temporarily during development. Further, you should only commit these comments to VCS in exceptional cases. You can disable a rule for the whole file or the next line:
// the following disables the rule for the whole file
/* eslint-disable eqeqeq */
var testVar = "This should be 'let' or 'const'";
// eslint-disable-next-line no-undef
undefinedFunctionCall();
"hello world!" == "hello world"
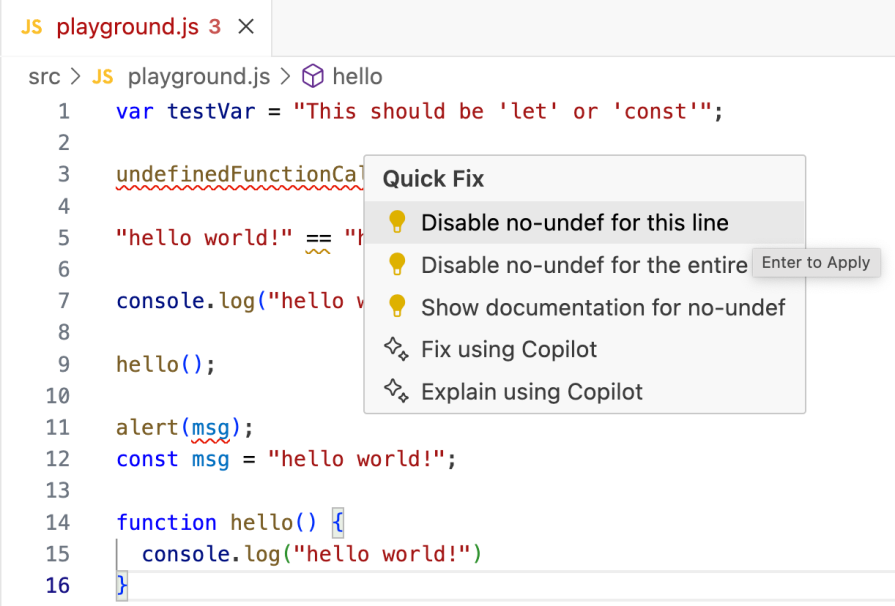
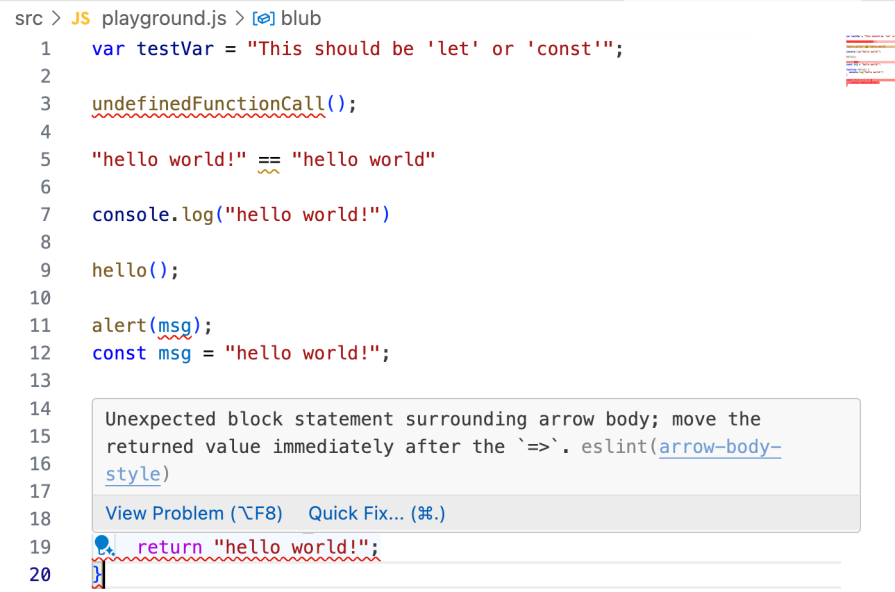
You can also utilize the code editor integration to add these comments. With VS Code, you can right-click on ESLint errors or warnings and use the Quick Fix feature:
👁 Demo Showing How Easy It Is To Add Disable Comments With Quick Fix
For a rule violation, your code editor may show a rule suggestion when you inspect the violation. In such a case, some problems reported by this rule are manually fixable by the code editor.
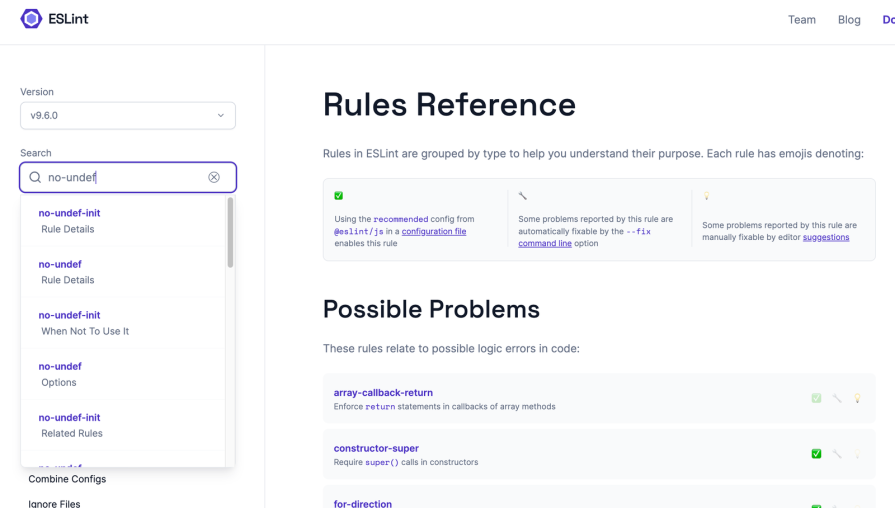
With the VS Code ESLint extension, you can do this from a context menu. When you browse through ESLint’s Rules Reference, you can easily identify rules with suggestions by a bulb 💡 icon:
👁 Eslint Rules Reference Example
Besides rule suggestions that require manual intervention of the developer to fix a violation, rule fixes safely correct violations automatically since they don’t alter application logic. Every auto-fixable rule is marked with a wrench 🔧 icon.
This feature is particularly useful for addressing common coding mistakes, formatting inconsistencies, and stylistic issues that adhere to predefined coding standards. To apply these automatic fixes, you can utilize the --fix option from the CLI:
$ npx eslint --fix
Later, we’ll see how to establish a productive development workflow in your code editor to perform auto-fix on saving source files.
ESLint has a large community offering many publicly available configurations you can integrate via npm. These shared npm packages can contain one or more of the following concepts: configuration, rules, plugins, processors, and parsers. Here’s how these concepts correlate:
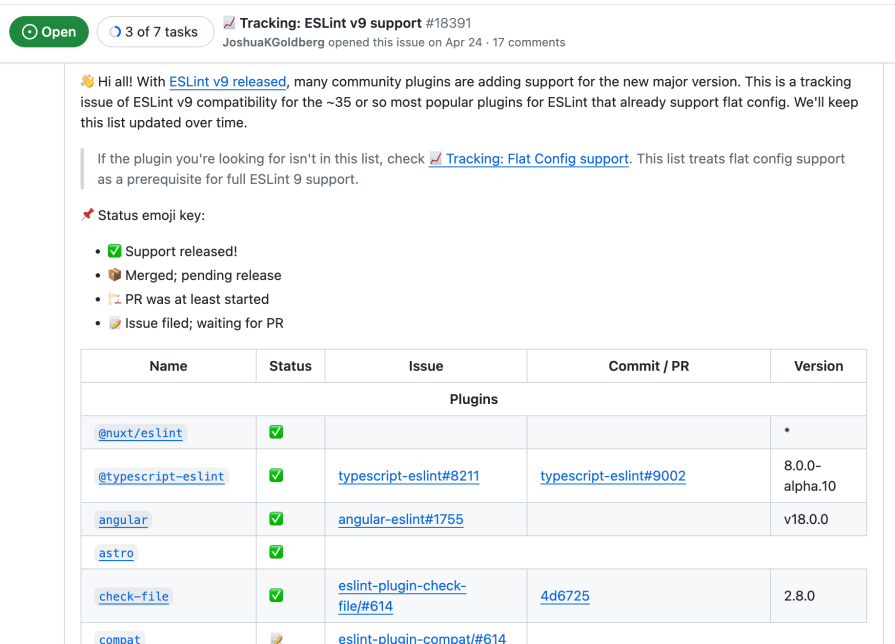
eslint.config file represents an ESLint configurationscript tag in .vue files)Espree) to support more JS language extensions (e.g., @typescript-eslint/parser to let ESLint understand TypeScript code)vue-eslint-parser to process .vue filesOver the years, many popular and widespread shared configurations have been developed. However, with every breaking change in ESLint, the community projects need to migrate. Therefore, it’s important to check the compatibility with ESLint v9 support and flat config support in particular before using a third-party npm package:
👁 Tracking Eslint Version 9 Support
To use a shared ruleset, you can also leverage the CLI option --config. The following installs a third-party configuration, eslint-config-canonical:
$ npm init @eslint/config@latest -- --config eslint-config-canonical
Let’s look at an example to install a shared plugin. To add Vue support, we have to install eslint-plugin-vue:
$ npm i -D eslint-plugin-vue
The following eslint.config integrates the recommended ESLint rules in addition to the recommended configuration of eslint-plugin-vue. Further, it overrides one of the available Vue rules:
// eslint.config.js
import pluginJs from "@eslint/js";
import pluginVue from "eslint-plugin-vue";
export default [
 { rules: pluginJs.configs.recommended.rules },
 ...pluginVue.configs["flat/recommended"],
 {
 // override default rule settings
 rules: {
 // change severity to warning
 "vue/no-reserved-props": "warn"
 },
 },
];
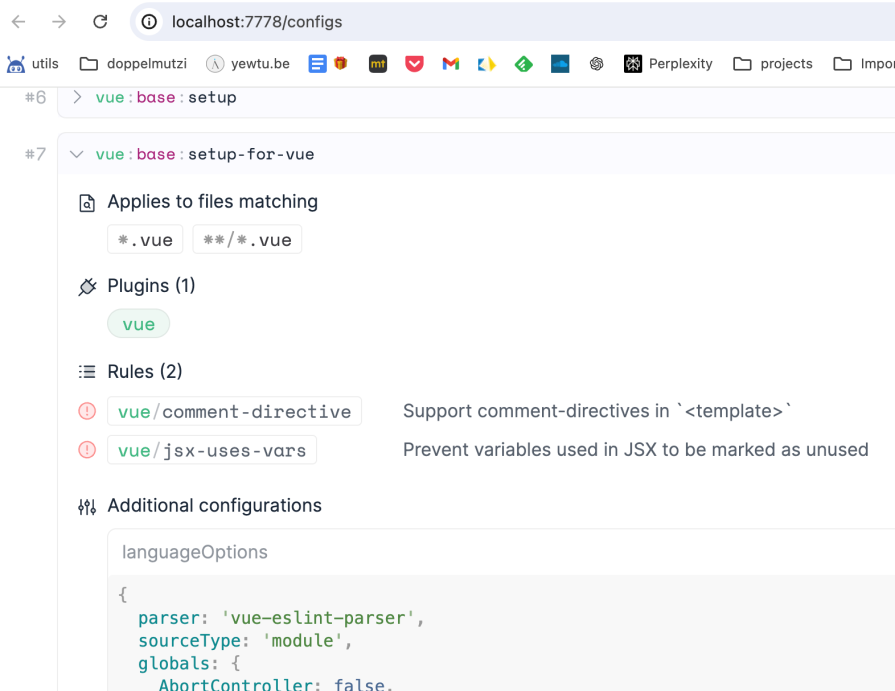
If you inspect pluginVue.configs["flat/recommended"], you find out that internally the plugin uses a dedicated processor and parser:
//...
module.exports = [
 // ...
 {
 name: 'vue:base:setup-for-vue',
 files: ['*.vue', '**/*.vue'],
 plugins: {
 // ...
 },
 languageOptions: {
 parser: require('vue-eslint-parser'),
 sourceType: 'module',
 globals: globals.browser
 },
 rules: {
 'vue/comment-directive': 'error',
 'vue/jsx-uses-vars': 'error'
 },
 processor: 'vue/vue'
 }
]
The ESLint config inspect also shows this fact for the entry vue:base:setup-for-vue:
👁 Integrating A Vue Specific Parser Using Vue Base Setup
This section explains a couple of use cases of using ESLint in projects.
Besides using the CLI option --fix, you can execute auto-fix from your code editor when you save a file. Then, all fixable rule violations in the file are automatically solved. This has multiple advantages:
This workflow is also very handy if you integrate ESLint with code formatting.
As already mentioned, the ESLint team has deprecated all formatting rules and recommends only using logical rules. You can still use these stylistic rules, although their usage is discouraged.
A better approach is to choose one of the two options to enable ESLint supporting code formatting.
The common approach is to integrate ESLint with dedicated code formatting tools, such as Prettier or dprint. For Prettier, the preferred way is to run Prettier as an ESLint rule with eslint-plugin-prettier.
The following steps are required to set this up. First, install all dependencies:
$ npm i -D eslint@latest @eslint/js globals eslint-plugin-prettier eslint-config-prettier prettier
Then, use the plugins in eslint.config.mjs:
import pluginJs from "@eslint/js";
import pluginPrettierRecommended from "eslint-plugin-prettier/recommended";
export default [
 {
 name: "ESLint recommended config",
 ...pluginJs.configs.recommended,
 },
 {
 name: "ESLint plugin for Prettier formatting",
 ...pluginPrettierRecommended,
 },
];
Next, the IDE integration is required. For VS Code, make sure to install the extensions for ESLint and Prettier.
Lastly, we need to configure the format on save for VS Code in .vscode/settings.json:
{
 "editor.formatOnSave": true,
 "editor.codeActionsOnSave": {
 "source.fixAll.eslint": "explicit"
 }
}
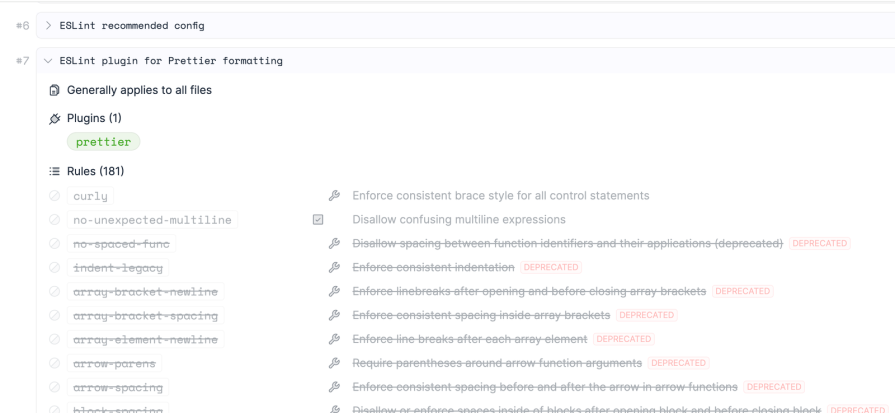
The npm package eslint-config-prettier eventually disables any ESLint rules dealing with code formatting to avoid conflicts with Prettier. You can see this with the handy ESLint Config Inspector:
The second option is to use ESLint Stylistic. The primary focus of this project is on all stylistic rules including code formatting. This project was initiated as ESLint and typescript-eslint teams decided to deprecate formatting/stylistic-related rules.
The following steps are required to use ESLint Stylistic:
$ npm i -D @stylistic/eslint-plugin-js
Then you need to include the plugin into your eslint.config:
import pluginJs from "@eslint/js";
import stylisticJs from "@stylistic/eslint-plugin-js";
export default [
 {
 name: "logical rules only",
 ...pluginJs.configs.recommended,
 },
 {
 plugins: {
 "@stylistic/js": stylisticJs,
 }
 }
];
Finally, you need the same .vscode/settings.json as explained above if you want to use the plugin with auto-fixing stylistic issues on save:
👁 Demo Eslint Stylistic Auto Fixing Stylistic Issues On Save
Using ESLint with Git commit hooks (with the help of tools like Husky and lint-staged) and within CI/CD pipelines serves complementary purposes to ensure code quality and consistency throughout the development lifecycle.
Integrating ESLint with Git commit hooks ensures that code is automatically linted before it is committed. This helps with catching and fixing linting errors early in the development process, preventing problematic code from entering the codebase. Tools like lint-staged help you to run ESLint only on changed files to improve DX.
As another safety net, you should also integrate ESLint into your CI/CD pipeline. In this section, we discussed how to integrate ESLint into your IDE, which means that ESLint runs on the current file you’re working on. In your CI/CD environment, you should lint all your files for every pipeline run.
ESLint has been around for over 10 years. Over the years, there have been many competitors who have gradually lost favor with users. This section provides an overview of the field and how ESLint compares to its competitors.
Launched as one of the first linting tools for JavaScript, JSLint is known for being the forefather of JavaScript linters. It is highly opinionated and does not support custom rule configuration, setting a strict coding standard without room for deviation.
Emerging as a fork of JSLint, JSHint was introduced to offer developers more configuration options. Despite this, it remains less flexible than ESLint, particularly in terms of rule customization and plugin support, limiting its adaptability to diverse project needs. The last release dates back to 2022.
Initially the go-to linting tool for TypeScript, TSLint has been deprecated as of 2019 in favor of ESLint, which expanded its capabilities to include TypeScript through plugins. TSLint’s deprecation marked a significant shift in the TypeScript community towards a more unified linting solution.
Standing out among its first-generation peers, ESLint has become the dominant tool in the JavaScript ecosystem since 2013. Its success is attributed to its extensive configurability, plugin ecosystem, and support for custom rules, making it adaptable to a wide range of coding styles and project requirements.
The landscape of JavaScript linting tools has evolved significantly from the first generation’s more opinionated and rigid tools to the second generation’s performance-focused and more accessible tools.
As part of these new linters, Biome emerged in the wake of the pandemic in 2020, but under the name Rome. Biome was created in mid-2023 as a fork of Rome, which is an active project supported by a growing community. Biome focuses on a broader scope, including code formatting in addition to linting. Concerning linting, language support is not yet on par with ESLint.
Launched in 2021 with the promise of enhancing the developer workflow, quick-lint-js positions itself as a complementary tool to ESLint. It is designed for “real-time speed”, offering rapid feedback within your code editor without latency. Another goal of the tool is zero-config, so it’s opinionated. The tool is aimed at a particular target group.
A relatively new entrant, RSLint focuses on providing a zero-config linting tool. It is in early development and not ready for production. The last release is from 2022, so it’s unclear if development is still active.
Starting in February 2023, oxlint is not intended to replace ESLint but to complement it, especially in scenarios where ESLint’s performance might be a bottleneck. It supports JavaScript, TypeScript and some frameworks; e.g., Vue.js.
As a linter for the Deno runtime, deno lint supports JavaScript and TypeScript natively. Its integration with Deno sets it apart from the rest of the pack, catering specifically to projects utilizing this runtime.
While ESLint remains a cornerstone of JavaScript linting, the emergence of new tools reflects the community’s ongoing search for efficiency, performance, and adaptability to specific project needs. The outcome of this second generation’s impact is still unfolding, with many tools finding their niche or serving as valuable complements to ESLint’s comprehensive capabilities.
The following table compares ESLint with its current competitors:
| ESLint | JSHint | Biome | quick-lint-js | RSLint | oxlint | deno lint | |
|---|---|---|---|---|---|---|---|
| Available since | 2013 | 2010 | 2023 (Rome 2010) | 2020 | 2020 | 2022 | 2020 |
| Underlying technology | JS (rewrite w/ Rust announced) | JS | Rust (Rome: JS) | C++ | Rust | Rust | Rust / TS |
| License | MIT | MIT | MIT | free GPL v3 | MIT | MIT | MIT |
| Average releases per year | 30 | 5 | 60 | 20 | 2 | 45 (parent project oxc) |
20 |
| npm downloads per week | 38M | 565K | 531K | 650 | – | 63K | – |
| GitHub stars | 24.6K | 9K | 12.7K | 1.5K | 2.7K | 9.8K | 1.5K |
| Mentioned in any year of State of JS | ✅ | ❌ | ❌ | ❌ | ❌ | ❌ | ❌ |
| TS support | ✅ | ❌ | ✅ | ✅ | ✅ | ✅ | ✅ |
| JSX support | ✅ | ✅ (w/ JSXHint) | ✅ | ✅ | ❌ | ✅ | ❌ |
| Vue.js support | ✅ | ❌ | ❌ | ❌ | ❌ | ✅ | ❌ |
| CSS support | ✅ | ❌ | ✅ | ❌ | ❌ | ❌ | ❌ |
| Supports code formatting | ✅ | ❌ | ✅ | ❌ | ❌ | ❌ | ❌ |
| VS Code integration | ✅ | ✅ | ✅ | ✅ | ❌ | ✅ | ✅ |
| IntelliJ integration | ✅ | ✅ | ✅ | ❌ | ❌ | ❌ | ✅ |
| Latest version | 9.7.0 | 2.13.6 | 1.8.3 | 3.2.0 | 0.3.2 | 0.6.0 | 0.60.1 |
| Configurability | extensive | minimal | advanced | zero | zero | advanced (ESLint v8 config scheme) | minimal |
| Third-party plugin support | ✅ | ❌ | ❌ | ❌ | ❌ | ❌ | ❌ |
| Third-party rules | ✅ | ❌ | ❌ | ❌ | ❌ | ❌ | ❌ |
I got the impression that the ESLint team took some of the criticisms seriously and resolved them with version 9 — e.g., more sensible default options to counteract the need for configuration. The recently published blog post confirms my point of view, as there are still major architectural changes to be made to ESLint’s core, which will presumably further improve performance.
Projects like Biome are certainly one reason why the ESLint team decided to make these complex adaptations. Some of the reasons given by competitors as to why their own solution is better than ESLint are already outdated.
Should you stick to ESLint as the linting tool of your choice? I recommend using ESLint in most use cases, especially in a commercial environment. ESLint is well adopted and developers most likely know how to use it due to the wide distribution.
Even the ambitious competitor projects cannot yet cover all the use cases that developers need. For example, Biome does not support completely CSS or Vue.js as of July 2024. There are also other voices from the community who advocate for the use of ESLint with Prettier as the best combination for linting and formatting.
There has always been criticism regarding ESLint’s complexity and performance. However, concrete project experience in development teams, its very good documentation, and tooling are very good arguments in favor of ESLint.
Unless you want to cover a very specific use case, such as real-time feedback in the IDE (which is possible with quick-lint-js), ESLint covers virtually all relevant development use cases with its rich feature set.
TSRX adds first-class control flow, conditional hooks, and scoped styles to React via a TypeScript compiler extension — no new framework required.
Learn how to build a full React Native auth system using Better Auth and Expo — with email/password login, Google OAuth, session persistence, and protected routes.
Compare the top AI development tools and models of June 2026. View updated rankings, feature breakdowns, and find the best fit for you.
Learn how Bloom filters reduce database lookups for username availability checks while preserving correctness at scale.
Hey there, want to help make our blog better?
Join LogRocket’s Content Advisory Board. You’ll help inform the type of content we create and get access to exclusive meetups, social accreditation, and swag.
Sign up now