 |
VOOZH | about |
|
VOOZH | about |
Apps often have different categories of content or features available to users. Naturally, you want your users to be able to quickly glance at each option and move between categories with a simple swipe. That’s where the Flutter TabBar class comes in.
👁 Flutter TabBar Tutorial With ExamplesIn this tutorial, we’ll tell you everything you need to know about TabBar in Flutter, show you how to implement tabs in your Flutter app, and walk through some TabBar examples.
We’ll cover the following in detail:
If you’re a visual learner, check out this quick video tutorial:
DefaultTabController & TabBar (Flutter Widget of the Week)
Do you need to organize your widgets into tabs? The DefaultTabController, TabBar, and TabBarView widgets are for you. Learn more about DefaultTabController → https://goo.gle/36yqbVu Learn more about TabBar → https://goo.gle/35vZHmc This video is also subtitled in Chinese, Indonesian, Italian, Japanese, Korean, Portuguese, and Spanish. Learn everything about Flutter at → https://goo.gle/2WAhEN1 Get more tips!
The Replay is a weekly newsletter for dev and engineering leaders.
Delivered once a week, it's your curated guide to the most important conversations around frontend dev, emerging AI tools, and the state of modern software.
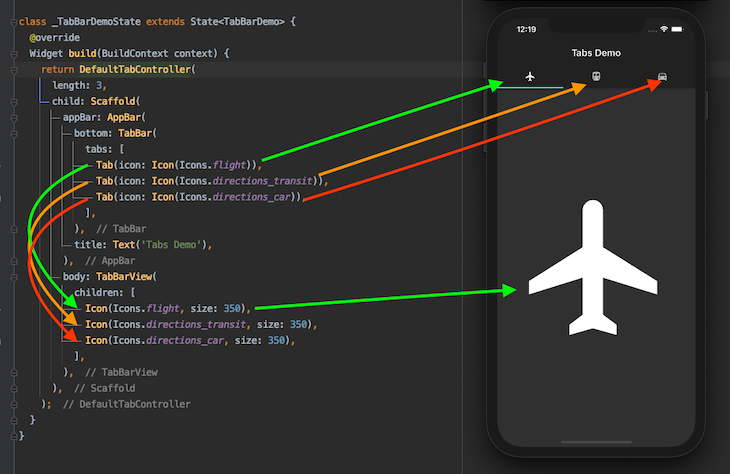
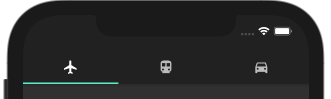
Here’s the minimal code to get TabBar up and running:
DefaultTabController(
 length: 3,
 child: Scaffold(
 appBar: AppBar(
 bottom: TabBar(
 tabs: [
 Tab(icon: Icon(Icons.flight)),
 Tab(icon: Icon(Icons.directions_transit)),
 Tab(icon: Icon(Icons.directions_car)),
 ],
 ),
 title: Text('Tabs Demo'),
 ),
 body: TabBarView(
 children: [
 Icon(Icons.flight, size: 350),
 Icon(Icons.directions_transit, size: 350),
 Icon(Icons.directions_car, size: 350),
 ],
 ),
 ),
);
To implement TabBar in your Flutter app, complete the following steps:
Scaffold widget inside the DefaultTabController. This should be used for most simple use cases. If you want to control the tabs programmatically, you should use TabController and avoid this stepTabBar widget as the bottom property of AppBarTabBarView in the body of the AppBar. TabBarView is like PageView, which is used mostly with TabBar because it shows the widget based on the currently selected tabYou can modify the tab indicator in TabBar to customize the look and feel of your Flutter app.
Below are some examples of ways you can modify the indicator to improve the user experience and overall appearance of your app.
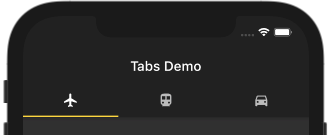
To alter the color of a tab:
TabBar(
 indicatorColor: Colors.amberAccent,
 tabs: [],
)
👁 Flutter TabBar: Change Color
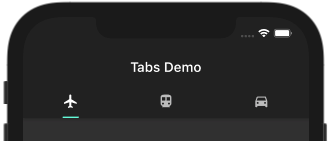
Here’s how to change the size of a tab:
TabBar(
 indicatorSize: TabBarIndicatorSize.label,
 tabs: [],
)
This makes the indicator size equal to the width of the label. The default value is TabBarIndicatorSize.tab.
To change the height of a tab:
TabBar(
 indicatorWeight: 10,
 tabs: [],
)
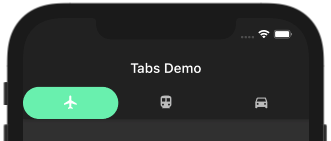
You can change the indicator itself, as shown below:
TabBar(
 indicator: BoxDecoration(
 borderRadius: BorderRadius.circular(50), // Creates border
 color: Colors.greenAccent), //Change background color from here
 tabs: [],
)
Changing the background color of tab is as easy as changing the color: Colors.greenAccent.
👁 Flutter TabBar: Background Color
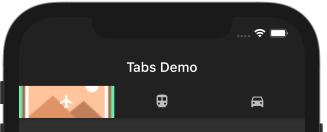
To set a background image with TabBar:
indicator: BoxDecoration(
 color: Colors.greenAccent,
 image: DecorationImage(
 image: AssetImage('assets/images/placeholder.png'),
 fit: BoxFit.fitWidth)),
👁 Flutter TabBar: Background Image
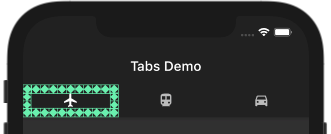
If you want to create a custom indicator with TabBar, enter the following:
indicator: CustomDecoration(12.0),
👁 Flutter TabBar: Custom Indicator
Since the indicator property accepts Decoration, your imagination is the only limitation. You can create anything at the place of the indicator.
Let’s say you’re working on an app that has a lot of categories, similar to Google Play:
👁 Flutter TabBar: Scrollable Tabs Example (Google Play)
Let’s explore some ways to include all your tabs and make it scrollable, both horizontally and vertically.
The TabBar widget has a property dedicated to configuring horizontally scrollable tabs. Set the isScrollable to True, and the job is done. You’ll have to set it explicitly because it defaults to False.
👁 Flutter TabBar: Horizontally Scrollable Tabs
TabBar(
 isScrollable: true,
 tabs: [
 ...
 ],
)
You should always strive to improve the user experience of your app. Most users appreciate it if you make the TabBar go away and hide the AppBar when it’s not needed. When a user wants to see more content in a specific category by scrolling up, the AppBar is hidden, creating more space to lay out the content:
👁 Flutter AppBar: Vertically Scrollable Tabs
DefaultTabController(
 length: 5,
 child: Scaffold(
 body: NestedScrollView(
 headerSliverBuilder: (BuildContext context, bool innerBoxIsScrolled) {
 return <Widget>[
 new SliverAppBar(
 title: Text('Tabs Demo'),
 pinned: true,
 floating: true,
 bottom: TabBar(
 isScrollable: true,
 tabs: [
 Tab(child: Text('Flight')),
 Tab(child: Text('Train')),
 Tab(child: Text('Car')),
 Tab(child: Text('Cycle')),
 Tab(child: Text('Boat')),
 ],
 ),
 ),
 ];
 },
 body: TabBarView(
 children: <Widget>[
 Icon(Icons.flight, size: 350),
 Icon(Icons.directions_transit, size: 350),
 Icon(Icons.directions_car, size: 350),
 Icon(Icons.directions_bike, size: 350),
 Icon(Icons.directions_boat, size: 350),
 ],
 ),
 )),
);
All you need to do is replace the AppBar with [SliverAppBar](https://api.flutter.dev/flutter/material/SliverAppBar-class.html) and wrap it inside the NestedScrollView. But to prevent TabBar from going off the screen, set the pinned and floating flags to true.
Most of the time, we need more than just a basic TabBar. Let’s see some practical examples where changing the tab programmatically and being able to listen to the Tab change event is crucial for the app.
Sometimes you may need to move to the next tab with the click of a button. Here’s how you do that.
👁 Flutter TabBar: Change Tabs Programmatically
Create and assign TabController:
TabController _controller;
int _selectedIndex = 0;
@override
void initState() {
 super.initState();
 _controller = TabController(length: 5, vsync: this);
}
@override
void dispose() {
 _controller.dispose();
 super.dispose();
}
//Assign here
bottom: TabBar(
 controller: _controller,
 isScrollable: true,
 tabs: [... ],
),
// And here
body: TabBarView(
 controller: _controller,
 children: <Widget>[... ],
 //controller: _tabController,
),
Use the TabController to move to the next page with the click of a button:
onPressed: () {
 _controller.animateTo(_selectedIndex += 1);
},
You may want to perform some operations when a specific tab is open. This callback comes in handy when you want to perform initialize something again when a particular tab is open or destroy something when tab is not open.
@override
void initState() {
 // TODO: implement initState
 super.initState();
 _controller = TabController(length: 5, vsync: this);

 _controller.addListener(() {
 setState(() {
 _selectedIndex = _controller.index;
 });
 print("Selected Index: " + _controller.index.toString());
 });
}
Tip: If you implement onTap of TabBar for the tab change event, like this:
bottom: TabBar(onTap: (){

},
…you won’t get a callback when you swipe the tab bar with your finger. That’s why it’s always better to add a listener to get notified.
So far, we’ve seen AppBar with TabBar, but let’s say you want to completely get rid of AppBar. Here’s how to do that.
👁 Flutter TabBar Without AppBar
DefaultTabController(
 length: 3,
 child: Scaffold(
 appBar: AppBar(
 flexibleSpace: Column(
 mainAxisAlignment: MainAxisAlignment.end,
 children: [
 TabBar(
 tabs: [...],
 )
 ],
 ),
 ),
 body: TabBarView(
 children: [...],
 ),
 ),
);
All you need to do is replace the title and bottom properties of AppBar with flexibleSpace and create a column inside it containing the actual TabBar.
By default, tabs do not preserve the state. For example, when you scroll and move to the next tab and then return, the previous tab will not show the content you left while scrolling; it will start from the first. This makes for a poor user experience.
Let’s explore how to resolve this issue (watch the counts carefully in this example):
👁 Flutter TabBar: Preserving State
Provide the mixin to the class:
class _FlightPageState extends State<FlightPage>
 with AutomaticKeepAliveClientMixin<FlightPage> {
Override the getter:
@override
bool get wantKeepAlive => true;
That’s it!
In this tutorial, we reviewed all the basics of the TabBar class in Flutter. We learned what TabBar is, how it works, and how to solve common issues you might encounter along your Flutter journey. I hope the practical examples we examined in this article helped you learn these important concepts.
Install LogRocket via npm or script tag. LogRocket.init() must be called client-side, not
server-side
$ npm i --save logrocket

// Code:

import LogRocket from 'logrocket';
LogRocket.init('app/id');
// Add to your HTML:

<script src="https://cdn.lr-ingest.com/LogRocket.min.js"></script>
<script>window.LogRocket && window.LogRocket.init('app/id');</script>
Learn how to build a full React Native auth system using Better Auth and Expo — with email/password login, Google OAuth, session persistence, and protected routes.
Compare the top AI development tools and models of June 2026. View updated rankings, feature breakdowns, and find the best fit for you.
Learn how Bloom filters reduce database lookups for username availability checks while preserving correctness at scale.
Learn how to test Nuxt apps with Vitest, @nuxt/test-utils, runtime mocks, server route mocks, and Playwright e2e tests.
Hey there, want to help make our blog better?
Join LogRocket’s Content Advisory Board. You’ll help inform the type of content we create and get access to exclusive meetups, social accreditation, and swag.
Sign up now