 |
VOOZH | about |
|
VOOZH | about |
Editor’s note: This article was updated 2 September 2022 to include information about the benefits of BootstrapVue, the differences between BootstrapVue and Bootstrap, and to make general updates to the code.
👁 Getting Started BootstrapvueVue.js is a popular JavaScript library used for developing prototypes in a short time. This includes user interfaces, frontend applications, static webpages, and native mobile apps. It is known for its easy to use syntax and simple data binding features.
Recently, a new package was released in the Vue.js ecosystem. It is an integration of the popular Bootstrap framework and Vue.js. This package is known as BootstrapVue. It allows us to use custom components that integrate with Bootstrap (v4) on the fly.
What’s more? It supports the custom Bootstrap components, the grid system, and also supports Vue.js directives.
In this post, we’ll walk through the basics of BootstrapVue, explain the general concepts, demonstrate the setup process, and build out a mini Vue.js project in the process to give you more practical experience.
The Replay is a weekly newsletter for dev and engineering leaders.
Delivered once a week, it's your curated guide to the most important conversations around frontend dev, emerging AI tools, and the state of modern software.
Given that Bootstrap is the most popular CSS framework available (in my opinion), most developers who have moved or who are intending to move from frameworks like Vanilla JavaScript to Vue.js always find the migration a bit difficult because of Bootstrap’s heavy dependency on jQuery.
With BootstrapVue, any developer can make that switch from Vanilla.js or jQuery to Vue.js without bothering about Bootstrap’s heavy dependency on jQuery or even finding a way around it. That’s how BootstrapVue comes to the rescue. It helps to bridge that gap and allows incoming Vue developers to use Bootstrap in their projects with ease.
Bootstrap and BootstrapVue are both open source tools used to compose the frontend of websites. While they sound similar, they are not the same thing.
Firstly, BootstrapVue is a wrapper library built around Vue.js, so developers can easily integrate BootstrapVue into their applications.
Second, BootstrapVue is a component library and Bootstrap is a CSS framework. This means that BootstrapVue comes with UI components like b-alert and b-button, while BootStrap comes with utility classes like alert and btn.
BootstrapVue has a lot of benefits, including:
When using module bundlers like webpack, babel, etc., it is preferable to include the package into your project directly. For demonstration purposes and to give you a hands-on approach to understanding and using BootstrapVue, we’ll set up a Vue.js project with BootstrapVue and build it up to a functional Vue.js application that fetches meals from an external API.
First, we have to create a Vue.js project that we can use to demonstrate the implementation of the BootstrapVue component. First, open a terminal window and run the command below:
npm init vue@latest
The above command will throw a preset selection dialogue like this:
👁 Npm Init Vue Latest Selection Dialogue
Next, navigate into the vue-project directory and start the development server with the commands below:
cd vue-project
npm install
npm run dev
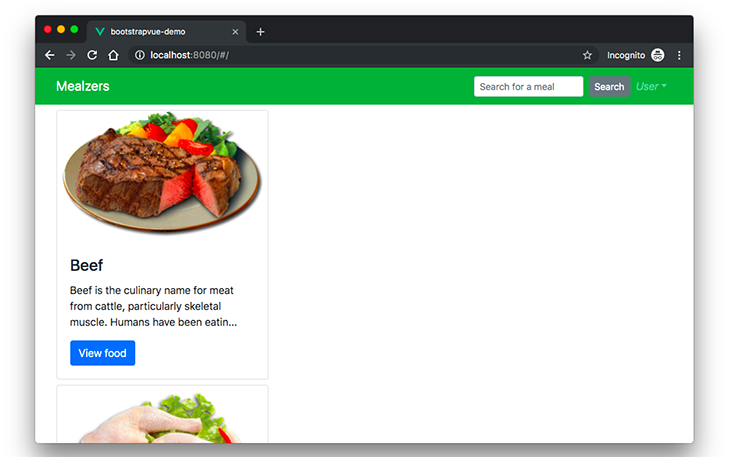
This will serve the application on localhost:8080. Upon navigating to that URL, we see the live application:
There are two major ways to do this, using package managers like npm and yarn, or using the CDN links.
We’ll install all the necessary packages we mentioned earlier for the project using npm or yarn. To do that, navigate to the project’s root directory and run either of the commands below, depending on your preferred package manager:
# With npm
npm install bootstrap-vue bootstrap axios
OR
# With yarn
yarn add bootstrap-vue bootstrap axios
The above command will install the BootstrapVue and Bootstrap packages. The BoostrapVue package contains all of the BootstrapVue components and the regular Bootstrap contains the CSS file. We’ve also installed Axios to help with fetching meals for our app from themealdb API.
We’ve seen the package manager way of installing BootstrapVue into our Vue project, now let’s take a look at a different approach that may require less effort. To add Bootstrap and BootstrapVue to your Vue project via CDN, open the index.html file in the projects public folder and add this code in the appropriate places:
<!-- Add Bootstrap and Bootstrap-Vue CSS to the <head> section -->
<link type="text/css" rel="stylesheet" href="https://unpkg.com/bootstrap/dist/css/bootstrap.min.css"/>
<link type="text/css" rel="stylesheet" href="https://unpkg.com/bootstrap-vue@latest/dist/bootstrap-vue.min.css"/>

<!-- Add Vue and BootstrapVue scripts just before the closing </body> tag -->
<script src="https://unpkg.com/vue/dist/vue.min.js"></script>
<script src="https://unpkg.com/bootstrap-vue@latest/dist/bootstrap-vue.min.js"></script>
This will pull in the minified, and the latest version of each library into our project, nice and easy! However, for the purpose of this project, we’ll stick to the first option of using the package manager. So, let’s proceed with setting up the BootstrapVue package.
Next, let’s set up the BootstrapVue package we just installed. Head on over to your main.js file and add this line of code to the top:
//src/main.js
import Vue, { createApp } from "vue";
import App from "./App.vue";
import { BootstrapVue, IconsPlugin } from "bootstrap-vue";
import "./assets/main.css";

// Import Bootstrap and BootstrapVue CSS files (order is important)
import "bootstrap/dist/css/bootstrap.css";
import "bootstrap-vue/dist/bootstrap-vue.css";

// Make BootstrapVue available throughout your project
Vue.use(BootstrapVue);

// Optionally install the BootstrapVue icon components plugin
Vue.use(IconsPlugin);
createApp(App).mount("#app");
Here, we imported the BoostrapVue and IconsPlugin package and then registered them in the application using the Vue.use() function so that our Vue application can recognize it. We also imported the Bootstrap and BootstrapVue CSS file into the project.
We are now at the stage where we can start exploring the BoostrapVue component. Let’s get started by creating our first component. The first component we’ll create will be the navbar component. Go to your components directory, create a file with the name Navbar.vue and update it with the code below:
//src/components/Navbar.vue
<template>
 <div>
 <b-navbar toggleable="lg" type="dark" variant="success">
 <b-container>
 <b-navbar-brand href="#">Mealzers</b-navbar-brand>
 <b-navbar-toggle target="nav-collapse"></b-navbar-toggle>
 <b-collapse id="nav-collapse" is-nav>
 <!-- Right aligned nav items -->
 <b-navbar-nav class="ml-auto">
 <b-nav-form>
 <b-form-input
 size="sm"
 class="mr-sm-2"
 placeholder="Search for a meal"
 v-model="meal"
 ></b-form-input>
 <b-button
 size="sm"
 class="my-2 my-sm-0"
 type="submit"
 @click.prevent="getMeal"
 >Search</b-button>
 </b-nav-form>
 <b-nav-item-dropdown right>
 <!-- Using 'button-content' slot -->
 <template slot="button-content"><em>User</em></template>
 <b-dropdown-item href="#">Profile</b-dropdown-item>
 <b-dropdown-item href="#">Sign Out</b-dropdown-item>
 </b-nav-item-dropdown>
 </b-navbar-nav>
 </b-collapse>
 </b-container>
 </b-navbar>
 </div>
</template>

<script>
 export default {
 data() {
 return {
 meal: ''
 }
 },
 methods: {
 getMeal() {
 ...
 }
 }
 }
</script>
The navbar components contain several BootstrapVue components, one of which is b-navbar. This component is the mother component of every other component in the navbar. Without this component, all other components in the navbar won’t render properly.
The text color on the navbar can be changed with the type props. The background-color of the navbar can also be changed with the variant props. These colors could be any of the normal Bootstrap default colors — info, primary, success, etc.
Another component is b-navbar-brand. This is where the logo of the website can be rendered. It also takes in the variant and type props which can be used to change the background-color and text-color respectively. Other BootstrapVue components are:
b-nav-formb-nav-item-dropdownb-dropdown-itemb-navbar-toggleb-collapseb-nav-item (which could be disabled with the “disabled” attribute)b-navbar-navb-nav-itemA great thing about BootstrapVue components is that they are responsive by default. As a result, we don’t need to write any additional code or use external libraries to make them responsive.
Another component I’d like us to look at is the Card component. The Card component allows us to display images, text, and so on in a card. It is written as b-card. To demonstrate it, let’s create a Cards.vue file in our components directory. Then update it with the code below:
//src/components/Cards.vue
<template>
 <b-container>
 <div v-if="meals.length">
 <b-row>
 <div v-bind:key="data.index" v-for="data in meals">
 <b-card
 v-bind:title="data.strCategory"
 v-bind:img-src="data.strCategoryThumb"
 img-alt="Image"
 img-top
 tag="article"
 style="max-width: 20rem;"
 class="mb-2">
 <b-card-text>{{ `${data.strCategoryDescription.slice(0,100)}...` }}</b-card-text>
 <b-button href="#" variant="primary">View food</b-button>
 </b-card>
 </div>
 </b-row>
 </div>
 <div v-else>
 <h5>No meals available yet</h5>
 </div>
 </b-container>
</template>

<script>
import axios from "axios";
export default {
 data() {
 return {
 meals: []
 };
 },
 mounted() {
 axios
 .get("https://www.themealdb.com/api/json/v1/1/categories.php")
 .then(response => {
 this.meals = response.data.categories;
 })
 .catch(err => {
 console.log(err);
 });
 }
};
</script>
To render the Cards component we just created, let’s modify the HelloWorld.vue file. Open it up and update it with the code below:
//src/components/HelloWorld.vue
<template>
 <div>
 <Cards />
 </div>
</template>

<script>
 import Cards from './Cards.vue'
</script>
What we’ve done here is create a Cards component and nest it into the HelloWorld.vue file. Notice that in the Cards component, we have a lifecycle hook that modifies our data. As a result, the data gets populated into the b-card component before being rendered to the browser.
Next, let’s update our App.vue file to capture our recent changes and render the right component to the browser. Open it up and update it with the snippet below:
//App.vue
<template>
 <div id="app">
 <Navbar />
 <HelloWorld/>
 </div>
</template>
<script>
 import HelloWorld from './components/HelloWorld.vue';
 import Navbar from './components/Navbar.vue';
</script>
At this point, if we go back to the browser, we will see our meal store app running like this:
The card isn’t properly laid out and we have to correct that. Luckily, BootstrapVue has some in-built components we can use to put our cards in a grid. They are:
b-rowb-colLet’s modify the code in our Cards.vue file to render the content in a grid with the BootstrapVue components we mentioned above. Open up the Cards.vue file and update the HTML markup with the snippet below:
//src/components/Cards.vue
<template>
 <b-container>
 <div v-if="meals.length">
 <b-row>
 <div v-bind:key="data.index" v-for="data in meals">
 <b-row>
 <b-col l="4">
 <b-card
 v-bind:title="data.strCategory"
 v-bind:img-src="data.strCategoryThumb"
 img-alt="Image"
 img-top
 tag="article"
 style="max-width: 20rem;"
 class="mb-2">
 <b-card-text>{{ `${data.strCategoryDescription.slice(0,100)}...` }}</b-card-text>
 <b-button href="#" variant="primary">View food</b-button>
 </b-card>
 </b-col>
 </b-row>
 </div>
 </b-row>
 </div>
 <div v-else>
 <h5>No meals available yet</h5>
 </div>
 </b-container>
</template>
Here, we wrapped the b-col component with b-row to create the grid layout.
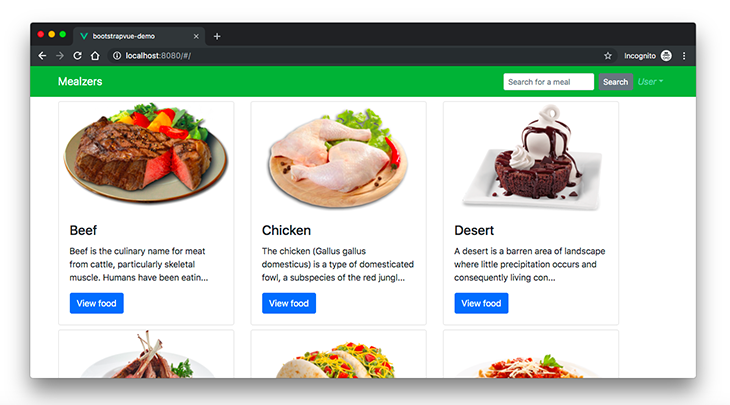
Now if we check back on the browser, we should see a properly laid out card with rendered contents in a grid.
👁 Meal Store App With Card Contents
We have a neatly rendered responsive meals application. We built all of this with just a handful of BootstrapVue’s components. To learn more about BootstrapVue and all of the things you can do with it, consider checking out the official documentation.
What if you would like to migrate an existing project from regular Bootstrap4 to BootstrapVue? How simple would it be? It’ll be a breeze. Here’s all you need to do:
bootstrap.js file from build scriptsjQuery from your application, BootstrapVue works independentlyAnd that’s it! In three clear steps, you can migrate your existing projects from regular jQuery dependent Bootstrap to the simpler independent BootstrapVue package without breaking any existing code.
In this post, we have demonstrated by way of examples how to get started with BootstrapVue. We went from the installation steps to setting it up in a Vue project, and finally using its custom components to build out parts of our Mealzers application. As we can see, the BootstrapVue module is simple and easy to use. If you have a working knowledge of the regular Bootstrap package, getting started with BootstrapVue will be a breeze.
Debugging Vue.js applications can be difficult, especially when users experience issues that are difficult to reproduce. If you’re interested in monitoring and tracking Vue mutations and actions for all of your users in production, try LogRocket.
👁 LogRocket Dashboard Free Trial BannerLogRocket lets you replay user sessions, eliminating guesswork by showing exactly what users experienced. It captures console logs, errors, network requests, and pixel-perfect DOM recordings — compatible with all frameworks.
With Galileo AI, you can instantly identify and explain user struggles with automated monitoring of your entire product experience.
Modernize how you debug your Vue apps — start monitoring for free.
Build dynamic LLM routing in Next.js with OpenRouter, TanStack AI, task classification, model fallbacks, and cost-aware routing.
TSRX adds first-class control flow, conditional hooks, and scoped styles to React via a TypeScript compiler extension — no new framework required.
Learn how to build a full React Native auth system using Better Auth and Expo — with email/password login, Google OAuth, session persistence, and protected routes.
Compare the top AI development tools and models of June 2026. View updated rankings, feature breakdowns, and find the best fit for you.
Would you be interested in joining LogRocket's developer community?
Join LogRocket’s Content Advisory Board. You’ll help inform the type of content we create and get access to exclusive meetups, social accreditation, and swag.
Sign up now