 |
VOOZH | about |
|
VOOZH | about |
Most websites still force AI agents to operate through guesswork. DOM scraping breaks when markup changes, and computer vision adds latency while still leaving the model to infer what each control actually does.
👁 How to make your website agent-ready with Google’s Web MCPGoogle’s Web Model Context Protocol, or WebMCP, points to a cleaner approach. It gives websites a way to expose structured, agent-friendly actions directly in the browser so an agent can interact with capabilities your application defines explicitly instead of reverse-engineering the UI. Chrome describes WebMCP as a proposed browser standard for making sites more reliable, precise, and performant for agent workflows.
That distinction matters because most web apps were designed for people, not agents. A button may look obvious to a human user, but from an LLM’s perspective, it is still just interface surface area that has to be interpreted. WebMCP narrows that gap by letting your application describe what an agent can do and how to do it.
In this tutorial, you’ll learn how WebMCP works, where it fits, and how to implement it using both declarative HTML patterns and imperative JavaScript or React APIs. By the end, you’ll have a clearer sense of when WebMCP is enough on its own and when you still need a separate MCP server on the backend.
The Replay is a weekly newsletter for dev and engineering leaders.
Delivered once a week, it's your curated guide to the most important conversations around frontend dev, emerging AI tools, and the state of modern software.
WebMCP is meant for live, in-browser interaction. Instead of asking an agent to infer actions from visible UI, you expose those actions as structured tools the browser agent can discover and call directly. Chrome positions it as a frontend complement to MCP, not a replacement for it. MCP is for backend systems, external tools, and persistent integrations; WebMCP is for helping browser agents understand and act on a website that is already open in a tab.
You can read more in Chrome’s WebMCP vs. MCP guidance.
That gives WebMCP a few practical advantages.
There is an important limitation, though: WebMCP tools are tab-bound. They exist only while the user is on the page. Once the tab closes or the user navigates away, those tools disappear. That makes WebMCP a strong fit for real-time site interaction, but not a replacement for persistent server-side integrations.
At the time of writing, WebMCP is available through Chrome’s early preview program rather than as a generally available browser feature. That means setup details may change quickly, including browser versions, flags, and debugging workflows. Chrome’s official guidance is to join the early preview program to access current documentation and prototyping support.
For this tutorial, you should have:
useEffect HookBecause this API is still evolving, it is better to link to the current Chrome documentation in the published piece than to hard-code a specific Chrome version unless you have verified that number immediately before publishing.
Chrome currently describes WebMCP as exposing two implementation styles: a declarative API for standard actions that can be described in HTML, and an imperative API for more dynamic interactions that need JavaScript execution.
The declarative API is the simpler of the two. It works well for flows that already map cleanly to forms, inputs, and submit actions. The imperative API is better when the tool needs access to application state, conditional registration, or richer side effects.
A useful rule of thumb is this: use declarative WebMCP when the agent is filling out a form you already have, and use imperative WebMCP when the agent needs to trigger real application behavior inside a live client-side UI.
The declarative API lets you turn a standard form into a tool an agent can call. Instead of forcing the agent to infer what a form does, you annotate the form and its parameters directly.
<form
 toolname="product_search"
 tooldescription="Searches for products in the catalog"
 action="/search"
>
 <label for="query">Search</label>
 <input
 type="text"
 name="query"
 toolparamtitle="Search Query"
 toolparamdescription="The product to search for"
 />

 <button type="submit">Submit</button>
</form>
Here, the form itself becomes the tool surface.
toolname gives the tool a stable name the agent can calltooldescription explains what the tool does and helps the agent choose when to use ittoolparamtitle and toolparamdescription describe the input in a machine-readable wayThis approach works well for simple, predictable interactions like search, newsletter signup, or support ticket submission. It keeps the implementation close to the markup and avoids adding JavaScript just to make an existing form agent-friendly.
Its limitation is that it only goes so far. Once the tool depends on client state, conditional availability, or multi-step business logic, you will usually want the imperative API instead.
To show where imperative WebMCP becomes useful, let’s add agent support to a React ecommerce app. The goal is to expose two capabilities:
That second point matters. Good WebMCP integrations should reflect the state of the live page, not expose a permanent set of actions regardless of what the user can actually do.
Start by wrapping the browser’s modelContext API in a utility module:
const getModelContext = () => {
 if (
 typeof window !== "undefined" &&
 window.navigator &&
 window.navigator.modelContext
 ) {
 return window.navigator.modelContext;
 }

 return null;
};

export const registerAgentTool = (config) => {
 const modelContext = getModelContext();

 if (modelContext && modelContext.registerTool) {
 try {
 modelContext.registerTool(config);
 } catch (err) {
 console.error(`[WebMCP] Failed to register tool: ${config.name}`, err);
 }
 }
};

export const unregisterAgentTool = (name) => {
 const modelContext = getModelContext();

 if (modelContext && modelContext.unregisterTool) {
 try {
 modelContext.unregisterTool(name);
 } catch (err) {
 console.error(`[WebMCP] Failed to unregister tool: ${name}`, err);
 }
 }
};
This helper does two jobs.
First, it guards access to navigator.modelContext so your application does not fail in environments where WebMCP is unavailable. Second, it centralizes registration and cleanup so your components stay focused on application behavior instead of browser capability checks.
That cleanup step is especially important in React. Since WebMCP tools are tied to the current page state, unregistering them when a component unmounts helps keep the agent’s available actions aligned with what the user can actually do.
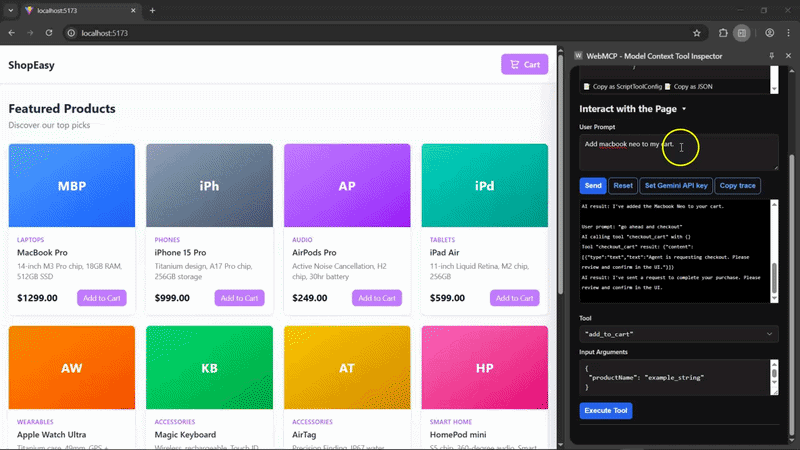
add_to_cart toolNow let’s expose a tool that adds a featured product to the cart by name:
useEffect(() => {
 registerAgentTool({
 name: "add_to_cart",
 description: "Adds a featured product to the shopping cart by its name",
 inputSchema: {
 type: "object",
 properties: {
 productName: {
 type: "string",
 description:
 "The name of the product (for example, 'MacBook Pro' or 'iPhone 15 Pro')",
 },
 },
 required: ["productName"],
 },
 execute: async ({ productName }) => {
 const product = products.find(
 (p) => p.name.toLowerCase() === productName.toLowerCase()
 );

 if (product) {
 addToCart(product);

 return {
 content: [
 {
 type: "text",
 text: `Added ${product.name} to cart.`,
 },
 ],
 };
 }

 return {
 content: [
 {
 type: "text",
 text: `Product "${productName}" not found.`,
 },
 ],
 };
 },
 });

 return () => unregisterAgentTool("add_to_cart");
}, []);
This example shows the main value of imperative WebMCP: the agent is not clicking an Add to cart button and hoping the UI behaves as expected. Instead, it calls a clearly defined capability with a validated input shape and receives a predictable result.
The inputSchema tells the agent exactly what argument it needs. The execute function bridges agent intent to your real application logic, and the returned text gives the agent a clean confirmation path it can surface back to the user.
That is a better fit than visual automation for any action where the interface is only a thin layer over deeper client-side state.
Below is the tool registration combined with the rest of the product page logic:
import { useState, useEffect } from "react";
import OrderConfirmation from "./components/OrderConfirmation";
import Header from "./components/Header";
import ProductCard from "./components/ProductCard";
import Cart from "./components/Cart";
import { products } from "./data/products";
import { registerAgentTool, unregisterAgentTool } from "./utils/webmcp";

export default function App() {
 const [cartItems, setCartItems] = useState([]);
 const [cartOpen, setCartOpen] = useState(false);
 const [order, setOrder] = useState(null);

 const addToCart = (product) => {
 setCartItems((prev) => {
 const existing = prev.find((i) => i.id === product.id);

 if (existing) {
 return prev.map((i) =>
 i.id === product.id ? { ...i, qty: i.qty + 1 } : i
 );
 }

 return [...prev, { ...product, qty: 1 }];
 });

 setCartOpen(true);
 };

 useEffect(() => {
 registerAgentTool({
 name: "add_to_cart",
 description: "Adds a featured product to the shopping cart by its name",
 inputSchema: {
 type: "object",
 properties: {
 productName: {
 type: "string",
 description:
 "The name of the product (for example, 'MacBook Pro' or 'iPhone 15 Pro')",
 },
 },
 required: ["productName"],
 },
 execute: async ({ productName }) => {
 const product = products.find(
 (p) => p.name.toLowerCase() === productName.toLowerCase()
 );

 if (product) {
 addToCart(product);

 return {
 content: [
 {
 type: "text",
 text: `Added ${product.name} to cart.`,
 },
 ],
 };
 }

 return {
 content: [
 {
 type: "text",
 text: `Product "${productName}" not found.`,
 },
 ],
 };
 },
 });

 return () => unregisterAgentTool("add_to_cart");
 }, []);

 const updateQty = (id, qty) => {
 if (qty <= 0) {
 setCartItems((prev) => prev.filter((i) => i.id !== id));
 } else {
 setCartItems((prev) =>
 prev.map((i) => (i.id === id ? { ...i, qty } : i))
 );
 }
 };

 const removeItem = (id) => {
 setCartItems((prev) => prev.filter((i) => i.id !== id));
 };

 const handleCheckout = () => {
 const id = "ORD-" + Math.random().toString(36).slice(2, 8).toUpperCase();

 setOrder({
 id,
 items: cartItems,
 total: cartItems.reduce((sum, i) => sum + i.price * i.qty, 0),
 });

 setCartItems([]);
 setCartOpen(false);
 };

 const cartCount = cartItems.reduce((sum, i) => sum + i.qty, 0);

 return (
 <div className="min-h-screen bg-gray-50 flex flex-col">
 <Header cartCount={cartCount} onCartOpen={() => setCartOpen(true)} />

 <main className="max-w-6xl mx-auto px-4 py-8 flex-1">
 <div className="mb-6">
 <h2 className="text-2xl font-bold text-gray-800">Featured Products</h2>
 <p className="text-gray-500 mt-1">Discover our top picks</p>
 </div>

 <div className="grid grid-cols-1 sm:grid-cols-2 md:grid-cols-3 lg:grid-cols-4 gap-5">
 {products.map((product) => (
 <ProductCard
 key={product.id}
 product={product}
 onAddToCart={addToCart}
 />
 ))}
 </div>
 </main>

 <Cart
 isOpen={cartOpen}
 onClose={() => setCartOpen(false)}
 items={cartItems}
 onUpdateQty={updateQty}
 onRemove={removeItem}
 onCheckout={handleCheckout}
 />

 {order && (
 <OrderConfirmation order={order} onClose={() => setOrder(null)} />
 )}
 </div>
 );
}
The surrounding React code is ordinary application logic, and that is part of the point. WebMCP does not require a separate agent-only version of your UI. It lets the agent hook into the same client-side state transitions your human users already rely on.
checkout_cart tool only when checkout is validCheckout is a better example of why tool lifecycle matters. You do not want the agent seeing a checkout tool when the cart is empty or the panel is closed.
This version registers the tool only when checkout is actually available:
useEffect(() => {
 if (isOpen && items.length > 0) {
 registerAgentTool({
 name: "checkout_cart",
 description: "Completes the purchase for all items currently in the cart",
 inputSchema: {
 type: "object",
 properties: {},
 },
 execute: async () => {
 onCheckout();

 return {
 content: [
 {
 type: "text",
 text: "Order placed successfully by the agent.",
 },
 ],
 };
 },
 });
 }

 return () => unregisterAgentTool("checkout_cart");
}, [isOpen, items.length, onCheckout]);
This is a strong pattern for WebMCP integrations in stateful applications. Instead of exposing the agent to every possible action all the time, you register tools only when the corresponding UI state makes them valid.
That keeps the contract cleaner and reduces the chance that an agent attempts an action that should not currently be available.
Cart component integrationimport { useEffect } from "react";
import { registerAgentTool, unregisterAgentTool } from "../utils/webmcp";
export default function Cart({
isOpen,
onClose,
items,
onUpdateQty,
onRemove,
onCheckout,
}) {
const total = items.reduce((sum, item) => sum + item.price * item.qty, 0);
const totalItems = items.reduce((sum, item) => sum + item.qty, 0);
useEffect(() => {
if (isOpen && items.length > 0) {
registerAgentTool({
name: "checkout_cart",
description: "Completes the purchase for all items currently in the cart",
inputSchema: {
type: "object",
properties: {},
},
execute: async () => {
onCheckout();
return {
content: [
{
type: "text",
text: "Order placed successfully by the agent.",
},
],
};
},
});
}
return () => unregisterAgentTool("checkout_cart");
}, [isOpen, items.length, onCheckout]);
return (
<>
<div
className={`fixed inset-0 bg-black/40 z-40 transition-opacity duration-300 ${
isOpen ? "opacity-100 pointer-events-auto" : "opacity-0 pointer-events-none"
}`}
onClick={onClose}
/>
<div
className={`fixed top-0 right-0 h-full w-80 bg-white shadow-2xl z-50 flex flex-col transform transition-transform duration-300 ${
isOpen ? "translate-x-0" : "translate-x-full"
}`}
>
<div className="flex items-center justify-between p-4 border-b border-gray-100">
<h2 className="text-lg font-bold text-gray-800">
Your Cart{totalItems > 0 && ` (${totalItems})`}
</h2>
<button
onClick={onClose}
className="text-gray-400 hover:text-gray-600 text-xl leading-none cursor-pointer"
>
✕
</button>
</div>
<div className="flex-1 overflow-y-auto p-4 space-y-3">
{items.length === 0 ? (
<div className="text-center text-gray-400 mt-20">
<div className="flex items-center justify-center mb-3">
<svg
xmlns="http://www.w3.org/2000/svg"
className="w-16 h-16 text-gray-300"
fill="none"
viewBox="0 0 24 24"
stroke="currentColor"
strokeWidth={1.5}
>
<path
strokeLinecap="round"
strokeLinejoin="round"
d="M3 3h2l.4 2M7 13h10l4-8H5.4M7 13L5.4 5M7 13l-1.5 6h13M10 21a1 1 0 100-2 1 1 0 000 2zm7 0a1 1 0 100-2 1 1 0 000 2z"
/>
</svg>
</div>
<p className="font-medium">Your cart is empty</p>
<p className="text-sm mt-1">Add some products to get started.</p>
</div>
) : (
items.map((item) => (
<div
key={item.id}
className="flex items-center gap-3 bg-gray-50 rounded-lg p-3"
>
<div
className={`bg-linear-to-br ${item.color} w-12 h-12 rounded-lg flex items-center justify-center text-2xl shrink-0`}
>
<span className="text-white font-bold text-sm">{item.abbr}</span>
</div>
<div className="flex-1 min-w-0">
<p className="font-medium text-sm text-gray-800 truncate">
{item.name}
</p>
<p className="text-purple-500 text-sm font-semibold">
${(item.price * item.qty).toFixed(2)}
</p>
</div>
<div className="flex items-center gap-1 shrink-0">
<button
onClick={() => onUpdateQty(item.id, item.qty - 1)}
className="w-6 h-6 bg-gray-200 hover:bg-gray-300 rounded text-sm font-bold cursor-pointer"
>
−
</button>
<span className="w-6 text-center text-sm font-medium">
{item.qty}
</span>
<button
onClick={() => onUpdateQty(item.id, item.qty + 1)}
className="w-6 h-6 bg-gray-200 hover:bg-gray-300 rounded text-sm font-bold cursor-pointer"
>
+
</button>
</div>
<button
onClick={() => onRemove(item.id)}
className="text-red-400 hover:text-red-600 shrink-0 cursor-pointer"
title="Remove"
>
<svg
xmlns="http://www.w3.org/2000/svg"
className="w-4 h-4"
fill="none"
viewBox="0 0 24 24"
stroke="currentColor"
strokeWidth={2}
>
<path
strokeLinecap="round"
strokeLinejoin="round"
d="M19 7l-.867 12.142A2 2 0 0116.138 21H7.862a2 2 0 01-1.995-1.858L5 7m5 4v6m4-6v6M9 7h6m2 0a1 1 0 00-1-1h-4a1 1 0 00-1 1m-4 0h10"
/>
</svg>
</button>
</div>
))
)}
</div>
{items.length > 0 && (
<div className="p-4 border-t border-gray-100">
<div className="flex justify-between text-gray-500 text-sm mb-1">
<span>Subtotal</span>
<span>${total.toFixed(2)}</span>
</div>
<div className="flex justify-between text-gray-500 text-sm mb-3">
<span>Shipping</span>
<span className="text-green-600 font-medium">Free</span>
</div>
<div className="flex justify-between font-bold text-gray-900 text-lg mb-4">
<span>Total</span>
<span>${total.toFixed(2)}</span>
</div>
<button
onClick={onCheckout}
className="w-full bg-purple-400 text-white py-3 rounded-xl font-semibold hover:bg-purple-500 active:scale-95 transition-all cursor-pointer"
>
Checkout
</button>
</div>
)}
</div>
</>
);
}
Once your tools are registered, inspect them in a WebMCP-capable Chrome environment and verify two things:
That second check is easy to overlook, but it is where many dynamic integrations will either feel robust or feel brittle. If a checkout tool remains visible after the cart empties, for example, your agent contract is already out of sync with the product experience.
If you include the demo GIF in the article, add a short caption that explains what the reader is seeing rather than just dropping the image into the page.
You can find the full demo codebase in the linked GitHub repository.
WebMCP improves precision, but it does not remove the need for product safeguards.
If an agent can submit a checkout flow, file a support ticket, or change account settings, you should still apply the same trust boundaries you would use for human-driven automation. For sensitive actions, that usually means a confirmation step, clear user visibility, and defensive server-side validation.
In practice, that means you should not treat “the agent called the right tool” as sufficient authorization. WebMCP defines a cleaner invocation path, but your application still owns approval, validation, rate limiting, and business rules.
For lower-risk tasks like search or filtering, direct tool execution may be fine. For higher-risk tasks like purchases, account changes, or destructive operations, add an explicit confirmation UI before completing the action.
This is the decision that matters most in practice. The real comparison is not WebMCP versus general computer-use agents. It is WebMCP versus backend MCP, because that is the implementation choice most teams will actually face.
Use this framework to decide where each capability belongs:
| Approach | Best for | Strengths | Limitations |
|---|---|---|---|
| WebMCP | Live interaction with a website already open in the browser | Fast, DOM-aware, tied to real session state, works with existing frontend UI | Ephemeral, browser-specific, preview-stage, not a persistent backend integration |
| MCP | Backend tools, data access, workflows available across clients and agents | Persistent, environment-agnostic, works outside the browser | Does not directly understand your live website UI |
| DOM scraping or computer use | Sites with no structured agent interface | Works even when the site exposes no tools | Slower, more brittle, more error-prone, sensitive to UI changes |
That framing is more useful because it answers the likely implementation question directly: should you expose this capability in the frontend, the backend, or both?
A practical rule is:
WebMCP is a good fit when all three of these are true:
That makes it especially promising for e-commerce flows, support flows, multi-step forms, and dashboard interactions where the UI already exists but agent reliability matters.
It is a weaker fit when the action should be available regardless of whether the site is open, when the workflow belongs entirely on the server, or when the feature is too sensitive to expose without a more opinionated approval model.
WebMCP offers a more reliable alternative to scraping and computer-use style interaction for browser agents. Instead of making a model guess how to operate your UI, you expose the actions that matter in a structured form the browser can understand.
That does not make WebMCP a replacement for MCP, and it does not remove the need for product safeguards. What it does do is give frontend teams a cleaner way to make live web applications usable by agents without rebuilding those experiences around a separate integration layer. Chrome currently positions it as an early-preview, browser-native way to expose structured actions from the frontend, and that is the most useful way to think about it right now.
For simple flows, the declarative API may be enough. For stateful React apps, the imperative API is where WebMCP becomes more compelling. The more your application depends on live client state, the more valuable it becomes to replace inferred UI automation with explicit, registered tools.
Claude Code vs. OpenCode in a real Next.js refactor: benchmark results, mistakes, prompts, and when to use each CLI agent.
Every time you explain your team’s coding standards to Claude, you are doing work that should be reusable. The same […]
Learn how to move beyond one-shot prompting in Claude with structured workflows for AI-assisted coding, debugging, PR reviews, documentation, testing, and automation.
Learn how to build advanced Next.js forms with rule engines, client-side previews, Server Actions, and server-validated form logic.
Hey there, want to help make our blog better?
Join LogRocket’s Content Advisory Board. You’ll help inform the type of content we create and get access to exclusive meetups, social accreditation, and swag.
Sign up now