 |
VOOZH | about |
|
VOOZH | about |
As your application or website grows larger, it becomes increasingly difficult to work with just one CSS file. This increase in size can lead to loads of problems, like trying to have different selector names, and scrolling up and down to find and edit a single selector in a huge file.
👁 ImageWith CSS Modules, you can write your CSS rules traditionally, but styles are consumed with JavaScript and scoped locally to avoid unintended side effects elsewhere. This is achieved by creating a unique class name for CSS selectors, allowing you to use the same CSS class name in different files without worrying about name collisions. Plus, you don’t need to come up with different selector names, giving you complete flexibility and reusability of CSS within components.
In short, CSS Modules are component-based stylesheets that allow us to create contained, modular CSS by creating unique classes and scoped selectors.
In this article, we will practice using CSS Modules with a webpack demo project in order to learn how to configure an app to escape CSS’s notoriously tricky global scope problem.
The Replay is a weekly newsletter for dev and engineering leaders.
Delivered once a week, it's your curated guide to the most important conversations around frontend dev, emerging AI tools, and the state of modern software.
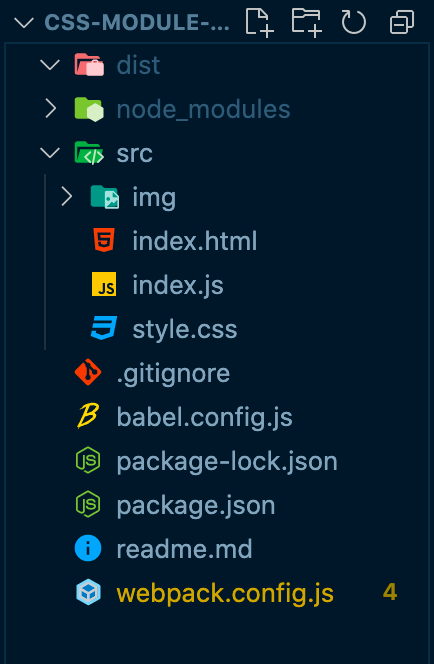
Let’s begin by setting up webpack. Our demo app has an src folder containing index.html, style.css, and index.js.
Outside the src folder, we have our webpack.config.js, babel.config.js, package.json, and package-lock.json files.
👁 Screenshot of CSS module file tree
You can use the npm run build command to build the project and npm run dev to start the app in localhost 8080.
Now, in the package.json file, we should have webpack, webpack-cli ,webpack-dev-server, html-webpack-plugin installed.
babel-related modules are for transforming modern JavaScript into an older syntax, and CleanWebpackPlugin will delete the contents of the dist folder every time the project is built.
For the webpack.config.js file, we have some configurations written like so:
const path = require("path");
const HtmlWebpackPlugin = require("html-webpack-plugin");
const { CleanWebpackPlugin } = require("clean-webpack-plugin");

module.exports = {
 entry: {
 main: "./src/index.js",
 },
 output: {
 path: path.resolve(__dirname, "dist"),
 filename: "main.js",
 publicPath: "",
 },
 target: ["web", "es5"],
 stats: { children: true },
 mode: "development",
 devServer: {
 static: path.resolve(__dirname, "./dist"),
 compress: true,
 port: 8080,
 open: true,
 },
 devtool: "inline-source-map",
 module: {
 rules: [
 {
 test: /\\.js$/,
 loader: "babel-loader",
 exclude: "/node_modules/",
 },
 ],
 },
 plugins: [
 new HtmlWebpackPlugin({
 template: "./src/index.html",
 }),
 new CleanWebpackPlugin(),
 ],
};
In order to work with CSS Modules, we need to install style-loader and css-loader:
npm i css-loader --save-dev
npm i style-loader --save-dev
We need the css-loader module to interpret @import and url() like import/require(), and resolve them, along with the style-loader module to inject our CSS into the DOM.
style-loader and css-loaderWe have babel-loader already set up in our rules array; this is the place for adding our loaders in webpack.
Loaders tell webpack how to modify files before they are added to the dependency graph. The rules array consists of our loaders, and helps us perform transformations on files. These help with the loading of files and images.
Note that we can chain multiple loaders together. In the following code block, css-loader and style-loader are used together.
Similar to babel-loader, we can load CSS files to style our pages like so:
module: {
 rules: [
 {
 test: /\\.js$/,
 loader: "babel-loader",
 exclude: "/node_modules/",
 },
 // CSS rules
 {
 test: /\\.css$/,
 use: [
 "style-loader",
 {
 loader: "css-loader",
 options: {
 importLoaders: 1,
 modules: true,
 },
 },
 ],
 },
 ],
 },
After babel-loader, we have several other objects that will look for any CSS files and transform them:
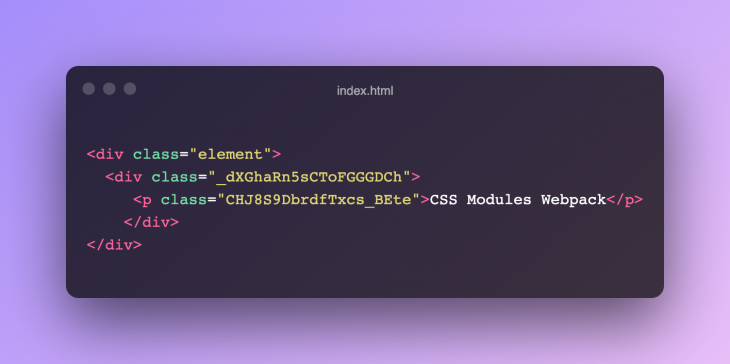
test key tells webpack to apply this rule to any file ending with the .css extensionimportLoaders option is given a value of 1, which sets the number of loaders applied before CSS Modules and the @import at-rulemodules:true option enables CSS ModulesInside the HTML, we have a div with a class name of element. We will access this element inside our JavaScript file:
<!DOCTYPE html>
<html lang="en">
 <head>
 <meta charset="UTF-8" />
 <meta http-equiv="X-UA-Compatible" content="IE=edge" />
 <meta name="viewport" content="width=device-width, initial-scale=1.0" />
 <title>CSS Modules Webpack</title>
 </head>
 <body>
 <div class="element"></div>
 </body>
</html>
In the src folder, we have style.css file. Let’s add some CSS inside it:
:global body {
 margin: 0;
 padding: 0;
}

.page {
 background-color: purple;
 width: 100vw;
 height: 100vh;
 font-family: "Helvetica Neue", Arial, sans-serif;
 display: flex;
 align-items: center;
 justify-content: center;
}

.text {
 text-transoform: capitalize;
 color: #fff;
 font-weight: bold;
 font-size: 4em;
}
As you can see, we have our styles for the body selector and two other class names.
You may recognize that we have :global before the body selector. This will allow us to write global styles for the body selector.
We don’t need to add a link tag in the index.html; instead, we will import our style.css inside the JavaScript file:
// index.js

import styles from "./style.css";

console.log(styles);
Importing CSS files in JavaScript wouldn’t be possible without webpack. Once we connect css-loader, webpack will be able to work with this import and bring our CSS files into the bundle.
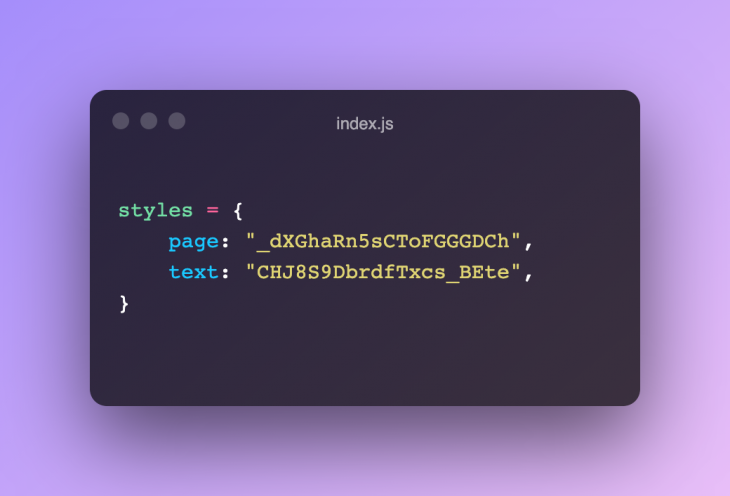
So, to begin to understand CSS modules, let’s begin by first looking at this import declaration: import styles from './style.css';.
Let’s look at what we get from the styles object by console logging:
👁 The styles object in index.js
Our page and text class names will be compiled into random strings of letters, numbers, and characters. Based on this, we can refer to our classes with styles.page and styles.text.
So, we get the ease of use of referring to simple classes while maintaining the benefits of non-global CSS. This will add the generated class names to our import statement, and we can then utilize the style object, which refers to the generated classNames:
const element = document.querySelector(".element");

element.innerHTML = `<div class="${styles.page}">
 <p class="${styles.text}">CSS Modules Webpack</p>
 </div>`;
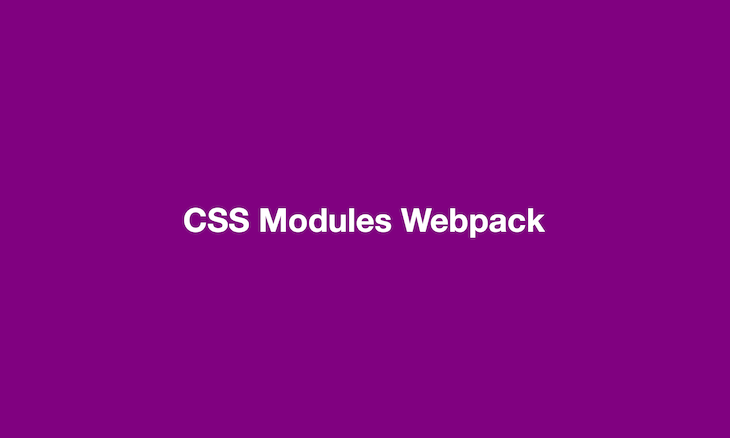
Now, the npm run build command builds a bundled version of our project in the dist folder.
Running npm run dev will show our styles applied to the page.
👁 Basic app with CSS Modules Webpack written in white on a purple background
We can see the generated class names in the DOM tree.
In this article, we learned how to use CSS Modules with webpack. I have used vanilla JS, but you can use CSS Modules with Gatsby, React, and Next.js, too.
Writing modular styles has gained importance in web development communities, and different approaches are emerging that are similar to CSS Modules. One of them is CSS-in-JS, or styled-components. With this, you can write CSS directly inside your JavaScript files.
You can find this demo project on GitHub!
As web frontends get increasingly complex, resource-greedy features demand more and more from the browser. If you’re interested in monitoring and tracking client-side CPU usage, memory usage, and more for all of your users in production, try LogRocket.
👁 LogRocket Dashboard Free Trial BannerLogRocket lets you replay user sessions, eliminating guesswork around why bugs happen by showing exactly what users experienced. It captures console logs, errors, network requests, and pixel-perfect DOM recordings — compatible with all frameworks.
LogRocket's Galileo AI watches sessions for you, instantly identifying and explaining user struggles with automated monitoring of your entire product experience.
Modernize how you debug web and mobile apps — start monitoring for free.
Install LogRocket via npm or script tag. LogRocket.init() must be called client-side, not
server-side
$ npm i --save logrocket

// Code:

import LogRocket from 'logrocket';
LogRocket.init('app/id');
// Add to your HTML:

<script src="https://cdn.lr-ingest.com/LogRocket.min.js"></script>
<script>window.LogRocket && window.LogRocket.init('app/id');</script>
TSRX adds first-class control flow, conditional hooks, and scoped styles to React via a TypeScript compiler extension — no new framework required.
Learn how to build a full React Native auth system using Better Auth and Expo — with email/password login, Google OAuth, session persistence, and protected routes.
Compare the top AI development tools and models of June 2026. View updated rankings, feature breakdowns, and find the best fit for you.
Learn how Bloom filters reduce database lookups for username availability checks while preserving correctness at scale.
Hey there, want to help make our blog better?
Join LogRocket’s Content Advisory Board. You’ll help inform the type of content we create and get access to exclusive meetups, social accreditation, and swag.
Sign up now