 |
VOOZH | about |
|
VOOZH | about |
Editor’s note: This post was updated on 23 March 2023 to reflect updates associated with Vue 3, as well as new information about persisting data when switching between dynamic components.
👁 Making Your Components Dynamic Vue 3This article is an introduction to the ways you can reference HTML elements in your components in Vue.js. You can toggle between views or component templates using the Vue router or by creating dynamic components.
The Vue router is used to navigate between views or component templates in the DOM. To use the Vue router, define routes in a routes component and indicate to Vue that the new component should be mounted on an event, such as click. This is the proper way to handle navigations in sidebar and menu components within the user interface.
If you’ve ever wanted the option to switch between two arbitrary components mounted in the DOM without creating routes, you may want to employ dynamic components.
Jump ahead:
The Replay is a weekly newsletter for dev and engineering leaders.
Delivered once a week, it's your curated guide to the most important conversations around frontend dev, emerging AI tools, and the state of modern software.
Dynamic components is a Vue.js feature that enables users to dynamically render different components based on certain conditions or user interactions. These components allow users to switch between two or more components —in other words, dynamically mount and unmount components in the UI — without using routing. Dynamic components also maintain the data state when returning to the initial component.
When designing your user interface, you’ll want some form of flexibility to show or hide nested components based on the application state. Dynamic components provide that platform in an efficient and simple way.
The feature saves you from a lot of code since you can easily achieve dynamic components with Vue conditional structures such as v-if and v-else. You can use conditional structures to achieve dynamic components by using a placeholder approach to easily bind logic to the component.
This approach will ensure that your presentation is always clean and unambiguous.
To follow along with the examples in this article, you’ll need the following:
node -v
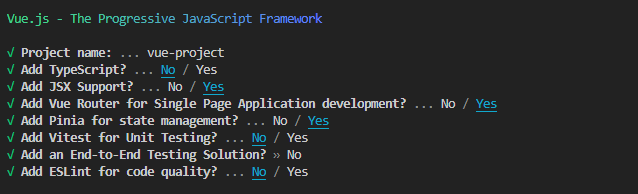
If you don’t have a Vue.js project set up, you can scaffold a new one with the following command:
npm init vue@latest
This command will initiate create-vue, the official Vue project scaffolding tool. It will prompt you to select some configurations; you can use the image below as a guide:
👁 Vue Project Scaffolding Tool
Once the installation is complete, run the following commands to install the project’s peer dependencies and start the development server:
cd vue-project
npm install
npm run dev
Vue offers a special inbuilt component, called component, that accepts a :is directive, specifying the name or definition of the component to be rendered. Here’s an example:
<component :is=”currentComponent”></component>
The component can also be a self-closing tag:
<component :is=”currentComponent”/>
N.B., for the sake of compatibility with different browsers, the first option is the most suitable
In the above example, the component will render whatever component is specified by the currentComponent data property. You can change this property dynamically, and the component will re-render with the new component.
In order to showcase the functionality of the <component/>, we’ll generate two dynamic components and switch between them without using routing. To accomplish this, go to your project’s components directory and create two new components. Name them Test_1 and Test_2 and insert the following code into each component, respectively:
<template>
//use "Test 2" for the second component
 <div><h1>Test 1</h1>
 </div>
</template>
<script>
export default {
 name: 'Test_1',
 props: {
 msg: String
 }
}
</script>
<!-- Add "scoped" attribute to limit CSS to this component only -->
<style scoped>
h3 {
 margin: 40px 0 0;
}
ul {
 list-style-type: none;
 padding: 0;
}
li {
 display: inline-block;
 margin: 0 10px;
}
a {
 color: #42b983;
}
</style>
Now that you have the components set up, go to the App.vue file and register the components, like so:
<template>
 <div id="app">
 <img alt="Vue logo" src="./assets/logo.png">
 <Test_1 />
 <Test_2 />
 </div>
</template>
<script>
import Test_1 from './components/Test1.vue'
import Test_2 from './components/Test2.vue'
export default {
 name: 'app',
 components: {
 Test_1, Test_2
 }
}
</script>
<style scoped>
#App {
 display: flex;
 flex-direction: column;
 justify-content: center;
 align-items: center;
 }

</style>
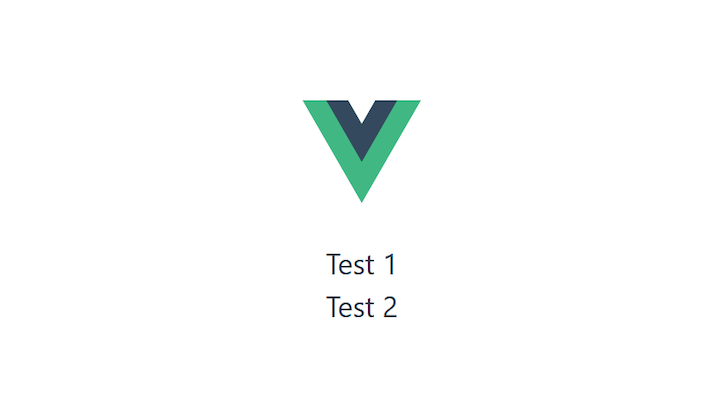
If you save the code at this point and open the browser, you should see a page similar to this:
👁 Two Vue.js Components Rendering Browser
As you can see, both components are simultaneously being rendered to the browser. If you want to mount only one component and then dynamically switch to the other, you have to create a dynamic component.
To do this, return to the App.vue component and replace the Test component declarations with the <component/> :
<template>
 <div id="app">
 <img alt="Vue logo" src="./assets/logo.png">
 <component />
 </div>
</template>
Next, you’ll need to declare a variable that corresponds with your current rendering component:
export default {
 name: "app",
 components: {
 Test_1,
 Test_2,
 },
 data() {
 return {
 component: "Test_1",
 };
 },
};
</script>
In the code above, we default to the Test_1 component by passing its name as a string value to the component variable.
Finally, pass the component variable to the :is directive on the <component/> to dynamically render the default component, which in this case is the Test_1 component:
<template>
 <div id="app">
 <img alt="Vue logo" src="./assets/logo.png">
 <component:is="component" />
 </div>
</template>
Upon saving the code, you’ll notice that only the Test_1 component is displayed on the browser.
👁 One Vue.js Component Rendering Browser
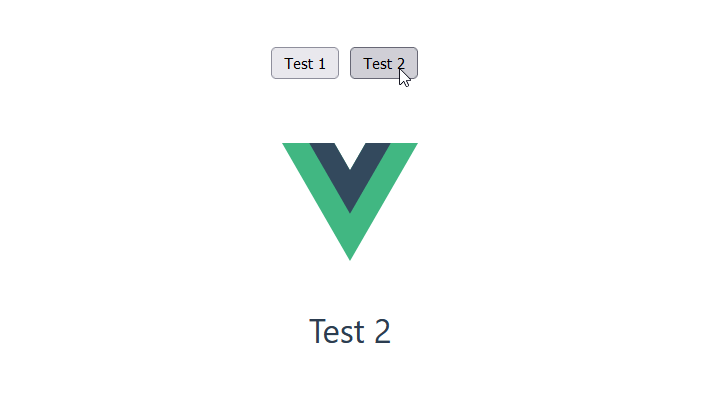
Currently, we are unable to switch between the components. We need a way to toggle the value of the component variable from Test_1 to Test_2. To accomplish this, we will generate two buttons that, when clicked, will mount their corresponding components.
<button @click="component ='Test_1'">Test_1</button>
<button @click="component ='Test_2'">Test_2</button>
When you add these buttons to the template in App.vue, and return to the browser, you should be able to dynamically switch both components as depicted in the GIF below:
👁 Dynamically Switching Between Vue 3 Components
As the Vue team built this feature, they opted to extend its capabilities to include storing data values per state.
To store this data, Vue provides a template element called keep-alive. Using keep-alive, you can ensure your component state stays exactly as you left it after you switch back from one component to the other.
For example, if you click on a link or enter a value in a text box and then switch components, keep-alive brings you back to the same link or text box you were using when you switch back.
To enable keep-alive, go to the template section of your app.vue file and wrap the component element with the keep-alive element:
<keep-alive>
 <component :is="component" />
</keep-alive>
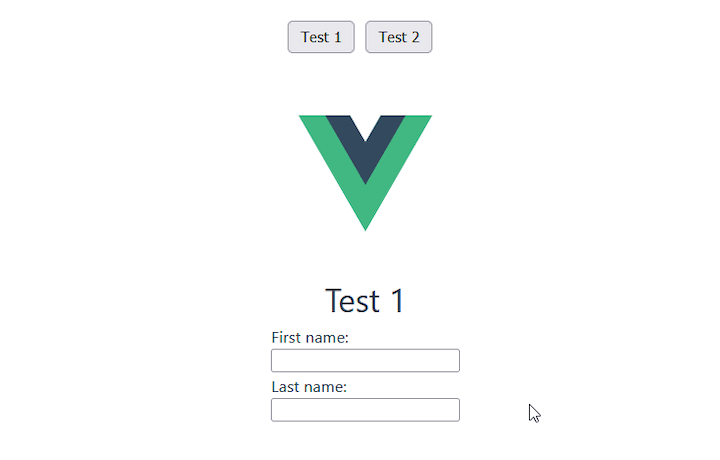
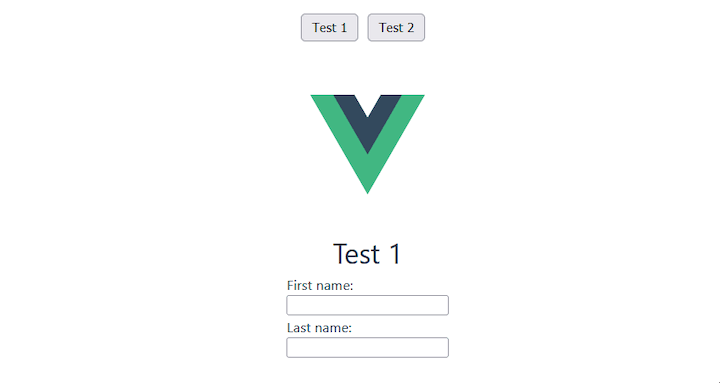
To see if it works, add a form and two radio elements to your Test_1.vue and Test_2.vue components, respectively:
//Test1
<template>
 <div><h1>Test 1</h1>
 <form>
 First name:<br>
 <input type="text" name="firstname"><br>
 Last name:<br>
 <input type="text" name="lastname">
 </form>
 </div>
</template>


//Test2
<template>
 <div><h1>Test 2</h1>
 <div>
 <label for="test">One</label>
 <input type="radio" name="test" id="test" />
 <label for="test">two</label>
 <input type="radio" name="test" id="test" />
 </div>
 </div>
</template>
When you save all project files, run the application again. Type into the input boxes, switch components, and toggle back to the original component. You’ll notice the values you typed before switching components are exactly as you left them.
👁 Persisting Data Switching Between Vue.js Dynamic Components
In the absence of the <keep-alive> component, the default behavior of dynamic components will be as follows:
👁 Default Behavior Vue.js Dynamic Components
In this article, we provided an introduction to using dynamic components in your Vue.js workflow. You also now have the ability to extend the powers of the component element through keep-alive.
This is a great tool for building user interfaces and can be applied to a variety of different use cases. Happy hacking!
Debugging Vue.js applications can be difficult, especially when users experience issues that are difficult to reproduce. If you’re interested in monitoring and tracking Vue mutations and actions for all of your users in production, try LogRocket.
👁 LogRocket Dashboard Free Trial BannerLogRocket lets you replay user sessions, eliminating guesswork by showing exactly what users experienced. It captures console logs, errors, network requests, and pixel-perfect DOM recordings — compatible with all frameworks.
With Galileo AI, you can instantly identify and explain user struggles with automated monitoring of your entire product experience.
Modernize how you debug your Vue apps — start monitoring for free.
Build dynamic LLM routing in Next.js with OpenRouter, TanStack AI, task classification, model fallbacks, and cost-aware routing.
TSRX adds first-class control flow, conditional hooks, and scoped styles to React via a TypeScript compiler extension — no new framework required.
Learn how to build a full React Native auth system using Better Auth and Expo — with email/password login, Google OAuth, session persistence, and protected routes.
Compare the top AI development tools and models of June 2026. View updated rankings, feature breakdowns, and find the best fit for you.
Would you be interested in joining LogRocket's developer community?
Join LogRocket’s Content Advisory Board. You’ll help inform the type of content we create and get access to exclusive meetups, social accreditation, and swag.
Sign up now