 |
VOOZH | about |
|
VOOZH | about |
If you’ve been active on Twitter or Reddit lately, you’ve likely seen discussions surrounding Vercel’s pricing model, which has turned many success stories into nightmares.
👁 ImageFor example, Cara, a creative platform, experienced a surge of 650,000 users overnight, resulting in a $95,000 bill from Vercel. This outraged many developers, so they started looking for cheaper alternatives that let them self-host their deployments.
Alternatives such as Heroku were previously and widely favored among developers due to its user-friendly nature and the provision of a free hobbyist tier. However, since Heroku discontinued its free plans, it’s no longer the go-to choice for most developers.
One alternative that has recently gained widespread adoption and popularity is Coolify, a free, open-source, self-hostable platform that provides the convenience of cloud services and enables users to host their applications effortlessly. With Coolify, you can avoid the risk of unforeseen charges, all while maintaining full control over your infrastructure.
In this article, I’ll list the benefits of using Coolify, walk you through the process of setting up a server and hosting Coolify, and demonstrate how to deploy resources on it.
If you’re already familiar with Coolify and are looking to implement it, then you can go ahead and skip to the getting started section.
The Replay is a weekly newsletter for dev and engineering leaders.
Delivered once a week, it's your curated guide to the most important conversations around frontend dev, emerging AI tools, and the state of modern software.
This article assumes you have the following:
Managing infrastructure manually is no longer feasible in today’s fast-paced development environment. As projects scale and evolve, maintaining consistency, reducing human error, and ensuring efficient deployment processes become paramount. This is where Infrastructure as Code (IaC) comes into play.
IaC is a DevOps practice that manages infrastructure using code. While this explains what IaC is, understanding its importance requires knowing why it’s needed and what problems it solves in relation to Coolify’s purpose.
Before IaC, IT infrastructure was managed manually. Developers or operations teams had to set up servers and configure them before deploying applications. This process was time-consuming and had issues like high cost, scalability problems, and inconsistencies.
The advent of Cloud computing relieved some of these discrepancies, allowing IT professionals to build and maintain data centers at lower costs. However, inconsistencies persisted when different people manually made configurations.
IaC revolutionizes how we handle infrastructure by enabling the management and provisioning of resources through code, fostering automation, version control, and collaboration. Tools like Terraform, Ansible, and Chef let developers define infrastructure (like servers and databases) in configuration files. This allows them to edit, copy, distribute, and repeat the setup without inconsistencies.
So, how does Coolify fit into all of this?
Coolify bridges the gap between traditional IaC tools and user-friendly application deployment.
While tools like Terraform, Chef, and Ansible focus on managing and provisioning infrastructure through code, they can be complex and require significant expertise. Coolify, on the other hand, offers a simpler, more accessible interface for deploying and managing applications, making it easier for developers who may not be experts in IaC to still benefit from its concepts.
In addition to aligning with IaC principles, Coolify offers several key features that embrace the IaC approach to modern development workflows:
Additionally, Coolify supports a Terraform provider, which enables you to manage its resources through Terraform code, thus bringing IaC capabilities into the mix.
To start using Coolify, you’ll need a server. This can be a Virtual Private Server (VPS) or any server you can access remotely. The server will host Coolify, allowing you to manage your applications and services.
There are many VPS providers to choose from, such as Digital Ocean, Linode, and Hetzner. Your decision will likely depend on who offers the best price and performance.
Coolify recommends Hetzner for its affordable and high-performance servers. However, their account verification process can be challenging, often rejecting new accounts without clear reasons.
After several rejections, I chose to go with Digital Ocean, which also offers a good balance of cost and performance. If you think you can successfully register with Hetzner, please consider using the referral link in the Coolify documentation to support the project.
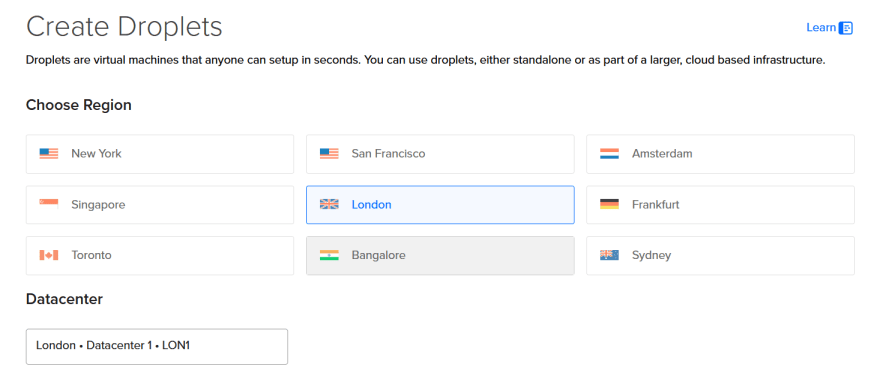
To set up a VPS, start by creating an account with your preferred provider, and then create a server. Pay attention to these key details when configuring your server:
Choose a server location close to your main users to ensure fast and reliable connections. For example, I chose London:
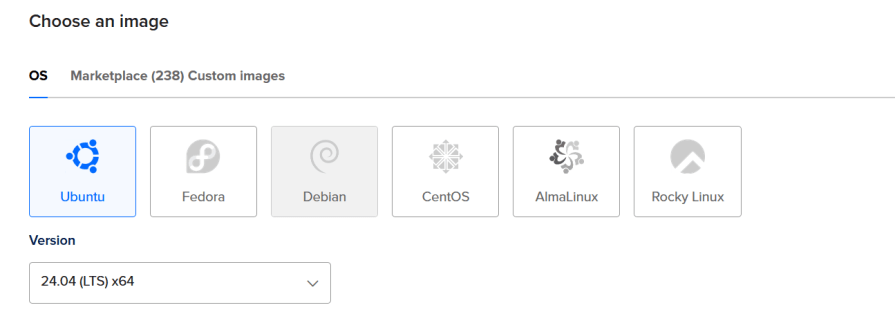
Select an operating system for your server. Ubuntu is a popular choice, or you can use one recommended by Coolify:
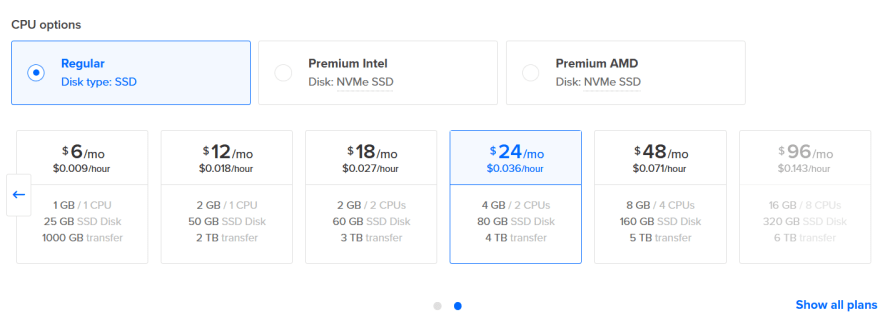
Choose the amount of CPU, RAM, and storage your applications will need. Coolify requires at least 2 CPUs, 2GB memory, and 30GB of storage. For my example, I chose a server with 2 CPUs, 4GB RAM, and 80GB storage:
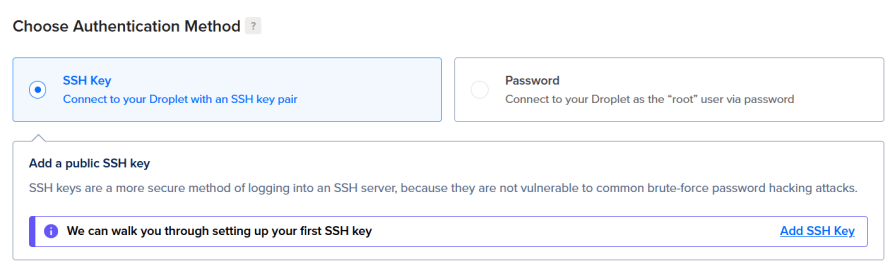
Decide how you will access the server. You can use either SSH keys or a password. SSH keys are recommended for better security:
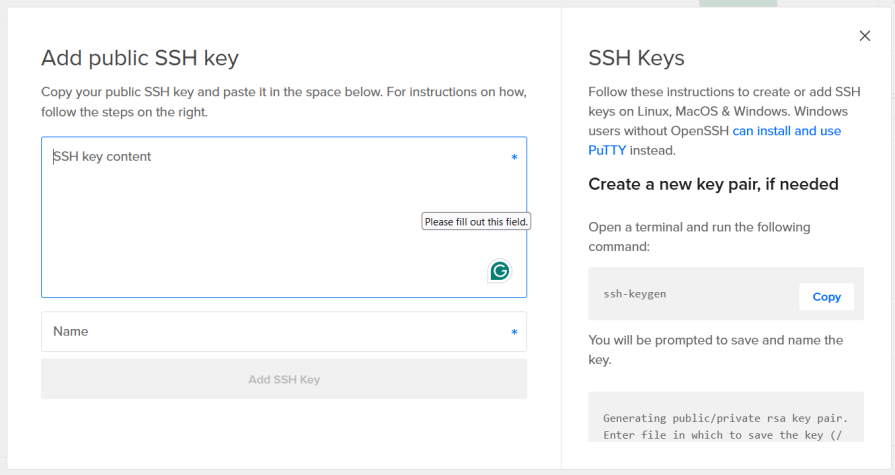
To set up SSH key access, click **Add SSH key** on your server setup page and a modal will pop up. I believe Hetzner has the same UX flow:
Next, open your terminal and run the following command to generate a key pair:
ssh-keygen
If you’re using Windows with Git installed, use the bash terminal to generate a key pair using the following command instead:
ssh-keygen -t rsa
Alternatively, you can install Puttygen and follow this instruction on how to generate a key pair.
After running the command, you’ll be asked to provide a path to save the key. Press enter to use the default path:
Generating public/private ed25519 key pair.
Enter file in which to save the key (/c/Users/david/.ssh/id_ed25519):
Then, you’ll be prompted to enter a passphrase. Choose a strong password and save it securely:
Enter passphrase (empty for no passphrase):
Enter same passphrase again:
Once you’ve set the passphrase, you’ll see a confirmation message indicating the SSH key pair was created:
Your identification has been saved in /c/Users/david/.ssh/id_rsa
Your public key has been saved in /c/Users/david/.ssh/id_rsa.pub
The key fingerprint is:
SHA256:j9HUkzKvqJoxGQYXCwjAnYMu9c/0fabrYosgMrvk160 david@Enigmae
The key's randomart image is:
+---[RSA 3072]----+
|*.+ o |
|.o.= o . . |
|....+ + + |
|.. o. . o + . |
|. o+ .S.. . |
| . oo .=..o |
|o.. * . o o+ |
|o+ o * +o . |
|oo. oE+..+o. |
+----[SHA256]-----+
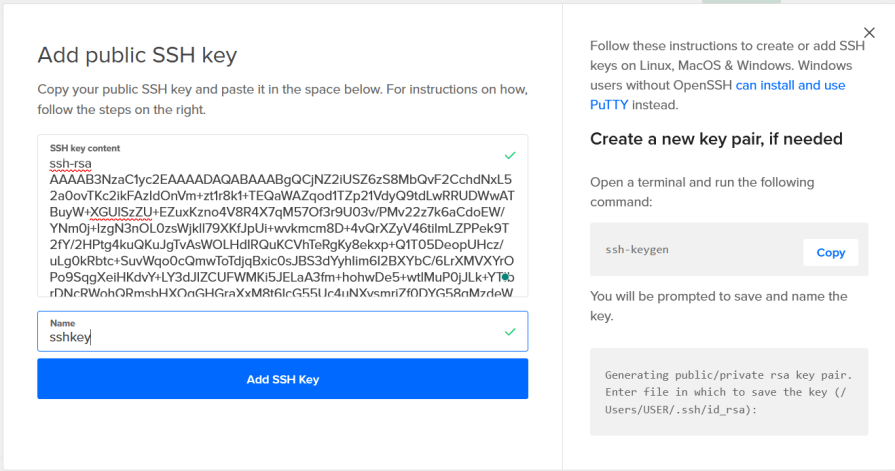
Next, run the following command to display your public key:
cat ~/.ssh/id_rsa.pub
The output should look something like this:
ssh-rsa AAAAB3NzaC1yc2EAAAADAQABAAABgQCjNZ2iUSZ6zS8MbQvF2CchdNxL52a0ovTKc2ikFAzIdOnVm+zt1r8k1+TEQaWAZqod1TZp21VdyQ9tdLwRRUDWwATBuyW+XGUlSzZU+EZuxKzno4V8R4X7qM57Of3r9U03v/PMv22z7k6aCdoEW/YNm0j+IzgN3nOL0zsWjkll79XKfJpUi+wvkmcm8D+4vQrXZyV46tilmLZPPek9T2fY/2HPtg4kuQKuJgTvAsWOLHdIRQuKCVhTeRgKy8ekxp+Q1T05DeopUHcz/uLg0kRbtc+SuvWqo0cQmwToTdjqBxic0sJBS3dYyhIim6I2BXYbC/6LrXMVXYrOPo9SqgXeiHKdvY+LY3dJIZCUFWMKi5JELaA3fm+hohwDe5+wtlMuP0jJLk+YTIbrDNcRWohQRmsbHXOgGHGraXxM8t6IcG55Uc4uNXysmriZf0DYG58qMzdeWgBzps4AnMRGYk1Lrbg8hK38nzYDwvQWpIhckCm1VtkiB/yXcovBSIUH+8U= david@Enigmae
Copy the output and paste it into the modal on your server setup page, then click Save or Add SSH Key:
After completing these steps, review your server’s configuration. If everything looks good, click the create button to create your server:
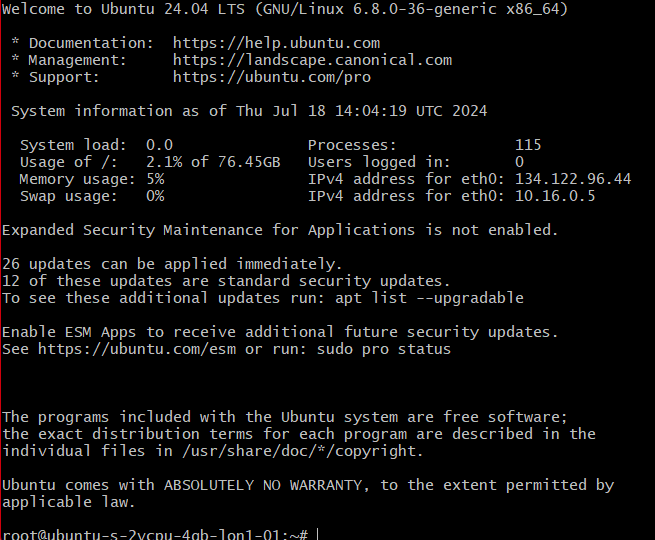
Once your virtual server is up and running, open your terminal and use this command to access it via SSH:
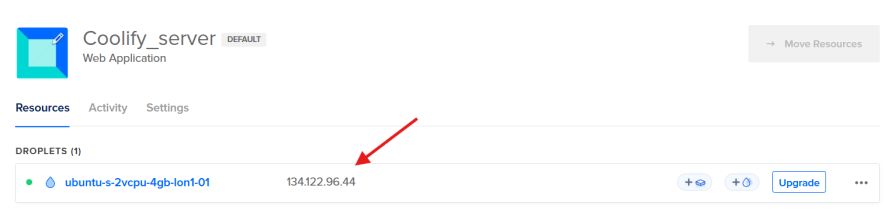
ssh root@<server-ip-address>
Replace <server-ip-address> with your server’s IP address, which you can find here:
After running the command, you’ll be asked if you want to add the IP address to the list of known IPs. Type "``yes" and press enter:
$ ssh [email protected]
The authenticity of host '134.122.96.44 (134.122.96.44)' can't be established.
ED25519 key fingerprint is SHA256:yfaoc/1er+eRO404gd83jRqQfh0Vo+hME1ONgYMasqA.
This key is not known by any other names.
Are you sure you want to continue connecting (yes/no/[fingerprint])? yes
The next prompt will ask you to enter the passphrase of your SSH key or your server’s password if you used password authentication:
Enter passphrase for key '/Users/david/.ssh/id_rsa':
Once authenticated, you will have remote access to your server:
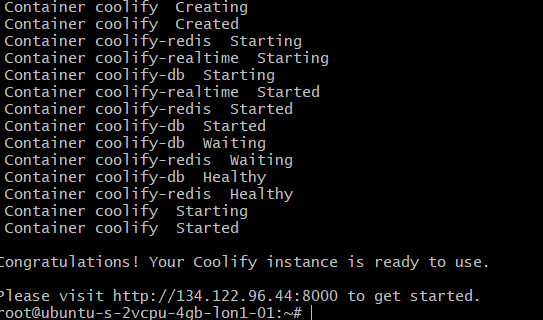
With remote access, we can run commands on the remote server directly from our computer. Let’s install Coolify on the server.
Paste the following command into your terminal and press enter to start the installation:
curl -fsSL https://cdn.coollabs.io/coolify/install.sh | bash
The installation process takes one to two minutes. Do not cancel it.
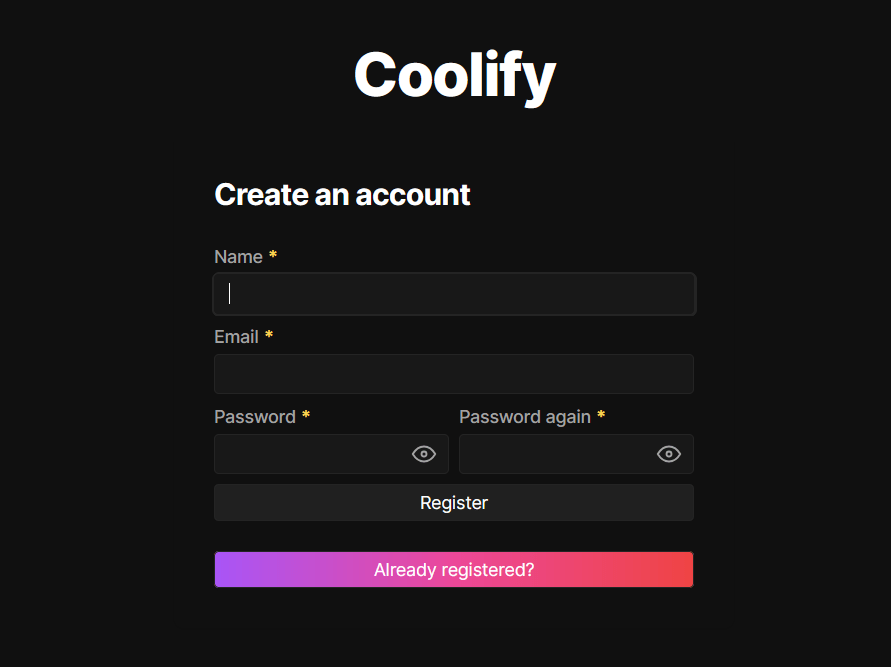
Once completed, the terminal will show an IP address where you can access Coolify. In my case, it was: http://134.122.96.44:8000:
Copy the IP address and enter it into your browser. This will take you to a registration page where you register to access the Coolify instance:
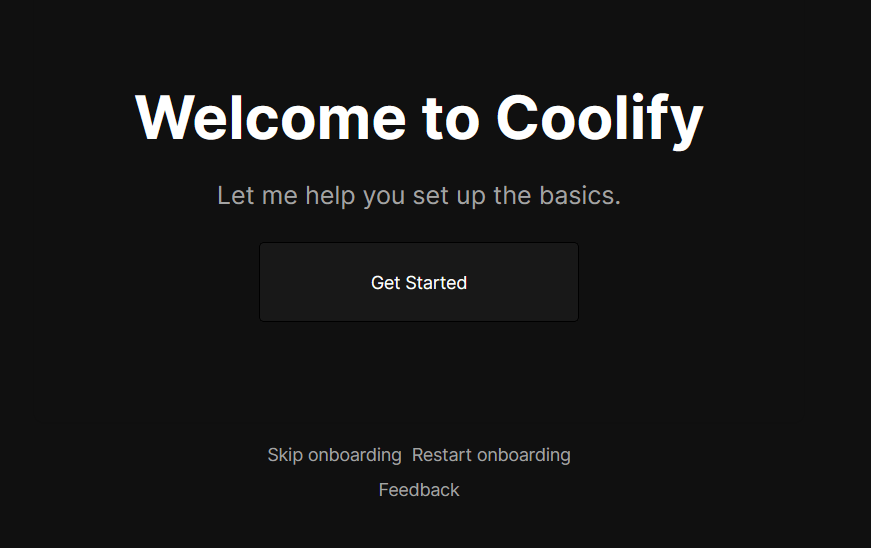
After registering, you’ll be redirected to a welcome page. Click Get Started to proceed through the onboarding pages:
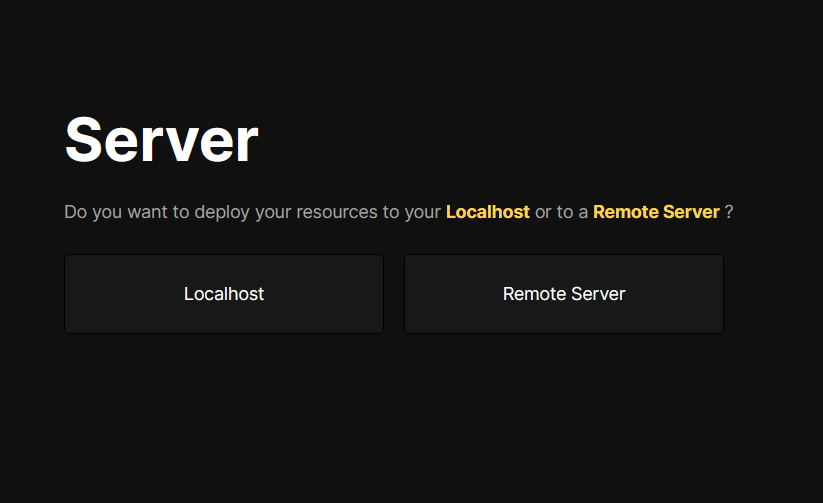
Follow the onboarding steps until you reach the “Server” page, where you’ll choose to deploy resources on Localhost or a Remote Server:
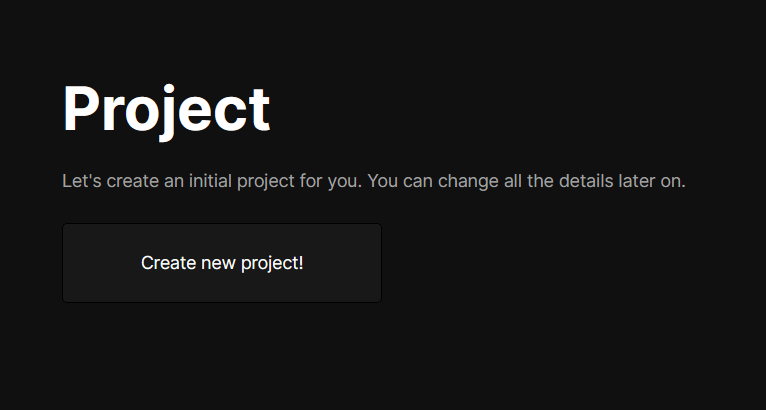
Remember, resources are components like your application, database, server, or other services you want to set up on your server. Here, Coolify is asking if you want to set these up on the same server where Coolify is installed (i.e. Localhost) or on a different remote server. If you don’t have another remote server, choose Localhost and create a new project:
After clicking Create new project, you’ll finish onboarding. Click Let``'``s do it! to access your Coolify dashboard:
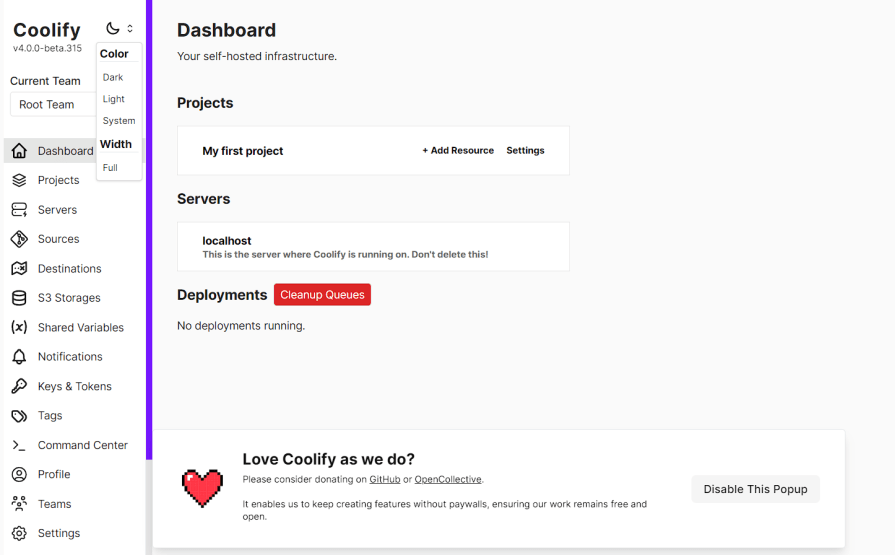
Et Voila! Coolify is now installed on your VPS. We’ll create and deploy a sample application in the next section.
To demonstrate deploying resources on Coolify, we’ll create the quintessential to-do application that features creating, reading, updating, and deleting (CRUD) tasks.
Ideally, we would use Next.js to deploy the server and frontend together. However, to demonstrate how to deploy standalone resources, we’ll deploy each one individually: a frontend (Next.js), a server (Node.js), and a database (Postgres).
If you already have a project or want to go straight to deploying resources, you can skip this section.
Let’s start with the Node.js server. Create a folder on your computer, open a terminal in that folder, and run this command:
mkdir backend && cd backend
This command will create a “backend” folder and navigate into it.
Next, initialize a new Node project and install the required dependencies:
npm init -y
npm install express pg cors body-parser dotenv
After installing the dependencies, set up the project with this structure:
backend/
├── controllers/
│ └── tasksController.js
├── db/
│ └── db.js
├── routes/
│ └── tasks.js
├── index.js
└── package.json
With the project structure ready, we can start building the app’s business logic. Start by opening the db.js file in the db folder and adding the following code:
// db/db.js
const { Pool } = require('pg');

const pool = new Pool({
 user: 'postgres',
 host: 'localhost',
 database: 'todos',
 password: 'pass',
 port: 5432,
});

const query = (text, params) => pool.query(text, params);

module.exports = {
 query,
};
This code establishes a connection pool to a PostgreSQL database and provides a function for executing SQL queries.
Leave the db.js file for now, and open the tasksController.js file in the controllers folder. Add this code:
// controllers/tasksController.js
const db = require("../db/db");

const getTasks = async (req, res) => {
 try {
 const result = await db.query("SELECT * FROM todos ORDER BY id");
 res.json(result.rows);
 } catch (err) {
 res.status(500).json({ error: err.message });
 }
};

const createTask = async (req, res) => {
 const { title, description } = req.body;
 try {
 const result = await db.query(
 "INSERT INTO todos (title, description) VALUES ($1, $2) RETURNING *",
 [title, description]
 );
 res.json(result.rows[0]);
 } catch (err) {
 res.status(500).json({ error: err.message });
 }
};

const updateTask = async (req, res) => {
 const { id } = req.params;
 const { title, description, completed } = req.body;
 try {
 const result = await db.query(
 "UPDATE todos SET title = $1, description = $2, completed = $3 WHERE id = $4 RETURNING *",
 [title, description, completed, id]
 );
 res.json(result.rows[0]);
 } catch (err) {
 res.status(500).json({ error: err.message });
 }
};

const deleteTask = async (req, res) => {
 const { id } = req.params;
 try {
 await db.query("DELETE FROM todos WHERE id = $1", [id]);
 res.sendStatus(204);
 } catch (err) {
 res.status(500).json({ error: err.message });
 }
};

module.exports = {
 getTasks,
 createTask,
 updateTask,
 deleteTask,
};
This code creates controller functions to interact with the Postgres database using prepared statements to:
getTasks)createTask)updateTask)deleteTask)Next, add routes for the controller methods by opening the tasks.js file in the routes folder and adding this code:
// routes/tasks.js
const express = require('express');
const router = express.Router();
const tasksController = require('../controllers/tasksController');

router.get('/', tasksController.getTasks);
router.post('/', tasksController.createTask);
router.put('/:id', tasksController.updateTask);
router.delete('/:id', tasksController.deleteTask);

module.exports = router;
Finally, open the index.js file and add this code:
// index.js
const express = require('express');
const bodyParser = require('body-parser');
const cors = require('cors');
const tasksRoutes = require('./routes/tasks');

const app = express();
const port = process.env.PORT || 5000;

app.use(cors());
app.use(bodyParser.json());

app.use('/tasks', tasksRoutes);

app.listen(port, () => {
 console.log(`Server running on port ${port}`);
});
Our server is halfway done. We just need to set up and connect to a Postgres database to make it functional.
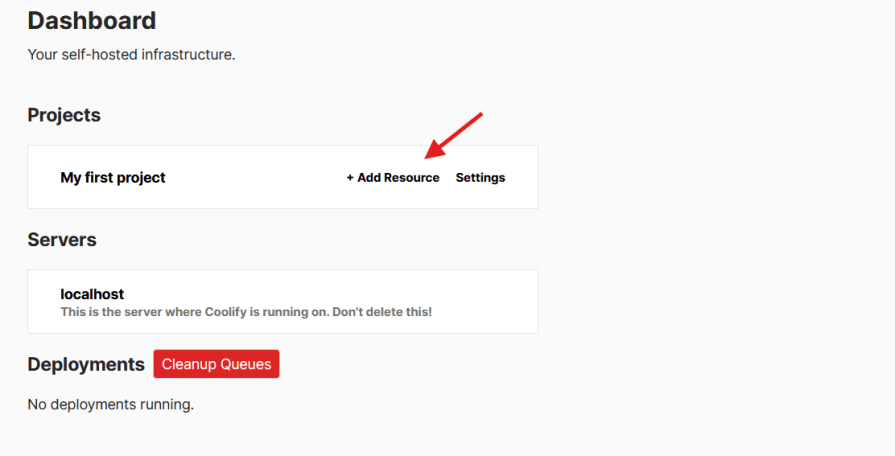
Setting up a Postgres database on Coolify is fairly straightforward because Coolify offers a ton of one-click resources for instant deployment, with Postgres being one of them.
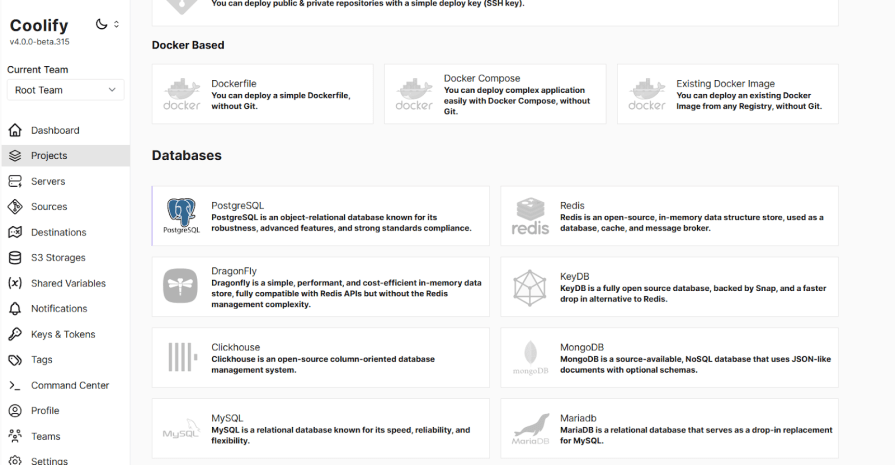
First, log into your Coolify dashboard and click add resource next to the project name:
This will take you to a page with various templates. Scroll down and select Postgres:
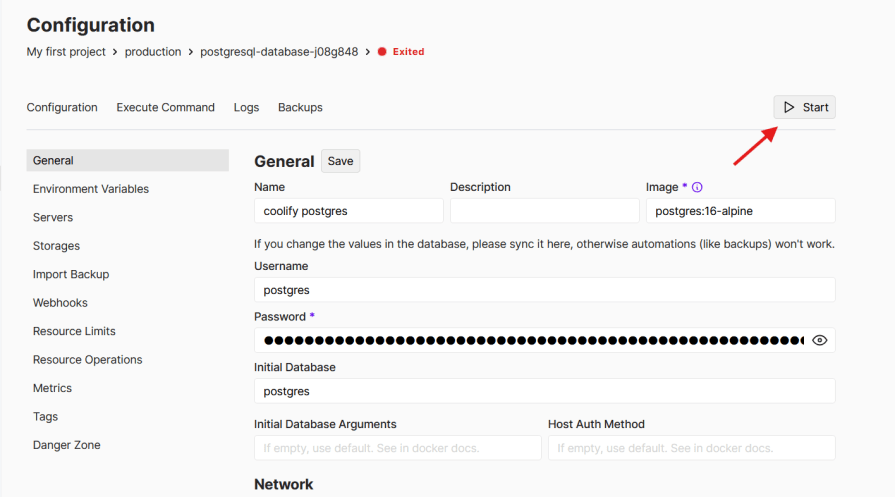
On the configuration page, enter a name for the database and a password (or use the default). Click the start button at the top right to launch the database:
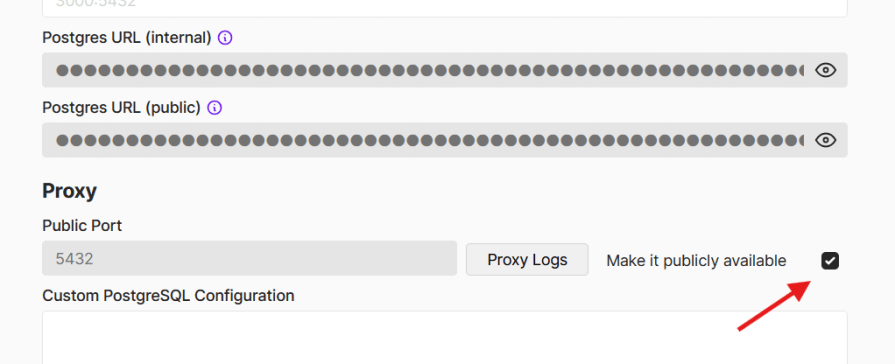
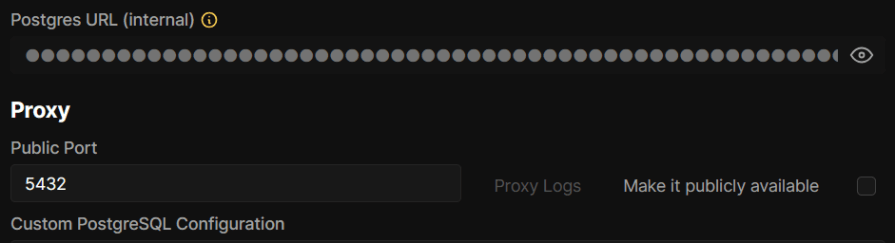
Once the database is up and running, scroll down and check the make it publicly available box. This provides a public connection URL for connecting to the database remotely:
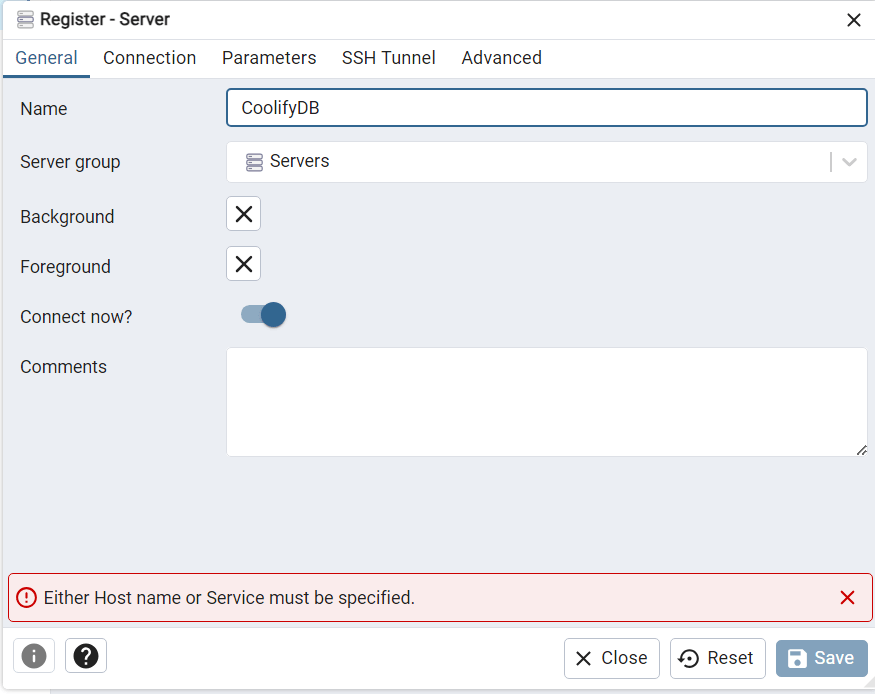
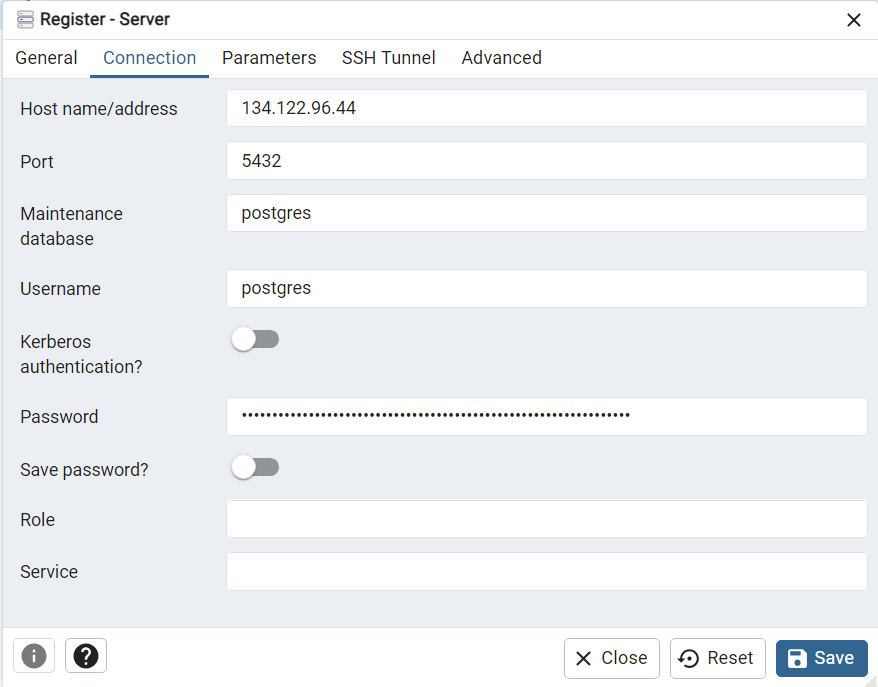
Next, install a Postgres client like pgAdmin or DBeaver on your computer. Open it, click add new server, and a modal will appear:
Add any name of your choice the server, click the connection tab, and enter the database host address. You can find this between @ and : in the public connection string:
Then, enter your Postgres instance password in the password field, and click on the save button:
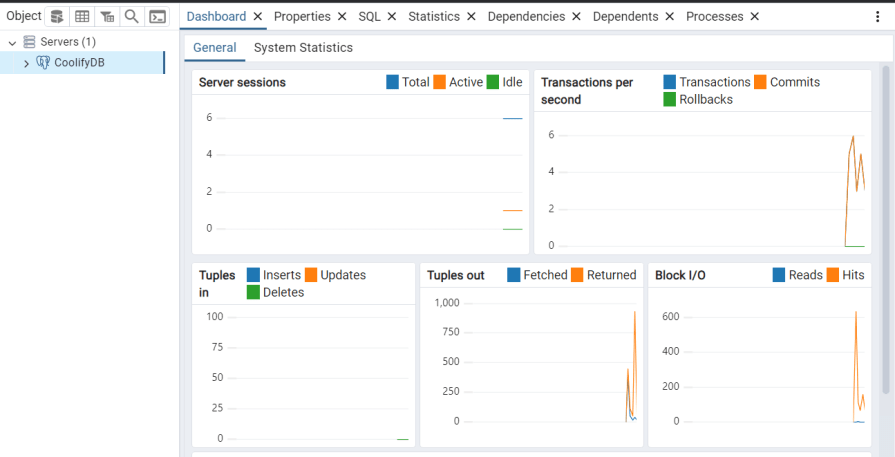
If successful, you’ll see the following dashboard, confirming that pgAdmin is successfully connected to the remote database:
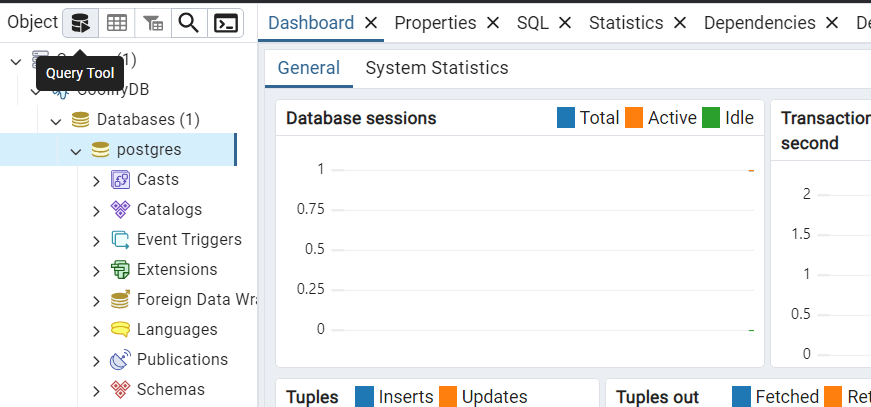
The next step is to create a table for our data. To do this, click the arrow icon next to the server name on the sidebar. Click Databases, select the database name (e.g., Postgres), and click the query tool icon on the top bar:
This opens the query page where you can create a table using query scripts:
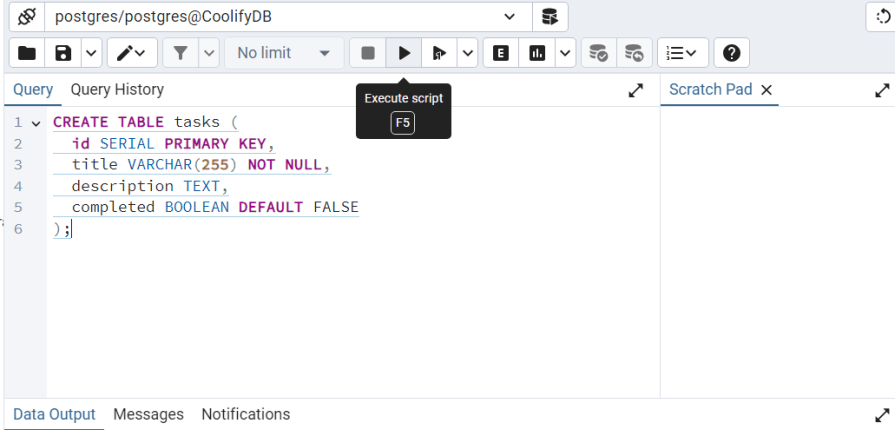
Copy and paste the query script below into the field, and click the play icon to run it:
CREATE TABLE tasks (
 id SERIAL PRIMARY KEY,
 title VARCHAR(255) NOT NULL,
 description TEXT,
 completed BOOLEAN DEFAULT FALSE
);
After running the script, you should get a similar response as below which means the table has been successfully created:
Query returned successfully in 252 msec.
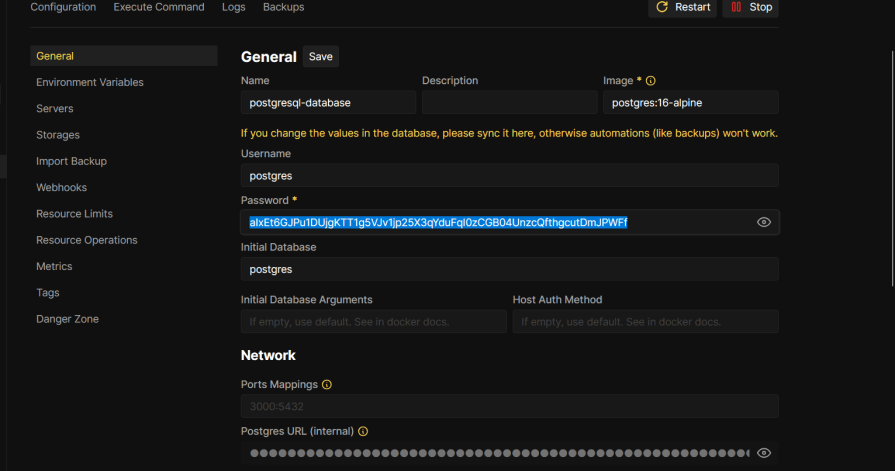
To connect the Node server to the database, create a .env file in the Node server’s root directory, add the following code to the file, and replace the long string with your database’s password:
DB_PASSWORD="aIxEt6GJPu1DUjgKTT1g5VJv1jp25X3qYduFqI0zCGB04UnzcQfthgcutDmJPWFf"
Then, update the db.js file with your database credentials and port like so:
const { Pool } = require("pg");

const pool = new Pool({
 user: "postgres",
 host: "134.122.96.44",
 database: "postgres",
 password: "aIxEt6GJPu1DUjgKTT1g5VJv1jp25X3qYduFqI0zCGB04UnzcQfthgcutDmJPWFf",
 port: 5432,
});

const query = (text, params) => pool.query(text, params);

module.exports = {
 query,
};
We updated the host, database, and password fields with the database’s hostname, database name, and password, respectively.
You can find the database name in the public connection URL string we exposed earlier. It appears after the last forward slash in the URL. For example, postgres, which is after the last forward slash, is the database name in the example below:
postgres://postgres:aIxEt6GJPu1DUjgKTT1g5VJv1jp25X3qYduFqI0zCGB04UnzcQfthgcutDmJPWFf@209.97.189.179:5432/postgres
The database password can also be found on the configuration page:
Now, start the development server to verify if it successfully connects to the database:
Setting up the frontend application is straightforward, so we won’t spend too much time on it.
Open your terminal and navigate to the “frontend” directory. Run the following command to install Next.js:
npx create-next-app@latest
After the installation, run the following commands to install Axios, and start the development server:
npm i axios && npm run dev
Next, open the page.js file in the app folder, clean up the boilerplate code, and add the following code:
import React, { useState, useEffect } from "react";
import axios from "axios";
const App = () => {
const [tasks, setTasks] = useState([]);
const [title, setTitle] = useState("");
const [description, setDescription] = useState("");
useEffect(() => {
fetchTasks();
}, []);
const fetchTasks = async () => {
const res = await axios.get("http://localhost:5000/tasks");
setTasks(res.data);
};
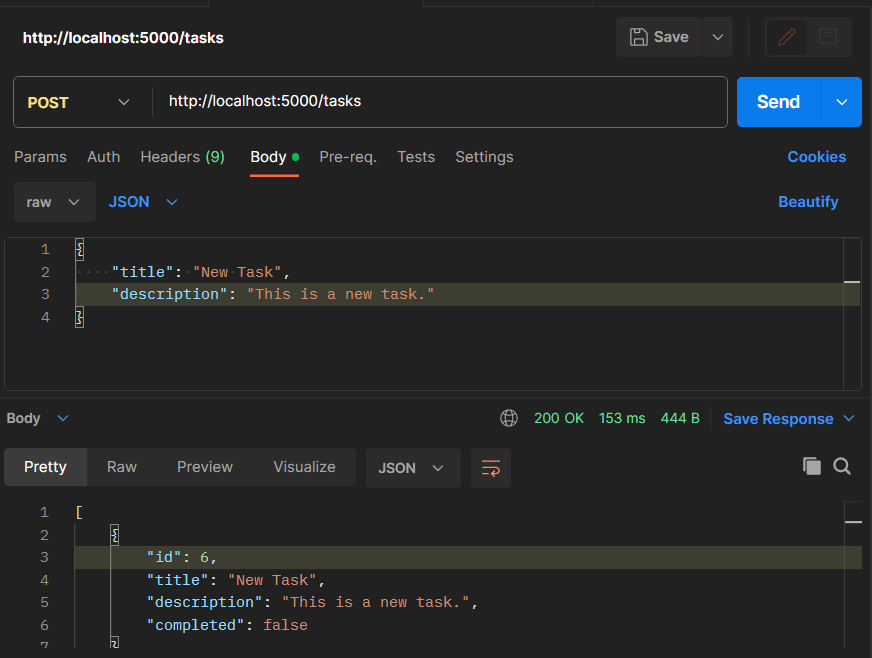
const addTask = async () => {
const res = await axios.post("http://localhost:5000/tasks", {
title,
description,
});
setTasks([...tasks, res.data]);
setTitle("");
setDescription("");
};
const updateTask = async (id, completed, title, description) => {
const res = await axios.put(
`http://vow8owk.209.97.189.179.sslip.io/tasks/${id}`,
{
title,
description,
completed,
}
);
setTasks(tasks.map((task) => (task.id === id ? res.data : task)));
};
const deleteTask = async (id) => {
await axios.delete(`http://localhost:5000/tasks/${id}`);
setTasks(tasks.filter((task) => task.id !== id));
};
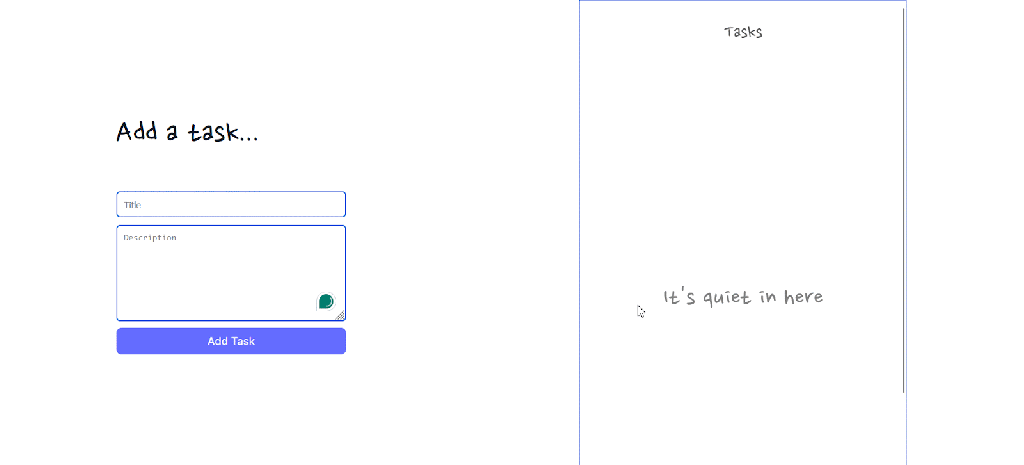
return (
<div>
<h1>Add a task...</h1>
<div>
<input
type="text"
value={title}
placeholder="Title"
onChange={(e) => setTitle(e.target.value)}
/>
<textarea
cols="45"
rows="8"
placeholder="Description"
onChange={(e) => setDescription(e.target.value)}
/>
<br />
<button onClick={addTask}>Add Task</button>
</div>
</div> {/* Close the div properly */}
);
};
export default App;
Here, we use Axios to interact with the database through the endpoints provided by our Node server.
Lastly, add the specified styles to the CSS file and go to localhost:3000 in your browser:
@import url('https://fonts.googleapis.com/css2?family=Nanum+Pen+Script&display=swap');

:root {
 font-family: Inter, system-ui, Avenir, Helvetica, Arial, sans-serif;
 line-height: 1.5;
 font-weight: 400;

 color-scheme: light dark;
 color: #111c25;
 background-color: #ffffff;

 font-synthesis: none;
 text-rendering: optimizeLegibility;
 -webkit-font-smoothing: antialiased;
 -moz-osx-font-smoothing: grayscale;
}

body {
 margin: 0;
 min-height: 100vh;
 color: #111c25;
 background-color: #ffffff;
}

h1 {
 font-size: 3.2em;
 line-height: 1.1;
}

button {
 border-radius: 8px;
 border: 1px solid transparent;
 padding: 0.6em 1.2em;
 font-size: 1em;
 font-weight: 500;
 font-family: inherit;
 background-color: #646cff;
 cursor: pointer;
 transition: border-color 0.25s;
}

li {
 list-style-type: none;
}

ul {
 padding: 0 15px;
}

p,
h1 {
 margin: 0;
}

button:hover {
 background-color: #d80b0b;
}

.add-task-button:hover {
 background-color: #414491;
}

button:focus,
button:focus-visible {
 outline: 4px auto -webkit-focus-ring-color;
}

input[type=text] {
 max-width: 100%;
 border-radius: 5px;
 background-color: white;
 color: #1a1a1a;
 border: solid #0060DF 2px;
 padding: 10px;
 margin-bottom: 10px;
}

textarea {
 border-radius: 5px;
 background-color: white;
 border: solid #0060DF 2px;
 padding: 10px;
 max-width: 100%;
 margin-bottom: 10px;
 color: #1a1a1a;
}

.task-form {
 display: flex;
 flex-direction: column;
 max-width: 400px;
}

.app-container {
 width: 100%;
 display: flex;
 justify-content: space-around;
 align-items: center;
}

.task-card {
 border: solid #0060DF 2px;
 border-radius: 5px;
 padding: 10px;
 width: 400px;
 margin-bottom: 10px;
}

.task-title {
 margin-bottom: 5px;
 display: flex;
 align-items: center;
 justify-content: space-between;
}

h1 {
 margin-bottom: 60px;
 font-family: "Nanum Pen Script", cursive;
}

.task-list-header {
 text-align: center;
 color: rgb(96, 96, 96);
 font-family: "Nanum Pen Script", cursive;
 font-size: 30px;
}

.task-checkbox {
 width: 15px;
 height: 15px;
 background-color: #f0f0f0;
 border: 1px solid #ccc;
 border-radius: 15px;
}

.task-completed {
 opacity: 0.5;
}

.delete-task-button {
 opacity: 1;
 background: #d80b0b;
 margin-top: 10px;
 display: block;
}

.task-list-section {
 border: #0060DF 0.2px solid;
 height: 700px;
 overflow-y: scroll;
 padding: 0 20px;
}

.task-actions {
 position: relative;
}

.arrow-icon {
 position: absolute;
 top: -30px;
 left: -50px;
 rotate: -30deg;
}

span {
 position: absolute;
 top: -45%;
 left: -100px;
 rotate: -40deg;
 font-size: 17px;
 font-family: "Nanum Pen Script", cursive;
 color: gray;
}

.show-text{
 display: flex;
 font-family: "Nanum Pen Script", cursive;
 justify-content: center;
 align-items: center;
 font-size: 40px;
 color: gray;
 width: 100%;
 height: 500px;
}

.hide-text{
 display: none;
}

@media only screen and (max-width: 868px) {
 .app-container {
 flex-direction: column;
 overflow: hidden;
 }

 .task-list-section {
 margin-top: 50px;
 border: none;
 border-top: 2px solid #747bff;
 }

 .task-card {
 width: 400px;
 }
}
If everything is set up correctly, the application should work as shown in the GIF below:
That’s it! All three resources are working together and running smoothly. You can find the code for the NextJs and Node server in my GitHub repository.
The next step is to deploy both the Node server and React application to our Coolify instance.
Coolify supports git-based deployment using Nixpacks, an open-source Buildpack tool that creates container images from a source directory for deployment anywhere on the web.
In other words, we don’t have to go through the trouble of containerizing our resources before deploying them on Coolify — we simply need to create and push our resources to their respective Git repositories, and Coolify will handle the rest.
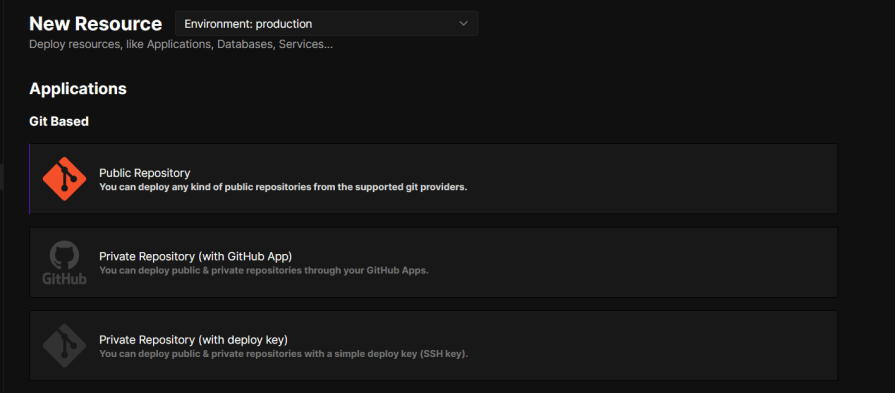
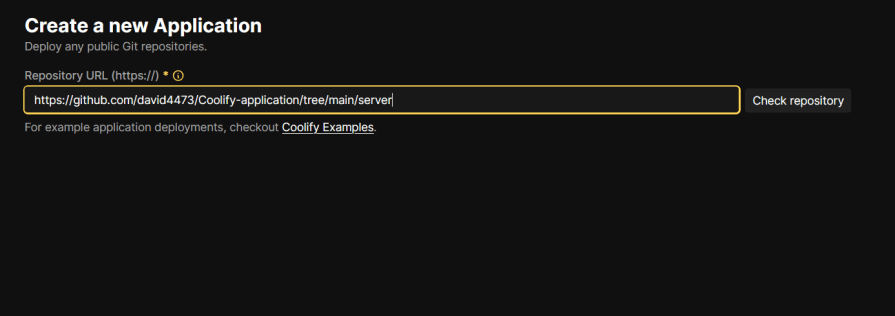
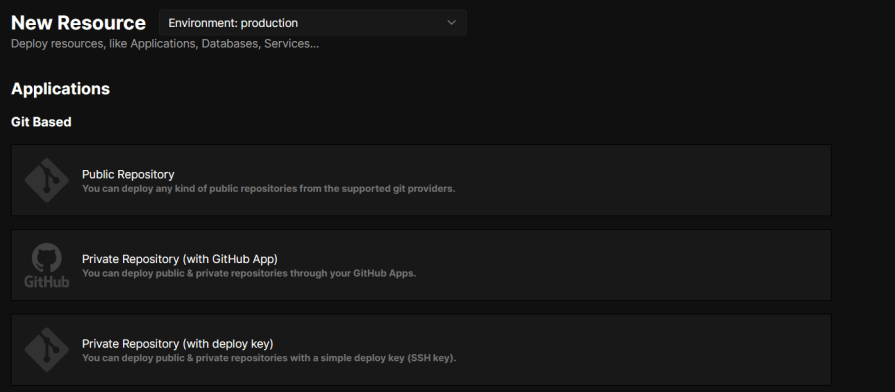
Go ahead and push the Node server and Next.js app to their respective repositories Then, in your Coolify dashboard, click the add resource button and select the Public Repository option:
Return to the Node server’s repository, copy the repository link from the address bar, and paste it into the field on Coolify:
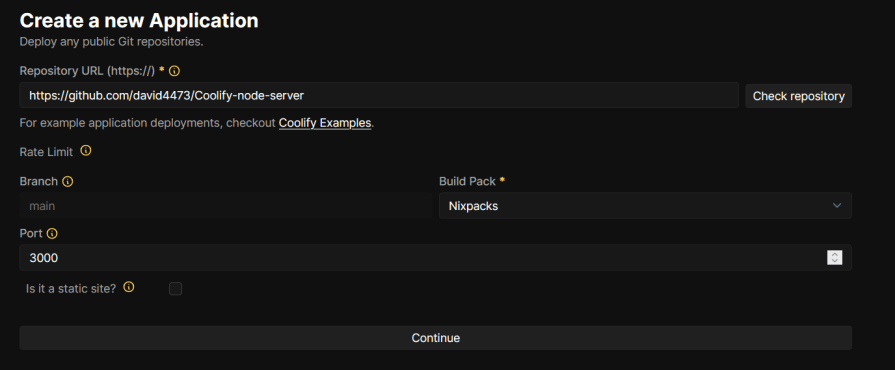
Once Coolify loads the repository, choose Nixpacks as the buildpack and set the port to 3000. Then click Continue:
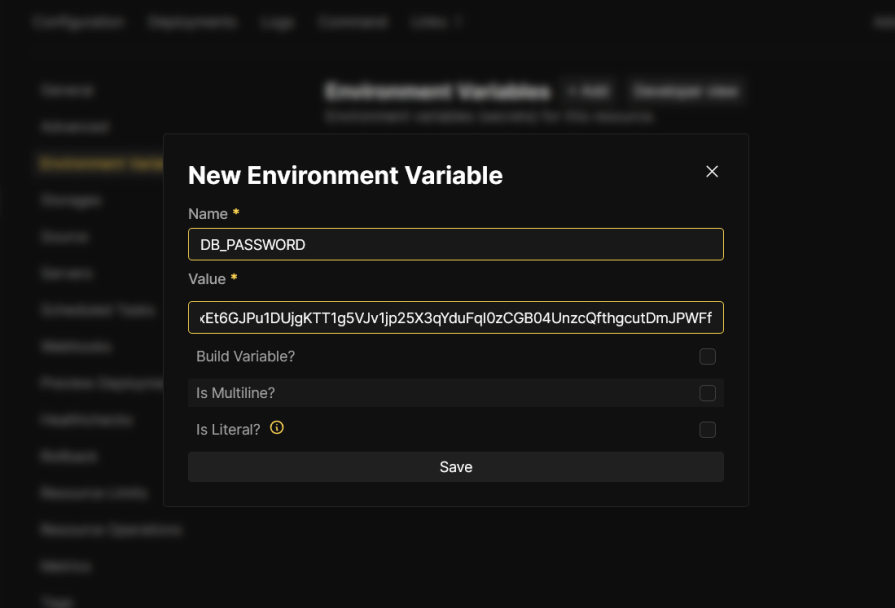
On the next page, navigate to Environment > +New, and add the environment variable for the database password. Click save:
After saving the environment variables, click Deploy at the top right corner of the screen to deploy the resource.
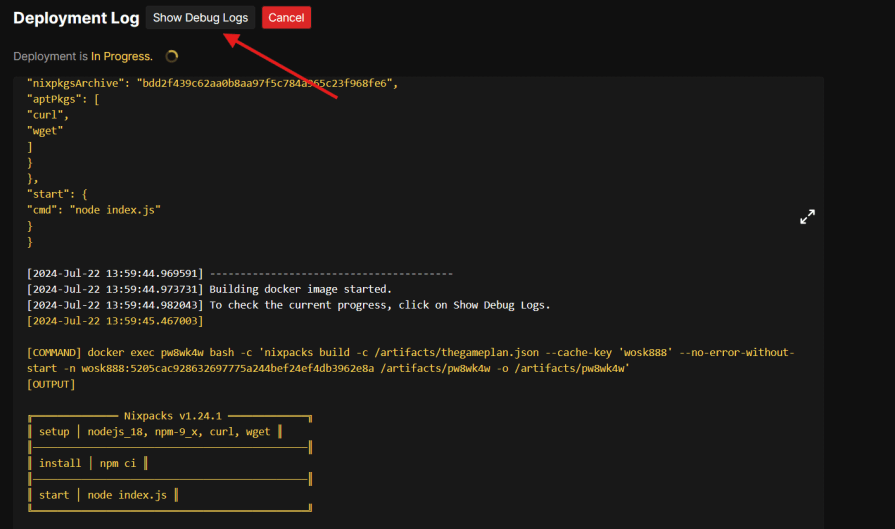
To monitor the deployment process, click the show debug button for detailed logs:
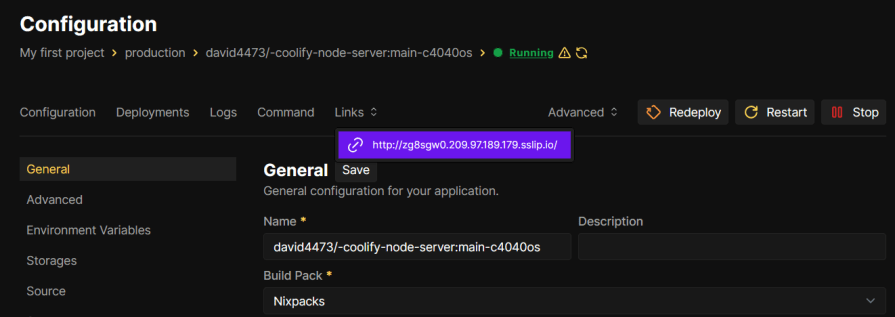
Once the application is successfully deployed, click the Links tab to find the domain and see your app live:
Repeat the same process to deploy the Next.js application, but remember to use the database’s private (internal) connection URL and uncheck the make it publicly available checkbox. This ensures secure internal communication within your Coolify setup:
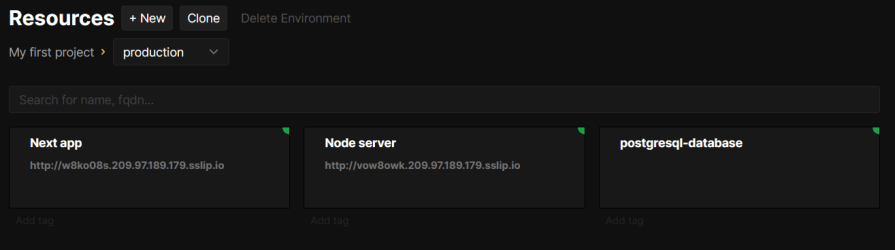
If everything is set up correctly, all three services should be running as expected:
Note that the connection to the application is not secure yet. Normally, this would be addressed with a custom domain, but for now, you can enable a free, temporary SSL certificate for the generated domain by adding an s after http in the address on the configuration page, like this:
When deploying for production, it’s important to be able to make changes to our resources, such as upgrading to a newer version or switching to a different version. Coolify makes this easy.
Upgrading resources like the Node server and the Next.js application is as simple as pushing the update to the source repository and redeploying the instance on Coolify.
Manually doing this back and forth can quickly become tedious. Thankfully, Coolify allows us to automate deployments with webhooks. This means Coolify will automatically redeploy a resource if it detects new updates in the project’s repository.
To set this up, go to your resource’s webhook menu. You can find this on the sidebar of your resource’s configuration page.
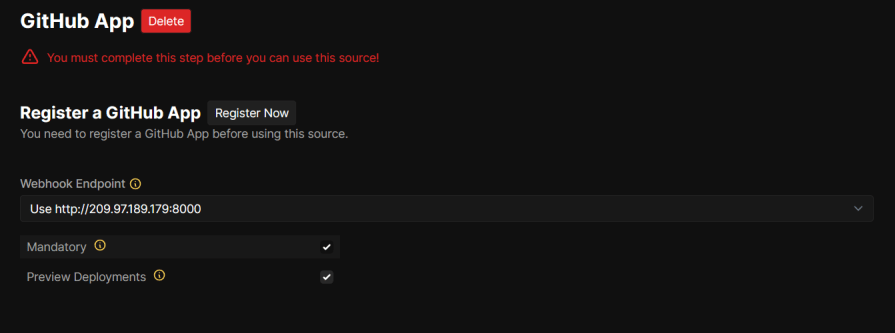
In the webhooks menu, click on the webhook configuration on GitHub button:
Change the webhook endpoint to your Coolify instance’s custom domain, if you have one set up, to avoid exposing your server IP, as shown in the image above.
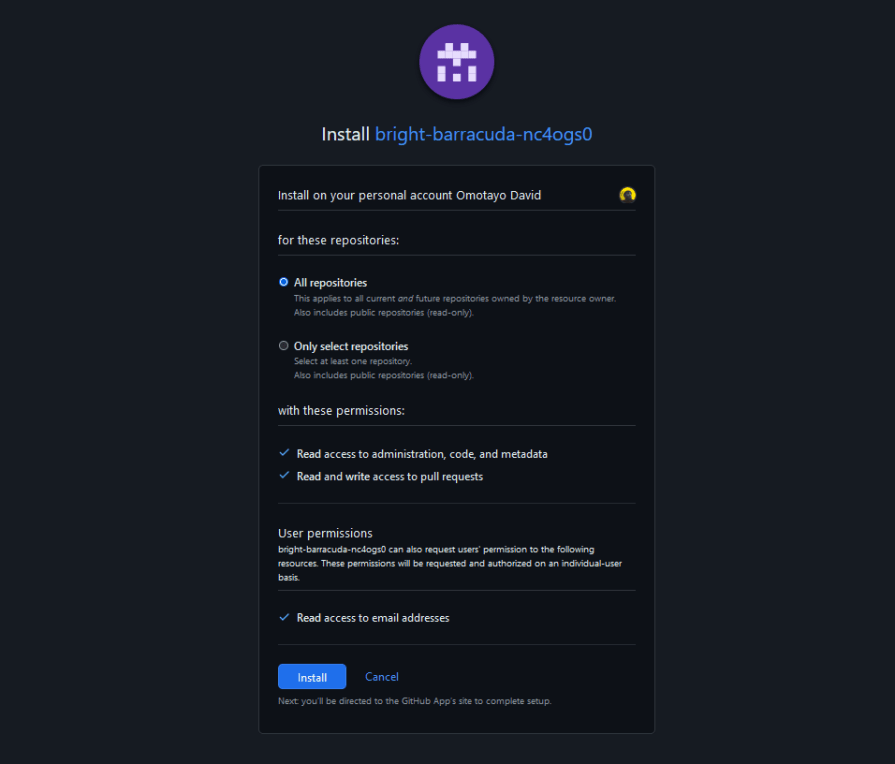
Next, click the Register Now button to log into your GitHub account, authenticate the GitHub app, and give it access to your repositories:
Make sure to select All repositories and click the install button.
After the installation, you’ll be redirected back to the GitHub app page, where you’ll see the information needed to trigger a rebuild when GitHub detects a new update:
Everything is hooked up! If we go back to the Coolify dashboard, we should be able to create new resources from our newly added source.
The process is similar to how we deployed the initial resources. The only difference is that instead of choosing the public Repository option on the “New Resources” page, we choose the Private Repository (with GitHub app) option:
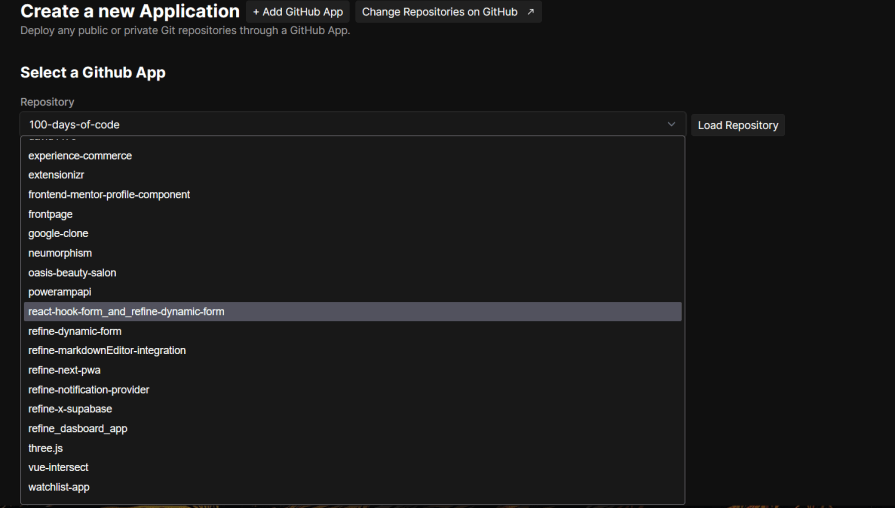
On the next page, choose the GitHub app we just created, and then select the repository you wish to load from the dropdown menu:
This will take you to a familiar page — the deployment configuration page. Click the deploy button to complete the process and deploy the application. Now, if you push an update to that repository, Coolify will be notified and automatically redeploy the resource.
So, is Coolify the ultimate alternative to the status quo? This depends on your requirements and the vision you have for your application. If you see your application scaling significantly in the future, setting up a self-hosted deployment might be a worthwhile investment. Otherwise, solutions like Heroku and Vercel will likely suffice.
While this guide will get you started with Coolify, there are even more features that I didn’t get into, such as setting up custom domains with wildcards for your Coolify instance and deployed resources or how to open up and close ports using a firewall.
What’s something you’d like to see with Coolify? Let me know in the comments. Thanks for reading, and happy building.
Deploying a Node-based web app or website is the easy part. Making sure your Node instance continues to serve resources to your app is where things get tougher. If you’re interested in ensuring requests to the backend or third-party services are successful, try LogRocket.
👁 LogRocket Network Request MonitoringLogRocket lets you replay user sessions, eliminating guesswork around why bugs happen by showing exactly what users experienced. It captures console logs, errors, network requests, and pixel-perfect DOM recordings — compatible with all frameworks.
LogRocket's Galileo AI watches sessions for you, instantly identifying and explaining user struggles with automated monitoring of your entire product experience.
LogRocket instruments your app to record baseline performance timings such as page load time, time to first byte, slow network requests, and also logs Redux, NgRx, and Vuex actions/state. Start monitoring for free.
Install LogRocket via npm or script tag. LogRocket.init() must be called client-side, not
server-side
$ npm i --save logrocket

// Code:

import LogRocket from 'logrocket';
LogRocket.init('app/id');
// Add to your HTML:

<script src="https://cdn.lr-ingest.com/LogRocket.min.js"></script>
<script>window.LogRocket && window.LogRocket.init('app/id');</script>
TSRX adds first-class control flow, conditional hooks, and scoped styles to React via a TypeScript compiler extension — no new framework required.
Learn how to build a full React Native auth system using Better Auth and Expo — with email/password login, Google OAuth, session persistence, and protected routes.
Compare the top AI development tools and models of June 2026. View updated rankings, feature breakdowns, and find the best fit for you.
Learn how Bloom filters reduce database lookups for username availability checks while preserving correctness at scale.
Would you be interested in joining LogRocket's developer community?
Join LogRocket’s Content Advisory Board. You’ll help inform the type of content we create and get access to exclusive meetups, social accreditation, and swag.
Sign up now