 |
VOOZH | about |
|
VOOZH | about |
As an Angular developer, a large part of our daily job is putting components together to build our app. From time to time, we will need to inject a component or UI template into another component dynamically.
👁 Rendering dynamic content in Angular components using Angular CDK portalsIn Angular, there are a couple of ways to render dynamic components into a host component before the CDK portals are released. These are:
Both methods have a drawback: the host component needs to reference the injected component directly. The coupling between the host and injected component makes it hard to test and maintain.
Portal provides a flexible and clean alternative method of injecting content into an Angular component.
Let’s walk through an example of using Portal step-by-step.
The Replay is a weekly newsletter for dev and engineering leaders.
Delivered once a week, it's your curated guide to the most important conversations around frontend dev, emerging AI tools, and the state of modern software.
Let’s say we’re enhancing the dashboard screen in an Angular app. The screen contains
dashboard): this is the container of the dashboard screenstats and action components): these display information related with current context of dashboardWhen the user picks an option from the selector, the app will navigate to different subroutes. As a result, the corresponding component will be loaded into the router outlet. The two subcomponents will then be updated with different content.
Upon the selection change, the selected service type data is pushed into the serviceType$ observable in the DashboardService. In the action component, we subscribe to the serviceType$ observable.
// TypeScript
// dashboard.component.ts
// when user change a selection, new serviceType are broadcasted
this.service.searchType$.next(serviceType);

// dashboard.service.ts
export class DashboardService {
 searchType$ = new BehaviorSubject('');
 constructor() { }
}
// action.component.ts
export class ActionComponent {
 serviceType$ = this.service.searchType$;
 constructor(private service: DashboardService) {}
}
We use ngSwitch to react to the observable serviceType$. In the following example, the action component content is updated when the observable value changes.
 // actions.Component
 <div class="panel-body" *ngIf="serviceType$ | async as serviceType">
 <div [ngSwitch]="serviceType">
 <div *ngSwitchCase="'client'">
 <button (click)="registerNewClient()" class="btn btn-primary">
 Register New Client
 </button>
 </div>
 <div *ngSwitchCase="'order'">
 <button (click)="registerNewOrder()" class="btn btn-danger">
 Search order
 </button>
 </div>
 <div *ngSwitchDefault>default action</div>
 </div>
 </div>
The dashboard works, but there are a couple of problems with the code:
These subcomponents are designed to present data, so they should be dumb, or presentational, components. Instead, the current design makes them aware of the external data entities
This means that they register event handling, which makes them hard to be reused. To add a new service type, we need to add ngSwitchCase into all of our subcomponents, and with more service types or subcomponents being added, the dashboard will become more complex and harder to maintain. What we want is to inject UI contents into the subcomponents while the subcomponents don’t know where the contents are coming from.
Portals are provided as part of the Angular Material CDK, which is internally developed by the Angular Material team. Its name was recently shortened to Angular CDK. The definition of portals in the official documentation is: portal is a piece of UI that can be dynamically rendered to an open slot on the page. There are two key parts:
Portal: the UI element (component or template) to render. It can be a component, a templateRef or a DOM element.PortalOutlet: the slot where the content will be rendered. In the previous version, it was called PortalHost.Let’s make use of the portals to solve the above problem.
To start using the Angular CDK portal, the following package needs to be installed.
npm install @angular/cdk
Then in the app.module.ts file, we need to import the CDK module.
// TypeScript
import {PortalModule} from '@angular/cdk/portal';
We have a few options to create a portal.
ComponentPortal: create a portal from a component type.
// TypeScript
this.portal = new ComponentPortal(StatsComponent);
TemplatePortal: create a portal from a <ng-template>
// Html
<ng-template #templatePortal>
 <ng-content></ng-content>
</ng-template>
DomPortal: create a portal from a native DOM element. This allows us to take any DOM element and inject it to the host
// Html
<div #domPortal>Total clients</div>
With DomPortal, the Angular binding within the content won’t be effective because it’s treated as a native DOM element.
Angular CDK also provides a cdkPortal directive, which is a version of TemplatePortal. The cdkPortal directive saves some boilerplate code compared to TemplatePortal, as we don’t need to manually instantiate the portal.
In this example, we use the cdkPortal directive because it’s simpler and more declarative.
As the below code shows, we wrap ng-content inside the ng-template in the ActionButtonComponent template. Then, we add the portal directive into the ng-template.
There are two equivalent selectors for the cdkPortal directive: portal or cdk-portal. ng-content is used so we can project contents from the other components.
// Html
// ActionButtonComponent
 <ng-template cdk-portal>
 <ng-content></ng-content>
 </ng-template>
Please note that the element with the cdkPortal directive will not be shown until it’s attached to CdkPortalOutlet. This applies to all elements, including div.
In the ActionButtonComponent class, we can reference the template using the @ViewChild and CdkPortal directives.
// TypeScript
// ActionButtonComponent
 @ViewChild(CdkPortal)
 private portal: CdkPortal;
PortalOutletIn the ActionComponent, we created a placeholder with the ID set to action.
// Html
// ActionComponent
 <div id="action"></div>
Now we can create the DomPortalOutlet. We use document.querySelector to get hold of the DOM element placeholder defined above. The rest of the parameters are injected via the component constructor.
Please note that the DomPortalOutlet was previously called DomPortalHost. Since Angular 9, it’s been renamed to DomPortalOutlet.
// Html
// ActionButtonComponent

 private host: DomPortalOutlet;

 constructor(
 private cfr: ComponentFactoryResolver,
 private appRef: ApplicationRef,
 private injector: Injector
 ) {}

 ngAfterViewInit(): void {
 this.host = new DomPortalOutlet(
 document.querySelector('#action),
 this.cfr,
 this.appRef,
 this.injector
 );
The creation of DomPortalOutlet occurs within the ngAfterViewInit lifecycle event. It’s necessary because ngAfterViewInit occurs right after the view is rendered.
After both portal and DomPortalOutlet are defined, we can attach the portal to the portalOutlet. This will inject the portal into the placeholder referenced by the portalOutlet.
// TypeScript
// ActionButtonComponent
export class ActionButtonComponent implements AfterViewInit, OnDestroy{

 @ViewChild(CdkPortal)
 private portal: CdkPortal;
 private host: DomPortalOutlet;

 constructor(
 private cfr: ComponentFactoryResolver,
 private appRef: ApplicationRef,
 private injector: Injector
 ) {}

 ngAfterViewInit(): void {
 this.host = new DomPortalOutlet(
 document.querySelector('#action),
 this.cfr,
 this.appRef,
 this.injector
 );
 this.host.attach(this.portal);
 }
}
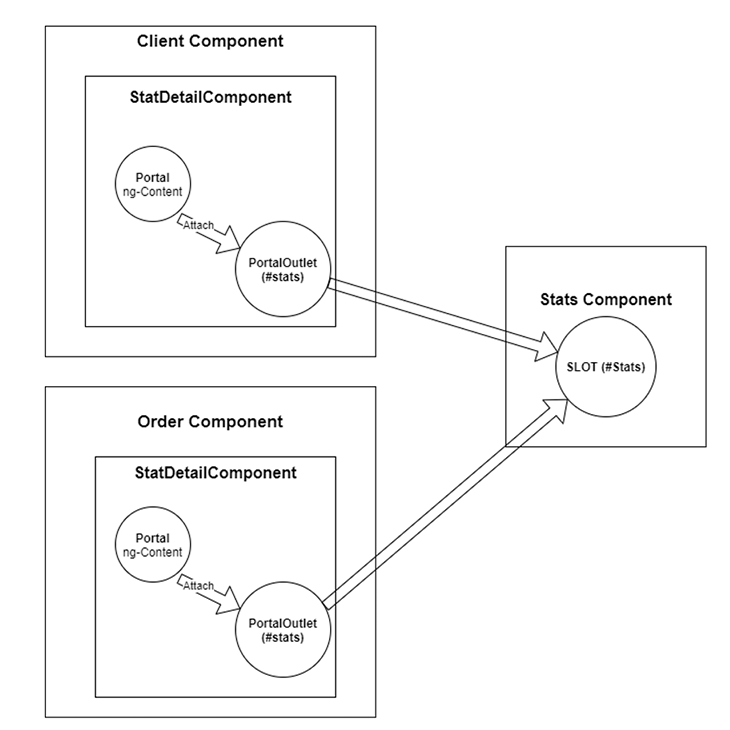
In this case, both the client and order components can project content into ActionButtonComponent. Those contents are shown in the portalOutlet in ActionComponent.
// Html
// client.component.html
<app-action-button>
 <button (click)="registerClient()" class="btn btn-primary">Register New Client</button>
</app-action-button>
Here is an overview of how the portal and portalOutlet work together.
👁 How the portal and portalOutlet work together
detach method vs. dispose methodWe use the detach method to remove the previously attached portal from the portalOutlet. It’s to clean things up when the parent component is removed.
Another way is to use the dispose method. When calling dispose, we permanently remove the portalOutlet from DOM.
// TypeScript
// ActionButtonComponent
ngOnDestroy(): void {
this.host.detach();
}
In our example, we use the detach method, as our intention is to detach the portal instead of removing the portalOutlet from DOM.
In the previous example, we don’t need to pass data because ng-content is used to project contents. But for other use cases, you may need to pass contextual data into the portal.
To pass context data in templatePortal, we can use the context property.
// TypeScript
this.portal.context = {}; // Your context data
For ComponentPortal, we can use token injection shown in the code below.
// TypeScript
// create a custom token
export const CONTEXT_TOKEN = new InjectionToken({...});

// when creating the componentPortal, provide the token injector
const injector = Injector.create({
providers: [{ provide: CONTEXT_TOKEN, useValue: {...}, // context data variable
});
const portal = new ComponentPortal(ComponentClass, null, injector);

//Inject the token into the constructor of the component, so it can be accessed
constructor(@Inject(CONTEXT_TOKEN) private data: T)
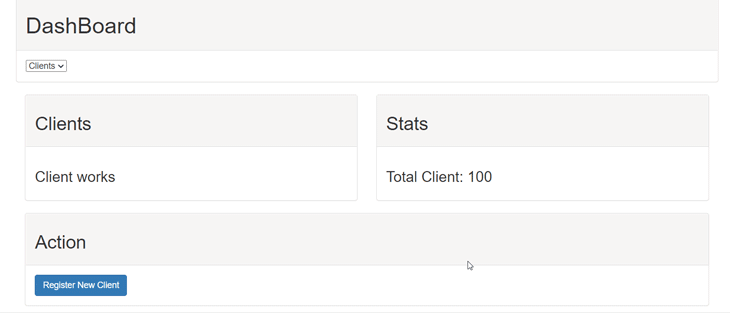
Below is what the final result looks like. Our dashboard shows dynamic content when the dropdown selector changes. Best of all, the subcomponents (the stats and action components) are loosely coupled. They do not contain logic about clients or orders; instead, they only need to focus on rendering the content correctly.
👁 The dashboard displaying our final results
In this article, we discussed how to use Angular CDK portals to inject dynamic contents to a few components in a dashboard. You can find the full example code on my GitHub.
The CDK Portal is a powerful feature. Its major benefits include its flexibility and clean separations. It gives us the ability to “teleport” content to any component within the screen, even if it’s outside the current component tree.
I hope this article can help you to apply this technique in your own awesome app!
Debugging Angular applications can be difficult, especially when users experience issues that are difficult to reproduce. If you’re interested in monitoring and tracking Angular state and actions for all of your users in production, try LogRocket.
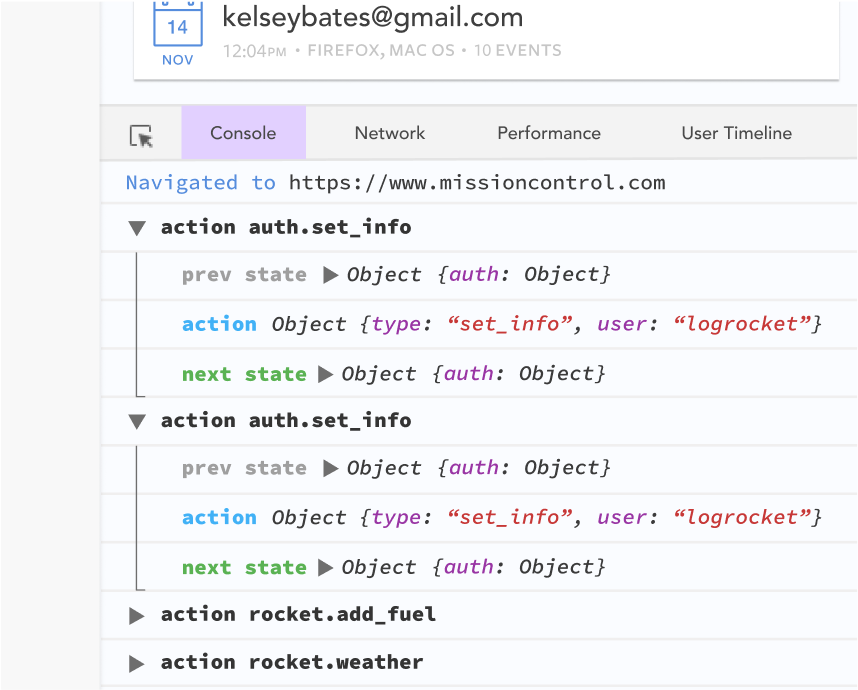
👁 LogRocket Dashboard Free Trial BannerLogRocket lets you replay user sessions, eliminating guesswork by showing exactly what users experienced. It captures console logs, errors, network requests, and pixel-perfect DOM recordings—compatible with all frameworks.
With Galileo AI, you can instantly identify and explain user struggles with automated monitoring of your entire product experience.
The LogRocket NgRx plugin logs Angular state and actions to the LogRocket console, giving you context around what led to an error, and what state the application was in when an issue occurred.
Modernize how you debug your Angular apps — start monitoring for free.
TSRX adds first-class control flow, conditional hooks, and scoped styles to React via a TypeScript compiler extension — no new framework required.
Learn how to build a full React Native auth system using Better Auth and Expo — with email/password login, Google OAuth, session persistence, and protected routes.
Compare the top AI development tools and models of June 2026. View updated rankings, feature breakdowns, and find the best fit for you.
Learn how Bloom filters reduce database lookups for username availability checks while preserving correctness at scale.
Hey there, want to help make our blog better?
Join LogRocket’s Content Advisory Board. You’ll help inform the type of content we create and get access to exclusive meetups, social accreditation, and swag.
Sign up now