 |
VOOZH | about |
|
VOOZH | about |
The performance and reliability of language models have become pivotal factors in the rapidly evolving AI and NLP landscapes. Testing these models thoroughly to ensure they meet user expectations is a critical step in their development.
👁 Using LangSmith Test LLMs AI AppsThis is where LangSmith comes into play. LangSmith is a dynamic testing framework that offers a powerful solution to assess the capabilities of language models and AI applications.
In this tutorial, we’ll explore the process of effectively utilizing LangSmith to test and evaluate language models, providing valuable insights into their performance, strengths, and limitations. With LangSmith as your ally, you’ll be equipped to refine and enhance your AI applications, optimizing them for real-world usage scenarios.
To follow along with this tutorial, you’ll need the following:
Let’s get started!
Jump ahead:
The Replay is a weekly newsletter for dev and engineering leaders.
Delivered once a week, it's your curated guide to the most important conversations around frontend dev, emerging AI tools, and the state of modern software.
LangSmith is an innovative and dynamic testing framework for evaluating language models and AI applications. As a platform, it is capable of building production-grade LLM applications.
In the realm of language model testing, LangSmith emerges as a robust and versatile testing framework. It provides tools that analyze and extract valuable insights from model responses, thereby assisting developers in refining their models for enhanced real-world interactions.
The LangSmith platform builds on top of LangChain. Simply put, LangSmith is for building production, whereas LangChain is for creating prototypes.
LangChain tracing tools are invaluable for investigating and debugging an agent’s execution steps. To gain a comprehensive understanding of chains or agents’ workflows, LangChain offers a tracing tool that enables us to visualize the sequence of calls effectively.
The LangChain tracing tool enables users to readily observe the methodology employed to arrive at its conclusions, fostering a deeper understanding of the model’s inner workings and building confidence in the accuracy of its responses. For instance, when different LLMs are used, the actions must be reviewed, and a method is required to check if the building blocks are working correctly.
One possible solution for implementing LangChain tracing is the Tracing Server, which provides two options: local-hosted via the LangChain Server Command and cloud-hosted via a Vercel app.
As we further explore the functionalities of LangSmith, its true potential for testing and enhancing language models and AI applications will become increasingly evident.
Here are some key features of LangSmith as a testing tool:
It’s time for the tutorial portion of this article. Let’s investigate how to use LangSmith to test and evaluate language models.
To get started setting the development environment, you’ll need to create a LangSmith account and verify your account to join the waitlist:
The next step involves initializing the environment, generating API keys, and ensuring their secure storage.
To create a LangChain component, install the most recent version of LangChain in your environment using Python or any other preferred programming language of your choice:
pip install - U langchain
Next, configure your runtime environment by following these three steps:
your-api-key placeholder with your generated API keysLANGCHAIN_ENDPOINT and enable LANGCHAIN_TRACING_V2 by setting it to trueLANGCHAIN_PROJECT to define the particular project you will be working on. This ensures that LangChain logs your runs to the intended project. Without this setting, the runs will be logged to a default projectBy following the above steps, you can automatically create the project, regardless of whether it already exists. You can accomplish this by following the shell commands provided below:
export LANGCHAIN_TRACING_V2=true
export LANGCHAIN_ENDPOINT=https://api.smith.langchain.com
export LANGCHAIN_API_KEY=<your-api-key>
export LANGCHAIN_PROJECT=<your-project> # if not specified, defaults to "default"
Next, create a LangSmith client to interact with the API:
from langsmith import Client

client = Client()
If you’re using Python, run the following commands to import the module:
from langchain.chat_models import ChatOpenAI

from langchain.agents import AgentType, initialize_agent, load_tools
The above code shows how the LangChain library is used to import the necessary modules and classes for this project: ChatOpenAI ,AgentType, initialize_agent, and load_tools.
Next, let’s create an instance of the ChatOpenAI class and store it in a llb variable. The temperature parameter will be set to 0, implying that the generated response will be more deterministic as shown in the code snippet below:
llm = ChatOpenAI(temperature=0)
Now, let’s call the load_tools function with a list of tool APIs, such as serpapi and llm-math, and also take the llm instance as a parameter. This function helps to load the specific language models and tools required for the task as shown in the code snippet below:
tools = load_tools(["serpapi", "llm-math"], llm=llm)
As a next step, initialize an agent by calling the initialize_agent function with several parameters like tools, llms, and agent:
 agent = initialize_agent(
 tools, llm, agent=AgentType.PROJECT_DESCRIPTION, verbose=False
)
The verbose parameter is set to false, indicating that the agent will not provide verbose or detailed output.
Below is the full code that’s used to set up a chat-based AI environment with LangChain. It initializes a chat model, loads specific tools, and creates an agent that can generate responses based on descriptions:
from langchain.chat_models import ChatOpenAI
from langchain.agents import AgentType, initialize_agent, load_tools

llm = ChatOpenAI(temperature=0)
tools = load_tools(["serpapi", "llm-math"], llm=llm)
agent = initialize_agent(
 tools, llm, agent=AgentType.PROJECT_DESCRIPTION, verbose=False
)
The code below defines a list of input examples using the asyncio library to asynchronously run the agent on each input and gather the results for further processing. This code also handles exceptions that may occur during the agent execution:
import asyncio

# Define a list of input examples
inputs = [
 "How many go on vacation to Maldives in 2023?",
 "Who is the faster man in the World?",
 "What is Obama's first daughter's age?",
 "What is the distance of Africa to America?",
 "What was the number of games Lionel Messi played in Inter Miami?",
 "What was the total number of male in America?",
 "How many artistes performed at 02 Arena in London in 2023?",
 "What is 10 raised to power of 20?",
 "Who is the best international news station?",
 "What is value of 10000 divided by 2?",
]

results = []

async def run_agent(agent, input_example):
 try:
 return await agent.run(input_example)
 except Exception as e:
 # Handle exceptions, if any
 return e

# Create an event loop and gather results
async def main():
 loop = asyncio.get_event_loop()
 for input_example in inputs:
 results.append(loop.create_task(run_agent(agent, input_example)))
 await asyncio.gather(*results)

# Run the main event loop
if __name__ == "__main__":
 loop = asyncio.get_event_loop()
 loop.run_until_complete(main())
It’s also important to call the wait_for_all_tracers function from the langchain.callbacks.tracers.langchain module as shown in the code snippet below:
from langchain.callbacks.tracers.langchain import wait_for_all_tracers
wait_for_all_tracers()
Calling the wait_for_all_tracers function helps ensure that logs and traces are submitted in full before the program proceeds. This is particularly useful for maintaining data consistency and completeness in logging in scenarios involving background threads or serverless deployments.
Congratulations on reaching this milestone! Assuming you’ve completed setting up your environment, your agent traces should now appear in the “Projects” section of the app. Now, let’s take the next exciting step and dive into the world of AI application evaluation!
LangSmith allows you to evaluate and test your LLM applications using LangSmith dataset. To demonstrate this, we‘ll evaluate another agent by creating a LangSmith dataset and configuring the evaluators to grade the agent’s output.
These datasets can be categorized as kv, llm, and chat. They refer to a collection of examples with input and output pairs that can be used to evaluate or test an agent or model. To gain a deeper understanding of evaluating a LangSmith dataset, let’s create the dataset, initialize new agents, and customize and configure the evaluation output.
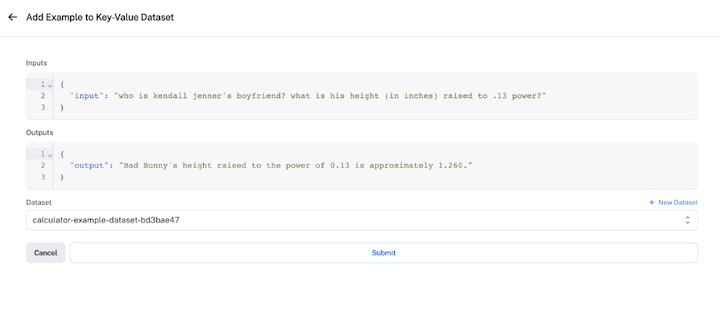
To create our dataset, we’ll collect examples from the existing runs we created earlier. To do this, click on the Add to Dataset button at the top right corner to make a selection from the existing runs.
The objective is to use these datasets to measure the performance of the agent:
dataset_name = f"calculator-example-dataset-{unique_identity}"

dataset = client.create_dataset(
 dataset_name, description="A calculator dataset"
)

runs = client.list_runs(
 project_name=os.environ["LANGCHAIN_PROJECT"],
 execution_order=1,
 error=False,
)
for run in runs:
 client.create_example(inputs=run.inputs, outputs=run.outputs, dataset_id=dataset.id)
Next, we’ll evaluate our LLM by initializing a new agent to benchmark. To do this, we’ll pass in a constructor called chain_factory to initialize each call.
Our evaluation will focus on an agent utilizing OpenAI’s function calling endpoints as shown in the code snippet below:
from langchain.chat_models import ChatOpenAI
from langchain.agents import AgentType, initialize_agent, load_tools

llm = ChatOpenAI(model="gpt-3.5-turbo-0613", temperature=0)
tools = load_tools(["serpapi", "llm-math"], llm=llm)

def agent_factory():
 return initialize_agent(tools, llm, agent=AgentType.OPENAI_FUNCTIONS, verbose=False)
Automated metrics and AI-guided feedback can be real game changers when it comes to assessing how well your component is doing.
Pre-implemented run evaluators can do some really cool things:
Here’s some sample code that demonstrates how to create pre-implemented run evaluators that add inputs and receive outputs of a dataset:
from langchain.evaluation import EvaluatorType
from langchain.smith import RunEvalConfig

evaluation_config = RunEvalConfig(

 evaluators=[

 EvaluatorType.QA,

 EvaluatorType.EMBEDDING_DISTANCE,

 RunEvalConfig.LabeledCriteria("helpfulness"),

 RunEvalConfig.Criteria(
 {
 "fifth-grader-score": "Do you have to be smarter than a fifth grader to answer this question?"
 }
 ),
 ],
 custom_evaluators=[],
)
👁 LangSmith Adding Inputs Receiving Outputs Dataset
N.B., for an in-depth exploration of how to choose the best evaluator for your specific needs and how to craft custom evaluators, check out the LangSmith documentation.
Now that you’ve successfully crafted and fine-tuned your custom evaluator to perfectly align with your specific requirements, it’s time to put your model to the test!
You can use the arun_on_dataset function (or the synchronous run_on_dataset if you prefer) to make it happen. This will:
llm or chain to work on each of those examplesThe below code demonstrates how to execute the agent and evaluator:
from langchain.smith import (
 arun_on_dataset,
 run_on_dataset,
)

chain_results = await arun_on_dataset(
 client=client,
 dataset_name=dataset_name,
 llm_or_chain_factory=agent_factory,
 evaluation=evaluation_config,
 verbose=True,
 tags=["testing-notebook"],
)
Guess what? You’ll get to witness this exciting action and its results directly within the LangSmith app. You can access the LangSmith test results tracing UI by following these steps:
LangSmith offers convenient data export options within the web application, allowing you to export data in popular formats like CSV or JSONL. Additionally, you can utilize the client to retrieve runs for in-depth analysis, store them in your preferred database, or easily share them with colleagues and collaborators.
AI applications will play a pivotal role in automating business operations and elevating project execution efficiency. As they continue to gain traction, their adoption is expected to surge.
Platforms like LangSmith and its counterparts have the potential to introduce a multitude of enhancements, including but not limited to:
In this article, we highlighted essential aspects of using LangSmith for LLM and AI application evaluation. We introduced LangSmith and then did a deep dive into setting up the development environment. and successfully evaluating and testing an AI application.
Throughout this article, we emphasized LangSmith’s pivotal role in effective testing, underlining its significance in ensuring reliable AI models. We used Python as our primary programming language to achieve this. You can explore LangSmith for more comprehensive model evaluation and other user-friendly features.
I hope you’ve found this article useful. Please leave a comment if you have any questions or concerns. Happy coding!
Install LogRocket via npm or script tag. LogRocket.init() must be called client-side, not
server-side
$ npm i --save logrocket

// Code:

import LogRocket from 'logrocket';
LogRocket.init('app/id');
// Add to your HTML:

<script src="https://cdn.lr-ingest.com/LogRocket.min.js"></script>
<script>window.LogRocket && window.LogRocket.init('app/id');</script>
TSRX adds first-class control flow, conditional hooks, and scoped styles to React via a TypeScript compiler extension — no new framework required.
Learn how to build a full React Native auth system using Better Auth and Expo — with email/password login, Google OAuth, session persistence, and protected routes.
Compare the top AI development tools and models of June 2026. View updated rankings, feature breakdowns, and find the best fit for you.
Learn how Bloom filters reduce database lookups for username availability checks while preserving correctness at scale.
Hey there, want to help make our blog better?
Join LogRocket’s Content Advisory Board. You’ll help inform the type of content we create and get access to exclusive meetups, social accreditation, and swag.
Sign up now