 |
VOOZH | about |
|
VOOZH | about |
Using a GraphQL API comes with distinct advantages. With GraphQL, we can request the exact data we need without ever under- or over-fetching. We can also get multiple resources in a single request. At the same time, the requests themselves can serve as a form of documentation, making it is easy to understand what data is being used, where, and why.
👁 GraphQL LogoBut the most exciting feature of GraphQL is that the API is fully described by its schema, including all data types for each possible query or mutation.
Why does this matter?
Because, based on that schema, we can automatically create TypeScript types for the entire API on the frontend. What’s more is we can easily autogenerate fully-typed custom React hooks for a data-fetching library like React Query.
Let me show you how.
The Replay is a weekly newsletter for dev and engineering leaders.
Delivered once a week, it's your curated guide to the most important conversations around frontend dev, emerging AI tools, and the state of modern software.
First, let’s create our React project with Create React App with the TypeScript template.
yarn create react-app graphql --template typescript
Next, we need an API. FakeQL provides a great way to create a mock GraphQL API and deploy it. Because we will be using the default definition, we can set everything up simply by clicking Extend JSON and then Deploy. The tool generates a unique URL where we can access our new API.
Now that we have our React app and our API, it is time to set up our data-fetching library, React Query.
Let’s install it:
yarn add react-query
Now, set up the React Query client.
import { QueryClient, QueryClientProvider } from 'react-query'

import Posts from 'components/Posts'

const queryClient = new QueryClient()

const App = () => {
 return (
 <QueryClientProvider client={queryClient}>
 <Posts />
 </QueryClientProvider>
 )
}

export default App
Because our API provides a list of posts, we will use a Posts component to display them. For the moment, let’s leave it empty.
// components/Posts.tsx

const Posts = () => {
 return (
 <></>
 )
}

export default Posts
Next, we need a query to get the list of posts. Let’s define it in a .graphql file and co-locate it with our component:
# components/Posts/posts.graphql

query Posts {
 posts {
 id
 title
 }
}
Finally, let’s also add a mutation for deleting a post:
# components/Posts/deletePost.graphql

mutation DeletePost($id: ID!) {
 deletePost(id: $id)
}
We are now ready to auto-generate our custom and fully typed React Query hooks based on the requests we previously defined in our .graphql files. We will be using GraphQL Code Generator.
We start by installing it:
yarn add graphql
yarn add -D @graphql-codegen/cli
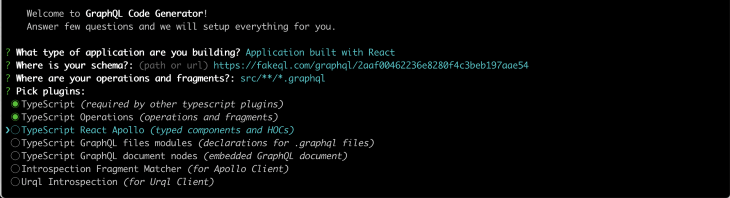
Next, we need to initialize the wizard and go through the steps:
yarn graphql-codegen init
First, we choose the type of app we are building:
Then, we define our schema is by pasting our FakeQL url.
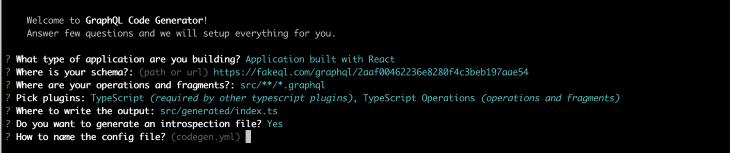
We define where our operations and fragments are:
👁 Defining Operations Fragments
We choose our plugins:
We choose where to write the output:
👁 Choosing Where to Write Output
Let’s also generate an introspection file:
👁 Generating Introspection File
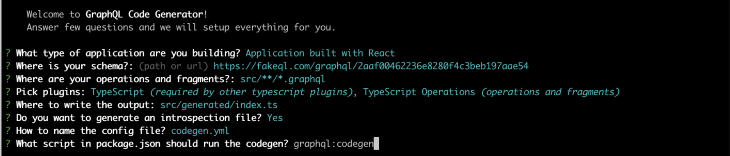
We need to name our config file:
Finally, let’s name our script graphql:codegen:
So far, so good!
In order to generate custom React Query hooks, we need to install the appropriate plugin:
yarn add -D @graphql-codegen/typescript-react-query
And add a quick edit of the codegen.yml config file in order to make it work:
overwrite: true
schema: 'https://fakeql.com/graphql/2aaf00462236e8280f4c3beb197aae54'
documents: 'src/**/*.graphql'
generates:
 src/generated/index.ts:
 plugins:
 - typescript
 - typescript-operations
 - typescript-react-query
 config:
 fetcher:
 endpoint: 'https://fakeql.com/graphql/2aaf00462236e8280f4c3beb197aae54'
Finally, we need to run our script.
yarn graphql:codegen
We are now done! Our fully-typed custom React Query hooks have been automatically generated and added directly to our project’s generated folder.
Let’s see them in action!
In our Posts component, we are now ready to display the list of posts:
import { usePostsQuery } from 'generated'

const Posts = () => {
 const { data } = usePostsQuery()
 return (
 <>
 {isLoading && <p>Loading ...</p>}
 {data &&
 data.posts?.map(post => (
 <div key={post?.id}>
 <p>{post?.title}</p>
 <hr />
 </div>
 ))}
 </>
 )
}

export default Posts
Let’s also add the DeletePost mutation we defined earlier.
import { useQueryClient } from 'react-query'
import { usePostsQuery, useDeletePostMutation } from 'generated'

const Posts = () => {
 const queryClient = useQueryClient()
 const { data, isLoading } = usePostsQuery()
 const { mutate } = useDeletePostMutation({
 onSuccess: () => queryClient.invalidateQueries('Posts'),
 })

 return (
 <>
 {isLoading && <p>Loading ...</p>}
 {data &&
 data.posts?.map(post => (
 <div key={post?.id}>
 <p>{post?.title}</p>
 <button onClick={() => post && mutate({ id: post.id })}>
 Delete
 </button>
 <hr />
 </div>
 ))}
 </>
 )
}

export default Posts
That’s it, we now have a working example!
The approach described above allows us to take full advantage of GraphQL on the frontend by automating both the creation of TypeScript types for the API and the generation of custom React Query hooks for each request.
By using it, we have also substantially reduced the amount of data-fetching boilerplate code we need to write. With this tooling in place, all we need to do in order to create additional React Query custom hooks for a request is to create a .graphql file and run the graphql:codegen script. Pretty cool, right?
Curious to play with the code yourself? Find a full working example in my GitHub repo.
Happy coding! ✨
LogRocket lets you replay user sessions, eliminating guesswork by showing exactly what users experienced. It captures console logs, errors, network requests, and pixel-perfect DOM recordings — compatible with all frameworks, and with plugins to log additional context from Redux, Vuex, and @ngrx/store.
With Galileo AI, you can instantly identify and explain user struggles with automated monitoring of your entire product experience.
Modernize how you understand your web and mobile apps — start monitoring for free.
Install LogRocket via npm or script tag. LogRocket.init() must be called client-side, not
server-side
$ npm i --save logrocket

// Code:

import LogRocket from 'logrocket';
LogRocket.init('app/id');
// Add to your HTML:

<script src="https://cdn.lr-ingest.com/LogRocket.min.js"></script>
<script>window.LogRocket && window.LogRocket.init('app/id');</script>
Learn how to build a full React Native auth system using Better Auth and Expo — with email/password login, Google OAuth, session persistence, and protected routes.
Compare the top AI development tools and models of June 2026. View updated rankings, feature breakdowns, and find the best fit for you.
Learn how Bloom filters reduce database lookups for username availability checks while preserving correctness at scale.
Learn how to test Nuxt apps with Vitest, @nuxt/test-utils, runtime mocks, server route mocks, and Playwright e2e tests.
Hey there, want to help make our blog better?
Join LogRocket’s Content Advisory Board. You’ll help inform the type of content we create and get access to exclusive meetups, social accreditation, and swag.
Sign up now