 |
VOOZH | about |
|
VOOZH | about |
The Replay is a weekly newsletter for dev and engineering leaders.
Delivered once a week, it's your curated guide to the most important conversations around frontend dev, emerging AI tools, and the state of modern software.
Docker is one of the most important technologies in enterprises nowadays. Most tech companies are using Docker to improve the deployment strategy of its products and services, making them robust and scalable. In this article, we will look at one of the most promising features of writing Dockerfiles efficiently to reduce the final image size. But first, let’s understand a bit about Docker.
👁 ImageDocker is containerization of the applications similar to VMs, but very lightweight (read the complete article on Docker vs Virtual Machines). Docker is a tool to easily create, deploy, and run applications by using containers that are independent of the OS.
A container packages the application services or functions with all of the libraries, configuration files, dependencies, and other necessary parts to operate. Each container shares the services of one underlying operating system.
Docker Images are the set of instructions written in a file called Dockerfile. These instructions act as a multi-layered filesystem in Docker. When a Docker user runs the images, it produces one or multiple containers.
We can also say that Docker Images are immutable files, basically a snapshot of the container. We can make n number of containers from a single Docker image similar to OOPs concept of creating n objects instances (which share common characteristics and behavior) from a single Class.
Like I said earlier, Dockerfile contains the set of instructions which acts as a multi-layer filesystem. The more instructions we have (for example RUN, COPY, ADD) in our Dockerfile, the greater the final size of the image. There are many other things that are responsible for increasing the size of the image, like the context, base image, unnecessary dependencies, packages, and a number of instructions.
Why do we need to reduce the size of the Docker image in this modern era of tech, where memory and storage are relatively cheap?
By reducing the Docker image size, we keep only the required artifacts in the final image and remove all the unnecessary data. It is also necessary because:
Reducing Docker Images is something we should know how to do to keep our application secure and stick with the proper industry standards and guidelines.
There are a lot of ways to do this, including:
Let’s move to Multi-Stage Builds 🤘
Multi-stage builds in Docker are a new feature introduced in Docker 17.05. It is a method to reduce the image size, create a better organization of Docker commands, and improve the performance while keeping the Dockerfile easy to read and understand.
The multi-stage build is the dividing of Dockerfile into multiple stages to pass the required artifact from one stage to another and eventually deliver the final artifact in the last stage. This way, our final image won’t have any unnecessary content except our required artifact.
Previously, when we didn’t have the multi-stage builds feature, it was very difficult to minimize the image size. We used to clean up every artifact (which isn’t required) before moving to the next instruction as every instruction in Dockerfile adds the layer to the image. We also used to write bash/shell scripts and apply hacks to remove the unnecessary artifacts.
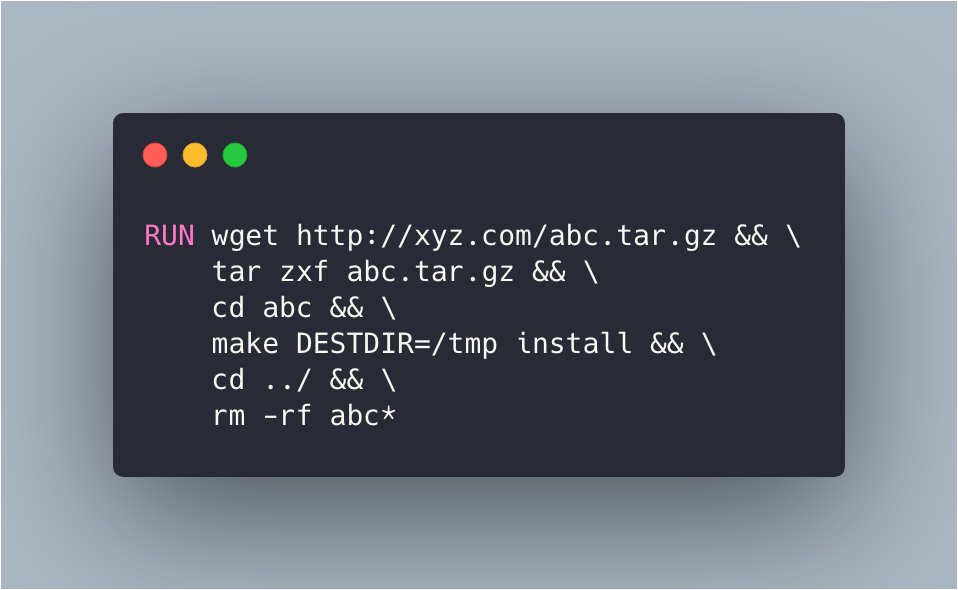
Let’s look at an example:
This is just the one instruction of the Dockerfile in which we need to download the abc.tar.gz file from some http://xyz.com website and extract the content and run make install.
In the same instruction, we stored the content of the make install command to /tmp dir and removed the remaining data like the downloaded tar file and extracted tar contents so that we can only have the content of the make install command, which is required for our further processing.
That’s all the stuff we have to do in one instruction to reduce the size of the final image. Now we can imagine the complexity of the Dockerfile for n number of instructions.
Ohh wait..wait..wait..!!! Now we have the power of multi-stage builds with which we can reduce the size of the image without compromising the readability of the Dockerfile.
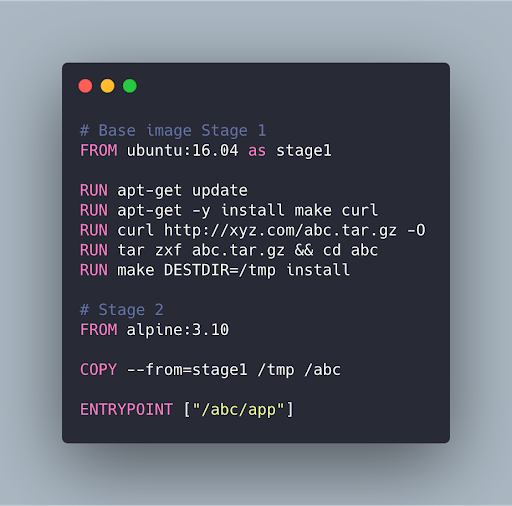
Let’s look at the same example using multi-stage build:
Here in this Dockerfile, we are using ubuntu:16.04 as a base image and called this stage as stage1 and executed some instructions as follows:
apt-get update to update the packagesapt-get -y install make curl to install make and curl packagesabc.tar.gz file from http://xyz.com using curlabc.tar.gz file and change the directory to abcmake DESTDIR=/tmp install command to store the output to tmp directoryalpine:3.10 as the base image because it is lighter/tmp dir from stage1 to /abc dir in stage2 by simply running COPY --from=stage1 /tmp /abc commandEntrypoint to run itThis way, we copied the required artifact from stage 1 to stage 2 without compromising the Dockerfile and successfully created the most optimized and reduced image. Similarly, we can use multi-stage builds to create a static build for the frontend files and pass the static files to stage 2 where we can use nginx base image to host them without keeping the large, bulky node_modules in our app which is of no use after the static build.
We can also use external Docker images as a stage and can also stop at a specific build stage. It is not always useful as we lost the previous stage intermediate containers so we won’t be able to leverage build cache in Docker. Read more about the multi-stage build from Docker official docs.
In this article, we looked at what Docker is, why we need to reduce the size of images, and how can we do this using multi-stage builds effectively. I hope this article helped you understand Docker and its multi-stage builds feature.
Feel free to comment and ask me anything. You can follow me on Twitter and Medium. Thanks for reading! 👍
Install LogRocket via npm or script tag. LogRocket.init() must be called client-side, not
server-side
$ npm i --save logrocket

// Code:

import LogRocket from 'logrocket';
LogRocket.init('app/id');
// Add to your HTML:

<script src="https://cdn.lr-ingest.com/LogRocket.min.js"></script>
<script>window.LogRocket && window.LogRocket.init('app/id');</script>
TSRX adds first-class control flow, conditional hooks, and scoped styles to React via a TypeScript compiler extension — no new framework required.
Learn how to build a full React Native auth system using Better Auth and Expo — with email/password login, Google OAuth, session persistence, and protected routes.
Compare the top AI development tools and models of June 2026. View updated rankings, feature breakdowns, and find the best fit for you.
Learn how Bloom filters reduce database lookups for username availability checks while preserving correctness at scale.
Hey there, want to help make our blog better?
Join LogRocket’s Content Advisory Board. You’ll help inform the type of content we create and get access to exclusive meetups, social accreditation, and swag.
Sign up now