 |
VOOZH | about |
|
VOOZH | about |
If you’re considering becoming a blockchain developer, this is a good time to get started.
👁 send bitcoin javascriptAfter all, according to Zip Recruiter’s data, an average blockchain developer salary is about $154,550/year.
However, with this article, you don’t need any knowledge of cryptography to follow along. If you know JavaScript, you are good to go.
At the end of this tutorial, you should have a general understanding of how bitcoin transactions work and should be able to send Bitcoin to anyone from your wallet using JavaScript.
The Replay is a weekly newsletter for dev and engineering leaders.
Delivered once a week, it's your curated guide to the most important conversations around frontend dev, emerging AI tools, and the state of modern software.
To follow along, you should have:
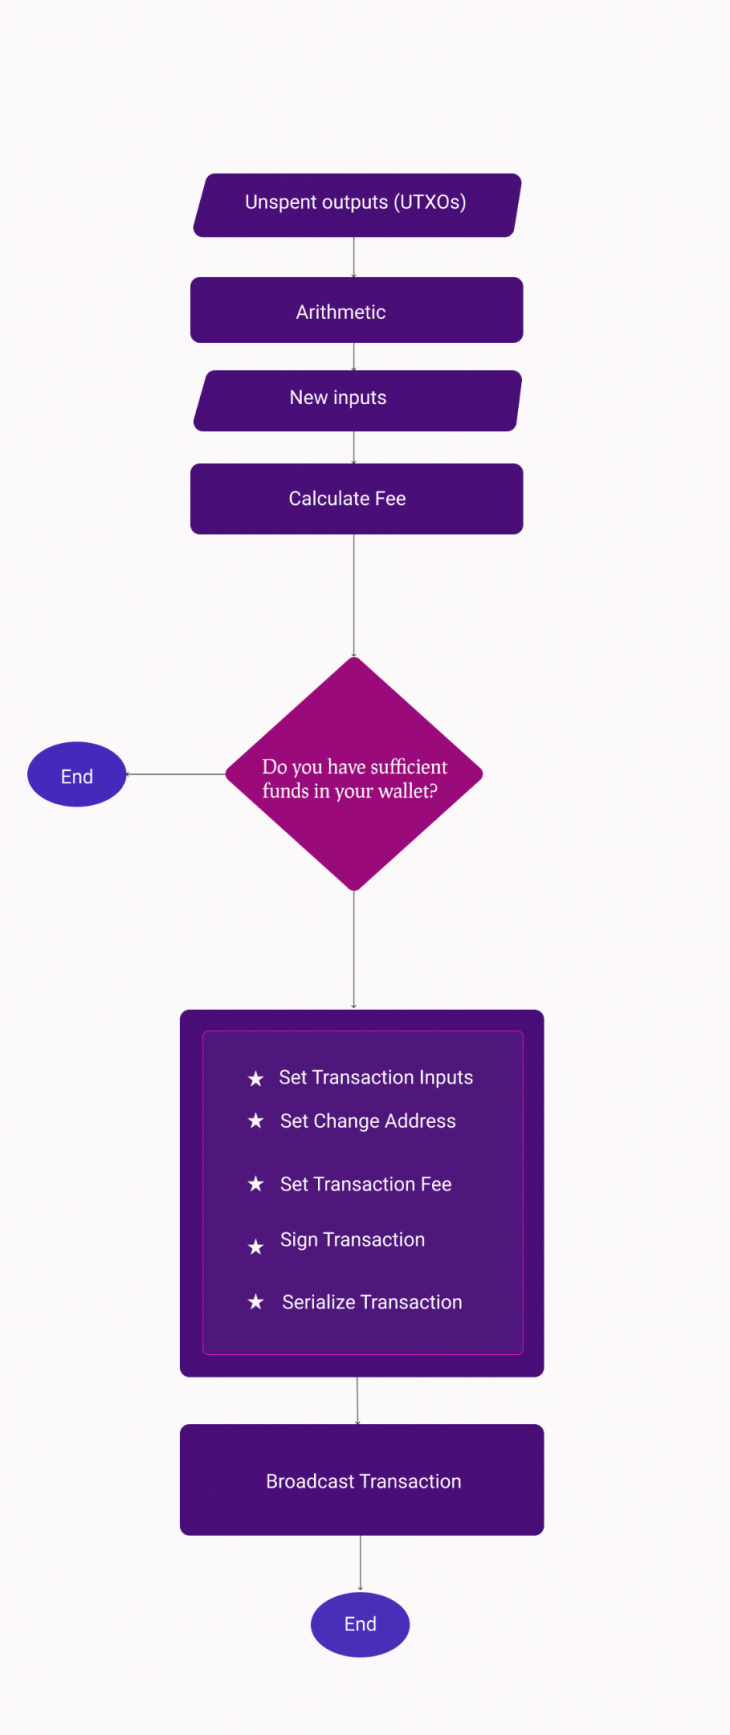
Here’s a simple workflow diagram of the entire bitcoin transaction process.
Here’s the transaction workflow:
First off, let’s define two key terms you’ll notice throughout this tutorial: the blockchain and a bitcoin transaction.
The blockchain can be described as an immutable distributed database of a global log of transactions. A block in the blockchain can be likened to a record in traditional databases.
A transaction is the transfer of value from one bitcoin wallet to another that gets included in the blockchain.
You’ll typically need to install and run your bitcoin node (your copy of the blockchain) on your server to be able to play around with the blockchain development. However, we won’t do that in this tutorial.
Instead, we’ll use third-party services that are already running a bitcoin node.
There is the bitcoin Testnet blockchain and the Mainnet blockchain. The Testnet is a bitcoin blockchain designed to be used for testing. This is what we’ll use in this tutorial.
N.B., do not use real bitcoin in development; bitcoin transactions are not reversible; once lost, they can not be recovered unless you have the private key of the receiving addresses
To get started, we need to have some bitcoins to send, right? So, let’s create a Testnet wallet and load it with some bitcoins. You can quickly use the wallet generator website to generate Testnet wallets.
Or you can generate one with bitcore-core.
Here is the one I just generated from the website.
93F2mUJPKbXW8Q9cMNz4ZmpsjgTbNjrMeCaUesTPE7k1DFhSmnk (in the real world this private key should not be shown to anyone, but this is a Testnet, so whatever 😀 )mtVE8anM63kQcgKUC6oQQD9K6xiV4wsr7qLet’s send some bitcoin to it using a bitcoin Testnet faucet website. I will send 0.00 bitcoin to this address (mtVE8anM63kQcgKUC6oQQD9K6xiV4wsr7q) from this Testnet website.
Now that we have some bitcoin in our wallet, let’s create a simple Node.js application that will allow us to send bitcoin.
Set up your node application with npm init -y and install the Bitcore open source library — we’ll use the Bitcore library and Axios to interface with the blockchain.
npm install axios, bitcore-lib
Create an index.js file and import the Bitcore and Axios library.
const axios = require("axios");
const bitcore = require("bitcore-lib");
Then create a function sendBitcoin that will actually send the bitcoin.
We’ll use the SoChain API to connect to the Testnet blockchain.
The code below is the building block of the function definition we’ll use to send bitcoin. It’s heavily commented to help with understanding.
 /**
 @receiverAddress - Address of the person you want to send bitcoin to
 @amountToSend - This is the amount of bitcoin you want to send to someone from your wallet. This amount will be deducted from your wallet and sent to this address.
*/

let sendBitcoin = (recieverAddress, amountToSend)=>{
 const sochain_network = "BTCTEST"; // the Testnet network for sochain
 const privateKey = `93F2mUJPKbXW8Q9cMNz4ZmpsjgTbNjrMeCaUesTPE7k1DFhSmnk`;// your privateKey -- the one we just generated

/* your bitcoin address. The one you want to send funds from -- the one we just generated */
 const sourceAddress = `mtVE8anM63kQcgKUC6oQQD9K6xiV4wsr7q`;
/**
because the outputs come in satoshis, and 1 Bitcoin is equal to 100,000,000 satoshies, we'll multiply the amount of bitcoin by 100,000,000 to get the value in satoshis.
*/
 const satoshiToSend = amountToSend * 100000000;
 let fee = 0;
 let inputCount = 0;
 let outputCount = 2; // we are going to use 2 as the output count because we'll only send the bitcoin to 2 addresses the receiver's address and our change address.
}
Unspent outputs are the transactions you received to your bitcoin wallet that have not been spent. Assuming you receive $100 USD worth of bitcoin in five different transactions, you will have five unspent outputs.
Let’s use the SoChain block explorer to find out how many outputs we have so far in our wallet. If you pass the network and the address to the URL below in a GET request, it will return a result that contains our unspent outputs.
https://sochain.com/api/v2/get_tx_unspent/{Network}/{Address}
For example if we pass our address to it, like so:
https://sochain.com/api/v2/get_tx_unspent/BTCTEST/mtVE8anM63kQcgKUC6oQQD9K6xiV4wsr7q
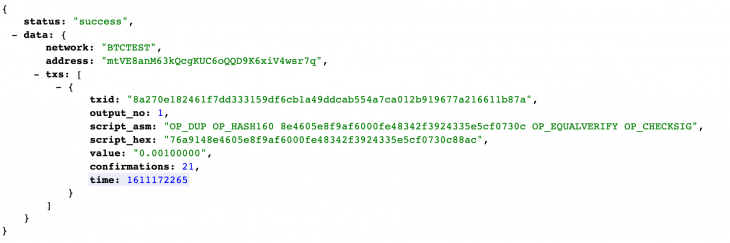
Here is the result we’ll get:
The txs part is an array of all the unspent outputs.
That’s just one unspent output we have there. Because I sent Bitcoin once to that address and it has not been spent.
To use that data in our code, let’s Axios to grab that data:
 const utxos = await axios.get(
 `https://sochain.com/api/v2/get_tx_unspent/${sochain_network}/${sourceAddress}`
 );
Next, initialize a new transaction using the Bitcore lib API.
const transaction = new bitcore.Transaction();
From here onward, we’ll use this transaction instance to complete the entire process.
From the unspent outputs, we need to build a new input. Our input is going to be equal to the unspent outputs.
Let’s grab the essential elements of the outputs we need to create new inputs from the unspent output array. We are doing this because the shape of the object that the Bitcore API requires is not the same as what SoChain returns to us. Below are the required items we’ll be looking out for in our transaction.
utxo.satoshis = Math.floor(Number(element.value) * 100000000);
utxo.script = element.script_hex;
utxo.address = utxos.data.data.address;
utxo.txId = element.txid;
utxo.outputIndex = element.output_no;
Grab that data from the array of unspent output and build the new inputs:
 let inputs = [];
 let utxos = response.data.data.txs;

 for (const element of utxos) {
 let utxo = {};
 utxo.satoshis = Math.floor(Number(element.value) * 100000000);
 utxo.script = element.script_hex;
 utxo.address = response.data.data.address;
 utxo.txId = element.txid;
 utxo.outputIndex = element.output_no;
 totalAmountAvailable += utxo.satoshis;
 inputCount += 1;
 inputs.push(utxo);
 }
Now that we’ve got the inputs in an array, let’s set the transaction inputs.
transaction.from(inputs);
If you have played around with bitcoin, you will notice that sometimes the fees are high and other times, they may be close to zero. Well, that’s because there is really no fee. Sounds counterintuitive, right?
Yes, you can decide to send bitcoin without a fee, but it might take a long time before it’ll get picked and added to the blockchain by miners. The fee is a concept that allows miners to be compensated for their effort and to keep the network secure.
Also, because the maximum block size in a bitcoin transaction is 1MB, miners tend to give priority to the transactions with the highest fees. As of this writing, the average priority fee is about 108 satoshis/byte.
So, how do you determine the fee?
Because the fee doesn’t depend on the amount of bitcoin you are sending, and instead upon the size of the transaction, you need to first determine the size of the transaction. Interestingly, the size of the transaction depends on the input and output in the transaction.
This formula can be used to determine the size:
transactionSize = inputCount * 180 + outputCount * 34 + 10 - inputCount;
In every bitcoin transaction, the inputs contribute 180 bytes each to the transaction, while the output contributes 34 bytes each to the transaction. Then there is an extra 10 bytes you add or subtract from the transaction as well.
Assuming you have a transaction with two inputs and two outputs, the transaction size will be 2180+234+10-2 = 436 bytes.
So, if you want to pay 20 satoshis per byte, the fee will be:
Fee = 20*436
Fee = 8720 satoshis
Because 100,000,000 satoshis equal 1 bitcoin, we should divide 8720/100,000,000.
This makes the fee 0.0000872 bitcoin, which is approximately $3.03 USD as of the time of this writing.
That’s how you determine your bitcoin fee.Also, you can use bitcoinfees.earn.com/api to get the recommended fees.
Now that you know the fee for the transaction, you could easily check if your balance is enough to cover the transaction including the fees.
 // Check if we have enough funds to cover the transaction and the fees
 if (totalAmountAvailable - satoshiToSend - fee < 0) {
 throw new Error("Balance is too low for this transaction");
 }
Now that you have calculated your fees and verified that you have enough balance to cover your fees and the entire transaction, you can go ahead and set the receiving address and fees with the Bitcore API.
 transaction.to(recieverAddress, satoshiToSend); // receiving address and amount of satoshis to send.
 transaction.fee(fee);
You can’t send only part of your bitcoin balance out to another address. No, you take out everything and send the amount you want to the receiving address, then send back the change to yourself.
So, the change address is your address — the address you want to get the balance paid into after sending to the receiver.
So, we’ll use the Bitcore function transaction.change to set the address:
transaction.change(sourceAddress);
Before we can spend bitcoin in a wallet, we must have the private key of that wallet. Your private key is your password to unlock the funds in any bitcoin wallet.
 // Sign transaction with your private key
 transaction.sign(privateKey);
To broadcast the transaction, we need to serialize the transaction in order to get the transaction hex:
const serializedTransaction = transaction.serialize();
It’s this transaction hex we’ll broadcast to the blockchain.
Let’s broadcast the transaction to the blockchain through the SoChain node with a post request the API.
 // broadcast transaction
 const result = await axios({
 method: "POST",
 url: `https://sochain.com/api/v2/send_tx/${sochain_network}`,
 data: {
 tx_hex: serializedTX,
 },
 });

return result.data.data
Here is the complete code for everything we’ve built so far:
const sendBitcoin = async (recieverAddress, amountToSend) => {
 const sochain_network = "BTCTEST";
 const privateKey = "";
 const sourceAddress = "";
 const satoshiToSend = amountToSend * 100000000;
 let fee = 0;
 let inputCount = 0;
 let outputCount = 2;
 const utxos = await axios.get(
 `https://sochain.com/api/v2/get_tx_unspent/${sochain_network}/${sourceAddress}`
 );
 const transaction = new bitcore.Transaction();
 let totalAmountAvailable = 0;

 let inputs = [];
 let utxos = response.data.data.txs;

 for (const element of utxos) {
 let utxo = {};
 utxo.satoshis = Math.floor(Number(element.value) * 100000000);
 utxo.script = element.script_hex;
 utxo.address = response.data.data.address;
 utxo.txId = element.txid;
 utxo.outputIndex = element.output_no;
 totalAmountAvailable += utxo.satoshis;
 inputCount += 1;
 inputs.push(utxo);
 }

 transactionSize = inputCount * 146 + outputCount * 34 + 10 - inputCount;
 // Check if we have enough funds to cover the transaction and the fees assuming we want to pay 20 satoshis per byte

 fee = transactionSize * 20
 if (totalAmountAvailable - satoshiToSend - fee < 0) {
 throw new Error("Balance is too low for this transaction");
 }

 //Set transaction input
 transaction.from(inputs);

 // set the recieving address and the amount to send
 transaction.to(recieverAddress, satoshiToSend);

 // Set change address - Address to receive the left over funds after transfer
 transaction.change(sourceAddress);

 //manually set transaction fees: 20 satoshis per byte
 transaction.fee(fee);

 // Sign transaction with your private key
 transaction.sign(privateKey);

 // serialize Transactions
 const serializedTransaction = transaction.serialize();
 // Send transaction
 const result = await axios({
 method: "POST",
 url: `https://sochain.com/api/v2/send_tx/${sochain_network}`,
 data: {
 tx_hex: serializedTX,
 },
 });
 return result.data.data;
};
Congratulations, you’ve successfully created a simple JavaScript function to send bitcoin to your friend using 62 lines of code.
You can simply call the sendBitcoin function then pass the receiver’s bitcoin address and the amount you wish to send as shown below to send bitcoin to anyone.
sendBitcoin("mtVE8anM63kQcgKUC6oQQD9K6xiV4wsryq", 0.0003)
The response from this API will contain your transaction ID, which you can use to verify the transaction on any bitcoin explorer — in our case, any bitcoin Testnet explorer.
To send real bitcoin, you’ll need to change the network from BTCTEST to BTC and use your real bitcoin wallet’s private key and address.
There is a lot more to learn about the blockchain, cryptocurrencies, and how to work with them. I believe this should provide you with basic information on how to use JavaScript to send bitcoin from your wallet and enable you to build up knowledge from there.
If you wish to learn more, I recommend reading the book Programming the Blockchain or Mastering Bitcoin, they are both free books and have a ton of information to get you up started on your journey to becoming a blockchain developer. I’ve also made a video to walk you through, even more, you can check it out on YouTube.
If you enjoyed this post, please share. Happy hacking!
Debugging code is always a tedious task. But the more you understand your errors, the easier it is to fix them.
LogRocket allows you to understand these errors in new and unique ways. Our frontend monitoring solution tracks user engagement with your JavaScript frontends to give you the ability to see exactly what the user did that led to an error.
👁 LogRocket Dashboard Free Trial BannerLogRocket records console logs, page load times, stack traces, slow network requests/responses with headers + bodies, browser metadata, and custom logs. Understanding the impact of your JavaScript code will never be easier!
Compare the top AI development tools and models of June 2026. View updated rankings, feature breakdowns, and find the best fit for you.
Learn how Bloom filters reduce database lookups for username availability checks while preserving correctness at scale.
Learn how to test Nuxt apps with Vitest, @nuxt/test-utils, runtime mocks, server route mocks, and Playwright e2e tests.
I had four weeks to build a complete app from scratch using AI tools like OpenCode and Claude Opus: here’s how it went.
Hey there, want to help make our blog better?
Join LogRocket’s Content Advisory Board. You’ll help inform the type of content we create and get access to exclusive meetups, social accreditation, and swag.
Sign up now