 |
VOOZH | about |
|
VOOZH | about |
React Native for Web is an open source project that enables you to use React Native core components in React web applications. React Native for Web uses React DOM to render JavaScript code that is compatible with React Native in a web browser, making code sharing possible.
👁 Code Share React Native WebIn this tutorial, we’ll set up a React web app using Parcel, build components using React Native core components, and finally, share these components between our mobile and web applications with React Native for Web.
Let’s get started!
The Replay is a weekly newsletter for dev and engineering leaders.
Delivered once a week, it's your curated guide to the most important conversations around frontend dev, emerging AI tools, and the state of modern software.
First, we’ll create a new React Native app. For this demonstration, I’m using npx, but you can also use the react-native-cli package if it is installed globally on your development environment.
Open up a new terminal window and execute the following command:
npx react-native init MyApp
MyApp is a placeholder for the name of your React Native project.
If you are using iOS Simulator, run yarn run ios. If you’re using an emulator for Android, run yarn run android. Once the build process is complete, you’ll see the default React Native app with the boilerplate code, which you can modify inside of App.js.
As an example, I’ll render a simple text message inside of App.js:
import React from 'react';
import { View, StyleSheet, Text } from 'react-native';

const styles = StyleSheet.create({
 screenContainer: {
 flex: 1
 },
 text: {
 fontSize: 20,
 color: 'cornflowerblue',
 marginTop: 50,
 alignSelf: 'center'
 }
});

const App = () => {
 return (
 <View styles={styles.screenContainer}>
 <Text style={styles.text}>I'm a React Native component</Text>
 </View>
 );
};

export default App;
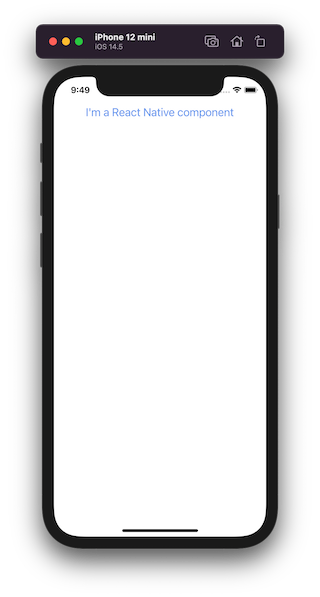
The output of the code above will look like the image below:
👁 Basic React Native App Setup
We’ll use Parcel, a bundler that requires zero configuration, to easily set up a new web app in React. Setting up a React app using Parcel follows a similar paradigm to generating an app using Create React App.
Create a new directory inside of your React Native project called web/. Inside, we’ll create the following files and add the respective boilerplate code.
Create a file called index.html and add the following code:
<html>
 <body>
 <div id="root"></div>
 <script src="./index.js"></script>
 </body>
</html>
Create an App.js file and add the following code to render a text inside of the h2 tag:
import React from 'react';

const WebAppTitle = () => {
 return (
 <div>
 <h2 style={{ color: '#9400d3', fontSize: '32' }}>
 I'm a React app component.
 </h2>
 </div>
 );
};

const App = () => {
 return (
 <>
 <WebAppTitle />
 </>
 );
};

export default App;
Note that the WebAppTitle is a custom web component. Now, we’ll create an index.js file and add the following code:
import React from 'react';
import { render } from 'react-dom';

import App from './App';

render(<App />, document.getElementById('root'));
Next, we’ll initialize a React app with yarn init, which will open an interactive session for you to create a package.json file and add the required defaults. However, you can skip this session by running the shorthand yarn init --yes.
After running yarn init --yes, the package.json file should look like the code below:
{
 "name": "web",
 "version": "1.0.0",
 "main": "index.js",
 "license": "MIT"
}
Next, install the following dependencies inside of the web directory:
yarn add react react-dom react-native-web
yarn add -D parcel-bundler
Parcel can take any file as an entry point, but an HTML or a JavaScript file is recommended for a web app. Now, we’ll add the following scripts to the package.json file:
{
 "scripts": {
 "start": "parcel serve ./index.html",
 "build": "parcel build ./index.html"
 }
}
Bundling our web app with Parcel requires a custom setup. To configure Parcel to add an alias for the react-native-web package, add the following code to package.json:
{
 "alias": {
 "react-native": "react-native-web"
 }
}
The complete package.json file should look like the following code block:
{
 "name": "web",
 "version": "1.0.0",
 "main": "index.js",
 "license": "MIT",
 "dependencies": {
 "react": "17.0.2",
 "react-dom": "17.0.2",
 "react-native-web": "0.17.1"
 },
 "devDependencies": {
 "parcel-bundler": "1.12.5"
 },
 "scripts": {
 "start": "parcel serve ./index.html",
 "build": "parcel build ./index.html"
 },
 "alias": {
 "react-native": "react-native-web"
 }
}
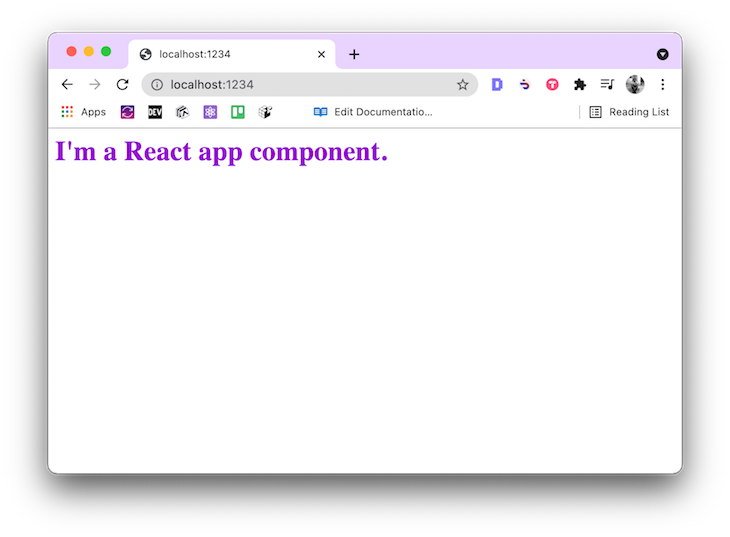
To start the development server for the web app, run yarn start from the terminal window. Parcel will build the web app and serve it on http://localhost:1234:
Now that we’ve set up a React Native app and a React web app, let’s create a shared component that we can use in both.
Inside the root directory of your project, create a new subdirectory called shared. The subdirectory’s name indicates that anything inside of it is shared between the web and mobile apps. Inside of shared, create another subdirectory called components.
Let’s create a file called Header.js, which will contain styles to display a header with a title. Add the following code to Header.js:
import React from 'react';
import { View, Text, StyleSheet } from 'react-native';

const styles = StyleSheet.create({
 header: {
 paddingTop: 50,
 backgroundColor: 'blue'
 },
 headerText: {
 fontSize: 22,
 color: 'white',
 fontWeight: 'bold',
 paddingHorizontal: 10
 }
});

const Header = () => {
 return (
 <View style={styles.header}>
 <Text style={styles.headerText}>I'm a shared component.</Text>
 </View>
 );
};

export default Header;
Next, add the component to the App.js file in the root directory of your project:
// add this after other import statements
import Header from './shared/components/Header';

// Modify the JSX in App component
const App = () => {
 return (
 <View styles={styles.screenContainer}>
 <Header />
 <Text style={styles.text}>I'm a React Native component</Text>
 </View>
 );
};
You’ll have to add a symbolic link to the shared directory for the web app, which is used to reference the contents of a directory at a specific location. Make sure you are in the web directory and run the following command in the terminal window:
ln -s /Users/<your-os-username>/<path-to-the-shared-directory>/shared
The command above will create a reference to the shared directory inside of the web directory. Now, you can import the Header component inside the web/App.js file the same way you imported the React Native app:
// web/App.js
import React from 'react';
import Header from './shared/components/Header';

const WebAppTitle = () => {
 return (
 <div>
 <h2 style={{ color: '#9400d3', fontSize: '32' }}>
 I'm a React app component.
 </h2>
 </div>
 );
};

const App = () => {
 return (
 <>
 <Header />
 <WebAppTitle />
 </>
 );
};

export default App;
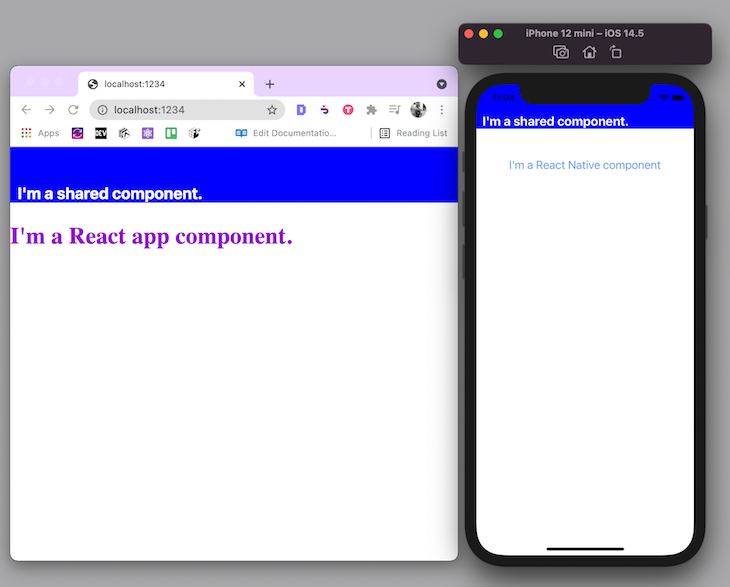
Run yarn start to restart the development for the web app. The output of this command will look like the image below:
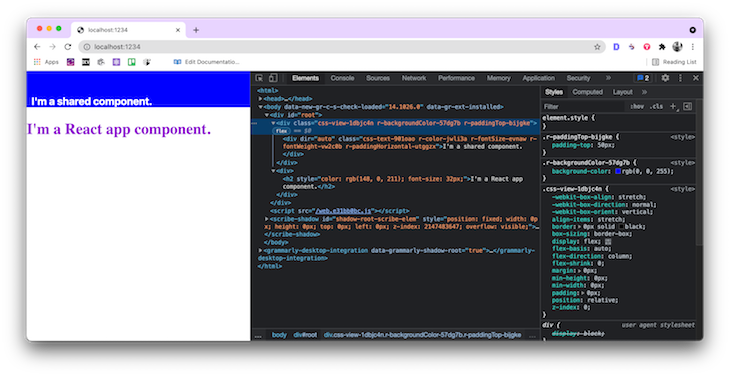
If you want to see how React Native for Web builds the DOM elements in the web browser, open up Developer Tools and navigate to the Elements tab. You can also right-click on the web page and select Inspect Element:
👁 Inspect Element React Native Web
On closer look, you’ll see that React Native for Web converts React Native styles and components to DOM elements. When styling components, React Native uses JavaScript objects. React Native for Web implements the React Native style API.
LogRocket's Galileo AI watches sessions for you and and surfaces the technical and usability issues holding back your React Native apps.
LogRocket also helps you increase conversion rates and product usage by showing you exactly how users are interacting with your app. LogRocket's product analytics features surface the reasons why users don't complete a particular flow or don't adopt a new feature.
Start proactively monitoring your React Native apps — try LogRocket for free.
TSRX adds first-class control flow, conditional hooks, and scoped styles to React via a TypeScript compiler extension — no new framework required.
Learn how to build a full React Native auth system using Better Auth and Expo — with email/password login, Google OAuth, session persistence, and protected routes.
Compare the top AI development tools and models of June 2026. View updated rankings, feature breakdowns, and find the best fit for you.
Learn how Bloom filters reduce database lookups for username availability checks while preserving correctness at scale.
Hey there, want to help make our blog better?
Join LogRocket’s Content Advisory Board. You’ll help inform the type of content we create and get access to exclusive meetups, social accreditation, and swag.
Sign up now