 |
VOOZH | about |
|
VOOZH | about |
Testing is a vital part of modern-day software development; in fact, the TDD paradigm, short for test-driven development, stresses the importance of writing tests before writing even a single line of code.
👁 Storybook Lost Pixel Getting StartedFor backend applications, this might be straightforward; however, testing UI-centric applications can be quite tricky. Here, Lost Pixel comes in handy; Lost Pixel is an open source tool that helps identify regressions in the user interface with every push that we make to the application.
In this article, we’ll learn how to test a few Storybook components using Lost Pixel. Let’s get started!
The Replay is a weekly newsletter for dev and engineering leaders.
Delivered once a week, it's your curated guide to the most important conversations around frontend dev, emerging AI tools, and the state of modern software.
According to the Lost Pixel GitHub page, Lost Pixel is an open source visual regression testing tool. Lost Pixel renders actual images of components; when we make any changes to the component, Lost Pixel compares the original images to the changed ones, thereby detecting regression.
Lost Pixel’s approach is quite different from snapshot testing using Jest, in which the entire component is represented in its verbose, textual format, and then compared with the changed version.
At the time of writing, Lost Pixel supports Storybook, Ladle, Next.js, Gatsby, and Remix. In this article, we’ll explore using Lost Pixel alongside Storybook components.
Storybook is a tool that can help us optimize our React development workflow. According to the official Storybook documentation, Storybook is a tool for UI development that isolates components, making development faster and easier.
We can think of Storybook as a platform that lets us code the building blocks for our applications independently of each other. When we finally put all of them together into meaningful applications, we’ll encounter fewer bugs and surprises in behavior. In addition, Storybook provides free documentation of all our components. To get more clarity on how all of that works, let’s build a hands-on project with Storybook, React, and Vite.
In this article, we’ll set up Storybook in a React project. For that, we’ll first need a base React project. First, let’s create our React project using Vite:
npm create vite@latest
We’ll follow the prompts on the screen to create a React project with JavaScript. Once that finishes running, we can run the project that we just created by going into that directory and starting the dev server:
cd storybook-testing
npm run dev
You should see the Vite + React homescreen running on http://127.0.0.1:5173/ by visiting the same URL in the browser:
👁 Vite React Homescreen Browser
Now, we’ll set up Storybook in this repo by running the following code:
npx storybook init
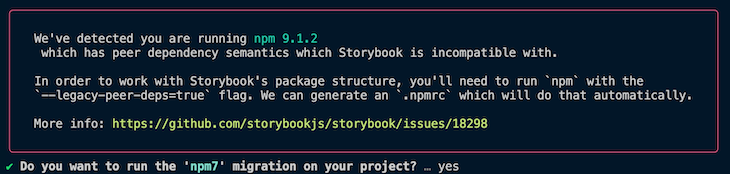
The command above will add the necessary files and make the required changes to the package.json for Storybook to work. If you get an error like the one below, select yes to create a new .npmrc file in the repo:
👁 Error Install Npm Rc Package
Next, we can run Storybook using the command below:
npm run storybook
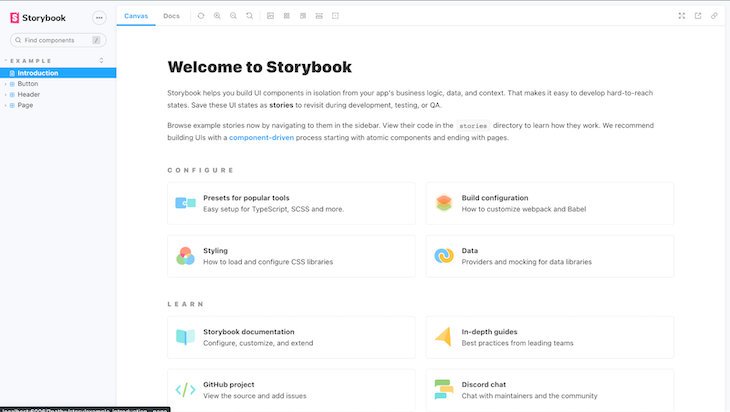
The command above will bring up the Storybook homepage on http://localhost:6006/, which looks like the following image:
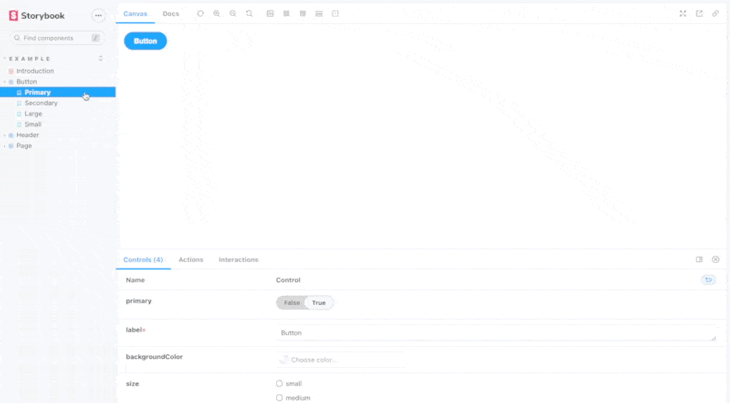
Notice that Storybook has already created a few button components that we can explore using the UI:
👁 Storybook Button Component Example Gif
We’ll use Lost Pixel to perform regression testing on these pre-defined buttons.
With those changes, we can push the code to a new GitHub repo as follows:
git init
git add --all
git commit -m 'first commit'
git remote add origin <repo_origin_url>
git push -u origin main
Now that the repo is ready, we’ll add the Lost Pixel code.
With our UI set up, we’ll introduce Lost Pixel into the same repository. First, we install Lost Pixel using the command below:
npm install lost-pixel
Next, we create a lost-pixel.config.js file at the root of our Vite project:
import { CustomProjectConfig } from 'lost-pixel';
export const config: CustomProjectConfig = {
 storybookShots: {
 storybookUrl: './storybook-static',
 },
 generateOnly: true,
 failOnDifference: true,
};
In the code above, we’re telling Lost Pixel where to find the Storybook components. In our case, once the Storybook build command runs, the Storybook components will be found at the ./storybook-static URL.
Next, we need to create two GitHub workflows. In the root of the repo, create a folder named .github and another folder named workflows inside of it. We’ll place the following two files inside the workflows folder.
lost-pixel-update.ymlThe lost-pixel-update.yml workflow will help Lost Pixel create the baselines against which it will perform regression testing. While performing the tests, Lost Pixel needs to know the right way to render the component in order to determine whether the component has diverged from that behavior.
The lost-pixel-update.yml file looks like the following:
on: [workflow_dispatch]
jobs:
 build:
 runs-on: ubuntu-latest
 steps:
 - name: Checkout
 uses: actions/checkout@v2
 - name: Setup Node.js
 uses: actions/setup-node@v2
 with:
 node-version: 16.x
 cache: 'npm'
 - name: Install dependencies
 run: npm ci
 - name: Build Storybook components
 run: npm run build-storybook
 - name: Run Lost Pixel container
 id: lp
 uses: lost-pixel/[email protected]
 env:
 LOST_PIXEL_MODE: update
 - name: Create Pull request
 uses: peter-evans/create-pull-request@v4
 if: ${{ failure() && steps.lp.conclusion == 'failure' }}
 with:
 token: ${{ secrets.GH_TOKEN }}
 commit-message: update lost-pixel baselines
 delete-branch: true
 branch: "lost-pixel-baselines/${{ github.ref_name }}"
 title: "Lost Pixel updating baselines - ${{ github.ref_name }}"
 body: Automated baseline update PR - lost pixel
Notice that the steps in this GitHub action are straightforward. We create a Node.js container, build our Storybook components, and then run Lost Pixel using the pre-built action released on the GitHub action store, lost-pixel/[email protected].
This action runs the Lost Pixel action in update mode. However, notice that the last step is special, creating a pull request with the changed components so that those can be merged with the repo and act as the new baseline components. We’re using the secrets.GH_TOKEN to authenticate while we create the pull request, which we’ll review later.
lost-pixel-test.ymlThe lost-pixel-test.yml workflow will be triggered on every push to the repo, thereby generating the new images for the components and comparing them against those generated while running the baseline tests. If there is any difference between the two, the test will fail. The lost-pixel-test.yml file looks like the following code:
on: [push]
jobs:
 build:
 runs-on: ubuntu-latest
 steps:
 - name: Checkout
 uses: actions/checkout@v2
 - name: Setup Node
 uses: actions/setup-node@v2
 with:
 node-version: 16.x
 cache: 'npm'
 - name: Install dependencies
 run: npm ci
 - name: Build Storybook
 run: npm run build-storybook
 - name: Lost Pixel
 id: lp
 uses: lost-pixel/[email protected]
This action is almost the same as the previous action with some slight differences. The last step that creates a PR is missing, and we’re also not running Lost Pixel in update mode. As we noticed in the lost-pixel-update.yml file, the PR creation step requires that we supply secrets.GH_TOKEN.
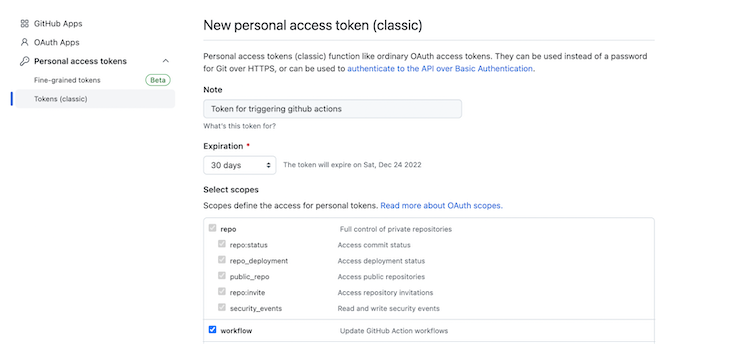
Check out this GitHub repo for the detailed steps to generate a personal access token. In short, the steps are as follows:
👁 Generate New Personal Access Token Github Classic
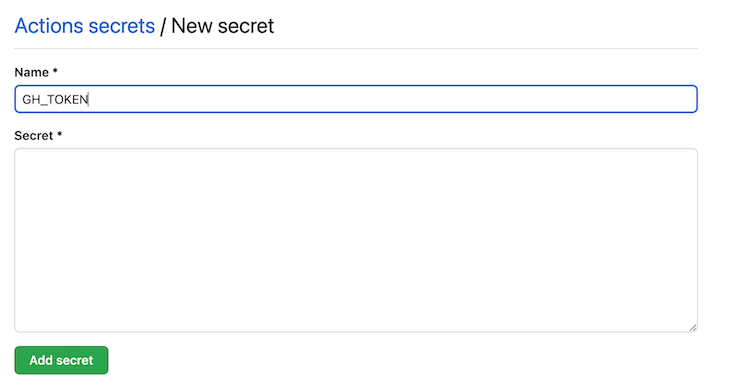
Once the token is generated, copy it to the clipboard. We need to add it as a secret in the repo:
Name the secret GH_TOKEN, paste the secret, and then click on Add secret. This will add the secret to the repo so that the PR creation step goes through smoothly.
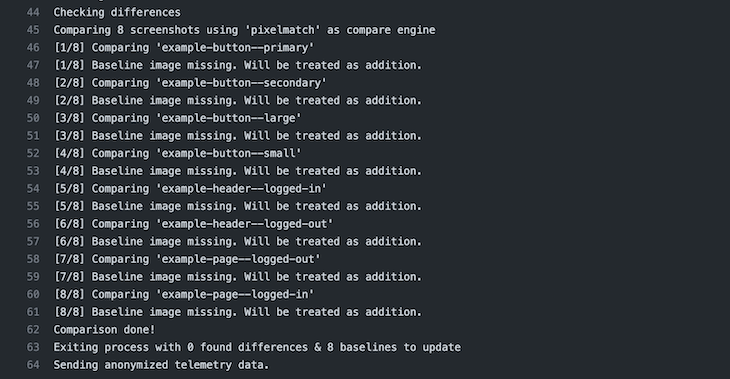
With this setup done, we can now run the action to generate the baselines for all our of Storybook components. Add the two newly created .yml files, create a commit, and push it to the remote repo. We can see that the test gets triggered immediately on a code push, but it fails because there are no baselines:
👁 Create Baselines Storybook Components
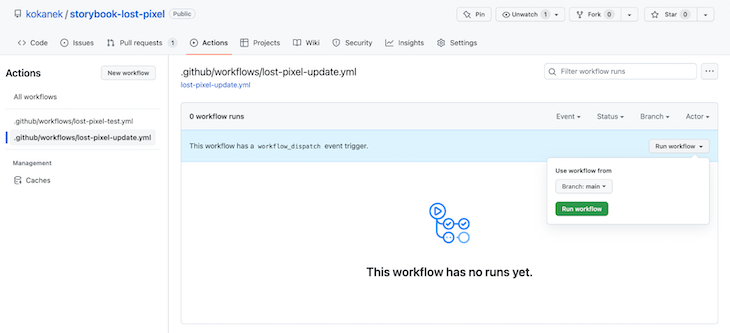
Let’s run the workflow to generate baselines. Visit the Actions tab of the GitHub repo, then select the lost-pixel-update.yml workflow. Click on Run workflow:
👁 Run Lost Pixel Storybook Github Action
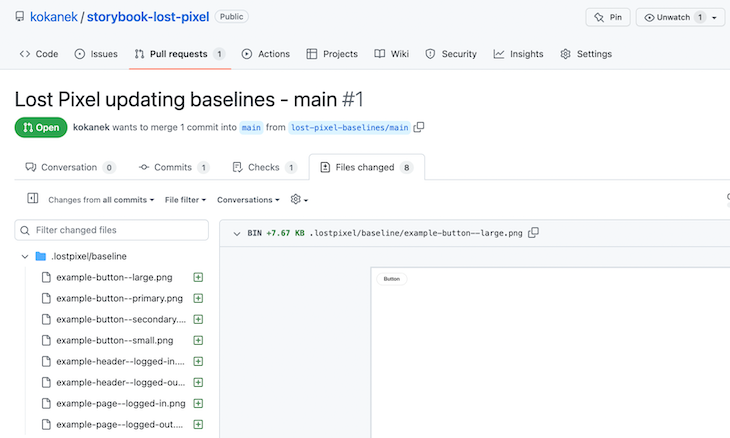
With all the previous steps completed, the workflow runs smoothly and creates a pull request as a result:
👁 Storybook Lost Pixel Workflow Run Success
Merge the pull request so that the .png files corresponding to the baselines get merged in the repo.
With the baselines configured, let’s introduce some visual regressions in our Storybook component. Visit the stories Button.stories.jsx file and change the label of the primary button to say Test Button:
export const Primary = Template.bind({});
// More on args: https://storybook.js.org/docs/react/writing-stories/args
Primary.args = {
 primary: true,
 label: 'Test Button',
};
Save the file, commit, and push to the remote:
git commit -m 'testing regression'
git pull --rebase
git push
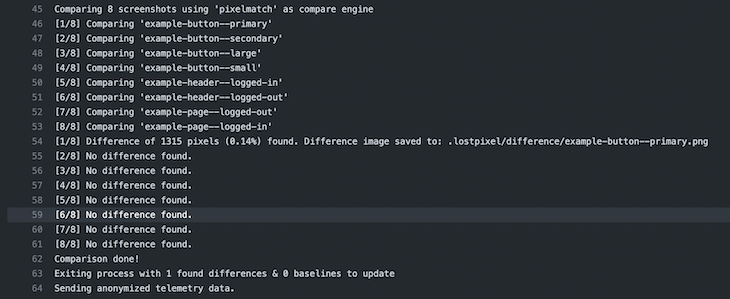
You should see that the lost-pixel-test.yml workflow is triggered immediately. It runs, successfully pointing out that there is a regression in the primary button version of the component:
👁 Lost Pixel Test YML Workflow Triggered
If this is an expected regression, we can trigger the lost-pixel-update.yml workflow as before, and the baselines would be updated.
Lost Pixel provides us with an alternate method to perform UI regression testing, which is significantly different from the standard practice of snapshot testing. If your project uses lots of Storybook components, and you’re not concerned about additional .png images being pushed to the repository, you can explore Lost Pixel in your projects for detecting UI regressions.
Install LogRocket via npm or script tag. LogRocket.init() must be called client-side, not
server-side
$ npm i --save logrocket

// Code:

import LogRocket from 'logrocket';
LogRocket.init('app/id');
// Add to your HTML:

<script src="https://cdn.lr-ingest.com/LogRocket.min.js"></script>
<script>window.LogRocket && window.LogRocket.init('app/id');</script>
TSRX adds first-class control flow, conditional hooks, and scoped styles to React via a TypeScript compiler extension — no new framework required.
Learn how to build a full React Native auth system using Better Auth and Expo — with email/password login, Google OAuth, session persistence, and protected routes.
Compare the top AI development tools and models of June 2026. View updated rankings, feature breakdowns, and find the best fit for you.
Learn how Bloom filters reduce database lookups for username availability checks while preserving correctness at scale.
Would you be interested in joining LogRocket's developer community?
Join LogRocket’s Content Advisory Board. You’ll help inform the type of content we create and get access to exclusive meetups, social accreditation, and swag.
Sign up now