 |
VOOZH | about |
|
VOOZH | about |
With just a few lines of code, Astro integrations let you add new functionality and behavior to an Astro project. However, to effectively write Astro integrations, we must understand the Astro hooks lifecycle.
👁 Understanding Astro integrations and the hooks lifecycleThese hooks are how we plug into Astro’s internal build process and specify custom behavior. This article serves as a guide to every hook, including where they should be used and how to create a custom integration that logs all relevant hooks in a sample Astro build process.
The Replay is a weekly newsletter for dev and engineering leaders.
Delivered once a week, it's your curated guide to the most important conversations around frontend dev, emerging AI tools, and the state of modern software.
By definition, integrations extend your Astro project with new functionality and behavior. Most of the integrations you build will be to support a particular feature, such as the official sitemap integration that generates a sitemap when you build your Astro project.
Once you sufficiently understand how to build feature integrations, you‘ll be able to transfer your knowledge to building libraries or renderer integrations, such as the official React, Preact, Vue, or Tailwind integrations for Astro.
In a general sense, “lifecycle” refers to the series of changes in the life of an organism. For example, a butterfly starts as an egg, then turns into a larva, a pupa, and ultimately a full-blown adult butterfly. Until human cloning becomes available, there’s a decent chance you also started as an infant, then became a toddler, went through puberty, and finally entered adulthood. At least, I hope so!
In software, “lifecycle” refers to the different stages of a given process. With Astro hooks, we explicitly refer to the stages Astro goes through while building your application pages.
This process covers resolving the Astro configuration setup, spinning up a local server, and bundling your pages statically or rendering them on the server side in production.
To productively develop custom integrations, we’ll need to know where in the lifecycle we want to effect a change or reaction. Hooks are functions that are called at various stages of the build; to interact with the build process, we can use the following ten hooks:
astro:config:setupastro:config:doneastro:server:setupastro:server:startastro:server:doneastro:build:startastro:build:setupastro:build:generatedastro:build:ssrastro:build:doneTen seems like a lot to remember, but you don’t have to memorize these. Instead, we’ll focus on understanding how they work; you can always refer to the official reference when needed.
One of the first questions I asked myself when I started tinkering with Astro integrations was, “When exactly are these triggered, and is there some order of execution to them?”
Let’s consider the following diagram, which depicts the order in which the hooks are executed:
👁 The order in which hooks are executed in development and production modes
Two hooks kick off the process:
astro:config:setupastro:config:doneThese hooks are always executed, regardless of the Astro build process. Let’s breakdown when these are executed and how to leverage them in custom integrations.
astro:config:setupThink about being the first one at the pub, before it opens. You can cause a ruckus before anyone else even shows up!
Similarly, this hook is executed when Astro is initialized. This happens before the Astro project or Vite config is resolved. The astro:config:setup hook is where we swoop in to extend the project configuration. In this hook, we can update the Astro config, apply Vite plugins, add component renderers, and inject scripts long before Astro starts building the application.
astro:config:doneLike a perfect pint of beer, we patiently wait to grab the glass until after it’s been poured. Similarly, this hook indicates when the Astro config has been resolved. When this hook triggers, it means every astro:config:setup hook has been invoked for every integration in the project.
After the Astro config has finally got its act together and all the other integrations have done their thing, we can retrieve the final config and use it in our integration.
Once we fire astro:config:done, there are two branches to consider: development and production mode.
Take a look at the flowchart above again. When developing your apps locally — without initiating a production build typically via npm run build or astro build — the order of hooks execution in our app will follow the left side of the flowchart. That flow triggers the following hooks:
astro:server:setupastro:server:startastro:server:doneThese hooks are executed when building your app for local development.
Here’s a breakdown of when these are executed and how we could leverage these in our custom integrations:
| Hook | Executed when … | Why use this? |
|---|---|---|
astro:server:setup |
We create the Vite server in development mode, before the listen() server event is fired, i.e., before starting the server |
We can update the Vite server options and middleware.
The Vite dev server object is passed as an argument to our hook. |
astro:server:start |
We fire the Vite listen() method, i.e., the server is running |
We can jump in here to intercept network requests at the specified dev server address (passed as an argument to our hook) |
astro:server:done |
We closed the dev server | This is where we run cleanups. If you wish to clean up any side effects triggered during astro:server:setup or astro:server:start, now is a good time! |
When we run a production build, two hooks will always be triggered. These are:
astro:build:startastro:build:setupHere’s a breakdown of when these execute and how we can leverage them in our custom integrations:
| Hook | Executed when … | Why use this? |
|---|---|---|
astro:build:start |
After the Astro config is completely resolved, but before the production build begins | The production build is about to start, but you can still set up some global objects or clients needed during the build |
astro:build:setup |
The build is just about to start and the build config is fully constructed | To steal the perfect phrase from the official Astro documentation: this is our final chance to modify the build.
We can overwrite some defaults and make sure everything is looking top-notch. |
I must mention that if you’re not sure whether to use astro:build:setup or astro:build:start, go for astro:build:start instead.
Now, depending on how the page is being built (statically generated or server-side-rendered), either astro:build:generated or astro:build:ssr will be invoked, respectively. Finally, we invoke astro:build:done.
Here’s the final breakdown of when these are executed and how we can use them in our custom integrations:
| Hook | Executed when … | Why use this? |
|---|---|---|
astro:build:generated |
The static production build has completely generated routes and assets. | We can access generated routes and assets before we clean up build artifacts. Per the official docs, this is uncommon, and we might be better off using astro:build:done in many cases, except when we really need to access the generated files before cleanup. |
astro:build:ssr |
A production SSR build completes | We get access to the SSR manifest, which is helpful when creating custom SSR builds. |
astro:build:done |
The production build completes! | This is where we may access the generated routes and assets, so we can copy them or transform them. To transform generated assets, consider using a Vite plugin and configuring astro:config:setup |
Let’s try some practice examples. Go ahead and write out a simple integration that, when invoked, spits out a log to the server console. Then, you can tinker with building several pages for production and inspect the logs.
Our eventual goal is to have a custom integration that looks something like this:
{
 name: "some-identifier",
 hooks: {
 "hook-name": () => {
 // log hook name so we know it's been invoked
 }
 }
}
Let’s go ahead and build this out. Create a new Astro application with the following custom integration:
// 📂 src/integrations/lifecycle-logs.ts

import kleur from "kleur";
import type { AstroIntegration } from "astro";

// Create a new dateTimeFormat object
const dateTimeFormat = new Intl.DateTimeFormat([], {
 hour: "2-digit",
 minute: "2-digit",
 second: "2-digit",
});

export const lifecycleLogs = () => {
 const hooks = [
 `astro:config:setup`,
 `astro:config:done`,
 `astro:server:setup`,
 `astro:server:start`,
 `astro:server:done`,
 `astro:build:start`,
 `astro:build:setup`,
 `astro:build:generated`,
 `astro:build:ssr`,
 `astro:build:done`,
 ] as const;

 // base integration structure. "hooks" will be updated
 let integration: AstroIntegration = {
 name: "astro-lifecycle-logs",
 hooks: {},
 };

 // loop over the hooks list and add the name and log
 for (const hook of hooks) {
 integration.hooks[hook] = () => {
 // 👀 Get a new date string
 const date = dateTimeFormat.format(new Date());

 // log with kleur colours and formatting
 console.log(`${kleur.gray(date)} ${kleur
 .bold()
 .yellow("[lifecycle-log]")} ${kleur.green(hook)}
 `);
 };
 }

 return integration;
};�

export default lifecycleLogs;
Import lifecycleLogs and add it to your project’s integration list:
// astro.config.mjs
import { defineConfig } from "astro/config";
import { lifecycleLogs } from 'src/integrations/lifecycle-logs'

export default defineConfig({
 // 👀 invoke the imported lifecycleLogs function in the list
 integrations: [lifecycleLogs()],
});
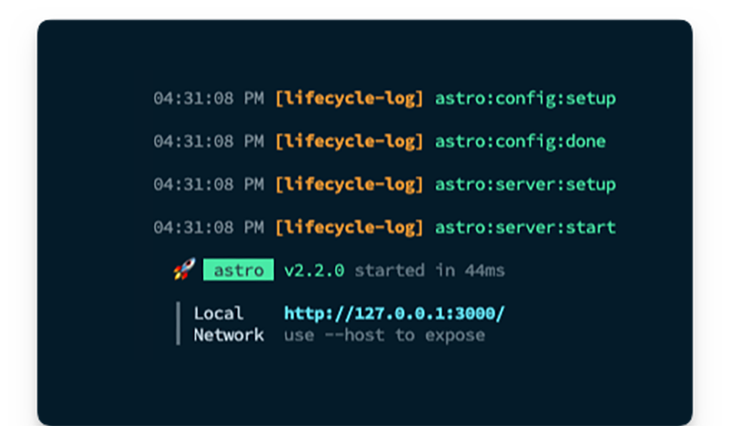
Finally, (re)start your application to see the logs in the console as shown below:
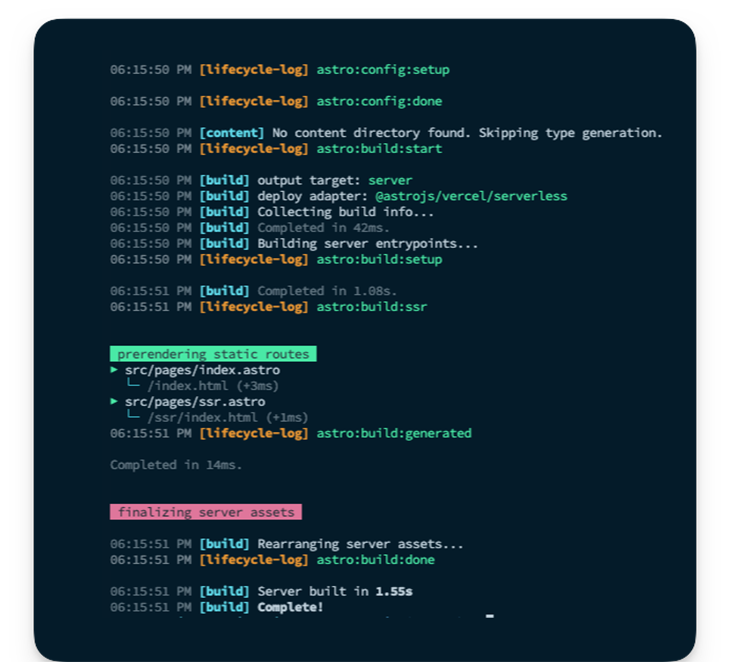
As an exercise, I suggest you add a new SSR page and run a production build to see the order of hooks execution logged. Below is an example with two pages:
index.astro pagessr.astro pageNow, observe the logs in the image below, and notice the [lifecycle-log] messages from astro:config:setup to astro:build:done. This represents the full lifecycle of the build process i.e., captured and logged.
Understanding Astro integrations and the hooks lifecycle is essential to building custom integrations. With your new knowledge of Astro’s ten hooks and their timings, you can go ahead and build more robust custom integrations.
If you want to keep in touch with me, you can find all my contact information on my personal site or LinkedIn. Cheers!
Install LogRocket via npm or script tag. LogRocket.init() must be called client-side, not
server-side
$ npm i --save logrocket

// Code:

import LogRocket from 'logrocket';
LogRocket.init('app/id');
// Add to your HTML:

<script src="https://cdn.lr-ingest.com/LogRocket.min.js"></script>
<script>window.LogRocket && window.LogRocket.init('app/id');</script>
Build dynamic LLM routing in Next.js with OpenRouter, TanStack AI, task classification, model fallbacks, and cost-aware routing.
TSRX adds first-class control flow, conditional hooks, and scoped styles to React via a TypeScript compiler extension — no new framework required.
Learn how to build a full React Native auth system using Better Auth and Expo — with email/password login, Google OAuth, session persistence, and protected routes.
Compare the top AI development tools and models of June 2026. View updated rankings, feature breakdowns, and find the best fit for you.
Would you be interested in joining LogRocket's developer community?
Join LogRocket’s Content Advisory Board. You’ll help inform the type of content we create and get access to exclusive meetups, social accreditation, and swag.
Sign up now