 |
VOOZH | about |
|
VOOZH | about |
The CSS attribute selector is an ultimate life hack that provides an efficient way to style HTML elements; in this article, we’ll learn about attribute selectors, covering what they are, where they’re needed, and how they compare to the basic CSS selectors. Let’s get started!
👁 CSS Attribute SelectorJump ahead:
[attribute] selector[attribute="value"] selector[attribute~="value"] selector[attribute|="value"] selector[attribute^="value"] selector[attribute$="value"] selector[attribute*="value"] selectorThe Replay is a weekly newsletter for dev and engineering leaders.
Delivered once a week, it's your curated guide to the most important conversations around frontend dev, emerging AI tools, and the state of modern software.
All HTML elements have properties associated with them called attributes, which help to define the characteristics of the element. With attribute selectors, you can effectively style various elements based on their respective attributes. For example, a div element could have an ID attribute. An attribute is made up of two parts, the name and value:
<div id ="main-content">
 <p>This is a quick example of attributes</p>
</div>
As its name implies, the main functionality of an attribute selector is to select elements based on their attributes or attribute value. The example below selects all <a> elements with a href attribute:
<!DOCTYPE html>
<html lang="en">
 <head>
 <meta charset="UTF-8" />
 <meta http-equiv="X-UA-Compatible" content="IE=edge" />
 <meta name="viewport" content="width=device-width, initial-scale=1.0" />
 <title>CSS Attribute Selectors</title>
 <style type="text/css">
 a[href] {
 color: red;
 }
 </style>
 </head>
 <body>
 <h1>Attribute Selectors Example</h1>
 <span>List of continents</span>
 <ul>
 <li><a href="http://www.europe.com">Europe</a></li>
 <li><a href="http://www.asia.com">Asia</a></li>
 <li><a target="_blank" href="http://www.africa.com">Africa</a></li>
 <li>North America</li>
 <li>South America</li>
 <li><a href="http://www.australia.com">Australia</a></li>
 <li><a target="_blank" href="http://www.antartica.com">Antartica</a></li>
 </ul>
 </body>
</html>
In the example above, all elements with the href attribute appear in red. Now, let’s discuss several different types of attribute selectors and explore the benefits they offer when used in CSS.
[attribute] selectorWe use the [attribute] selector to select an element with a specified attribute. In the following example, the [attribute] selector selects all <a> elements with a target attribute:
a[target="_blank"] {
 background-color: grey;
}
[attribute="value"] selectorThe [attribute="value"] selector enables us to select elements with a specific attribute and value:
[title="shoppinglist"] {
 background-color: yellow;
}
In the example above, [attribute="value"] selects all elements with a title attribute and an attribute value of shoppinglist.
[attribute~="value"] selectorWith the [attribute~="value"] selector, you can select elements with an attribute value containing a specific word.
In the following example, we select all elements with a title attribute containing a space-separated list of words, one of which is "fruit":
[title~="fruit"] {
 border: 7px solid yellow;
}
The example above will match elements with title="fruit", title="orange fruit", and title="fruit basket", but not title="a-fruit" or title="fruits".
[attribute|="value"] selectorWe use the [attribute|="value"] selector to target elements with either a specified attribute value or elements with the specified value followed by a hyphen, -.
Keep in mind that the value must be either a single word, like class="south", or the word followed by a hyphen - , for example, class="south-east". For reference, consider the example below:
[class|="south"] {
 background: green;
}
[attribute^="value"] selectorWith the [attribute^="value"] selector, we select elements whose value begins with the specified attribute. For example, [attribute^="value"] selects all <a> tags whose href attributes have beginning values of http:
a[href^= "http"]{
 colour :green;
}
Keep in mind that the specified value doesn’t have to be an entire word.
[attribute$="value"] selectorThe [attribute$="value"] selector selects an element based on what its attribute value ends with. Therefore, we can specify a word and select elements with attributes ending with the specified value.
In the code below, we select all <a> tags with href attributes that have a value ending with .pdf:
a[href$=".pdf"]{
 colour : pink;
}
[attribute*="value"] selectorWe use the [attribute*="value"] selector to select elements whose attribute value contains a specified value. In the example below, the [attribute*="value"] selector selects all elements with a class attribute and value containing "room":
[class*="room"] {
 background: yellow;
}
Now that we’re familiar with the various CSS attribute selectors, we’ll demonstrate how they compare to the basic CSS selectors for styling an item’s properties on a webpage.
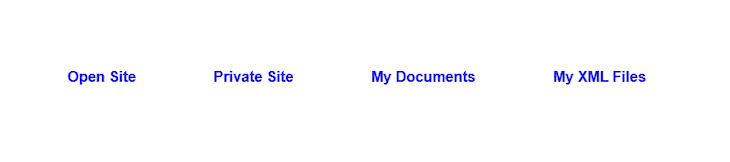
Suppose we have the following list of links that we need to style categorically:
<div class="links">
 <a href="http://amy.com/section">Open Site</a>
 <a href="https://amy.com/private_section">Private Site</a>
 <a href="docs/amy.pdf">My Documents</a>
 <a href="http://amy.com/files/data.xml">My XML Files</a>
</div>
Without the attribute selector, we‘re a bit limited in how far we can go with styling each list’s properties:
body {
 display: flex;
 justify-content: center;
 align-items: center;
 height: 100vh;
 font-family:sans-serif;
}

.links a {
 padding: 15px 20px;
 margin: 0 20px;
 font-weight: bold;
 text-decoration: none;
}
👁 Without Attribute Selector Style List
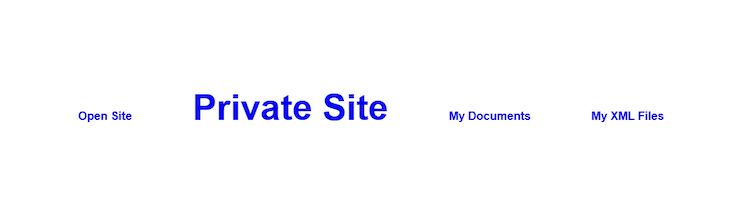
CSS attribute selectors allow us to do much more. For example, suppose we want to assign all links that have an href beginning with https a font size of 50px. We can achieve this by using the begin with selector. Apply the style with the following CSS code:
a[href^="https"] {
 font-size: 50px;
}
The link with Private Site is the only link that has a font size of 50px because it is the only link that has an href attribute with a value beginning with https:
👁 Style Link Attribute Selector
To achieve this same styling with basic CSS selectors, the process would be a bit longer. First, we have to give the Private Site link a class name as an identifier, then style that class name. Therefore, anytime we want to add a custom font size to a link using basic CSS selectors, we have to keep repeating the particular class name to the a element. The markup would be written as follows:
<a href="https://amy.com/private_section" class="increase-fontsize">Private Site</a>
The CSS would look like the following:
a.increase-fontsize {
 font-size: 50px;
}
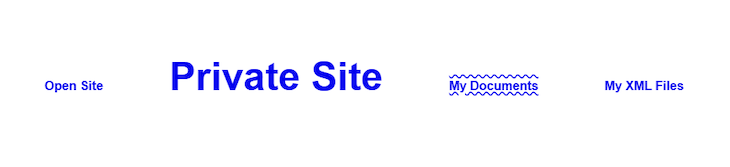
As another example, imagine that from our list of links, we want to style links with a .pdf extension so that the text is underlined both on top and bottom with wavy lines. Thanks to CSS attribute selectors, we can achieve this easily and avoid repeating ourselves throughout the codebase by using the ends with selector:
a[href$=".pdf"] {
 text-decoration-line: overline underline;
 text-decoration-style: wavy;
}
Now, we can see that the link with the .pdf extension is underlined above and below with wavy lines:
👁 Style Link CSS Attribute Selector Wavy Lines
Once again, to achieve this without using CSS attribute selectors, we would first have to attach an ID or class name to the links that have a .pdf extension, and then give styles of our choice to the class name or ID. The markup would look like the following code:
<a href="docs/amy.pdf" class="pdf-file">My Documents</a>
With the appropriate style for the class, the code would be as follows:
a.pdf-file {
 text-decoration-line: overline underline;
 text-decoration-style: wavy;
}
In this article, we’ve discussed all of the CSS attribute selectors available at the time of writing, considering the various ways to use them and understanding why we need them.
Many HTML elements, like <a /> and <img />, have various kinds of attributes. For example, the <a /> tag has attributes like the href and target, while the <img /> tag also has attributes like src and alt.
The attributes provided by these elements allow us to add extra information to the given element. For example, the alt attribute in an image tag indicates that the text should be displayed in case the image is not properly rendered on the DOM.
With attribute selectors, we can tap into the higher powers of specifying rules, amplifying the additional information that we place on an HTML element. In this tutorial, we demoed using the basic CSS selectors as well as the CSS attribute selectors for styling.
I hope you enjoy the superpowers of CSS, and feel free to leave a comment if you get stuck. Happy coding!
As web frontends get increasingly complex, resource-greedy features demand more and more from the browser. If you’re interested in monitoring and tracking client-side CPU usage, memory usage, and more for all of your users in production, try LogRocket.
👁 LogRocket Dashboard Free Trial BannerLogRocket lets you replay user sessions, eliminating guesswork around why bugs happen by showing exactly what users experienced. It captures console logs, errors, network requests, and pixel-perfect DOM recordings — compatible with all frameworks.
LogRocket's Galileo AI watches sessions for you, instantly identifying and explaining user struggles with automated monitoring of your entire product experience.
Modernize how you debug web and mobile apps — start monitoring for free.
TSRX adds first-class control flow, conditional hooks, and scoped styles to React via a TypeScript compiler extension — no new framework required.
Learn how to build a full React Native auth system using Better Auth and Expo — with email/password login, Google OAuth, session persistence, and protected routes.
Compare the top AI development tools and models of June 2026. View updated rankings, feature breakdowns, and find the best fit for you.
Learn how Bloom filters reduce database lookups for username availability checks while preserving correctness at scale.
Hey there, want to help make our blog better?
Join LogRocket’s Content Advisory Board. You’ll help inform the type of content we create and get access to exclusive meetups, social accreditation, and swag.
Sign up now