 |
VOOZH | about |
|
VOOZH | about |
In the fast-paced world of web development, security has become a major concern for developers and businesses alike. With the increasing number of data breaches and cyber attacks, it is essential for applications to have robust security systems in place. One critical aspect of this security system is the authentication process, which is the process of verifying a user’s identity.
👁 Using SuperTokens For Authentication In Next.jsHowever, the process of implementing a secure authentication system can be very complex and time consuming, particularly when working with complex frameworks like Next.js. This is where SuperTokens comes in. SuperTokens is a highly secure and customizable authentication solution that integrates seamlessly with Next.js.
In this article, we will discuss how SuperTokens can be used to add authentication in Next.js applications. We’ll explore its key features and benefits.
Jump ahead:
The Replay is a weekly newsletter for dev and engineering leaders.
Delivered once a week, it's your curated guide to the most important conversations around frontend dev, emerging AI tools, and the state of modern software.
To follow along with this tutorial, you‘ll need the following:
The final code is available on GitHub. Please give a ⭐ to the repo if you like the work.
Let’s face it, authentication is hard and costly. A team wanting to ship a product will most likely spend a lot of time building the login and signup pages then implementing social logins, email verification, session management, user management, forgotten password functionality, and even 2FA. It’s a lot to do even before the product goes live. This is where SuperTokens shines.
SuperTokens is an open source authentication and authorization framework designed to provide secure login and scalable access management for web and mobile applications. It allows developers to manage user sessions, handle tokens, store user data, and implement secure authentication flows:
SuperTokens does this through various auth strategies called recipes. SuperTokens is designed to streamline the authentication process, reduce security vulnerabilities, and provide a seamless user experience for both developers and end users.
SuperTokens differs from existing user authentication solutions in the following ways:
Security: SuperTokens is designed with security in mind, making it a secure and reliable authentication solution. It uses state-of-the-art encryption algorithms to protect user data and it is also immune to the most common security attacks, such as SQL injection and cross-site scripting (XSS).
Low vendor lock-in: There is a very low vendor lock-in with SuperTokens compared to other available alternatives because users have complete control over how SuperTokens works and where their data is stored.
Open source: SuperTokens is an open source solution, allowing developers to explore their code for bugs and offer suggestions for improvement.
Control and customizability: SuperTokens has a fundamentally unique architecture that provides significant control to the developer (native frontend experience, customizable auth logic in the backend, SDKs using our overrides feature).
Pre-built UI components: SuperTokens provides us with pre-built authentication user interfaces (e.g login form, etc) for easy integration.
N.B., At the time of writing this tutorial, SuperTokens doesn’t have first-class support for other frameworks like Vue.js and Angular. The SuperTokens’s pre-built UI components are all built in React, so you will have to load them into your Vue/Angular apps or build your custom UI.
To use SuperTokens with your own custom UI, refer to SuperTokens’ plain JavaScript SDK.
SuperTokens offers a rich set of features, including includes:
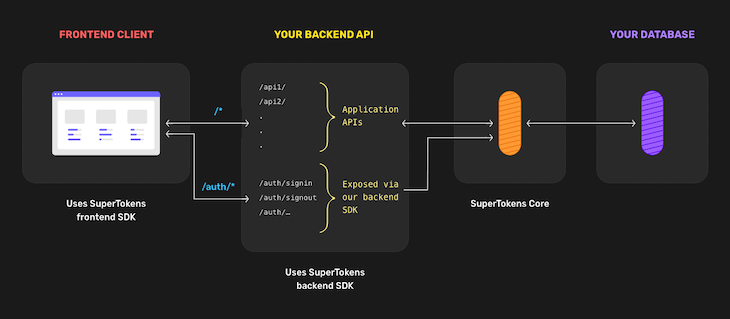
SuperTokens is made up of three components:
Frontend SDK: Renders the auth UI widgets and manages user session tokens automaticallyBackend SDK: Adds auth APIs to your backend. For example: sign in, sign upSuperTokens Core Service: This is an HTTP service that talks to your database. It also contains the core logic for auth. You can choose to self-host with your own database (with Docker or without Docker) or host it with a SuperTokens-managed service by signing up hereThe architecture employed here is quite unique and different from other auth providers as the backend API layer sits right in the middle of your frontend and SuperTokens.
This means that the frontend will never talk to the SuperTokens core directly, but rather that any request made will be to the APIs exposed by the backend SDK, which will then talk to the SuperTokens core.
This structure enables easy customizations of the auth logic and also enables a secure session solution:
👁 Self-Hosted Architecture Diagram
For backend integration, SDKs are currently available for the following: Golang, Python, and Node.js. Meanwhile, for the frontend, it is available with React.js, React Native, and Vanilla JS (Vue/ Angular/ JS).
There are also other framework-specific integrations available including GraphQL, Hasura, etc.
Currently, these are the available authentication recipes:
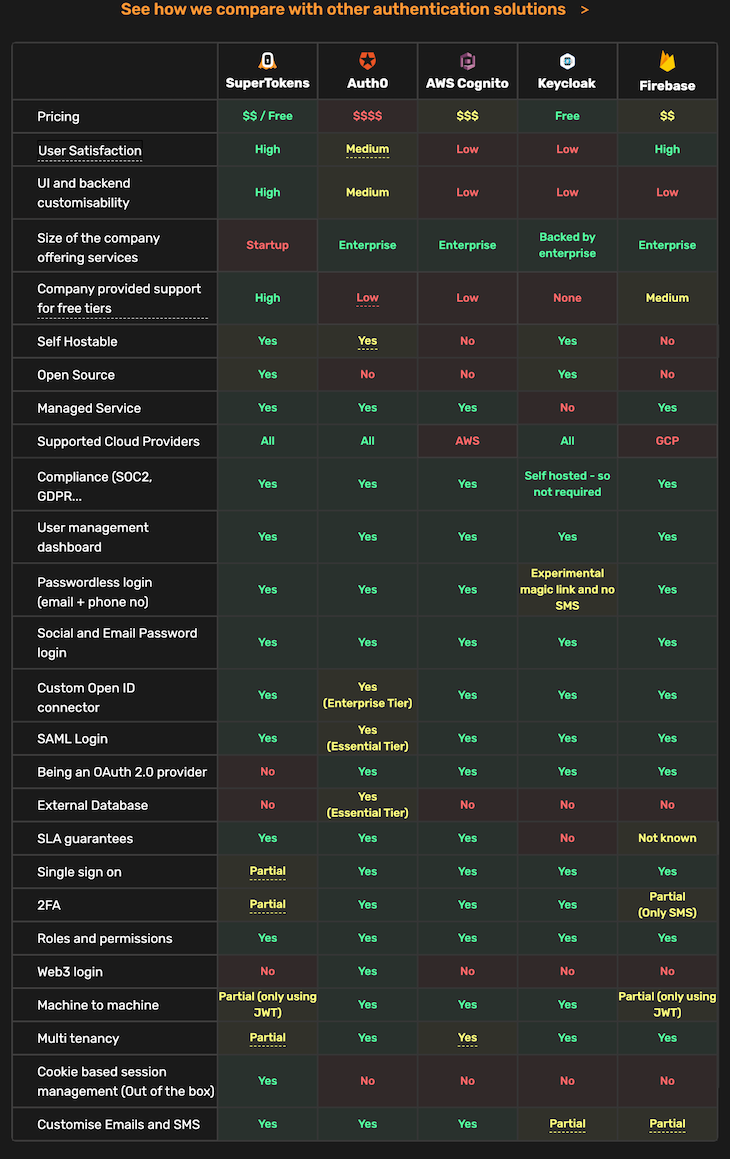
Now, let’s look at how SuperTokens compares to other auth providers:
👁 SuperTokens Vs. Other Auth Providers
First, choose an auth recipe. For the scope of this article, we will focus on implementing the EmailPassword Login authentication recipe.
First, get the starter project from GitHub. An important thing to note about the starter project is that it is a simple Next.js application and it uses Next UI for styling.
Now, let’s start authenticating!
First, clone the supertokens-next-auth repository on its starter branch to get started:
git clone --branch starter https://github.com/wisdomekpotu/supertokens-next-auth.git
Once you clone the repo, make supertokens-next-auth your current directory:
cd supertokens-next-auth
Next, install all project dependencies:
# Using YARN
yarn install
# Using NPM
npm install
# Using PNPM
pnpm install
Then, run the development server:
# Using YARN
yarn run dev
# Using NPM
npm run dev
# Using PNPM
pnpm run dev
The application should be running. Go to your browser and navigate to http://localhost:3000 to see the app rendered successfully. You should end up with this:
Now, we’ll install SuperTokens dependencies. In your terminal, run the following command:
# Using YARN
yarn add supertokens-node supertokens-auth-react supertokens-web-js nextjs-cors
# Using NPM
npm install supertokens-node supertokens-auth-react supertokens-web-js nextjs-cors
# Using PNPM
pnpm add supertokens-node supertokens-auth-react supertokens-web-js nextjs-cors
Set up a .env.local file in the root directory with the following:
// .env.local
NEXT_PUBLIC_APP_DOMAIN= "http://localhost:3000"
Our next step is to create configuration files. In the root directory of your project, create a config folder. Now, in this folder, create three files: appInfo.js , backendConfig.js, and frontendConfig.js:
// config/appInfo.js
export const websiteDomain = process.env.NEXT_PUBLIC_APP_DOMAIN

export const appInfo = {
 appName: 'SuperTokens Demo App',
 websiteDomain,
 apiDomain: websiteDomain,
 apiBasePath: "/api/auth",
 websiteBasePath: "/auth"
}
The appInfo.js file holds an important object called appInfo that carries the environment variables for both the frontend and backend.
appName: The name of your application
apiDomain: The URL of your website
websiteBasePath: The path where our login UI will be rendered
apiBasePath: The path through which SuperTokens API will be exposed
Now, we’ll create a frontend config function. Still in the config folder, create a file called frontendConfig.js and populate it with the code below:
// config/frontendConfig.js
import EmailPasswordReact from 'supertokens-auth-react/recipe/emailpassword'
import SessionReact from 'supertokens-auth-react/recipe/session'
import { appInfo } from './appInfo'
import Router from 'next/router'

export const frontendConfig = () => {
 return {
 appInfo,
 recipeList: [
 EmailPasswordReact.init(),
 SessionReact.init(),
 ],
 // this is so that the SDK uses the next router for navigation
 windowHandler: (oI) => {
 return {
 ...oI,
 location: {
 ...oI.location,
 setHref: (href) => {
 Router.push(href)
 },
 },
 }
 },
 }
}
In the code above, we export a function called frontendConfig, which returns the appInfo object created in the previous step and an array recipeList where we initialize the recipes we need, which are EmailPassword recipe and Session recipe.
Then, we’ll create a windowHandler property where we override the default behavior of the SDK to use the next/router library for navigation.
Next, we’ll create a backend config function. Create a file backendConfig.js in the config folder:
// config/backendConfig.js
import EmailPasswordNode from 'supertokens-node/recipe/emailpassword'
import SessionNode from 'supertokens-node/recipe/session'
import { appInfo } from './appInfo'

export const backendConfig = () => {
 return {
 framework: "express",
 supertokens: {
 connectionURI: process.env.NEXT_PUBLIC_CONNECTION_URI,
 apiKey: process.env.NEXT_PUBLIC_API_KEY,
 // For demo/test purposes all you need is to use https://try.supertokens.com as connectionURI and there is no need for an apiKey.
 },
 appInfo,
 recipeList: [
 EmailPasswordNode.init(),
 SessionNode.init(),
 ],
 isInServerlessEnv: true,
 }
}
The backendConfig function takes no arguments and returns an object containing configuration options. The options include:
framework: This specifies that the backend framework being used is Expresssupertokens: { ... }: This object contains configuration options for the SuperTokens library. It includes the connection URI and API key used to connect to the SuperTokens serviceappInfo: Information about the applicationrecipeList: A list of recipes to be used by the application. In this case, we initialize the EmailPasswordNode and SessionNode recipesisInServerlessEnv: A Boolean value indicating whether the application is running in a serverless environment. In this case, it’s set to true.N.B., You can use this site as the connectionURI for demo purposes. In production, you will need to replace this with the actual address of your SuperTokens core instance.
There are two ways to set up your core instance:
The credentials should look like this:
Now, when you get your credentials, head over to .env.local file and update as follows:
// .env.local
NEXT_PUBLIC_APP_DOMAIN= "http://localhost:3000"
NEXT_PUBLIC_CONNECTION_URI= "<YOUR_CONNECTION_URI>",
NEXT_PUBLIC_API_KEY= "<YOUR_API_KEY>"
To call the frontend init functions, navigate to /pages/_app.js file and replace it with the code below:
// pages/_app.js
import { NextUIProvider } from '@nextui-org/react';
import React from 'react';
import SuperTokensReact, { SuperTokensWrapper } from 'supertokens-auth-react';
import { frontendConfig } from '../config/frontendConfig';
if (typeof window !== 'undefined') {
 // we only want to call this init function on the frontend, so we check typeof window !== 'undefined'
 SuperTokensReact.init(frontendConfig());
}
function MyApp({ Component, pageProps }) {
 return (
 <SuperTokensWrapper>
 <NextUIProvider>
 <Component {...pageProps} />
 </NextUIProvider>
 </SuperTokensWrapper>
 );
}
export default MyApp;
Here, we call the init function for the frontend. Then, we proceed to wrap our entire application with the <SuperTokensWrapper> component.
To show the login UI, create a folder called auth in the pages folder. Then, create a [[...path]].js page.
The [[...path]].js file will contain the component for showing the SuperTokens UI:
// pages/auth/[[...path]].js
import React, { useEffect } from 'react';
import dynamic from 'next/dynamic';
import SuperTokens from 'supertokens-auth-react';
import { redirectToAuth } from 'supertokens-auth-react';

const SuperTokensComponentNoSSR = dynamic(
 new Promise((res) => res(SuperTokens.getRoutingComponent)),
 { ssr: false }
);

export default function Auth() {
 // if the user visits a page that is not handled by us (like /auth/random), then we redirect them back to the auth page.
 useEffect(() => {
 if (SuperTokens.canHandleRoute() === false) {
 redirectToAuth();
 }
 }, []);
 return <SuperTokensComponentNoSSR />;
}
Now, visit /auth page on your website:
To add backend Auth APIs and CORS setup, go to the pages/api/ folder and create an auth folder. Now create a file [[...path]].js and add the following code:
// pages/api/auth/[[...path]].js
import { superTokensNextWrapper } from 'supertokens-node/nextjs';
import supertokens from 'supertokens-node';
import { middleware } from 'supertokens-node/framework/express';
import { backendConfig } from '../../../config/backendConfig';
supertokens.init(backendConfig());
export default async function superTokens(req, res) {
 await superTokensNextWrapper(
 async (next) => {
 // This is needed for production deployments with Vercel
 res.setHeader(
 'Cache-Control',
 'no-cache, no-store, max-age=0, must-revalidate'
 );
 await middleware()(req, res, next);
 },
 req,
 res
 );
 if (!res.writableEnded) {
 res.status(404).send('Not found');
 }
}
In the code above, the [[...path]].js file will use the middleware exposed by the supertokens-node library to expose all the APIs like signin, signup, etc.
The backend setup is done! Try signing up now. It should be successful and you should be redirected to the home page.
You can also head over to your dashboard to see your user count:
N.B., This is for a SuperTokens managed service.
When a website is protected, only logged-in users can access it. A user who is not logged in and tries to access it will be taken to the login page. Let’s imagine we wish to safeguard your website’s home page (the / route).
In this case, we can edit the /pages/index.js file to add an auth wrapper around our Home component like so:
Import the SessionAuth module from supertokens-auth-react:
import { SessionAuth } from 'supertokens-auth-react/recipe/session'
Then, wrap our Home component with SessionAuth:
// pages/index.js
export default function Home() {
 return (
 // we protect ProtectedPage by wrapping it with SessionAuth
 <SessionAuth>
 // ...
 </SessionAuth>
 )
}
Test the page by navigating to /. You will be redirected to the login page. After that, sign in and visit / again. This time, there should be no redirection.
Finally, to implement the logout functionality, modify the pages/index.js file with the code below:
// pages/index.js
import { Card, Grid, Row, Text, Navbar, Button, Link } from '@nextui-org/react';
import { SessionAuth } from 'supertokens-auth-react/recipe/session';
import { signOut } from 'supertokens-auth-react/recipe/emailpassword';
import { useState } from 'react';
export default function Home() {
const [isloggedIn, setIsLoggedIn] = useState(null);
async function onLogout() {
await signOut();
setIsLoggedIn;
window.location.href = '/';
}
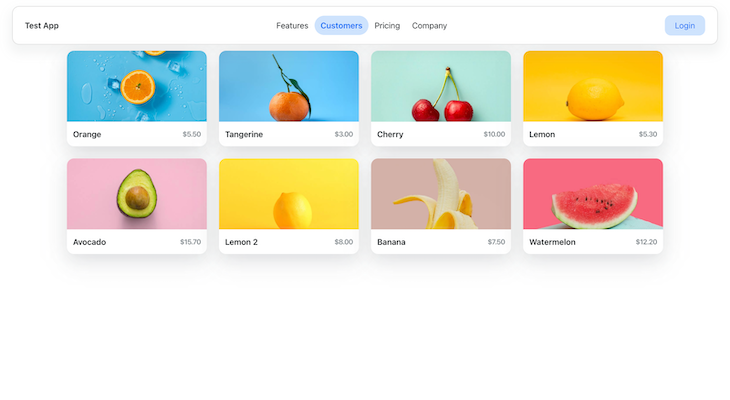
const list = [
{
title: 'Orange',
img: '/images/fruit-1.jpeg',
price: '$5.50',
},
{
title: 'Tangerine',
img: '/images/fruit-2.jpeg',
price: '$3.00',
},
{
title: 'Cherry',
img: '/images/fruit-3.jpeg',
price: '$10.00',
},
{
title: 'Lemon',
img: '/images/fruit-4.jpeg',
price: '$5.30',
},
{
title: 'Avocado',
img: '/images/fruit-5.jpeg',
price: '$15.70',
},
{
title: 'Lemon 2',
img: '/images/fruit-6.jpeg',
price: '$8.00',
},
{
title: 'Banana',
img: '/images/fruit-7.jpeg',
price: '$7.50',
},
{
title: 'Watermelon',
img: '/images/fruit-8.jpeg',
price: '$12.20',
},
];
return (
<>
<SessionAuth>
<Navbar isBordered variant='floating'>
<Navbar.Brand>
<Text b color='inherit' hideIn='xs'>
Test App
</Text>
</Navbar.Brand>
<Navbar.Content hideIn='xs' variant='highlight-rounded'>
<Navbar.Link href='#'>Features</Navbar.Link>
<Navbar.Link isActive href='#'>
Customers
</Navbar.Link>
<Navbar.Link href='#'>Pricing</Navbar.Link>
<Navbar.Link href='#'>Company</Navbar.Link>
</Navbar.Content>
<Navbar.Content>
<Navbar.Item>
{isloggedIn ? (
<Button auto flat as={Link} href='http://localhost:3000/auth'>
Login
</Button>
) : (
<Button auto flat as={Link} onPress={onLogout}>
Sign Out
</Button>
)}
</Navbar.Item>
</Navbar.Content>
</Navbar>
<Grid.Container gap={2} justify='center'>
{list.map((item, index) => (
<Grid xs={6} sm={2.5} key={index}>
<Card isPressable>
<Card.Body css={{ p: 0 }}>
<Card.Image
src={'https://nextui.org' + item.img}
objectFit='cover'
width='100%'
height={140}
alt={item.title}
/>
</Card.Body>
<Card.Footer css={{ justifyItems: 'flex-start' }}>
<Row wrap='wrap' justify='space-between' align='center'>
<Text b>{item.title}</Text>
<Text
css={{
color: '$accents7',
fontWeight: '$semibold',
fontSize: '$sm',
}}
>
{item.price}
</Text>
</Row>
</Card.Footer>
</Card>
</Grid>
))}
</Grid.Container>
</SessionAuth>
</>
);
}
The signOut method revokes the session on both the frontend and backend.
As seen in the code above, SuperTokens does not provide us with any UI for a signout button, so we have to add that. We then create a function called onLogout and pass it into the button using an onPress method.
Also, on auth success, the signOut function does not automatically redirect the user to the home page, so we do that by ourselves by using window.location.
The signOut function uses the backend signout API that was made available by the session recipe. Sign in and click on the signOut button to log out.
To implement a forgotten password functionality, we don’t have to do anything as SuperTokens takes care of this already.
At the time of writing this article, the following features are currently been developed:
You can stay updated with them by checking the SuperTokens product map.
This tutorial taught you how to set up quick and easy authentication in your Next.js application without extra complexities. We learned about the various recipes available and the pros and cons of SuperTokens compared to other similar solutions.
You can go ahead and try adding session verification to this example. Also, explore other strategies (recipes) that suite your needs and work with other frameworks and languages.
Feel free to drop a comment to let me know what you thought of this article. You can also find me on Twitter and GitHub. Thank you for reading!
Debugging Next applications can be difficult, especially when users experience issues that are difficult to reproduce. If you’re interested in monitoring and tracking state, automatically surfacing JavaScript errors, and tracking slow network requests and component load time, try LogRocket.
LogRocket captures console logs, errors, network requests, and pixel-perfect DOM recordings from user sessions and lets you replay them as users saw it, eliminating guesswork around why bugs happen — compatible with all frameworks.
LogRocket's Galileo AI watches sessions for you, instantly identifying and explaining user struggles with automated monitoring of your entire product experience.
The LogRocket Redux middleware package adds an extra layer of visibility into your user sessions. LogRocket logs all actions and state from your Redux stores.
👁 ImageModernize how you debug your Next.js apps — start monitoring for free.
TSRX adds first-class control flow, conditional hooks, and scoped styles to React via a TypeScript compiler extension — no new framework required.
Learn how to build a full React Native auth system using Better Auth and Expo — with email/password login, Google OAuth, session persistence, and protected routes.
Compare the top AI development tools and models of June 2026. View updated rankings, feature breakdowns, and find the best fit for you.
Learn how Bloom filters reduce database lookups for username availability checks while preserving correctness at scale.
Hey there, want to help make our blog better?
Join LogRocket’s Content Advisory Board. You’ll help inform the type of content we create and get access to exclusive meetups, social accreditation, and swag.
Sign up now