
Reinforcement fine-tuning (RFT) adapts an OpenAI reasoning model with a feedback signal you define. Like supervised fine-tuning, it tailors the model to your task. The difference is that instead of training on fixed “correct” answers, it relies on a programmable grader that scores every candidate response. The training algorithm then shifts the model’s weights, so high-scoring outputs become more likely and low-scoring ones fade.
OpenAI is winding down the fine-tuning platform. The platform is no longer accessible to new users, but existing users of the fine-tuning platform will be able to create training jobs for the coming months.
All fine-tuned models will remain available for inference until their base models are deprecated. The full timeline is here.
| How it works | Best for | Use with |
|---|---|---|
Generate a response for a prompt, provide an expert grade for the result, and reinforce the model’s chain-of-thought for higher-scored responses. Requires expert graders to agree on the ideal output from the model. |
|
Reasoning models only. |
This optimization lets you align the model with nuanced objectives like style, safety, or domain accuracy—with many practical use cases emerging. Run RFT in five steps:
- Implement a grader that assigns a numeric reward to each model response.
- Upload your prompt dataset and designate a validation split.
- Start the fine-tune job.
- Monitor and evaluate checkpoints; revise data or grader if needed.
- Deploy the resulting model through the standard API.
During training, the platform cycles through the dataset, samples several responses per prompt, scores them with the grader, and applies policy-gradient updates based on those rewards. The loop continues until we hit the end of your training data or you stop the job at a chosen checkpoint, producing a model optimized for the metric that matters to you.
Reinforcement fine-tuning is supported on o-series reasoning models only, and currently only for o4-mini.
Example: LLM-powered security review
To demonstrate reinforcement fine-tuning below, we’ll fine-tune an o4-mini model to provide expert answers about a fictional company’s security posture, based on an internal company policy document. We want the model to return a JSON object that conforms to a specific schema with Structured Outputs.
Example input question:
Using the internal policy document, we want the model to respond with JSON that has two keys:
compliant: A stringyes,no, orneeds review, indicating whether the company’s policy covers the question.explanation: A string of text that briefly explains, based on the policy document, why the question is covered in the policy or why it’s not covered.
Example desired output from the model:
Let’s fine-tune a model with RFT to perform well at this task.
Define a grader
To perform RFT, define a grader to score the model’s output during training, indicating the quality of its response. RFT uses the same set of graders as evals, which you may already be familiar with.
In this example, we define multiple graders to examine the properties of the JSON returned by our fine-tuned model:
- The
string_checkgrader to ensure the propercompliantproperty has been set - The
score_modelgrader to provide a score between zero and one for the explanation text, using another evaluator model
We weight the output of each property equally in the calculate_output expression.
Below is the JSON payload data we’ll use for this grader in API requests. In both graders, we use {{ }} template syntax to refer to the relevant properties of both the item (the row of test data being used for evaluation) and sample (the model output generated during the training run).
Prepare your dataset
To create an RFT fine-tune, you’ll need both a training and test dataset. Both the training and test datasets will share the same JSONL format. Each line in the JSONL data file will contain a messages array, along with any additional fields required to grade the output from the model. The full specification for RFT dataset can be found here.
In our case, in addition to the messages array, each line in our JSONL file also needs compliant and explanation properties, which we can use as reference values to test the fine-tuned model’s Structured Output.
A single line in our training and test datasets looks like this as indented JSON:
Below, find some JSONL data you can use for both training and testing when you create your fine-tune job. Note that these datasets are for illustration purposes only—in your real test data, strive for diverse and representative inputs for your application.
Training set
Test set
Upload your files
The process for uploading RFT training and test data files is the same as supervised fine-tuning. Upload your training data to OpenAI either through the API or using our UI. Files must be uploaded with a purpose of fine-tune in order to be used with fine-tuning.
You need file IDs for both your test and training data files to create a fine-tune job.
Create a fine-tune job
Create a fine-tune job using either the API or fine-tuning dashboard. To do this, you need:
- File IDs for both your training and test datasets
- The grader configuration we created earlier
- The model ID you want to use as a base for fine-tuning (we’ll use
o4-mini-2025-04-16) - If you’re fine-tuning a model that will return JSON data as a structured output, you need the JSON schema for the returned object as well (see below)
- Optionally, any hyperparameters you want to configure for the fine-tune
- To qualify for data sharing inference pricing, you need to first share evaluation and fine-tuning data with OpenAI before creating the job
Structured Outputs JSON schema
If you’re fine-tuning a model to return Structured Outputs, provide the JSON schema being used to format the output. See a valid JSON schema for our security interview use case:
Create a job with the API
Configuring a job with the API has a lot of moving parts, so many users prefer to configure them in the fine-tuning dashboard UI. However, here’s a complete API request to kick off a fine-tune job with all the configuration we’ve set up in this guide so far:
This request returns a fine-tuning job object, which includes a job id. Use this ID to monitor the progress of your job and retrieve the fine-tuned model when the job is complete.
To qualify for data sharing inference pricing, make sure to share evaluation and fine-tuning data with OpenAI before creating the job. You can verify the job was marked as shared by confirming shared_with_openai is set to true.
Monitoring your fine-tune job
Fine-tuning jobs take some time to complete, and RFT jobs tend to take longer than SFT or DPO jobs. To monitor the progress of your fine-tune job, use the fine-tuning dashboard or the API.
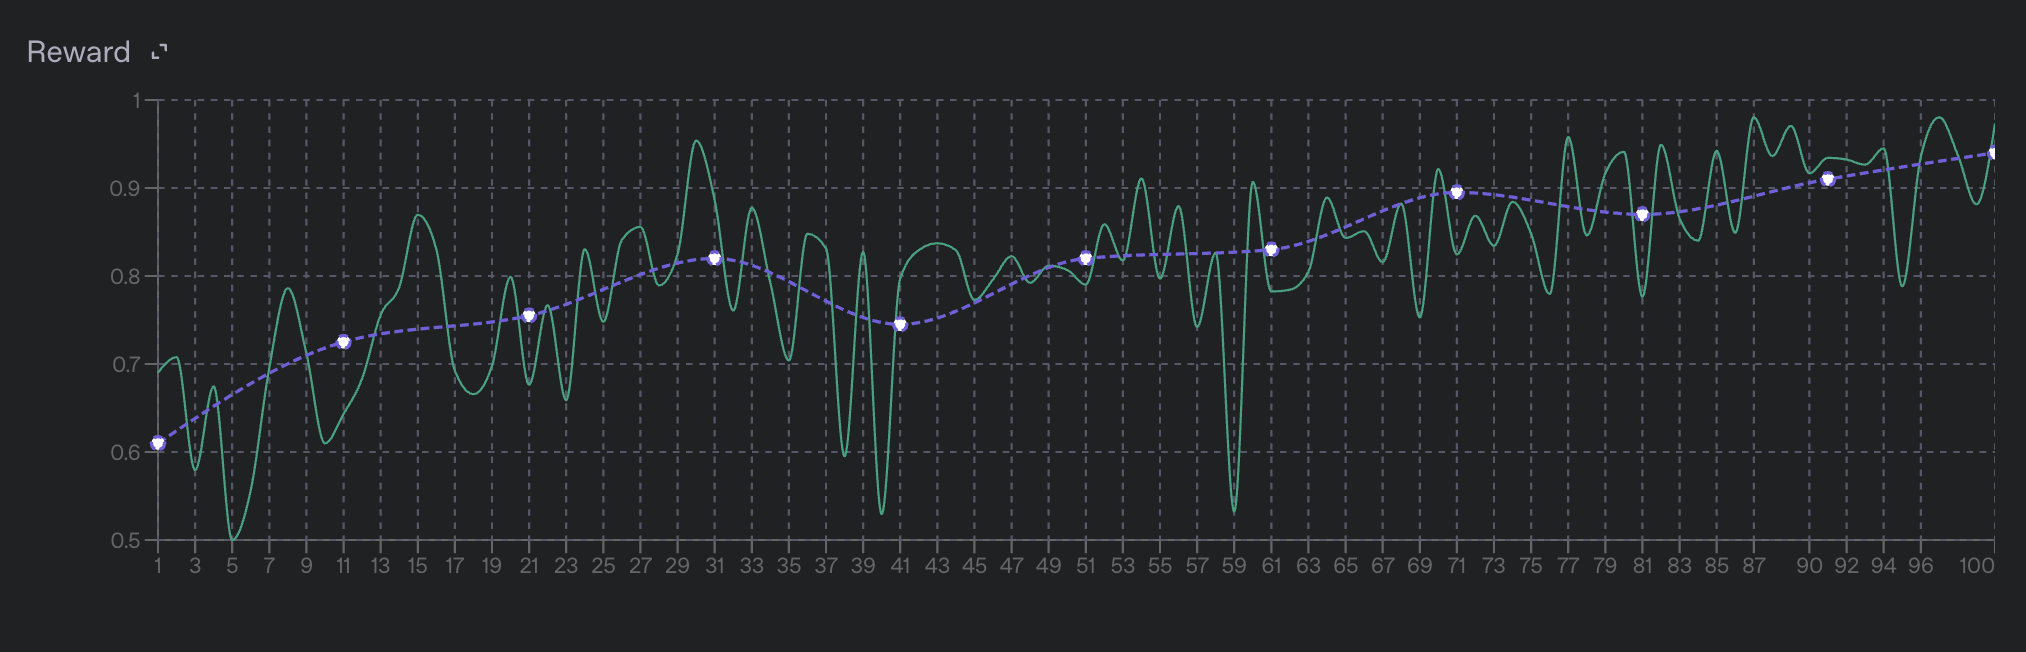
Reward metrics
For reinforcement fine-tuning jobs, the primary metrics are the per-step reward metrics. These metrics indicate how well your model is performing on the training data. They’re calculated by the graders you defined in your job configuration. These are two separate top-level reward metrics:
train_reward_mean: The average reward across the samples taken from all datapoints in the current step. Because the specific datapoints in a batch change with each step,train_reward_meanvalues across different steps are not directly comparable and the specific values can fluctuate drastically from step to step.valid_reward_mean: The average reward across the samples taken from all datapoints in the validation set, which is a more stable metric.
Find a full description of all training metrics in the training metrics section.
Pausing and resuming jobs
To evaluate the current state of the model when your job is only partially finished, pause the job to stop the training process and produce a checkpoint at the current step. You can use this checkpoint to evaluate the model on a held-out test set. If the results look good, resume the job to continue training from that checkpoint. Learn more in pausing and resuming jobs.
Evals integration
Reinforcement fine-tuning jobs are integrated with our evals product. When you make a reinforcement fine-tuning job, a new eval is automatically created and associated with the job. As validation steps are performed, we combine the input prompts, model samples, and grader outputs to make a new eval run for that step.
Learn more about the evals integration in the appendix section below.
Evaluate the results
By the time your fine-tuning job finishes, you should have a decent idea of how well the model is performing based on the mean reward value on the validation set. However, it’s possible that the model has either overfit to the training data or has learned to reward hack your grader, which allows it to produce high scores without actually being correct. Before deploying your model, inspect its behavior on a representative set of prompts to ensure it behaves how you expect.
Understanding the model’s behavior can be done quickly by inspecting the evals associated with the fine-tuning job. Specifically, pay close attention to the run made for the final training step to see the end model’s behavior. You can also use the evals product to compare the final run to earlier runs and see how the model’s behavior has changed over the course of training.
Try using your fine-tuned model
Evaluate your newly optimized model by using it! When the fine-tuned model finishes training, use its ID in either the Responses or Chat Completions API, just as you would an OpenAI base model.
- Navigate to your fine-tuning job in the dashboard.
- In the right pane, navigate to Output model and copy the model ID. It should start with
ft:… - Open the Playground.
- In the Model dropdown menu, paste the model ID. Here, you should also see other fine-tuned models you’ve created.
- Run some prompts and see how your fine-tuned performs!
Use checkpoints if needed
Checkpoints are models you can use that are created before the final step of the training process. For RFT, OpenAI creates a full model checkpoint at each validation step and keeps the three with the highest valid_reward_mean scores. Checkpoints are useful for evaluating the model at different points in the training process and comparing performance at different steps.
- Navigate to the fine-tuning dashboard.
- In the left panel, select the job you want to investigate. Wait until it succeeds.
- In the right panel, scroll to the list of checkpoints.
- Hover over any checkpoint to see a link to launch in the Playground.
- Test the checkpoint model’s behavior by prompting it in the Playground.
- Wait until a job succeeds, which you can verify by querying the status of a job.
- Query the checkpoints endpoint with your fine-tuning job ID to access a list of model checkpoints for the fine-tuning job.
- Find the
fine_tuned_model_checkpointfield for the name of the model checkpoint. - Use this model just like you would the final fine-tuned model.
The checkpoint object contains metrics data to help you determine the usefulness of this model. As an example, the response looks like this:
{
 "object": "fine_tuning.job.checkpoint",
 "id": "ftckpt_zc4Q7MP6XxulcVzj4MZdwsAB",
 "created_at": 1519129973,
 "fine_tuned_model_checkpoint": "ft:gpt-3.5-turbo-0125:my-org:custom-suffix:96olL566:ckpt-step-2000",
 "metrics": {
 "full_valid_loss": 0.134,
 "full_valid_mean_token_accuracy": 0.874
 },
 "fine_tuning_job_id": "ftjob-abc123",
 "step_number": 2000
}
Each checkpoint specifies:
step_number: The step at which the checkpoint was created (where each epoch is number of steps in the training set divided by the batch size)metrics: An object containing the metrics for your fine-tuning job at the step when the checkpoint was created
Safety checks
Before launching in production, review and follow the following safety information.
Next steps
Now that you know the basics of reinforcement fine-tuning, explore other fine-tuning methods.
Fine-tune a model by providing correct outputs for sample inputs.
Learn to fine-tune for computer vision with image inputs.
Fine-tune a model using direct preference optimization (DPO).
Appendix
Training metrics
Reinforcement fine-tuning jobs publish per-step training metrics as fine-tuning events. Pull these metrics through the API or view them as graphs and charts in the fine-tuning dashboard.
Learn more about training metrics below.
Evals integration details
Reinforcement fine-tuning jobs are directly integrated with our evals product. When you make a reinforcement fine-tuning job, a new eval is automatically created and associated with the job.
As validation steps are performed, the input prompts, model samples, grader outputs, and more metadata will be combined to make a new eval run for that step. At the end of the job, you will have one run for each validation step. This allows you to compare the performance of the model at different steps, and to see how the model’s behavior has changed over the course of training.
You can find the eval associated with your fine-tuning job by viewing your job on the fine-tuning dashboard, or by finding the eval_id field on the fine-tuning job object.
The evals product is useful for inspecting the outputs of the model on specific datapoints, to get an understanding for how the model is behaving in different scenarios. It can help you figure out which slice of your dataset the model is performing poorly on which can help you identify areas for improvement in your training data.
The evals product can also help you find areas of improvement for your graders by finding areas where the grader is either overly lenient or overly harsh on the model outputs.
Pausing and resuming jobs
You can pause a fine-tuning job at any time by using the fine-tuning jobs API. Calling the pause API will tell the training process to create a new model snapshot, stop training, and put the job into a “Paused” state. The model snapshot will go through a normal safety screening process after which it will be available for you to use throughout the OpenAI platform as a normal fine-tuned model.
If you wish to continue the training process for a paused job, you can do so by using the fine-tuning jobs API. This will resume the training process from the last checkpoint created when the job was paused and will continue training until the job is either completed or paused again.
Grading with Tools
If you are training your model to perform tool calls, you will need to:
- Provide the set of tools available for your model to call on each datapoint in the RFT training dataset. More info here in the dataset API reference.
- Configure your grader to assign rewards based on the contents of the tool calls made by the model. Information on grading tools calls can be found here in the grading docs
Billing details
Reinforcement fine-tuning jobs are billed based on the amount of time spent training, as well as the number of tokens used by the model during training. We only bill for time spent in the core training loop, not for time spent preparing the training data, validating datasets, waiting in queues, running safety evals, or other overhead.
Details on exactly how we bill for reinforcement fine-tuning jobs can be found in this help center article.
Training errors
Reinforcement fine-tuning is a complex process with many moving parts, and there are many places where things can go wrong. We publish various error metrics to help you understand what is going wrong in your job, and how to fix it. In general, we try to avoid failing a job entirely unless a very serious error occurs. When errors do occur, they often happen during the grading step. Errors during grading often happen either to the model outputting a sample that the grader doesn’t know how to handle, the grader failing to execute properly due to some sort of system error, or due to a bug in the grading logic itself.
The error metrics are available under the event.data.errors object, and are aggregated into counts and rates rolled up per-grader. We also display rates and counts of errors on the fine-tuning dashboard.