
Test reports show a unified view of all your tests in a pipeline. This page explains how to configure test reports and interpret the test dashboard.
Overview
The test tab in your project offers a unified view of the state of tests across all your pipelines. The test reports dashboard highlights test failures and can be filtered in many ways to provide insights into your test suite.
How to set up test reports
Before you can view your tests in the Test tabs, you need to perform a one-time setup. The benefit of having all tests in one place is usually worth the effort of this setup.
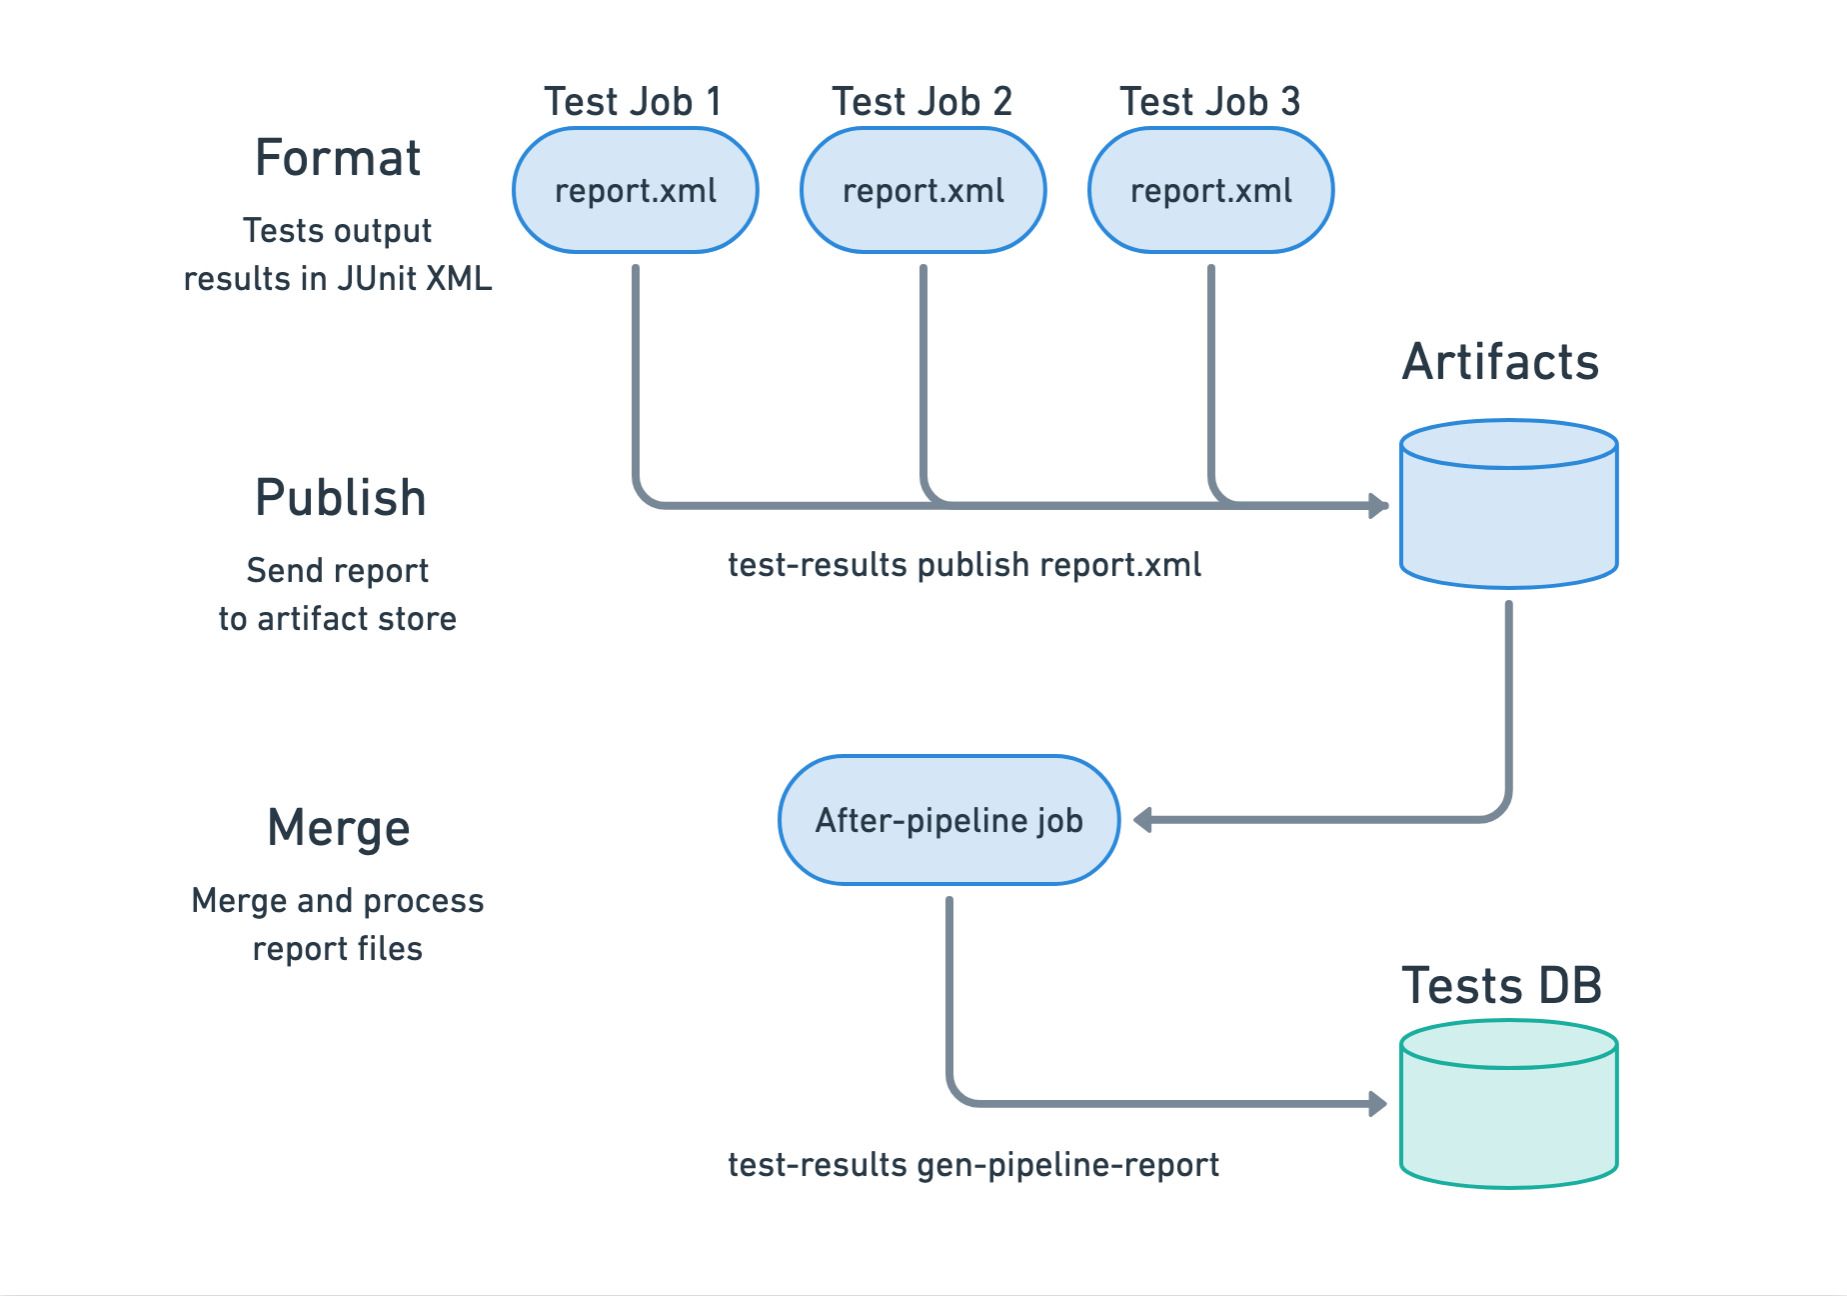
- Format: format test results in JUnit XML
- Publish: push results file into the artifact store
- Merge: collect and process all result files
👁 Steps to enable test results
Once test reports are configured, flaky test detection feature is automatically enabled.
Generating reports optimized for AI
In addition to JUnit reports, you can generate reports optimized for AI consumption. To enable this feature add --generate-mcp-summary to the publish and merge commands.
This option generates a mcp-summary.json artifact that's optimized for AI agent consumption.
Step 1 - Format
The JUnit XML format was created by the JUnit Project for Java but has been so popular that many other frameworks in diverse languages have implemented it.
<?xml version="1.0" encoding="UTF-8"?>
<testsuitestests="3"failures="2"errors="0"time="0.850294">
<testsuitetests="3"failures="2"time="0.063000"name="github.com/semaphoreci-demos/semaphore-demo-go"timestamp="2024-05-27T22:14:24Z">
<properties>
<propertyname="go.version"value="go1.22.3 linux/amd64"></property>
</properties>
<testcaseclassname="github.com/semaphoreci-demos/semaphore-demo-go"name="Test_count"time="0.020000">
<failuremessage="Failed"type="">=== RUN Test_count
dial tcp [::1]:5432: connect: connection refused
dial tcp [::1]:5432: connect: connection refused
dial tcp [::1]:5432: connect: connection refused
dial tcp [::1]:5432: connect: connection refused
 main_test.go:84: Select query returned 0
dial tcp [::1]:5432: connect: connection refused
--- FAIL: Test_count (0.02s)
</failure>
</testcase>
<testcaseclassname="github.com/semaphoreci-demos/semaphore-demo-go"name="Test_record"time="0.000000">
<failuremessage="Failed"type="">=== RUN Test_record
dial tcp [::1]:5432: connect: connection refused
dial tcp [::1]:5432: connect: connection refused
Serving: /getdata
Served: 
 main_test.go:144: Wrong server response!
dial tcp [::1]:5432: connect: connection refused
--- FAIL: Test_record (0.00s)
</failure>
</testcase>
</testsuite>
</testsuites>
The first step is to configure your test runner to generate a JUnit report. The format command runs as another command in the job — usually near the end.
To make setup easier, it's recommended to save all report files to the same path and filename. We'll use report.xml for the rest of the document.
Below there are examples of generating reports in different test runners.
The table shows possible test runners for popular languages. If your test runner is not listed here, you can still use test reports, but you need to find a test formatter that can export results to JUnit XML.
| Language | Test Runner | Formatter |
|---|---|---|
| JavaScript | Mocha | mocha-junit-reporter |
| JavaScript | Karma | karma-junit-reporter |
| JavaScript | ESLint | built-in |
| JavaScript | Jest | jest-junit |
| Ruby | RSpec | rspec_junit_formatter |
| Ruby | Cucumber | built-in |
| Elixir | ExUnit | junit-formatter |
| Go | GoTestSum | built-in |
| PHP | PHPUnit | built-in |
| Python | PyTest | built-in |
| Bash | Bats | built-in |
| Rust | Cargo Test | junit-report |
| Java | Maven | maven-surefire |
Step 2 - Publish
The publishing step uploads all report files to the artifact store. This is accomplished using the test-results tool, which is part of the Semaphore toolbox.
Assuming the file is called report.xml, you can publish the report with the following command.
[[ -f report.xml ]] && test-results publish report.xml
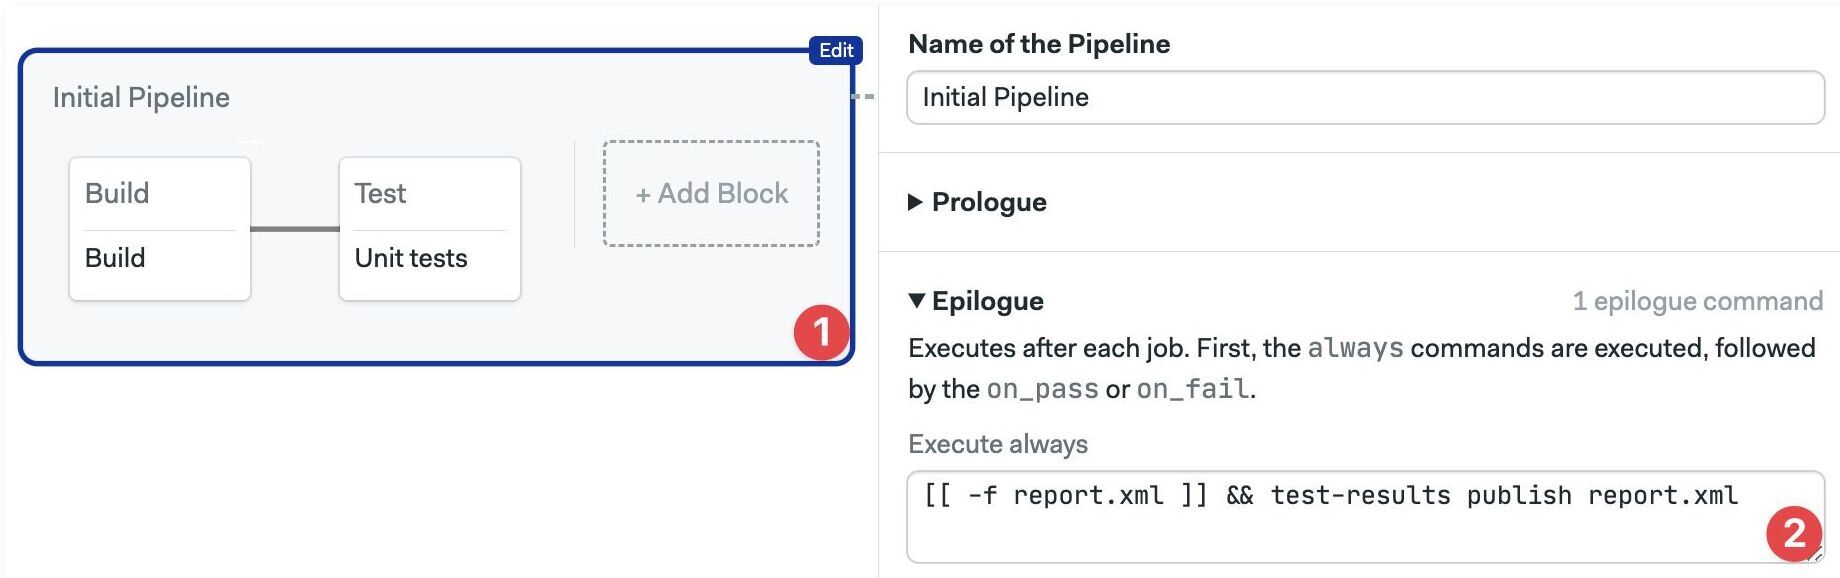
To simplify this step, you can add a pipeline epilogue to run the publish command after every job ends.
- Editor
- YAML
-
Select the pipeline with the test jobs
-
Add the publish command in the "Execute always" box of the Epilogue
- Open the pipeline file with the test jobs
- Add a
global_job_configkey at the YAML root - Type the publish command under
epilogue.always.commands
# ...
global_job_config:
epilogue:
always:
commands:
-'[[ -f report.xml ]] && test-results publish report.xml'
Step 3 - Merge
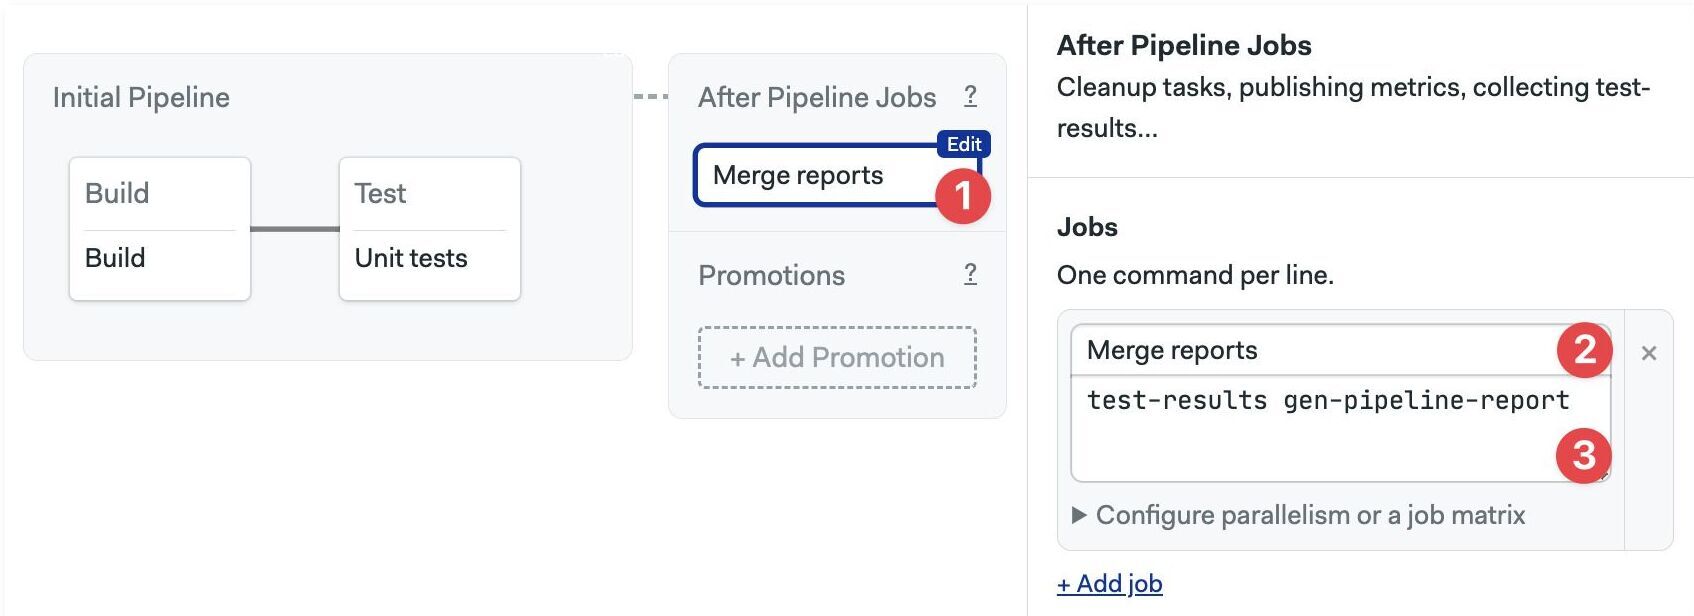
The final step is to merge and process all report files. This is achieved using an after-pipeline job.
- Editor
- YAML
-
Press +Add After Jobs
-
Type a name for the job
-
Type the command
test-results gen-pipeline-report
- Open the pipeline with the test jobs
- Add an
after_pipelinekey at the YAML root - Add the
nameundertask.jobs - Type the merge command
test-results gen-pipeline-reportin thecommandssection
# ...
after_pipeline:
task:
jobs:
-name: Merge reports
commands:
- test-results gen-pipeline-report
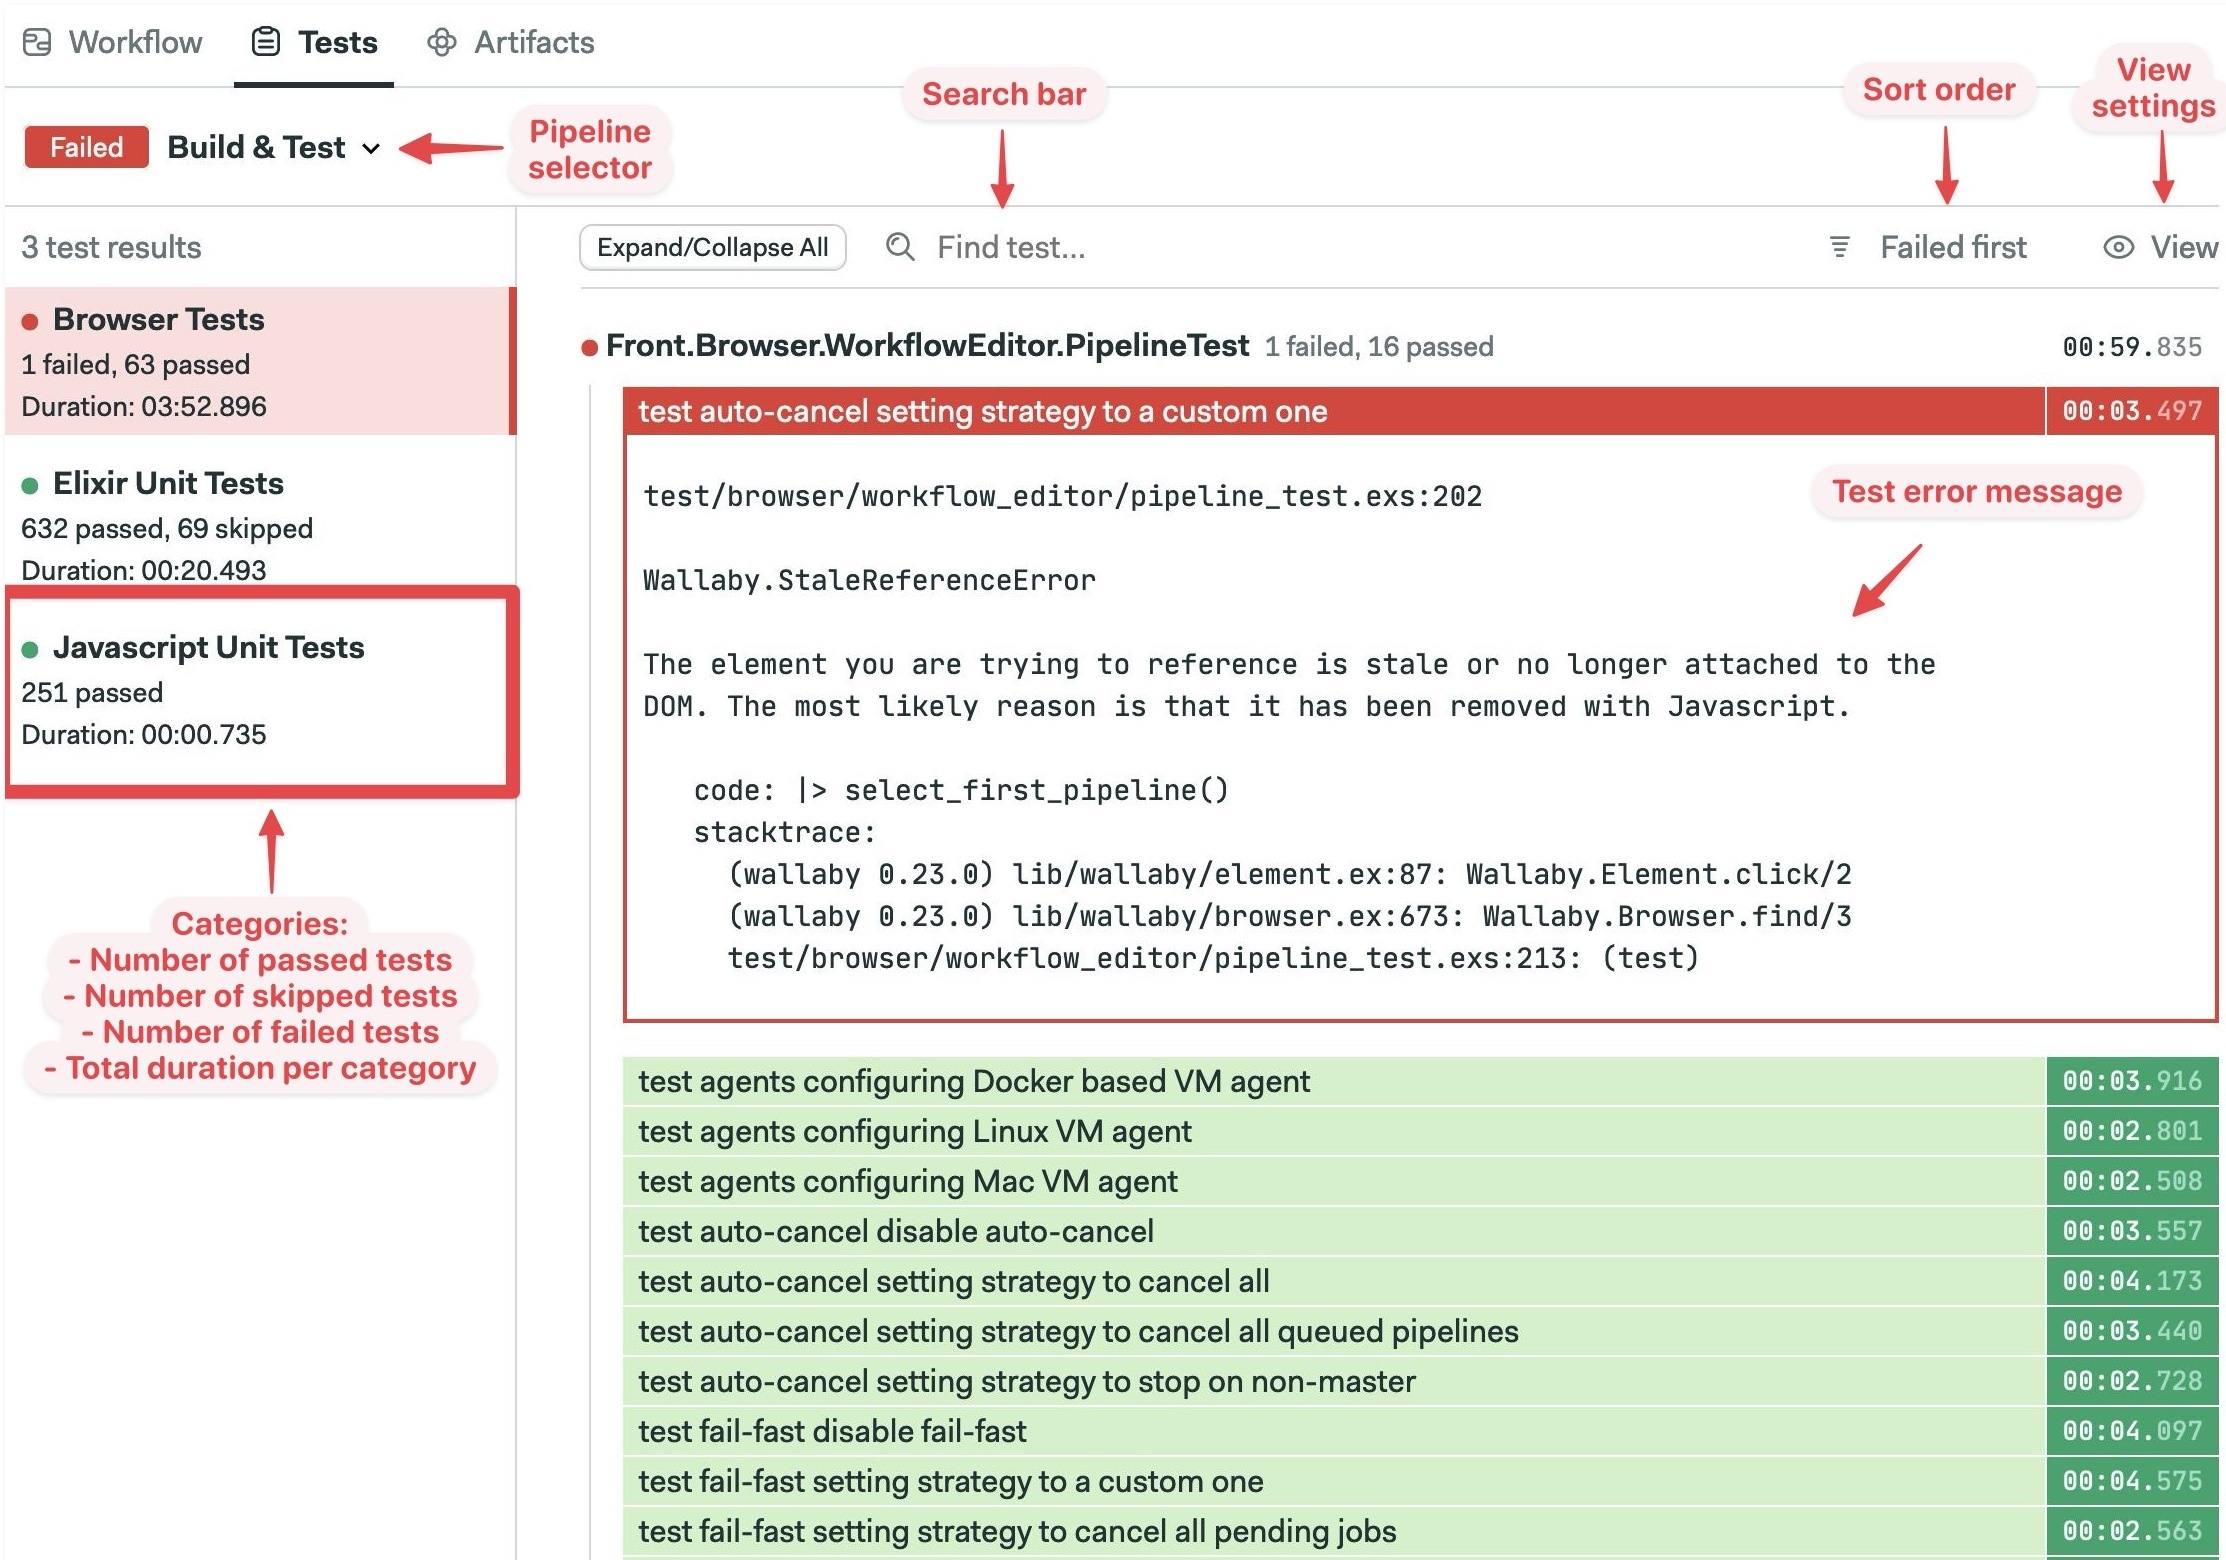
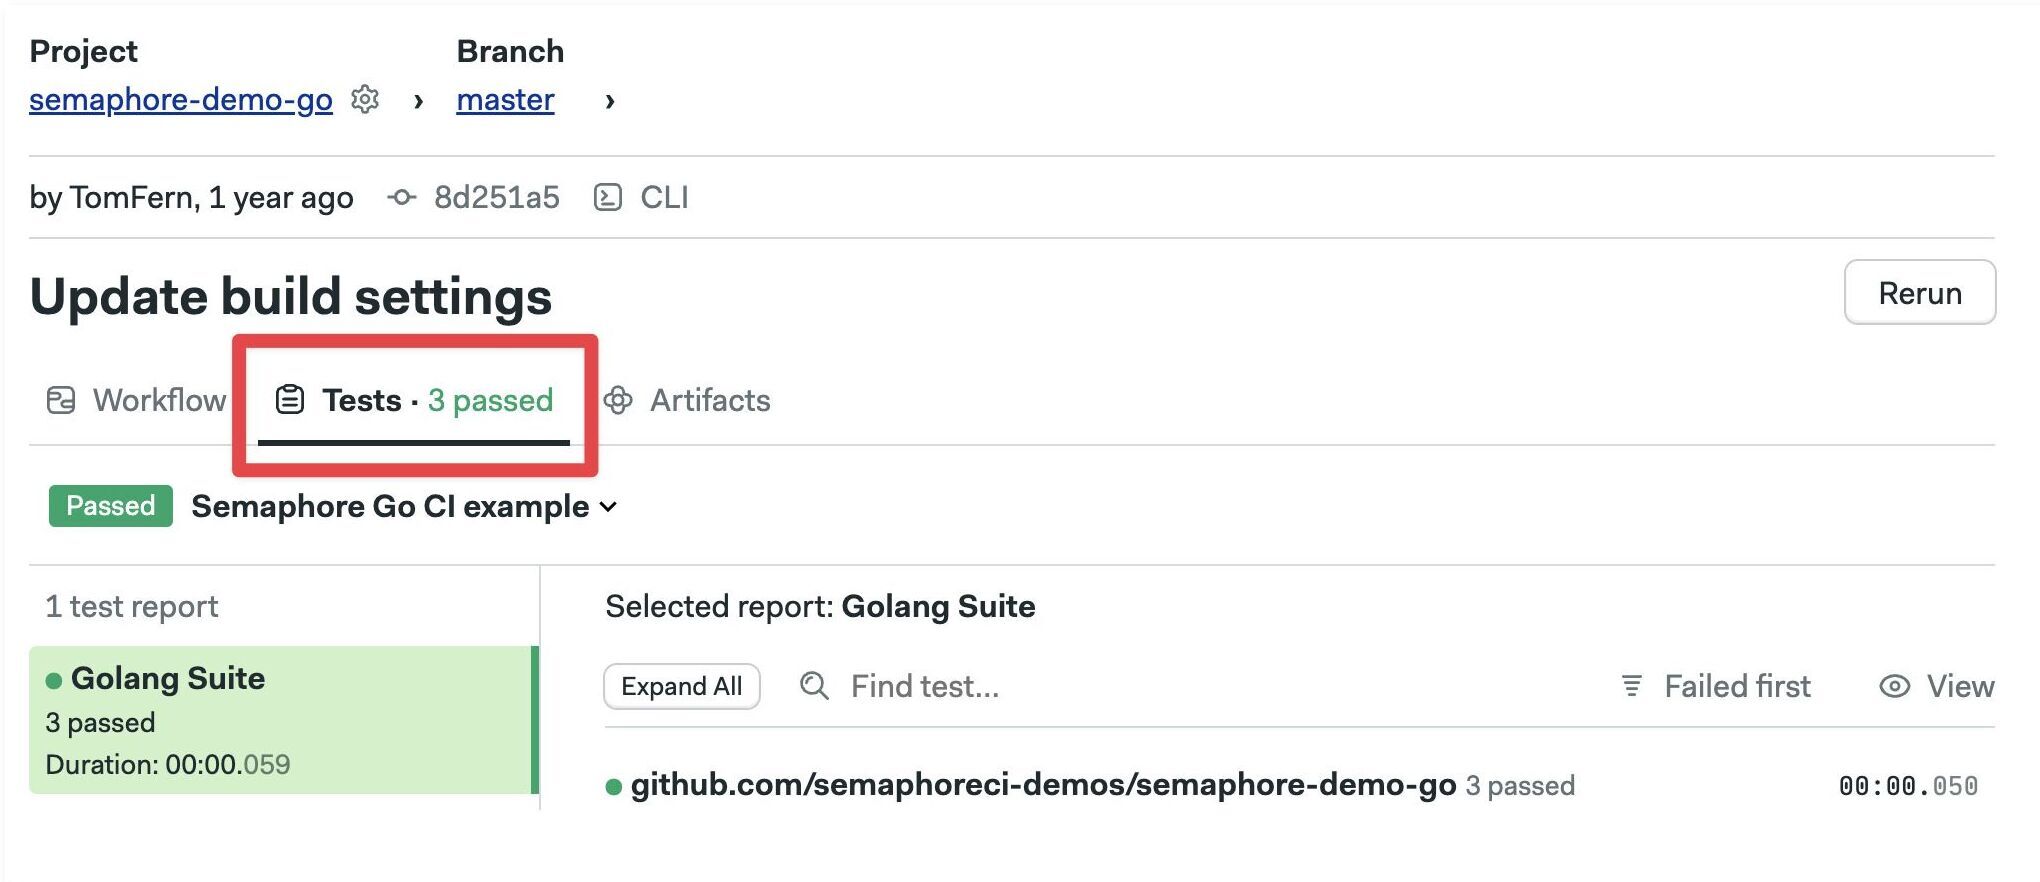
How to view test reports
To view test results, navigate to your pipeline and go to the Tests tab.
The test tab is only populated for the pipelines where test reports are configured. If you don't see anything yet, try rerunning the pipeline.
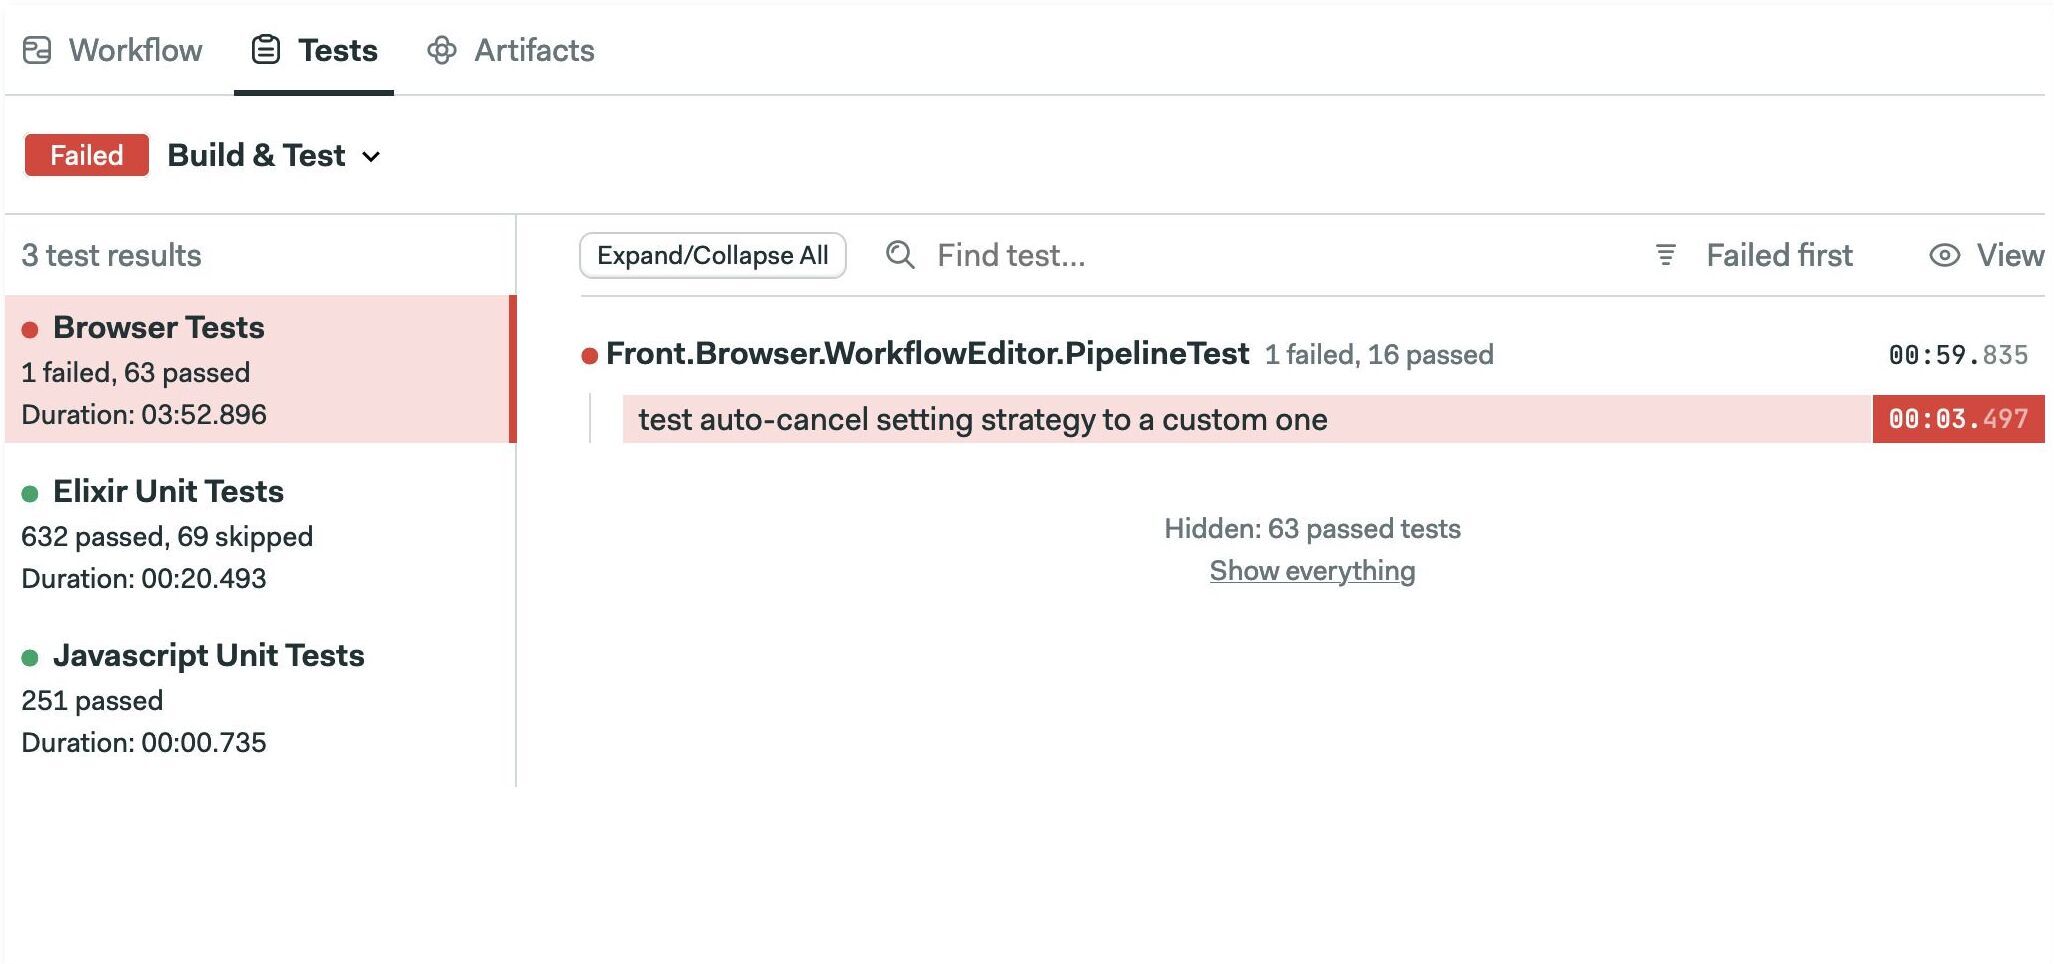
The default Test view shows failed tests first.
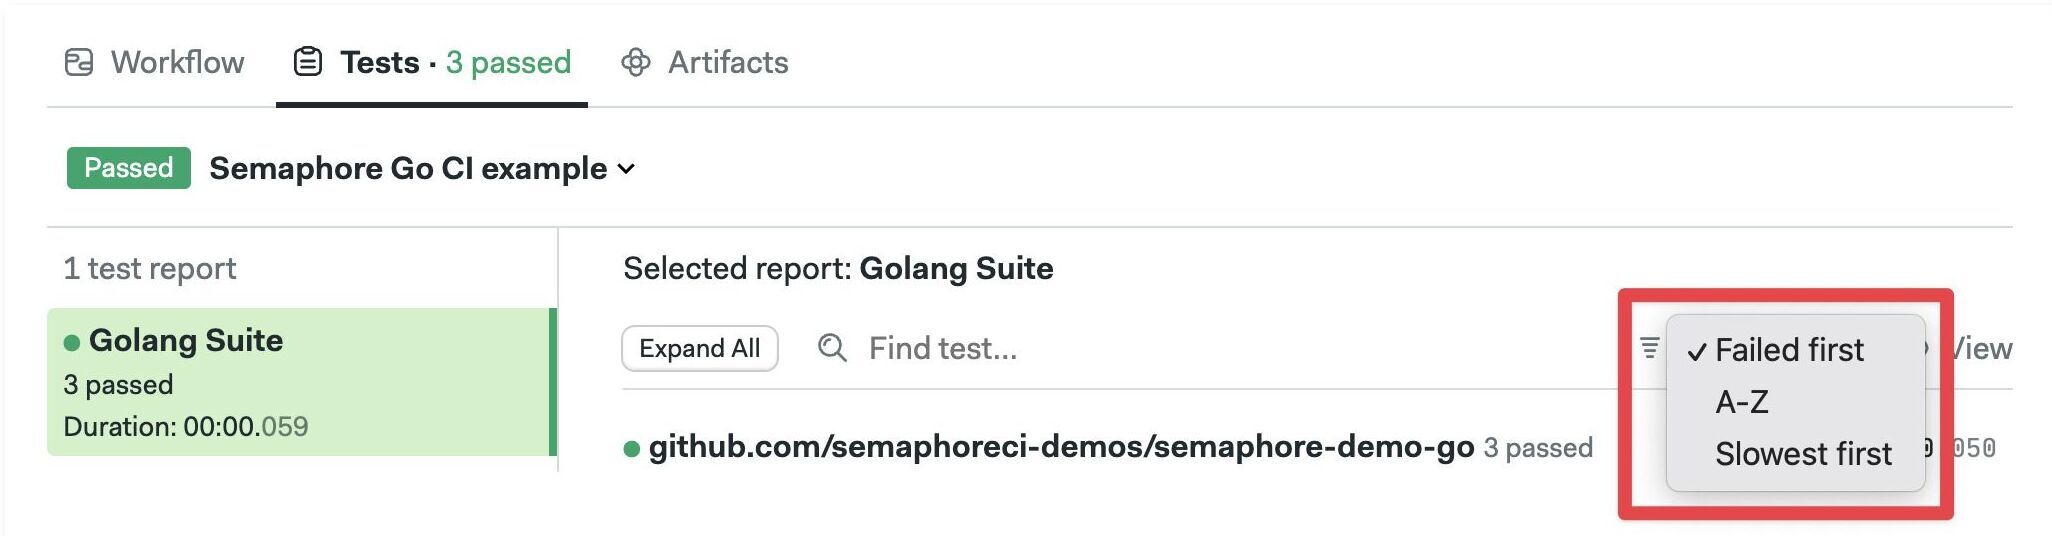
Click on "Failed first" to change the sort order. You can sort by "Slowest first" or alphabetically.
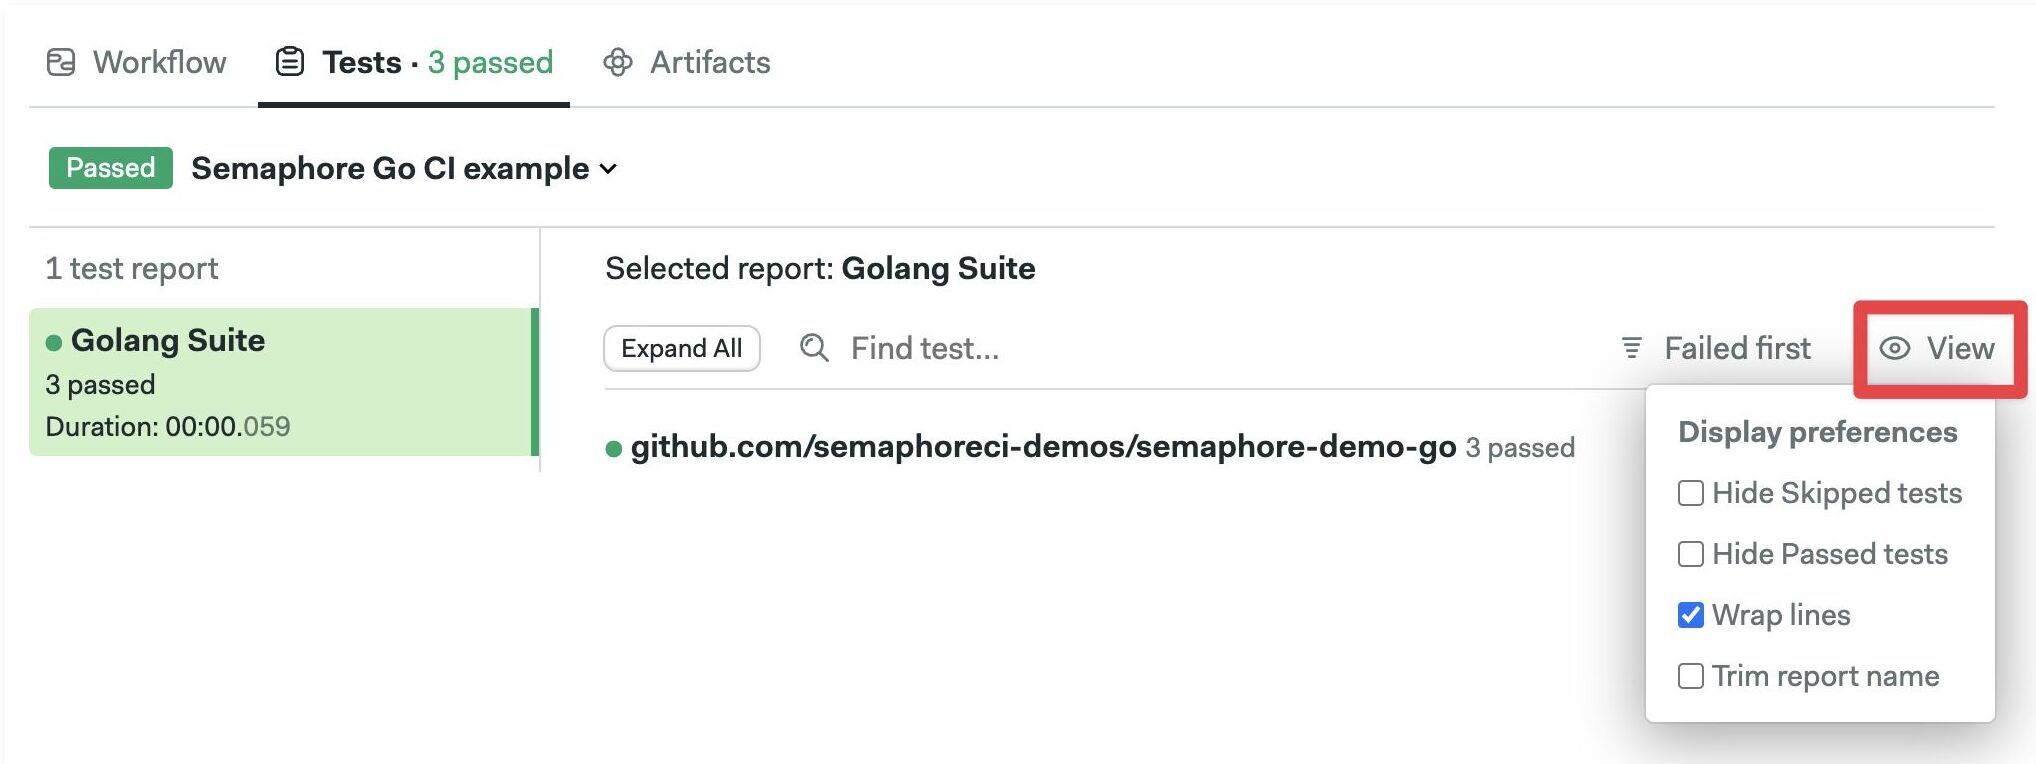
Click on "View" to change display preferences. You can hide passed or skipped tests and change how the report looks.
👁 Changing display preferences