This topic describes how to configure Azure Private Link to connect your Azure Virtual Network (VNet) to the Snowflake VNet in Azure.
Note that Azure Private Link is not a service provided by Snowflake. It is a Microsoft service that Snowflake enables for use with
your Snowflake account.
Azure Private Link provides private connectivity to Snowflake
by ensuring that access to Snowflake is through a private IP address. Traffic can only occur from the customer virtual network (VNet) to the
Snowflake VNet using the Microsoft backbone and avoids the public Internet. This significantly simplifies the network configuration by
keeping access rules private while providing secure and private communication.
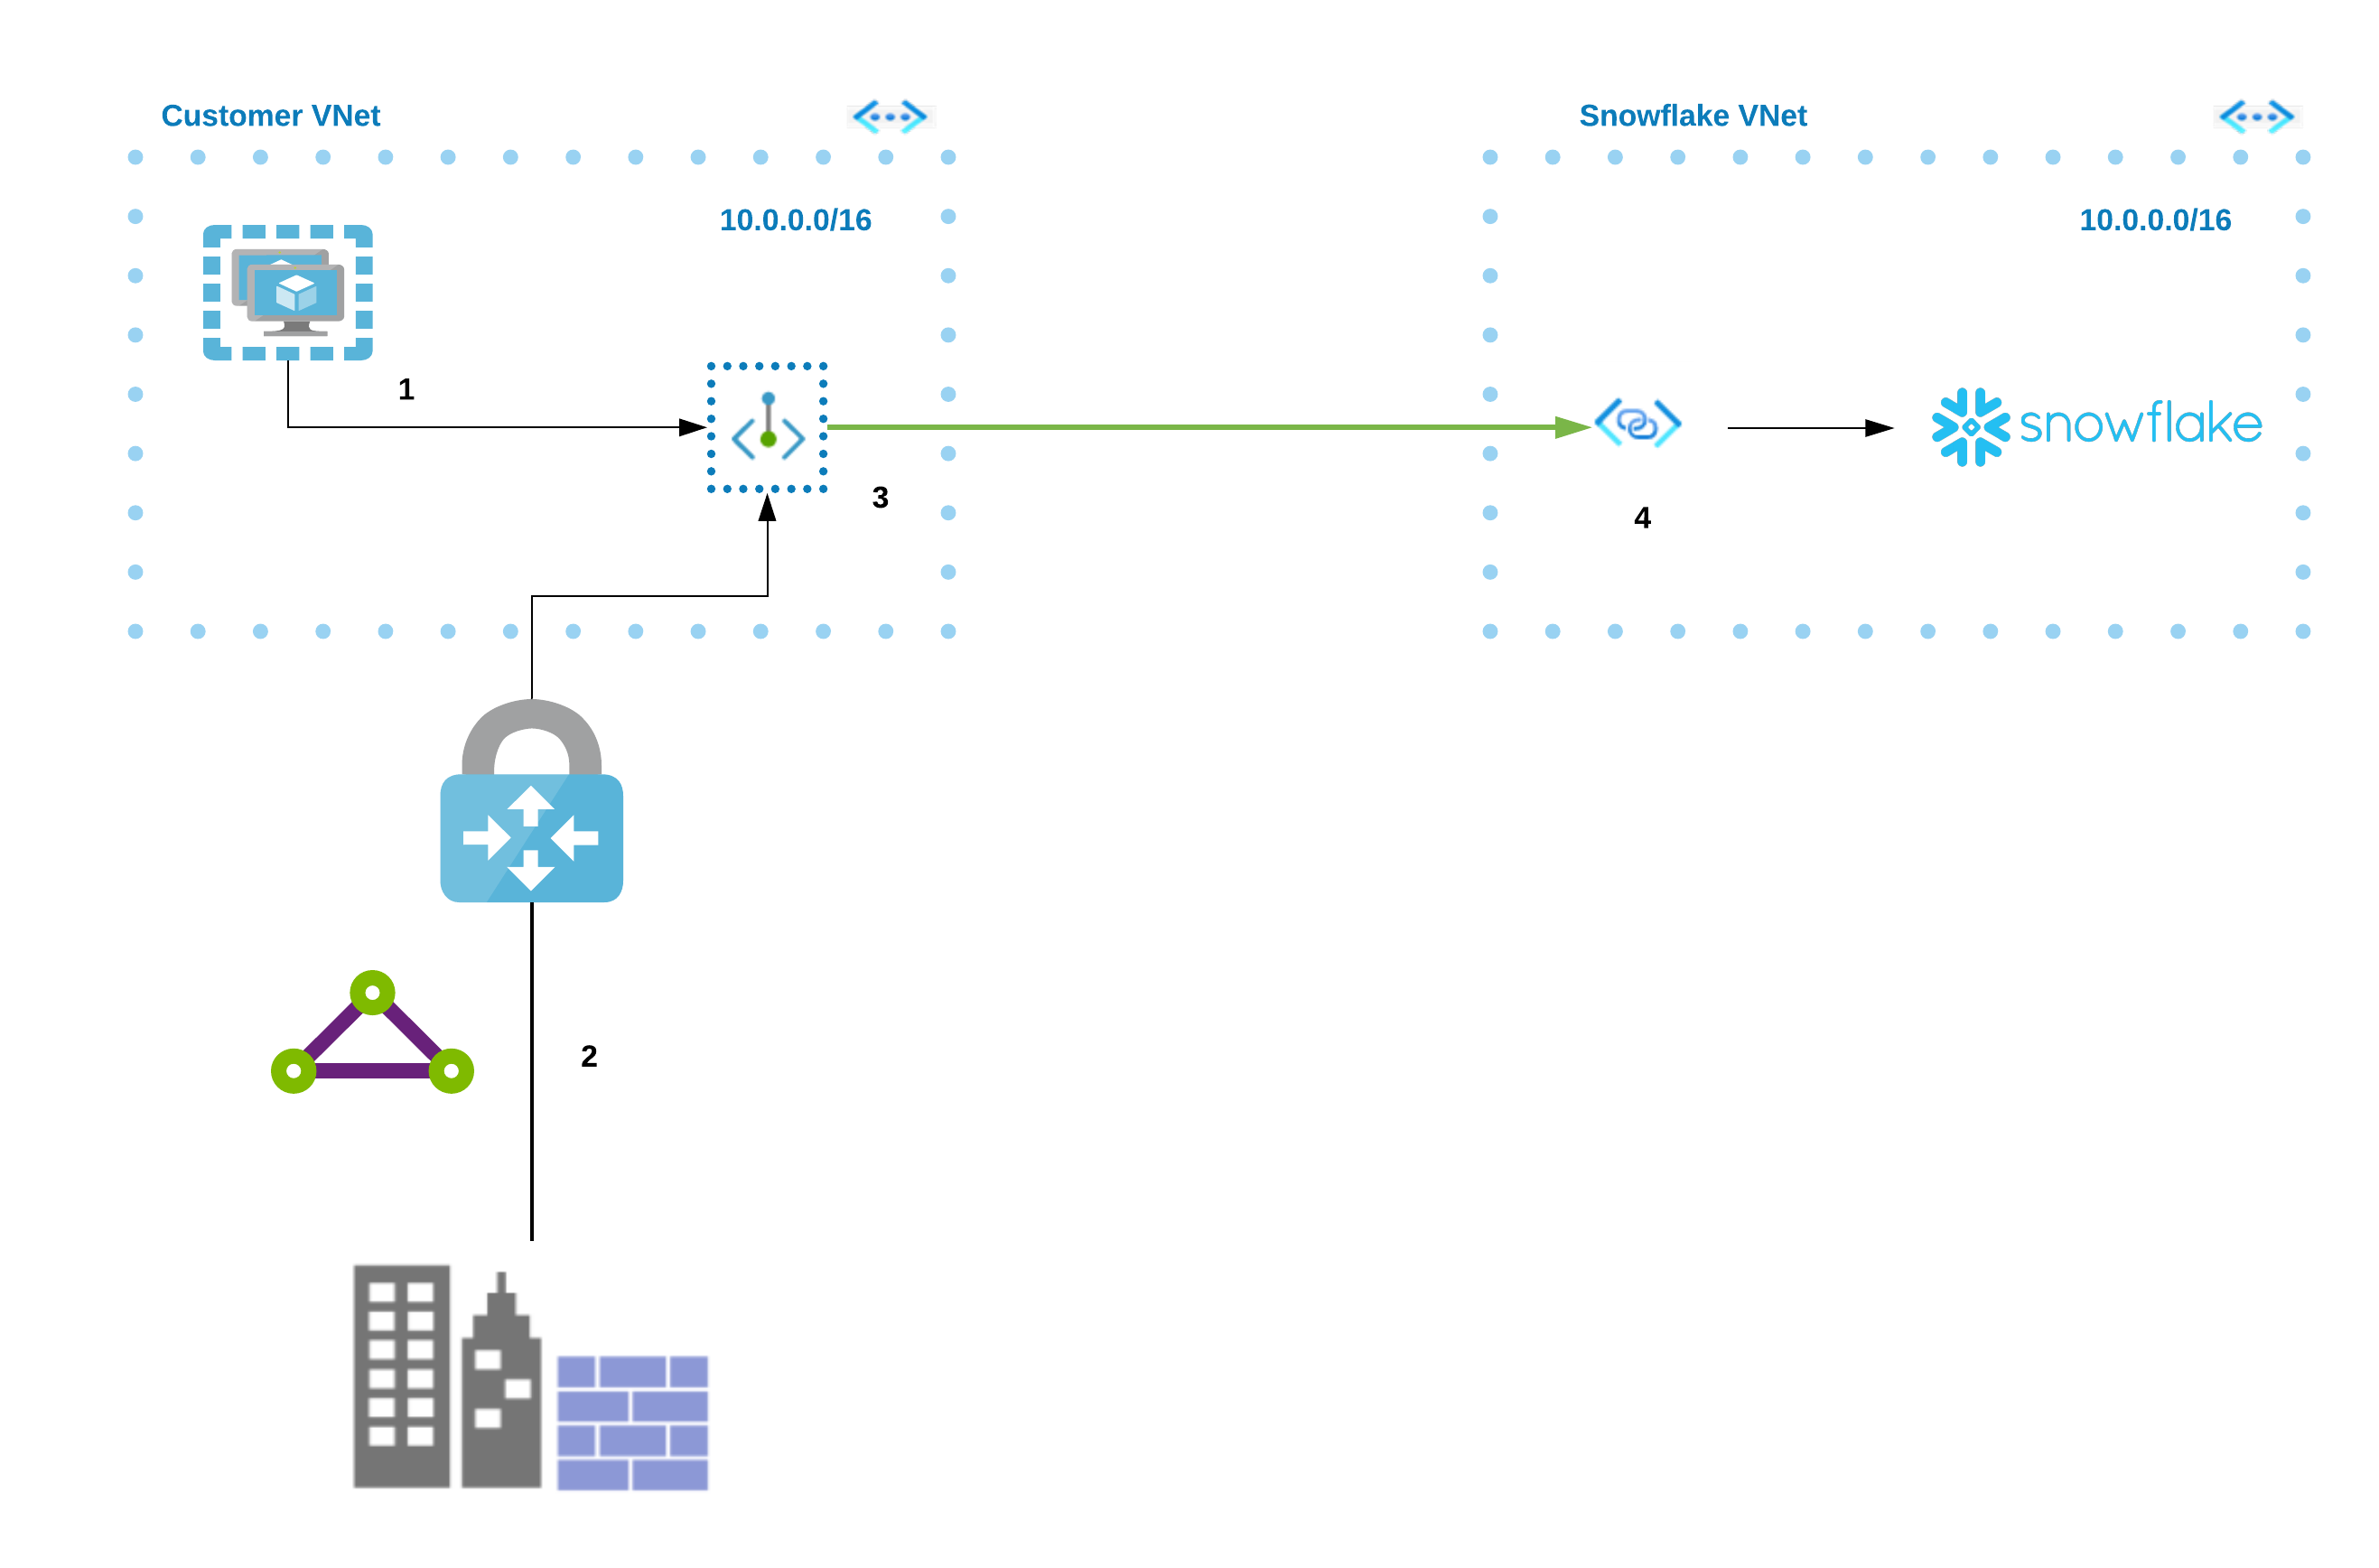
The following diagram summarizes the Azure Private Link architecture with respect to the customer VNet and the Snowflake VNet.
From either a virtual machine (1) or through peering (2), you can connect to the Azure Private Link endpoint (3) in your virtual network.
That endpoint then connects to the Private Link Service (4) and routes to Snowflake.
Here are the high-level steps to integrate Snowflake with Azure Private Link:
Create a Private Endpoint.
Generate and retrieve an access token from your Azure subscription.
Note that if you plan to use Azure Private Link to connect to a Snowflake internal stage or Snowflake-managed storage volume on
Azure, you must register your subscription with the Azure Storage resource provider before connecting from a private endpoint.
Enable your Snowflake account on Azure to use Azure Private Link.
Update your outbound firewall settings to allow the Snowflake account URL and OCSP URL.
Update your DNS server to resolve your account URL and OCSP URL to the Private Link IP address. You can add the DNS entry to your
on-premises DNS server or private DNS on your VNet, and use DNS forwarding to direct queries for the entry from other locations where
your users will access Snowflake.
Currently, the self-service enablement process described in this topic does not support authorizing a managed Private Endpoint from Azure
Data Factory, Synapse, or other managed services.
For details on how to configure a managed private endpoint for this use case, see this
article
(in the Snowflake community).
Configure access to Snowflake with Azure Private Link
Attention
This section only covers the Snowflake-specific details for configuring your VNet environment. Also, note that Snowflake is not
responsible for the actual configuration of the required firewall updates and DNS records. If you encounter issues with any of these
configuration tasks, please contact Microsoft Support directly.
This section describes how to configure your Azure VNet to connect to the Snowflake VNet on Azure using Azure Private Link. After initiating
the connection to Snowflake using Azure Private Link, you can determine the approval state of the connection in the Azure portal.
This procedure manually creates and initializes the necessary Azure Private Link resources to use Azure Private Link to connect to
Snowflake on Azure. Note that this procedure assumes that your use case does not involve Using SSO with Azure Private Link
(in this topic).
As a representative example using the Azure CLI, execute az account list --output table. Note the output values in the
Name, SubscriptionID and CloudName columns.
Name CloudName SubscriptionId State IsDefault
------- ---------- ------------------------------------ ------- ----------
MyCloud AzureCloud 13c... Enabled True
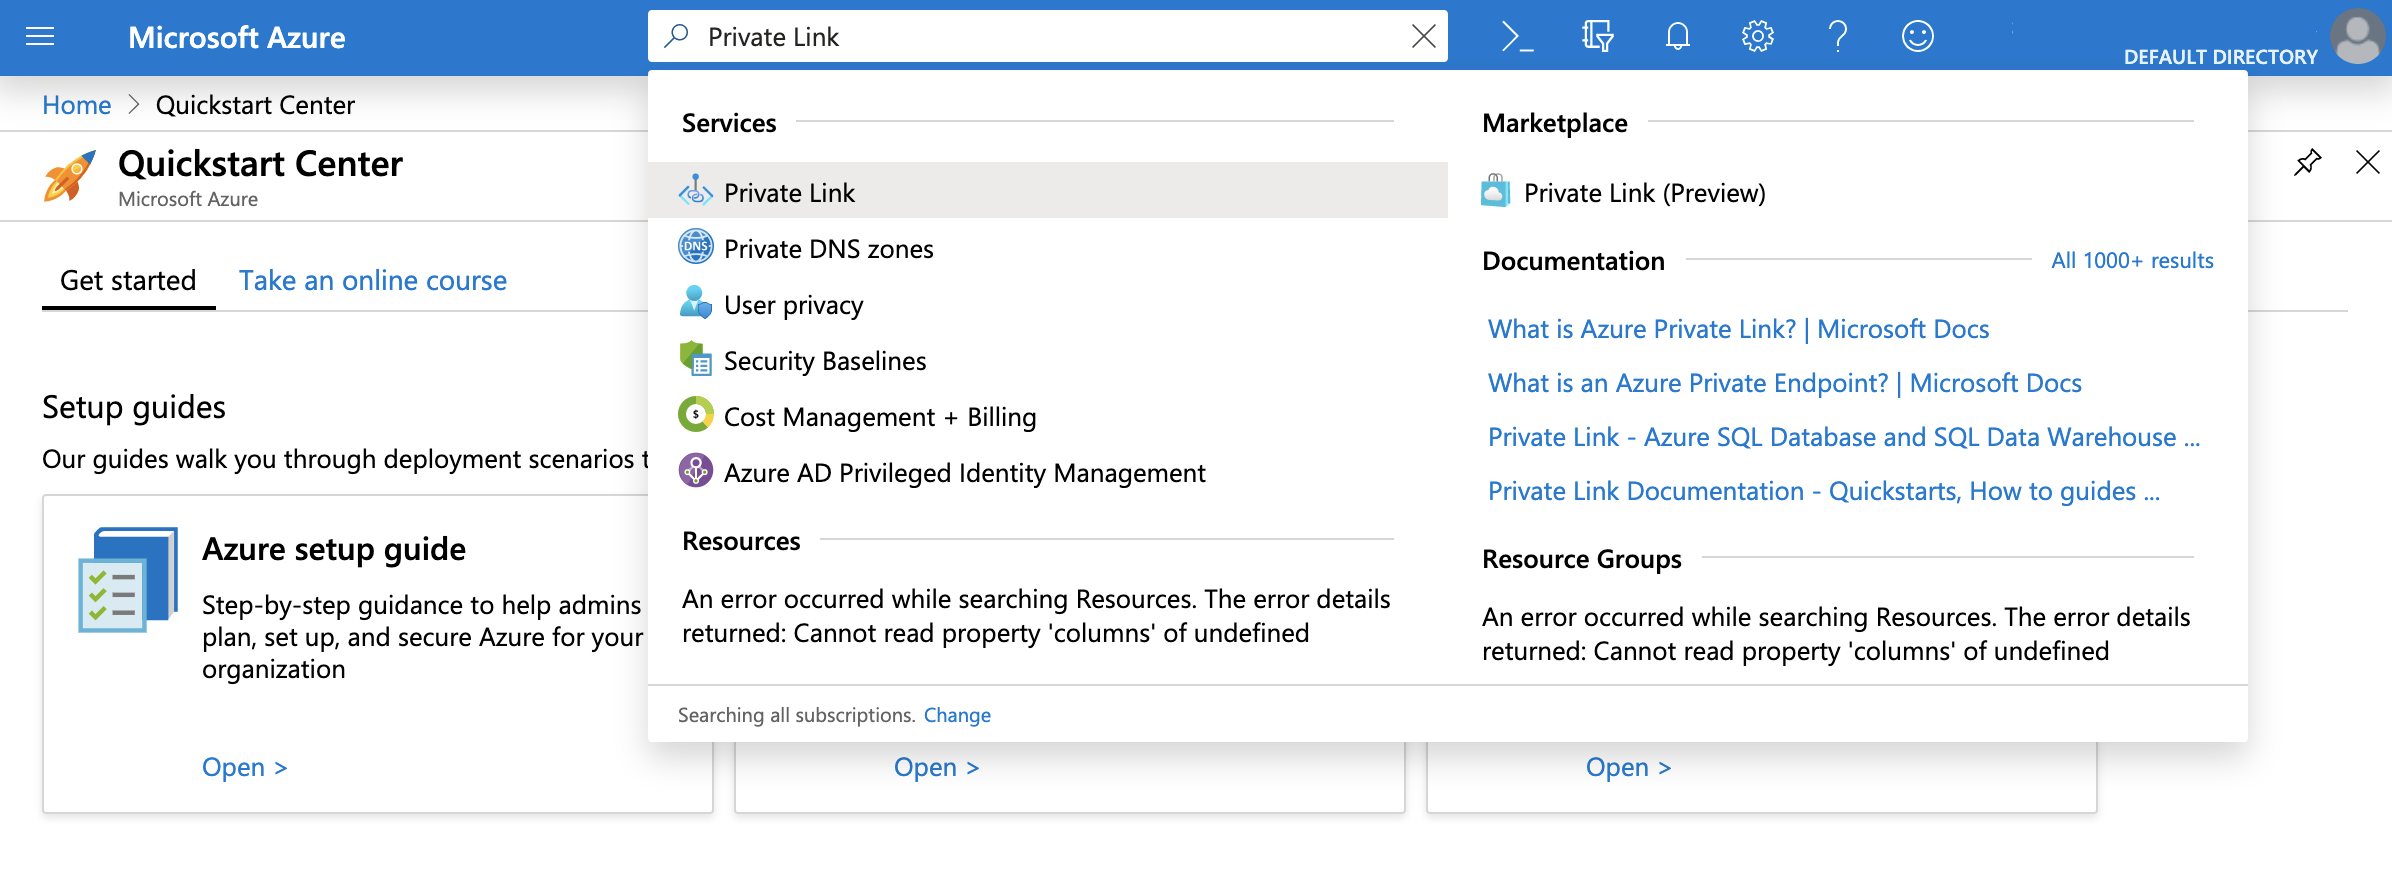
Navigate to the Azure portal. Search for Private Link and click Private Link.
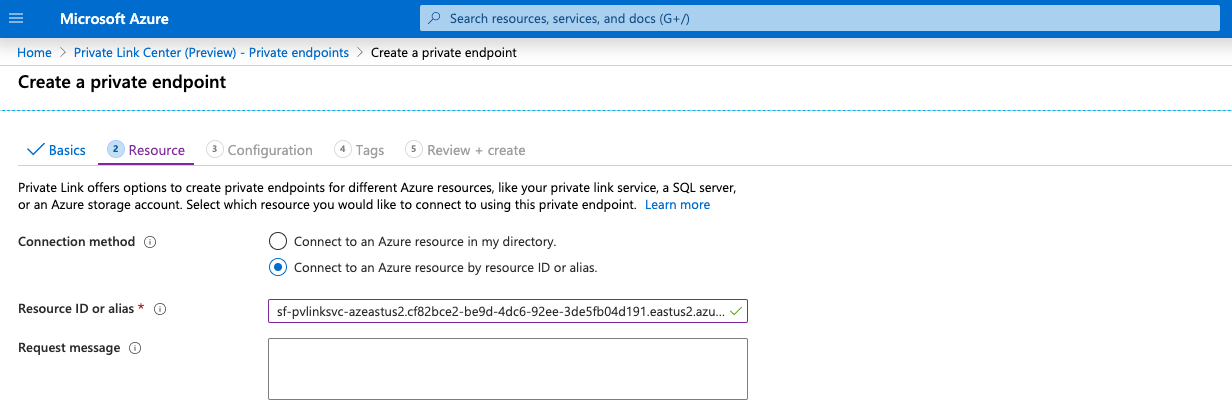
In Snowflake, execute SYSTEM$GET_PRIVATELINK_CONFIG and input the value for privatelink-pls-id
into the Resource ID or alias field. Note that the screenshot in this step uses the alias value for the east-us-2
region as a representative example, and that Azure confirms a valid alias value with a green checkmark.
If you receive an error message regarding the alias value, contact Snowflake Support to receive the resource ID value and then
repeat this step using the resource ID value.
Return to the Private endpoints section and allow a few minutes to wait. On approval, the Private Endpoint displays a
CONNECTION STATE value of Pending. This value will update to Approved after completing the authorization in
the next step.
Enable your Snowflake account on Azure to use Azure Private Link by completing the following steps:
In your command-line environment, record the private endpoint resource ID value using the following Azure CLI
network
command:
az network private-endpoint show
The private endpoint was created in the previous steps using the template files. The resource ID value takes the following form,
which has a truncated value:
In your command-line environment, execute the following
Azure CLI account command
and save the output. The output will be used as the value for the federated_token argument in the next step.
az account get-access-token --subscription <SubscriptionID>
Extract the access token value from the command output. This value will be used as the federated_token value in the next
step. In this example, the values are truncated and the access token value is eyJ...:
The user generating the Azure access Token must have Read permissions on the Subscription. The least privilege permission is
Microsoft.Subscription/subscriptions/acceptOwnershipStatus/read.
Alternatively, the default role Reader grants more coarse-grained permissions.
The accessToken value is sensitive information and should be treated like a password value — do not share this
value.
If it is necessary to contact Snowflake Support, redact the access token from any commands and URLs before creating a support
ticket.
In Snowflake, call the SYSTEM$AUTHORIZE_PRIVATELINK function,
using the private-endpoint-resource-id value and the federated_token value as arguments, which are truncated in
this example:
To verify your authorized configuration, call the SYSTEM$GET_PRIVATELINK function in your
Snowflake account on Azure. Snowflake returns Account is authorized for PrivateLink. for a successful authorization.
If it is necessary to disable Azure Private Link in your Snowflake account, call the
SYSTEM$REVOKE_PRIVATELINK function, using the argument values for
private-endpoint-resource-id and federated_token.
DNS Setup. All requests to Snowflake need to be routed via the Private Endpoint. Update your DNS to resolve the Snowflake account and
OCSP URLs to the private IP address of your Private Endpoint.
To get the endpoint IP address, navigate to Azure portal search bar and enter the name of the endpoint
(i.e. the NAME value from Step 5). Locate the Network Interface result and click it.
Configure your DNS to have the appropriate endpoint values from the SYSTEM$GET_PRIVATELINK_CONFIG
function resolve to the private IP address.
The values to obtain from the output of SYSTEM$GET_PRIVATELINK_CONFIG depend on which Snowflake features you access using private
connectivity. For a description of the possible values, see Return values.
Note that the values for regionless-snowsight-privatelink-url and snowsight-privatelink-url allow access to
Snowsight and the Snowflake Marketplace using private connectivity. However, there is additional configuration if you want to enable
URL redirects. For information, see Snowsight & Private Connectivity.
Note
A full explanation of DNS configuration is beyond the scope of this procedure. For example, you can choose to integrate an
Azure Private DNS zone into your environment. Please
consult your internal Azure and Cloud Infrastructure administrators to configure and resolve the URLs in DNS properly.
Using replication and Tri-Secret Secure with private connectivity
Snowflake supports replicating your data from the source account to the target account, regardless of whether you enable
Tri-Secret Secure or this feature in the target account.
Configure the CIDR block range to block public access to Snowflake using your organization’s IP address range. This range can be
from within your virtual network.
Once the CIDR Block ranges are set, only IP addresses within the CIDR block range can access Snowflake.
To block public access using a network policy:
Create a new network policy or edit an existing network policy. Add the CIDR block range for your organization.
