
Java Web Service: Top-Down Approach
Web services can be created with either top-down or bottom-up development. Here's a look at top-down development with a Java web service.
Join the DZone community and get the full member experience.
Join For FreeWeb services can be created using two methods: top-down development and bottom-up development.
In a top-down approach, we create the WSDL first and then generate the web service artifact using the tool available in JDK.
By creating the WSDL file first you will ultimately have more control over the web service, and can eliminate interoperability issues that may arise when creating a web service using the bottom-up method
Pre-requisite:
- Java should be installed and JAVA_HOME and PATH Environment is set.
- Any IDE of your preference. I used Eclipse.
We generate the web service artifact using the wsimport tool available in JDK.
https://docs.oracle.com/javase/6/docs/technotes/tools/share/wsimport.html
Usage: wsimport [options] <WSDL_URI>
where [options] include:

 -b <path> specify jaxws/jaxb binding files or additional schemas
 (Each <path> must have its own -b)
 -B<jaxbOption> Pass this option to JAXB schema compiler
 -catalog <file> specify catalog file to resolve external entity references
 supports TR9401, XCatalog, and OASIS XML Catalog format.
 -d <directory> specify where to place generated output files
 -extension allow vendor extensions - functionality not specified
 by the specification. Use of extensions may
 result in applications that are not portable or
 may not interoperate with other implementations
 -help display help
 -httpproxy:<host>:<port> specify a HTTP proxy server (port defaults to 8080)
 -keep keep generated files
 -p <pkg> specifies the target package
 -quiet suppress wsimport output
 -s <directory> specify where to place generated source files
 -target <version> generates code as per the given JAXWS spec version
 Defaults to 2.2, Accepted values are 2.0, 2.1 and 2.2
 e.g. 2.0 will generate compliant code for JAXWS 2.0 spec
 -verbose output messages about what the compiler is doing
 -version print version information
 -wsdllocation <location> @WebServiceClient.wsdlLocation value
 -clientjar <jarfile> Creates the jar file of the generated artifacts along with the
 WSDL metadata required for invoking the web service.
We will try to create a web service which has one service (Weather Service) with one operation (GetCurrentTemperature) which takes the City name as an input and returns the temperature.
Below the WSDL that was created to satisfy our purpose.
<?xml version="1.0" encoding="UTF-8" standalone="no"?>
<wsdl:definitions xmlns:soap="http://schemas.xmlsoap.org/wsdl/soap/"
 xmlns:tns="http://www.example.org/WeatherService/"
xmlns:wsdl="http://schemas.xmlsoap.org/wsdl/"
xmlns:xsd="http://www.w3.org/2001/XMLSchema"
name="WeatherService"
targetNamespace="http://www.example.org/WeatherService/">
 <wsdl:types>
 <xsd:schema targetNamespace="http://www.example.org/WeatherService/">
 <xsd:element name="GetCurrentTemperatureRq">
 <xsd:complexType>
 <xsd:sequence>
 <xsd:element name="city" type="xsd:string"/>
 </xsd:sequence>
 </xsd:complexType>
 </xsd:element>
 <xsd:element name="GetCurrentTemperatureRs">
 <xsd:complexType>
 <xsd:sequence>
 <xsd:element name="temperature" type="xsd:string"/>
 </xsd:sequence>
 </xsd:complexType>
 </xsd:element>
 </xsd:schema>
 </wsdl:types>
 <wsdl:message name="GetCurrentTemperatureRq">
 <wsdl:part element="tns:GetCurrentTemperatureRq" name="parameters"/>
 </wsdl:message>
 <wsdl:message name="GetCurrentTemperatureRs">
 <wsdl:part element="tns:GetCurrentTemperatureRs" name="parameters"/>
 </wsdl:message>
 <wsdl:portType name="WeatherServicePortType">
 <wsdl:operation name="GetCurrentTemperature">
 <wsdl:input message="tns:GetCurrentTemperatureRq"/>
 <wsdl:output message="tns:GetCurrentTemperatureRs"/>
 </wsdl:operation>
 </wsdl:portType>
 <wsdl:binding name="WeatherServiceSOAP" type="tns:WeatherServicePortType">
 <soap:binding style="document" transport="http://schemas.xmlsoap.org/soap/http"/>
 <wsdl:operation name="GetCurrentTemperature">
 <soap:operation soapAction="http://www.example.org/WeatherService/GetCurrentTemperature"/>
 <wsdl:input>
 <soap:body use="literal"/>
 </wsdl:input>
 <wsdl:output>
 <soap:body use="literal"/>
 </wsdl:output>
 </wsdl:operation>
 </wsdl:binding>
 <wsdl:service name="WeatherService">
 <wsdl:port binding="tns:WeatherServiceSOAP" name="WeatherServiceSOAP">
 <soap:address location="http://localhost:80/WeatherServiceApp/WeatherService"/>
 </wsdl:port>
 </wsdl:service>
</wsdl:definitions>
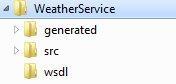
Create a below Folder structure anywhere in your hard drive.
Now create the WeatherService.wsdl file in the wsdl folder as created above.
Open Command Prompt and make the above WeatherService folder as root.
Run the below command to create the Web service artifact.
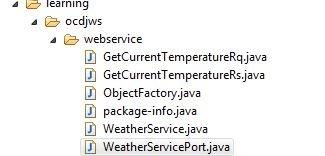
. wsimport -d ./generated -s ./src -p learning.ocdjws.webservice ./wsdl/WeatherService.wsdlBelow files are generated.
Create a Java project in IDE of your choice and import the files that are generated in src folder
Now have a structure for our web service. We need to create an implementation for our web service. Create a Java class WeatherServicePortImpl in learning.ocdjws.webservice package and implement the WeatherServicePort interface.
package learning.ocdjws.webservice;

import javax.jws.WebMethod;
import javax.jws.WebResult;
import javax.jws.WebService;
import javax.jws.soap.SOAPBinding;

@WebService(name = "WeatherServicePort", targetNamespace = "http://www.example.org/WeatherService/")
@SOAPBinding(parameterStyle = SOAPBinding.ParameterStyle.BARE)
public class WeatherServicePortImpl implements WeatherServicePort {

@Override
@WebMethod(operationName = "GetCurrentTemperature", action = "http://www.example.org/WeatherService/GetCurrentTemperature")
@WebResult(name = "GetCurrentTemperatureRs", targetNamespace = "http://www.example.org/WeatherService/", partName = "parameters")
public GetCurrentTemperatureRs getCurrentTemperature(
GetCurrentTemperatureRq request) {
System.out.println(request.getCity());
ObjectFactory objectfactory = new ObjectFactory();
GetCurrentTemperatureRs response = objectfactory
.createGetCurrentTemperatureRs();
response.setTemperature(Math.random() * 100 + "Degree Celcius");
return response;
}

}
Deploying in JVM Embedded Server
We can publish our web service using Endpoint API in javax.xml.ws.
JAX-WS RI Endpoint.publish API uses by default a light-weight HTTP server implementation that is included in Sun's Java SE 6.
Below class publishes our web service.
import javax.xml.ws.Endpoint;

public class WeatherServicePublish {

public static void main(String[] args) {
WeatherServicePortImpl implemtor= new WeatherServicePortImpl();
Endpoint.publish("http://localhost:80/WebServices/WeatherService", implemtor);
}
}
If everything goes fine we will be able to access our web service in below URL.
http://localhost/WebServices/WeatherService
Deploying in Web Container
We will now deploy the Web Service in web container. I used tomcat server.
Download and UnZip the JAXWS reference Implementation from https://jax-ws.java.net/2.2.10/
Create a Dyamaic Web Project in IDE of your Choice. And copy the Webservice artifact that are generated earlier using wsimport command and Implementation class to the src folder of new project.
Copy the all jar files from the lib folder(JAXWS RI Unzipped path) to WEB-INF\lib.
Open the web.xml and update the content as below.
<?xml version="1.0" encoding="UTF-8"?>
<web-app version="2.4"
xmlns="http://java.sun.com/xml/ns/j2ee" xmlns:xsi="http://www.w3.org/2001/XMLSchema-instance"
xsi:schemaLocation="http://java.sun.com/xml/ns/j2ee http://java.sun.com/xml/ns/j2ee/web-app_2_4.xsd">
<display-name>WeatherService</display-name>
<listener>
<listener-class>com.sun.xml.ws.transport.http.servlet.WSServletContextListener</listener-class>
</listener>
<servlet>
<servlet-name>WeatherService</servlet-name>
<servlet-class>com.sun.xml.ws.transport.http.servlet.WSServlet</servlet-class>
<load-on-startup>1</load-on-startup>
</servlet>
<servlet-mapping>
<servlet-name>WeatherService</servlet-name>
<url-pattern>/WeatherService</url-pattern>
</servlet-mapping>

</web-app>
For Information click WSServletContextListener and WSServlet links.
Create a file named sun-jaxws.xml in WEB-INF folder and update the endpoint details as below.
<?xml version="1.0" encoding="UTF-8"?>
<endpoints xmlns="http://java.sun.com/xml/ns/jax-ws/ri/runtime"
version="2.0">
<endpoint name="WeatherService"
implementation="learning.ocdjws.webservice.WeatherServicePortImpl"
url-pattern="/WeatherService" />
</endpoints>
Build the war files and deploy in Tomcat server. Check the tomcat console of any errors.
If everything goes fine we will be able to access our web service in below URL.
http://localhost:8080/WeatherService/WeatherService
In the next article we will learn about Bottom-Up Approach.
Happy Learning !!!
Opinions expressed by DZone contributors are their own.
Related
-
How To Get Cell Data From an Excel Spreadsheet Using APIs in Java
-
Enterprise RIA With Spring 3, Flex 4 and GraniteDS
-
Migrating Spring Java Applications to Azure App Service (Part 1: DataSources and Credentials)
-
How To Build Web Service Using Spring Boot 2.x