
If you use the custom events feature, then these count towards your billable monthly pageviews.
Custom events let you measure button clicks, subscription signups or any other action you want visitors to take. There are two ways to set them up:
- Using CSS class names: add a class to any HTML element you want to track. No JavaScript required. This is the easiest approach for most use cases and is covered in the first section below.
- Using JavaScript: call the
plausible()function directly for more advanced tracking needs such as dynamic values, conditional logic or tracking non-click interactions. See the manual JavaScript approach section.
If you're using WordPress or Google Tag Manager, you can set up custom events with our WordPress plugin or GTM template without writing code. Plausible also offers automated tracking for outbound link clicks, file downloads and form submissions straight from your site settings, pageview goals for tracking visits to specific pages and 404 error pages with a small snippet of code.
Testing this workflow for your site? Custom events work during the free trial, no credit card required
Add a CSS class name to the element you want to track on your site
Tag the site element you want to track with a CSS class name. How to do this varies depending on the site builder, CMS or framework you've used to build your site.
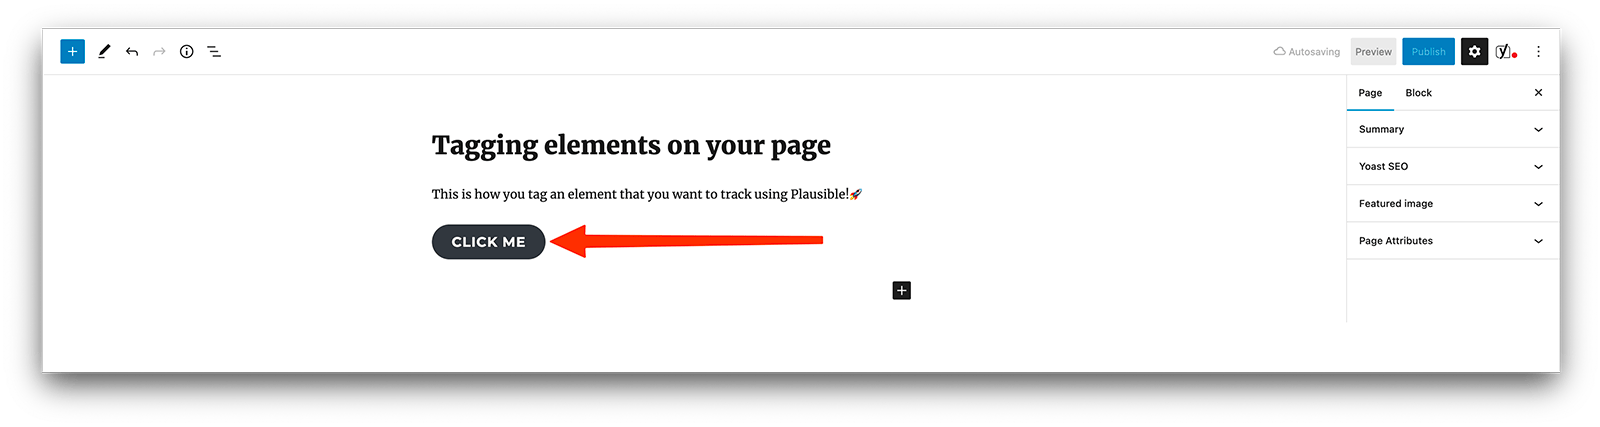
For instance, if you're using WordPress, you can click on any block element you want to track such as a button. This will open up the block menu on the right-hand side of your screen.
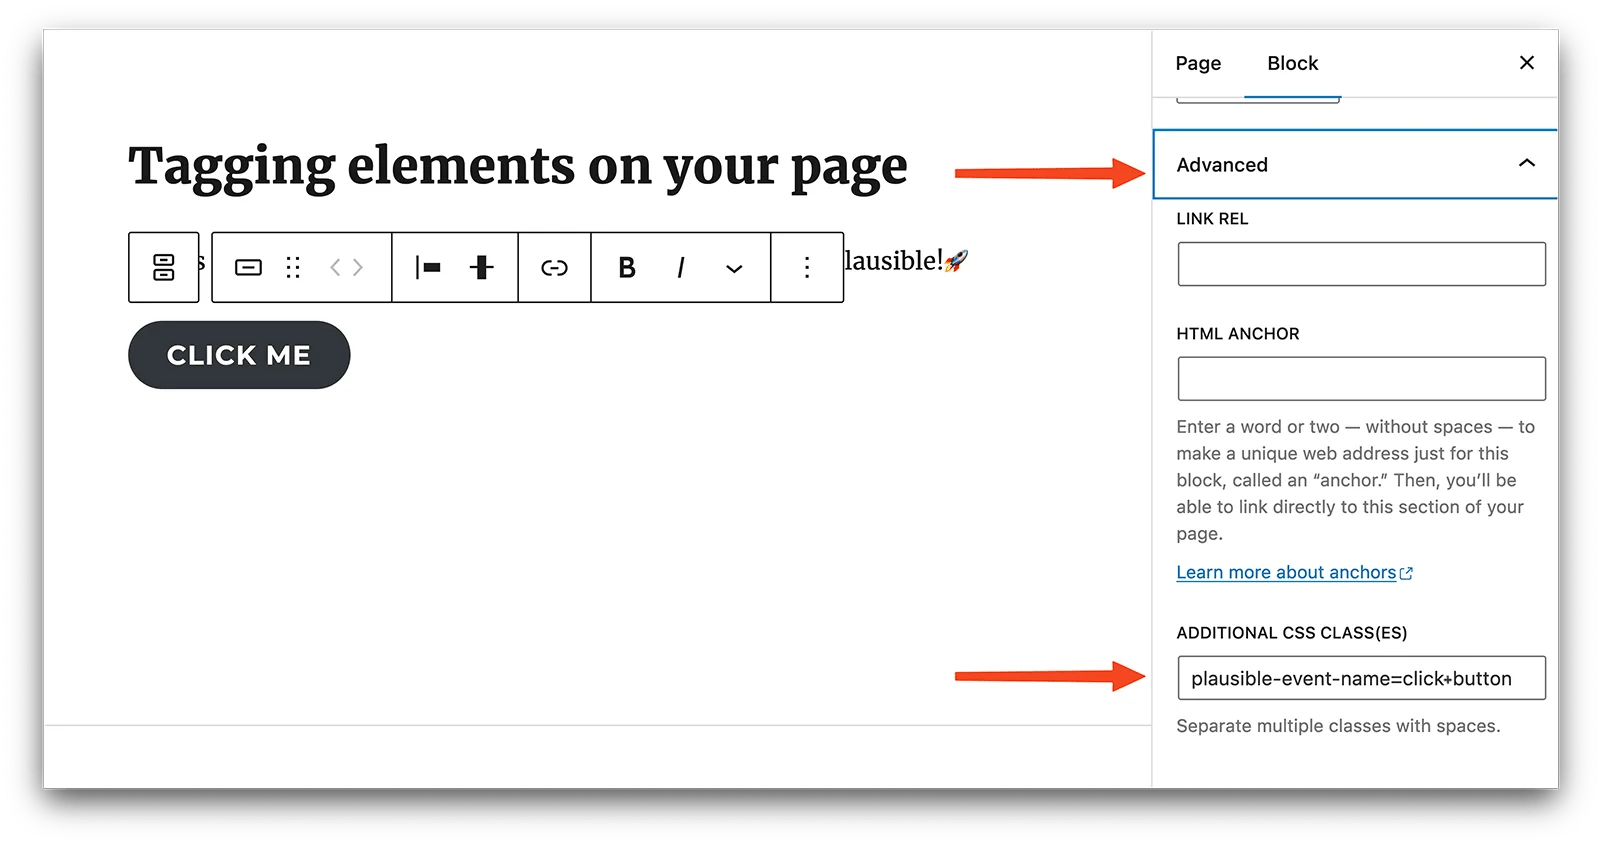
You can then click on "Advanced" and add a CSS class name in the "Additional CSS class(es)" field. Add the CSS class name in this format: plausible-event-name=MyEventName. For instance, if you want to track clicks on a button, you could use: plausible-event-name=Button+Click.
To represent a space in an event name, use a + sign. For example: plausible-event-name=Button+Click will display as Button Click in your dashboard.
You can also add class names directly in HTML
If you can edit the raw HTML code of the element you want to track, you can also add the classes directly in HTML. For example:
<!-- before -->
<button>Click Me</button>

<!-- after -->
<buttonclass="plausible-event-name=Button+Click">Click Me</button>
Or if your element already has a class attribute, just separate the new ones with a space:
<!-- before -->
<buttonclass="some-existing-class">Click Me</button>

<!-- after -->
<buttonclass="some-existing-class plausible-event-name=Button+Click">Click Me</button>
Verify that the CSS classes were added correctly
After adding the class, please go back to your site, and verify that the class attribute got added with the exact required format. You can check it by right-clicking the element and inspecting it. This will show you the HTML code of the element.
In some cases, the tracking classes might be added to a wrapper <div> element (parent to the element you want to track), but don't worry, Plausible will still be able to track clicks on the child element if its parent has the necessary classes.
Some CMSs like Webflow do not support an equals sign (=) in the classnames. If you add a class attribute with the value plausible-event-name=Signup, but when you go back to your page and inspect the element, it might have class="plausible-event-name-Signup" (equals sign replaced with a hyphen). If that's the case, use a double dash (--) instead of the equals sign. For example: plausible-event-name--signup.
If your CMS does not support adding CSS classes, please expand the following section of instructions.
Create a custom event goal in your Plausible account
When you send custom events to Plausible, they won't show up in your dashboard automatically. You'll have to configure the goal for the conversion numbers to show up.
To configure a goal, go to your website's settings in your Plausible account and visit the Goals section. You should see a list of current goals with a prompt to add a goal.
Click on the + Add goal button to go to the goal creation form.
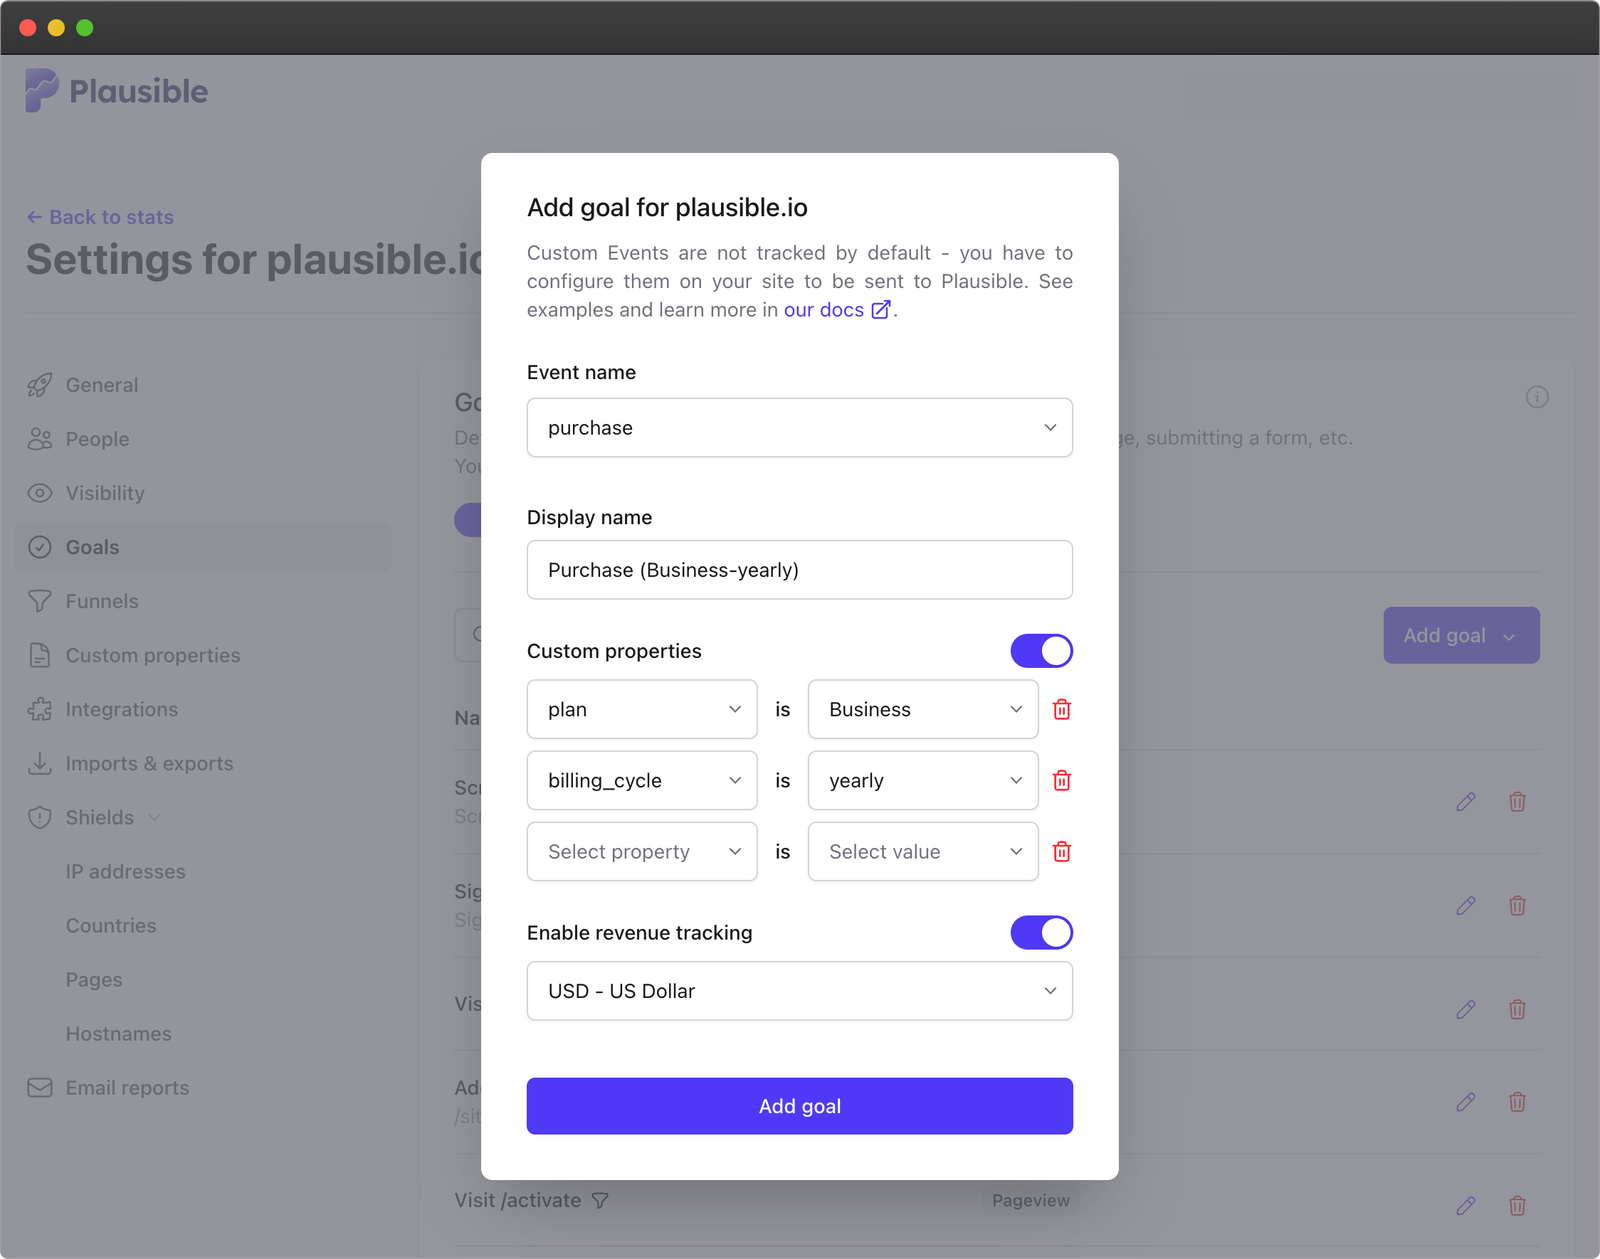
Select Custom event as the goal trigger and enter the name of the custom event you are triggering. The name must match the one you added as a CSS class name on your site for conversions to appear in your analytics dashboard. So in our example where you added a CSS class name plausible-event-name=Button+Click, the goal to add to your Plausible account is Button Click (plus is replaced by a space).
Narrow goals with custom properties
When creating a custom event goal, you can optionally narrow it down using custom properties. This lets you turn a broad goal into a more specific one by matching only events with certain property values, letting you track something like “Purchase (Business – yearly)” as its own goal rather than grouping all purchases together. Learn how to set up property-filtered goals.
Next, click on the Add goal button and you'll be taken back to the Goals page. When you navigate back to your Plausible dashboard, you should see the number of visitors who triggered the custom event. Custom events are listed at the bottom of your dashboard and will appear as soon as the first conversion has been tracked.
If you happen to be sending events to Plausible already, you might see the following message under the Add goal button:
You can click the link to automatically add all the goals you've been sending so far. If you end up not wanting to see some of them on the dashboard, you can simply remove them from the list.
That's it. You can now check out your goal conversions on the dashboard.
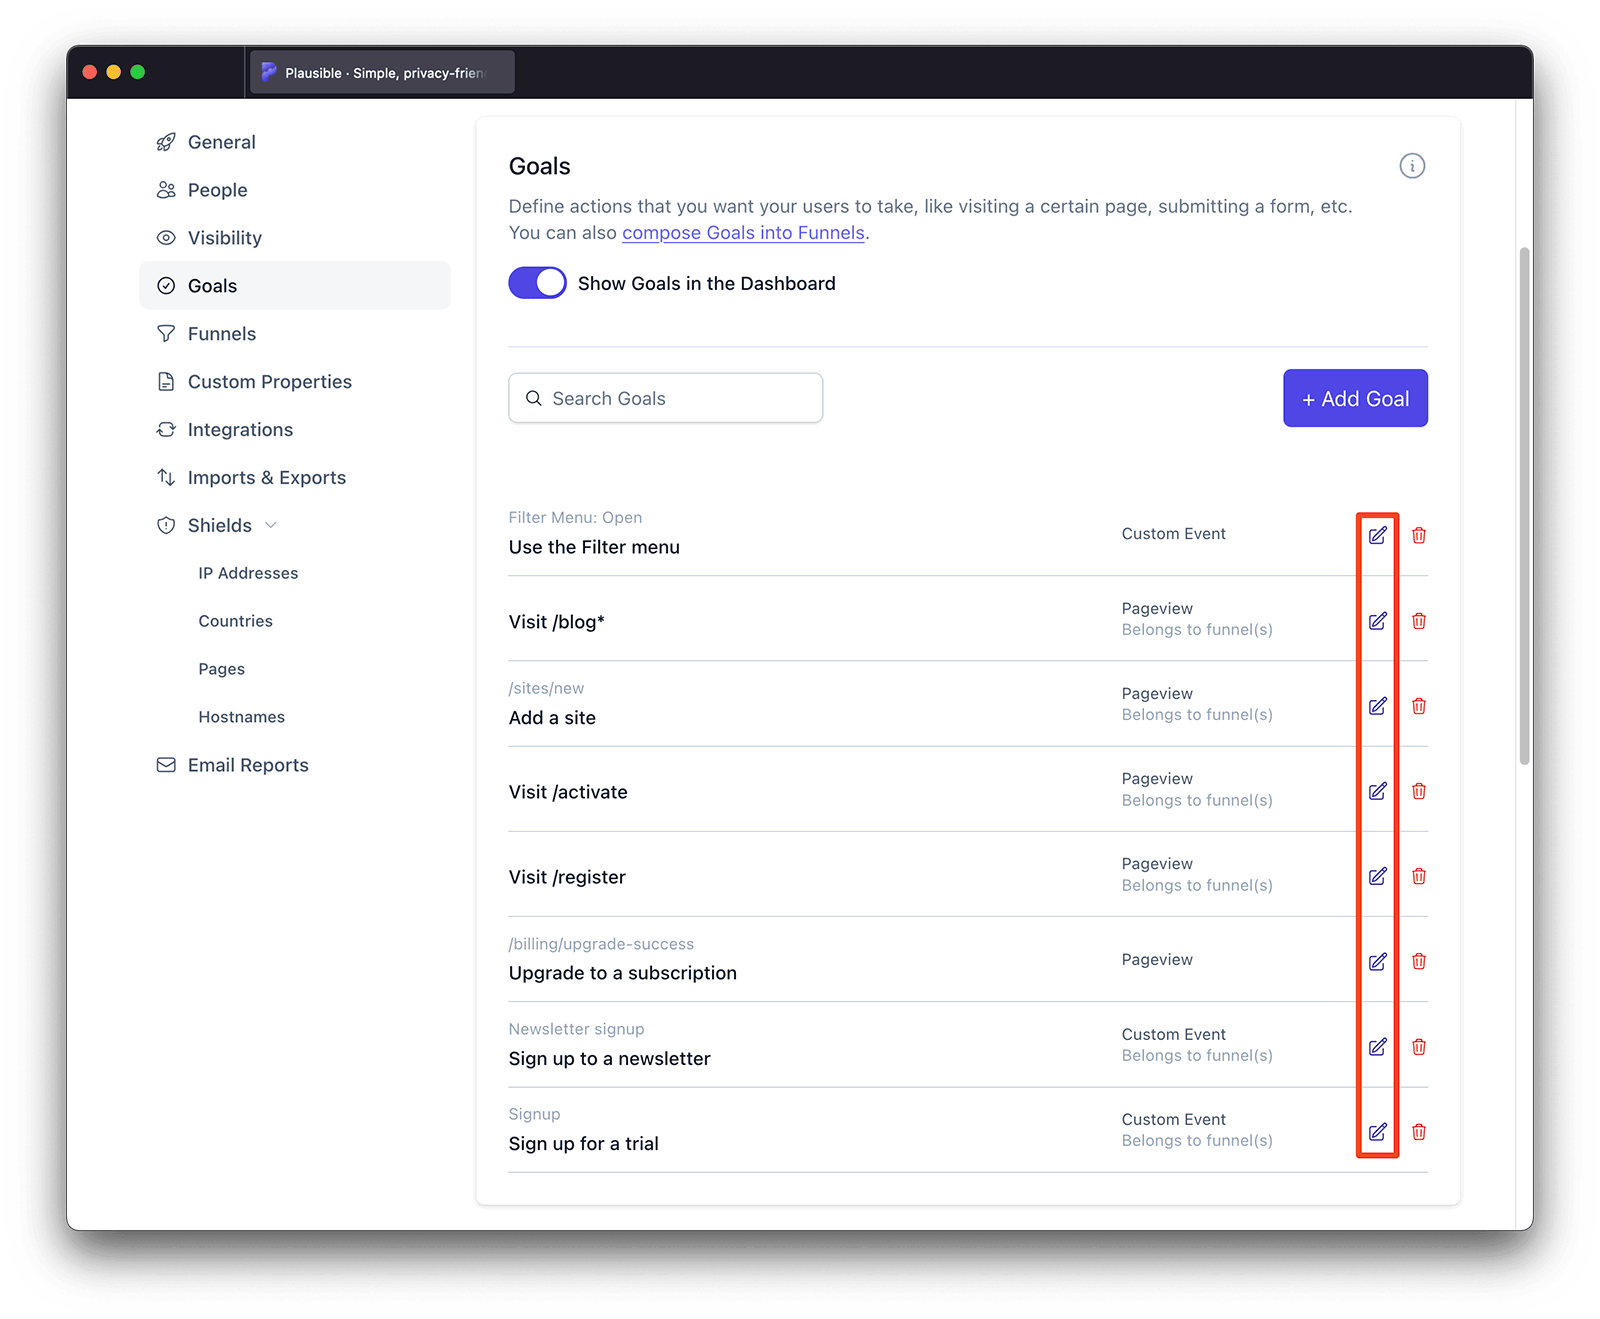
Edit a Custom Event Goal
To edit a custom event goal, start by locating the custom event goal you want to update in the Goals list. Click on the "Edit goal" button next to it, which will bring up the goal editing form.
From the pop up, you can select a new custom event from the dropdown menu that matches the updated custom event you want to track. You can also edit the display name. Or add custom properties to filter the goal by specific values.
Once you’ve made the necessary changes, click "Update goal" and your updated settings will be applied immediately.
Enhanced goal conversion tracking
Monetary values to track ecommerce revenue
You can also send dynamic monetary values alongside custom events to track revenue attribution. Here's how to set up the ecommerce revenue tracking.
Attach custom properties
You can attach custom properties to events to collect additional context alongside goal conversions. See how to set up custom properties.
Automatically attached properties
url
For clicks on links (<a> elements) tagged with plausible-event-name=..., we automatically track where the link is pointing (its href property).
This property is not automatically attached when the tagged <a> element is within <svg> tags.
There's no additional processing on our side for this value and the value of href is stored in full. If you're tagging links that contain sensitive data, you may want to stop this value from being sent. You can do so by providing the following transformRequest option when initializing the tracker.
functionomitAutomaticUrlProperty(payload){
if(payload.p.url){
delete payload.p.url
}
return payload
}

plausible.init({
transformRequest: omitAutomaticUrlProperty
// ... your other init options
})
Create funnels to optimize your conversion rate
After you have the custom events in place, you can start creating marketing funnels to uncover possible issues, optimize your site and increase the conversion rate. You can also use the Explore tab to trace the visitor paths that lead to your custom events.
Custom event not showing up?
Have you created the goal in your site settings?
Sending an event from your site is not enough. You must also create a matching goal in your site settings under Goals. Until you do, the event is received by Plausible but nothing appears in your dashboard. See the Create a custom event goal section above for the steps.
Does the goal name match exactly?
The goal name in your Plausible site settings must match the event name your site is sending, character for character including capitalisation.
The most common mismatch comes from the + sign in CSS class names. The class plausible-event-name=Button+Click sends the event name Button Click (plus replaced by space). If you created a goal called Button+Click instead of Button Click, nothing will be counted.
Has the event fired at least once after you created the goal?
Past events are not backfilled. If you set up the goal after events were already being sent, the counter starts from zero at the moment the goal was created. Trigger the event on your site after creating the goal and then check the dashboard.
Did your CMS replace the equals sign?
Webflow and some other site builders replace = with - when saving CSS class names. If you added plausible-event-name=Signup but the rendered HTML shows plausible-event-name-Signup, the event name will not be read correctly.
Use a double dash instead of the equals sign: plausible-event-name--Signup. Plausible treats -- and = identically.
How to verify the event is actually being sent
Open your browser developer tools and go to the Network tab. Trigger the action you are tracking and look for a request to plausible.io/api/event. If you see the request, check the response headers for x-plausible-dropped: 1. When that header is present, the event reached Plausible but was rejected by bot filtering. The most common cause is the request coming from localhost or a staging domain not added to your Plausible account.
If you see no request at all, the CSS class name was not added correctly or the Plausible script is not loading on that page.
GTM events not firing
If you set up custom events through Google Tag Manager, use GTM's built-in Preview mode to confirm the tag is firing. Check that your trigger conditions match the actual interaction and that the tag is published, not just saved as a draft.
Custom properties showing as (none)
(none) can appear for several reasons, including sending a null or undefined value, sending the property with some events but not all, or viewing the Properties tab without a custom event filter applied. See Custom Properties: (none) values for the full explanation. For troubleshooting: confirm the property value is not null or undefined at the moment the event fires, and that the property name is spelled exactly the same way in every event call.
What's next?
- Attach custom properties to your events to track additional context like plan type, product name or coupon code alongside conversions
- Add revenue values to purchase or checkout events to track ecommerce revenue attribution
- Build a funnel using your custom events as steps to see where visitors drop off between landing and converting
- Filter your dashboard by goal to see which sources and pages drive the most conversions for each event