
More than 5 years have passed since last update.
ReactJSで作る今時のSPA入門(リリース編)
ReactJSで作る今時のSPA入門(基本編)で作成したプロジェクトをリリースビルドしてデプロイする構成についての説明です。
リリースビルド
リリースビルド用に次のようなディレクトリ構成に変更します。
client部分だけBabelでリリース用ビルドをするため、
package.jsonをclient、server、プロジェクト全体で持つ構成にします。
distフォルダにBabelのビルド結果を出力して
ローカルからAWS EC2サーバにrsyncでデプロイする想定です。
configフォルダにはサーバ、クライアント共通の設定ファイルを格納してあります。(サーバの起動ポート番号など)
├── README.md
├── client
│   ├── dist
│   ├── package.json
│   ├── src
│   │   ├── App.js
│   │   ├── components
│   │   │   ├── NotFound.js
│   │   │   ├── TodoPage.js
│   │   │   └── UserPage.js
│   │   ├── index.js
│   │   ├── reducer
│   │   │   ├── reducer.js
│   │   │   └── user.js
│   │   └── static
│   │   └── index.html
│   ├── webpack.build.js
│   └── webpack.config.js
├── config
│   ├── default.js
│   ├── default-0.js
│   └── production.js
├── package.json
├── script
│   ├── connect.sh
│   ├── deploy.sh
│   └── env.sh
└── server
 ├── package.json
 ├── pm2_prod.json
 └── src
 └── server.js
プロジェクト全体のpackage.jsonです。
client用とserver用の開発用コマンドdevと
deploy用のコマンドdeployを作成してあります。
後述のdeploy.shのrsyncコマンドで公開サーバにアップロードします。
{"scripts":{"dev:client":"cd client && npm run dev","dev:server":"cd server && npm run dev","dev":"run-p dev:*","build:client":"cd client && npm run build","rsync":"./script/deploy.sh","deploy":"NODE_ENV=production run-s build:* rsync"},"devDependencies":{"npm-run-all":"^4.1.1"}}サーバ側のpackage.jsonです。
NodeJSサーバ専用のパッケージを分離しました。
公開サーバはpm2上で永続化している想定です。
{"scripts":{"dev":"NODE_CONFIG_DIR=../config node-dev --inspect src/server.js","prod":"pm2 delete learnReactJS;pm2 start pm2_prod.json"},"dependencies":{"axios":"^0.17.1","body-parser":"^1.18.2","config":"^1.28.1","express":"^4.16.2","nedb":"^1.8.0"},"devDependencies":{"node-dev":"^3.1.3"}}configフォルダのdefault.jsです。
サーバの起動ポート番号を指定してあります。
module.exports = {
 port: 8080
}
default-0.jsです。
本番サーバの起動の都合上入れています。
空で構いません。
module.exports = {
}
production.jsです。
default.jsのパラメータをオーバライドします。
今回はポート番号の指定を公開サーバでも変えないので中身は空で問題ありません。
default.js > default-0.js > production.jsの順番で読み込まれます。
module.exports = {
}
クライアント側のpackage.jsonです。
基本的にライブラリはBabelするためdevDependenciesでインストールします。
リリースビルド用に下記のパッケージを追加でインストールしてあります。
$ yarn add --dev npm-run-all autoprefixer precss html-webpack-plugin copy-webpack-plugin babel-preset-stage-0 babel-preset-env parallel-webpack
buildコマンドにてリリースビルドを行います。
NODE_CONFIG_DIRはconfigフォルダのパスを指定しています。
{"scripts":{"dev":"NODE_CONFIG_DIR=../config webpack-dev-server","rm":"rm -rf dist/*","build-webpack":"NODE_CONFIG_DIR=../config parallel-webpack -p --config webpack.build.js","build":"run-s rm build-webpack"},"devDependencies":{"autoprefixer":"^7.1.6","axios":"^0.17.1","babel-core":"^6.26.0","babel-loader":"^7.1.2","babel-plugin-transform-decorators-legacy":"^1.3.4","babel-plugin-transform-react-jsx":"^6.24.1","babel-polyfill":"^6.26.0","babel-preset-env":"^1.6.1","babel-preset-react":"^6.24.1","babel-preset-stage-0":"^6.24.1","config":"^1.28.1","copy-webpack-plugin":"^4.2.1","history":"^4.7.2","html-webpack-plugin":"^2.30.1","material-ui":"^1.0.0-beta.21","material-ui-icons":"^1.0.0-beta.17","npm-run-all":"^4.1.2","parallel-webpack":"^2.2.0","precss":"^2.0.0","react":"^16.1.1","react-dom":"^16.1.1","react-hot-loader":"^3.1.3","react-redux":"^5.0.6","react-router-dom":"^4.2.2","react-router-redux":"^5.0.0-alpha.8","redux":"^3.7.2","redux-devtools":"^3.4.1","redux-form":"7.1.2","redux-thunk":"^2.2.0","webpack":"^3.8.1","webpack-dev-server":"^2.9.4"}}webpack.config.jsです。
HtmlWebpackPluginとautoprefixerのプラグインを追加しました。
HtmlWebpackPluginはindex.htmlのbundle.js埋め込みを動的に行ってくれます。
autoprefixerはcss3のベンダープレフィックスをBabelビルド時に付与してくれます。
presetsにenvオプションを追加しました。
対象ブラウザは最新から2つ前までをメインターゲットとします。
const config = require('config')
const webpack = require('webpack')
const precss = require('precss')
const autoprefixer = require('autoprefixer')
const path = require('path')
const HtmlWebpackPlugin = require('html-webpack-plugin')

module.exports = {
 devtool: 'inline-source-map', // ソースマップファイル追加
 entry: [
 'babel-polyfill',
 'react-hot-loader/patch',
 path.join(__dirname,'/src/index'), // エントリポイントのjsxファイル
 ],
 // importの相対パスを絶対パスで読み込みできるようにする
 resolve: {
 modules: ['src', 'node_modules'], // 対象のフォルダ
 extensions: ['.js', '.json'] // 対象のファイル
 },
 // React Hot Loader用のデバッグサーバ(webpack-dev-server)の設定
 devServer: {
 contentBase: path.join(__dirname,'/src/static'), // index.htmlの格納場所
 historyApiFallback: true, // history APIが404エラーを返す場合にindex.htmlに飛ばす
 inline: true, // ソース変更時リロードモード
 hot: true, // HMR(Hot Module Reload)モード
 port: config.port + 1, // 起動ポート,
 host: '0.0.0.0',
 // CORSの対策(debugホストが違うため)
 proxy: {
 // CORSを許可するパスとサーバ
 '/api/**': {
 target: 'http://localhost:' + config.port,
 secure: false,
 changeOrigin: true
 }
 }
 },
 output: {
 publicPath: '/', // デフォルトルートにしないとHMRは有効にならない
 filename: 'bundle.js'
 },
 plugins: [
 new HtmlWebpackPlugin({
 template: 'src/static/index.html',
 filename: 'index.html'
 }),
 new webpack.HotModuleReplacementPlugin(), // HMR(Hot Module Reload)プラグイン利用
 // autoprefixerプラグイン利用、cssのベンダープレフィックスを自動的につける
 new webpack.LoaderOptionsPlugin({options: {
 postcss: [precss, autoprefixer({browsers: ['last 2 versions']})]
 }})
 ],
 module: {
 rules: [{
 test: /\.js?$/, // 拡張子がjsで
 exclude: /node_modules/, // node_modulesフォルダ配下は除外
 include: [path.join(__dirname , '/src')],// src配下のJSファイルが対象
 use: {
 loader: 'babel-loader',
 options: {
 // babel build presets
 presets: [
 [
 'env', {
 targets: {
 browsers: ['last 2 versions', '> 1%']
 },
 modules: false,
 useBuiltIns: true
 }
 ],
 'stage-0',
 'react'
 ],
 // babel トランスパイルプラグイン
 plugins: [
 "babel-plugin-transform-decorators-legacy", // decorator用
 "react-hot-loader/babel" // react-hot-loader用
 ]
 }
 }
 }]
 }
}
index.htmlからはbundle.jsの埋め込みを削除します。
(HtmlWebpackPluginが動的に埋め込みを行ってくれます)
<!DOCTYPE html>
<html>
<head>
 <meta charset="utf-8">
 <title>learnReactJS</title>
</head>
<body>
 <div id="root"></div>
 <!-- <script src='bundle.js'></script>-->
</body>
</html>
webpack.build.jsです。
リリースビルド時はwebpack.config.jsの設定を上書きしてビルドします。
プラグインでソースコードの圧縮、環境変数の埋め込みを行います。
const webpack = require('webpack')
const webpackConfig = require('./webpack.config.js')
const CopyWebpackPlugin = require('copy-webpack-plugin')
const HtmlWebpackPlugin = require('html-webpack-plugin')

const revision = require('child_process').execSync('git rev-parse HEAD').toString().trim()


const entries = [
 {path: 'src', out: ''},
]

const configs = entries.map(entry => {

 const config = Object.assign({}, webpackConfig)

 delete config.devtool
 config.entry = {
 'bundle': [
 'babel-polyfill',
 `${__dirname}/${entry.path}/index`,
 ]
 }
 // distフォルダに出力、bundle.jsファイル名を動的にリネーム
 config.output = {
 path: `${__dirname}/dist/${entry.out}`,
 filename: 'js-[hash:8]/[name].js',
 chunkFilename: 'js-[hash:8]/[name].js',
 publicPath: `/${entry.out}`,
 }

 config.plugins = [
 // Scope Hoisting
 // スコープの巻き上げによる呼び出し回数の削減と圧縮
 new webpack.optimize.ModuleConcatenationPlugin(),
 // 共通モジュールをまとめる
 new webpack.optimize.CommonsChunkPlugin({
 name: 'vendor',
 filename: 'js-[hash:8]/vendor.js',
 minChunks: (module) => {
 return module.context && module.context.indexOf('node_modules') !== -1
 }
 }),
 // 環境変数をエクスポート
 new webpack.DefinePlugin({
 'process.env': {
 'NODE_ENV': JSON.stringify(process.env.NODE_ENV),
 'GIT_REVISION': JSON.stringify(revision),
 },
 }),
 // JSミニファイ
 new webpack.optimize.UglifyJsPlugin({
 sourceMap: true,
 minimize: true,
 compress: {
 drop_debugger: true,
 drop_console: true,
 warnings: false
 }
 }),
 // HTMLテンプレートに生成したJSを埋め込む
 new HtmlWebpackPlugin({
 template: `src/static/${entry.out}index.html`,
 filename: 'index.html',
 }),
 ]

 return config
})

// source mapの出力形式を上書き
configs[0].devtool = 'source-map'
configs[0].plugins.push(
 // エントリーディレクトリーからdistディレクトリにindex.html以外のファイルをコピー
 new CopyWebpackPlugin([{ from: 'src/static', ignore: 'index.html' }]),
)

module.exports = configs
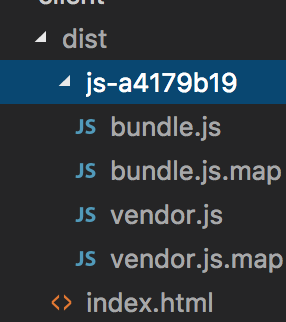
次のコマンドでリリースビルドを行います。
$ npm run build-webpack
成功するとdistフォルダにリリースビルド完了後のソースファイルが出力されるのでこのフォルダをデプロイします。
👁 スクリーンショット 2017-11-27 2.32.18.png
デプロイ
deploy.shです。
env.shで設定したEC2ターゲットにデプロイを行います。
# !/bin/sh

dir=`echo $(cd $(dirname $0) && pwd)`

source $dir/env.sh

set -eu

# deploy
rsync -av $dir/../config/ ec2-user@$domain:/var/www/learnReactJS/config
rsync --exclude-from $dir/.rsyncignore -av $dir/../client/dist/* ec2-user@$domain:/var/www/learnReactJS/public
rsync -av $dir/../server/ ec2-user@$domain:/var/www/learnReactJS/server
deploy先のフォルダ構成は以下の想定です。
└── var
    └── www
       └── learnReactJS
       ├── config
       ├── public
       └── server
env.shにはEC2のデプロイ対象のpublic IP
Route53のAレコードに設定したデプロイターゲットのドメイン名を指定します。
# !/bin/sh

ip='{xx.xx.xx.xx}'
domain='{domain}'
.rsyncignoreには転送時に除外ファイルを指定します。
本番環境なのでソースマップファイルは対象から外します。
*.map
*.db
サーバ起動の永続化
EC2側ではpm2をインストールしておきます。
pm2はnodeJSのプロセスを永続化してくれます。
$ npm install -g pm2
デプロイ後、
serverプロセスをpm2で起動します。
$ cd /var/www/learnReactJS/server
$ npm run prod
npm run prodは以下のコマンドです。
pm2のlearnReactJSプロセスを削除し、pm2_prod.jsonを参照してプロセスを起動します。
$ pm2 delete learnReactJS;pm2 start pm2_prod.json
pm2_prod.jsonです。
nameには起動プロセス名を指定します。
watchはファイル変更時にプロセスを再起動するフォルダ、ファイルを指定します。
ignore_watchは対象のファイルに変更があっても再起動しません。
scriptはプロセス起動対象のファイルパスです。
envには環境変数の指定をします。
{"apps":[{"name":"learnReactJS","watch":["/var/www/learnReactJS/server/src/**/*"],"ignore_watch":["/var/www/learnReactJS/server/user.db"],"script":"/var/www/learnReactJS/server/src/server.js","env":{"NODE_ENV":"production","NODE_CONFIG_STRICT_MODE":0,"NODE_CONFIG_DIR":"../config"}}]}下記のコマンドでpm2プロセスの起動状態とログを確認できます。
$ pm2 list
$ pm2 log
Register as a new user and use Qiita more conveniently
- You get articles that match your needs
- You can efficiently read back useful information
- You can use dark theme