 |
VOOZH | about |
|
VOOZH | about |
We’re so glad you’re here. You can expect all the best TNS content to arrive Monday through Friday to keep you on top of the news and at the top of your game.
Check your inbox for a confirmation email where you can adjust your preferences and even join additional groups.
Follow TNS on your favorite social media networks.
Become a TNS follower on LinkedIn.
Check out the latest featured and trending stories while you wait for your first TNS newsletter.
One of the great things about Python is that there is a library for almost everything and that includes controlling Lego robots. Recently, our team was brainstorming some ideas for how to make more exciting and attention-drawing demos for events compared to our standard dashboards and demos run on a laptop.
The end result was repurposing a Lego robot to make an interactive InfluxDB demo using Python to communicate with the robot via Bluetooth connection. In this article, I’ll go over some of the technical challenges and architecture decisions that went into making this robot a reality and how even a demo project as simple as a Lego robot can be applied to more complex use cases.
One of our team members came up with the idea to use a Lego Boost Robot as the core of the demo after working on one with his kid, who wasn’t exactly pleased to have his toy temporarily commandeered for the prototype phase. This coworker knew there were a few available Python libraries for controlling the robot.
The next stage was figuring out how to connect the different components involved with the robot demo, which basically involved the tradeoff between simplicity and reliability. We needed the setup to be easy enough to use so that nontechnical event staff would be able to start the demo. There were a few proposed architectures that involved using a Raspberry Pi or ESP32 to interact with the robot. In the end, we determined that it would be easiest to connect to the robot directly from a laptop running the other software required for the demo, rather than using other devices that could be lost or broken while traveling to events.
The first iteration of the robot demo does the following when activated:
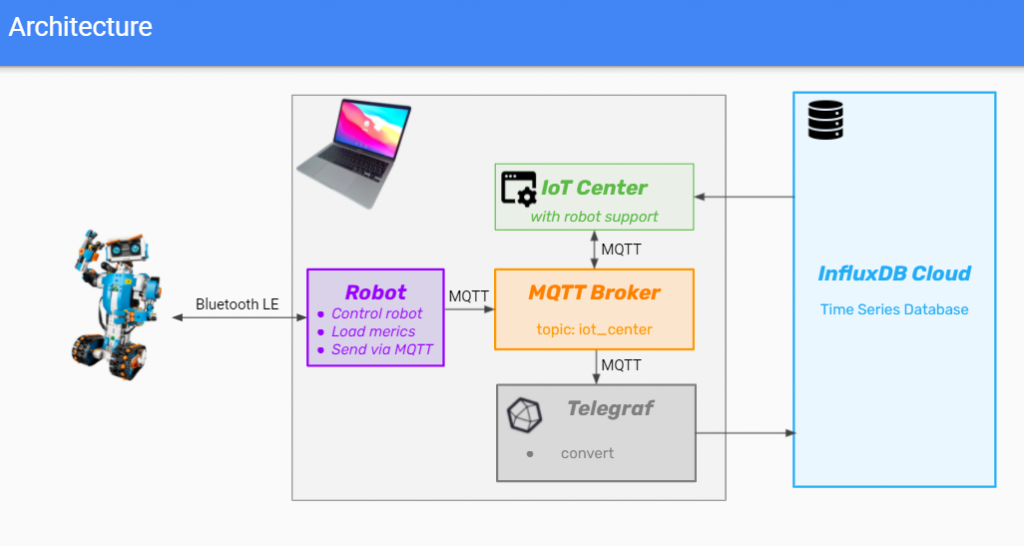
Now let’s take a deeper look at the different components that make up the Lego robot project. For such a simple demo, there are quite a few moving pieces. Here’s a diagram showing how everything is connected:
Python acts as the glue of the application by connecting to the robot via Bluetooth, giving it commands and then sending the sensor data to the MQTT broker. The Python script uses the following libraries:
InfluxDB is used for storing all the time-stamped sensor data being generated by the robot as it runs. These types of IoT workloads are ideal for a time-series database like InfluxDB. InfluxDB OSS is run locally for long-term storage, but it could also be configured to push data to a cloud instance using the edge replication feature.
Telegraf is used to forward sensor data to InfluxDB in this demo, but it also has support for over 40 other data stores. Telegraf is ingesting MQTT data in this use case but also has support for many other different input formats and has processor plugins, which can be used to transform data before outputting it for storage.
Mosquitto is an open source MQTT broker that we chose to use for this project. MQTT is commonly used for IoT projects, so it makes sense from an implementation perspective and also makes the project more relevant to potential users as a reference architecture.
IoT Center is an application built by InfluxData as an example IoT app and reference architecture for how to integrate InfluxDB with various IoT devices. For the robot demo, IoT Center receives the data over MQTT and displays it in real time via dashboards. IoT Center can also display historical data by querying InfluxDB directly using JavaScript client libraries.
The robot has sensors that provide the following values that are displayed in the dashboards:
Docker is used to simplify managing and running the demo for nontechnical users. All users need to do is activate the demo environment using Docker Desktop with a single click and then InfluxDB, Telegraf, Mosquitto and IoT Center are ready to go.
While making a Lego robot might seem like a toy problem, it really shows the power and flexibility of InfluxDB as a platform and the value of learning how to use it. For example, one of the interns who helped to create the Lego robot demo took this knowledge back to school and reused a good chunk of the code to perform real-time monitoring of a lab experiment involving the detection of atomic hydrogen:
This might seem crazy, but conceptually, it’s the same thing, just collecting data from a sensor.
InfluxDB is also used for even larger-scale experiments, with CERN using InfluxDB to store monitoring data for the ALICE experiment, which uses the 27-kilometer-long Large Hadron Collider to study the physical properties of the Quark-Gluon Plasma.
The Lego robot demo made its debut at AWS re:Invent and did a good job of drawing in visitors by making them curious to see what it could do. There are currently a few ideas for how to improve the demo by adding functionality. One idea is to create a more interactive demo by combining a color sensor that can trigger automated action by creating tasks and alerts using InfluxDB. Another option would be to allow the robot to be steered by either keyboard or mouse input. These ideas are really just the tip of the iceberg, and there are a ton of other possibilities thanks to the Python ecosystem. If you feel like building your own robot, you can check out the GitHub repo for inspiration.