 |
VOOZH | about |
|
VOOZH | about |
We’re so glad you’re here. You can expect all the best TNS content to arrive Monday through Friday to keep you on top of the news and at the top of your game.
Check your inbox for a confirmation email where you can adjust your preferences and even join additional groups.
Follow TNS on your favorite social media networks.
Become a TNS follower on LinkedIn.
Check out the latest featured and trending stories while you wait for your first TNS newsletter.
There is a concept in React that state is immutable. This doesn’t mean state can’t be changed. It just means we don’t mutate state directly. We do it with outside functions and copies.
The rule of thumb in React is to modify state via a setState function rather than mutate state directly. For example, our state is an array so rather than writing something like this.state.taks.push(insert new item here) our function will look a lot different and utilize setState.
It’s possible to update state with the push method directly, I believe there are use cases where it provides update functionality but it causes bugs along the component tree and I don’t recommend it. Here are some excellent resources for a deeper dive into setState from Kingsley Silas and one from Geeks for Geeks.
In this article, we are going to build a new React.js component, SubmitComponent, and add event functionality — to add text through the text bar. (We won’t discuss the JavaScript Event handlers themselves in depth so please check out this article instead if you’re curious.)
In index.js (from the Github folder) , please make sure that your index.js looks like the image below:
Please update TaskComponent as well to look like this:
And on to the new code!
React is built from reusable components so let’s start by setting up a new file in the src folder. I’m going to call it SubmitComponent but you can call it whatever you want.
This component will hold the submit elements – the text input box/ text input box functionality and the submit button/submit button functionality.
The component itself has the same skeleton as the App and TaskComponent components. Don’t forget to add the element to the app component and import.
Once that’s set up, add the HTML element code for a text box and a button. Don’t worry about styling. We can style everything later on once we have full functionality.
It should look like this once everything is built.
Run the npm start script and check the browser to see if everything is working.
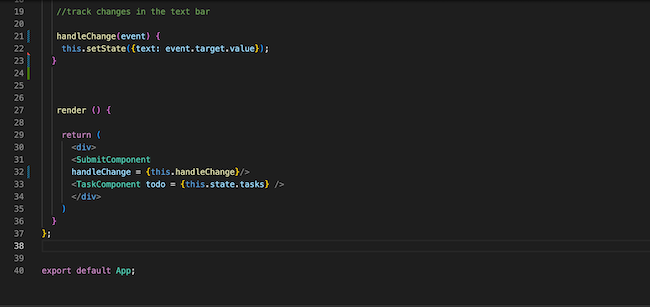
Write the main functionality in “my app” component. The space between the end if constructor and the beginning of the render is where you write the function. In React, functions usually start with the word handle.
The first bit of functionality we are going to add is the handleChange. This is where we track the changes in the text box and make sure each character typed into the box is saved in state. Here are the steps:
To expand:
Step 1: Create The New Variable As An Empty String In State
Since we are typing a string in the text bar, we can add it to state as a string. While state is immutable and we can’t update it directly, that relates to updates from the browser, in terms of hard coding, state can be updated directly.
The new state should look like this.
Step 2: Create the New Function That Will Hold Set State
This will look a lot like the traditional event handler that tracks changes but is just updated for the React functionality. The React Docs are helpful if you want a deeper dive on this (image below under step 3).
Step 3: Bind the Function in the Constructor
The function .bind() creates a new bound function that wraps the original function object in order for the function to work. I often forget this part until my function doesn’t trigger, which is why I listed it as its own step. For more details, please see this link.
Step 4: Pass the Function to the Element as a Prop in the App Component
This one is pretty standard and we did it in the last tutorial as well. In the submit component element in the return section on the App component, I defined a variable called handleChange = {this.handleChange}. Since the handleChange function isn’t in state, we don’t call it this.state.handle change but it will still be called as a prop in the submit component.
Step 5: Add the Function as a Prop to the Submit Component
Last step! In the input box element characteristics, add the onChange = {this.props.handleChange}. I like to track my changes using an <h1> tag. Otherwise, how would I be able to tell that my state is getting updated? I’ll have to then pass the text string in state as a variable to the submit component as a prop.
These steps are pretty straightforward and can be used when creating components and adding functionality. Can you now add a submit button that has a new functionality when it’s clicked?
Next week we are going to add a submit button that adds the input text to the task array and maps through the task array and displays multiple tasks on the page. I highly recommend getting familiar with the JavaScript map functionality as well as setState.
The GitHub is updated. You can check out the files on GitHub as well.
Next Tutorial: Click Functionality and Reusable Components.