
A Real-World Case Study of Using Git Commands as a Data Scientist
Complete with Branch Illustration
Data Science
You’re a data scientist. As data science is becoming more and more mature every day, software engineering practices begin creeping in. You are forced to venture out of your local jupyter notebooks and meet other data scientists in the wild to build a great product.
To help you out with this grand mission, you can rely on Git, a free and open-source distributed version control system to keep track of what everyone is coding.
Table of Contents
1. Git commands for setting up a remote repository
2. Git commands for working on a different branch
3. Git commands for joining in collaboration
4. Git commands for coworking
5. Resolving merge conflicts
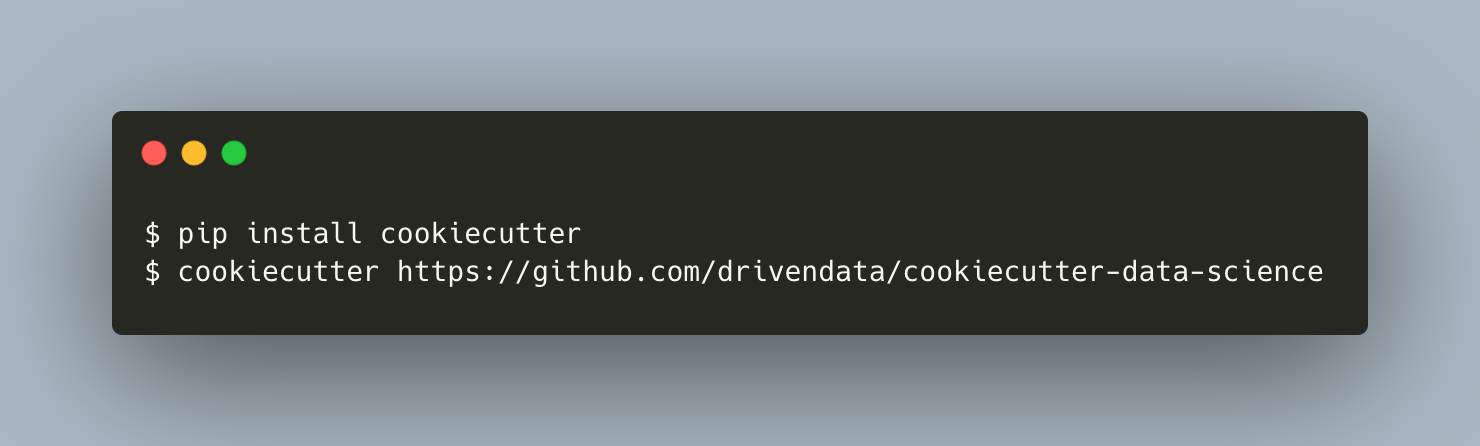
Wrapping UpTo be more concrete, let’s work with an actual project (see the end product here). And to minimize the hassle of creating one, we’ll use the famous Cookiecutter Data Science. Install cookiecutter and create a project template locally.
Fill in the prompt accordingly. In our case, it’s as follows.
project_name [project_name]: Data Science Project Example
repo_name [example_project_name_here]: ds-project-example
author_name [Your name (or your organization/company/team)]: Albers Uzila
description [A short description of the project.]: A simple data science project, template by cookiecutter
Select open_source_license:
1 - MIT
2 - BSD-3-Clause
3 - No license file
Choose from 1, 2, 3 (1, 2, 3) [1]: 1
s3_bucket [[OPTIONAL] your-bucket-for-syncing-data (do not include 's3://')]:
aws_profile [default]:
Select python_interpreter:
1 - python3
2 - python
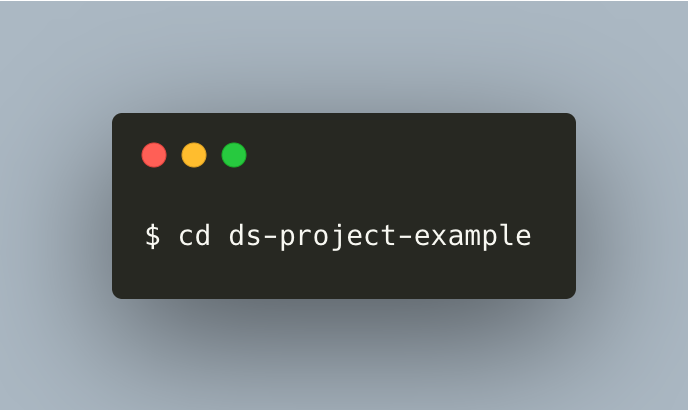
Choose from 1, 2 (1, 2) [1]: 1Change your working directory to ds-project-example folder by running the following command.
1. Git commands for setting up a remote repository
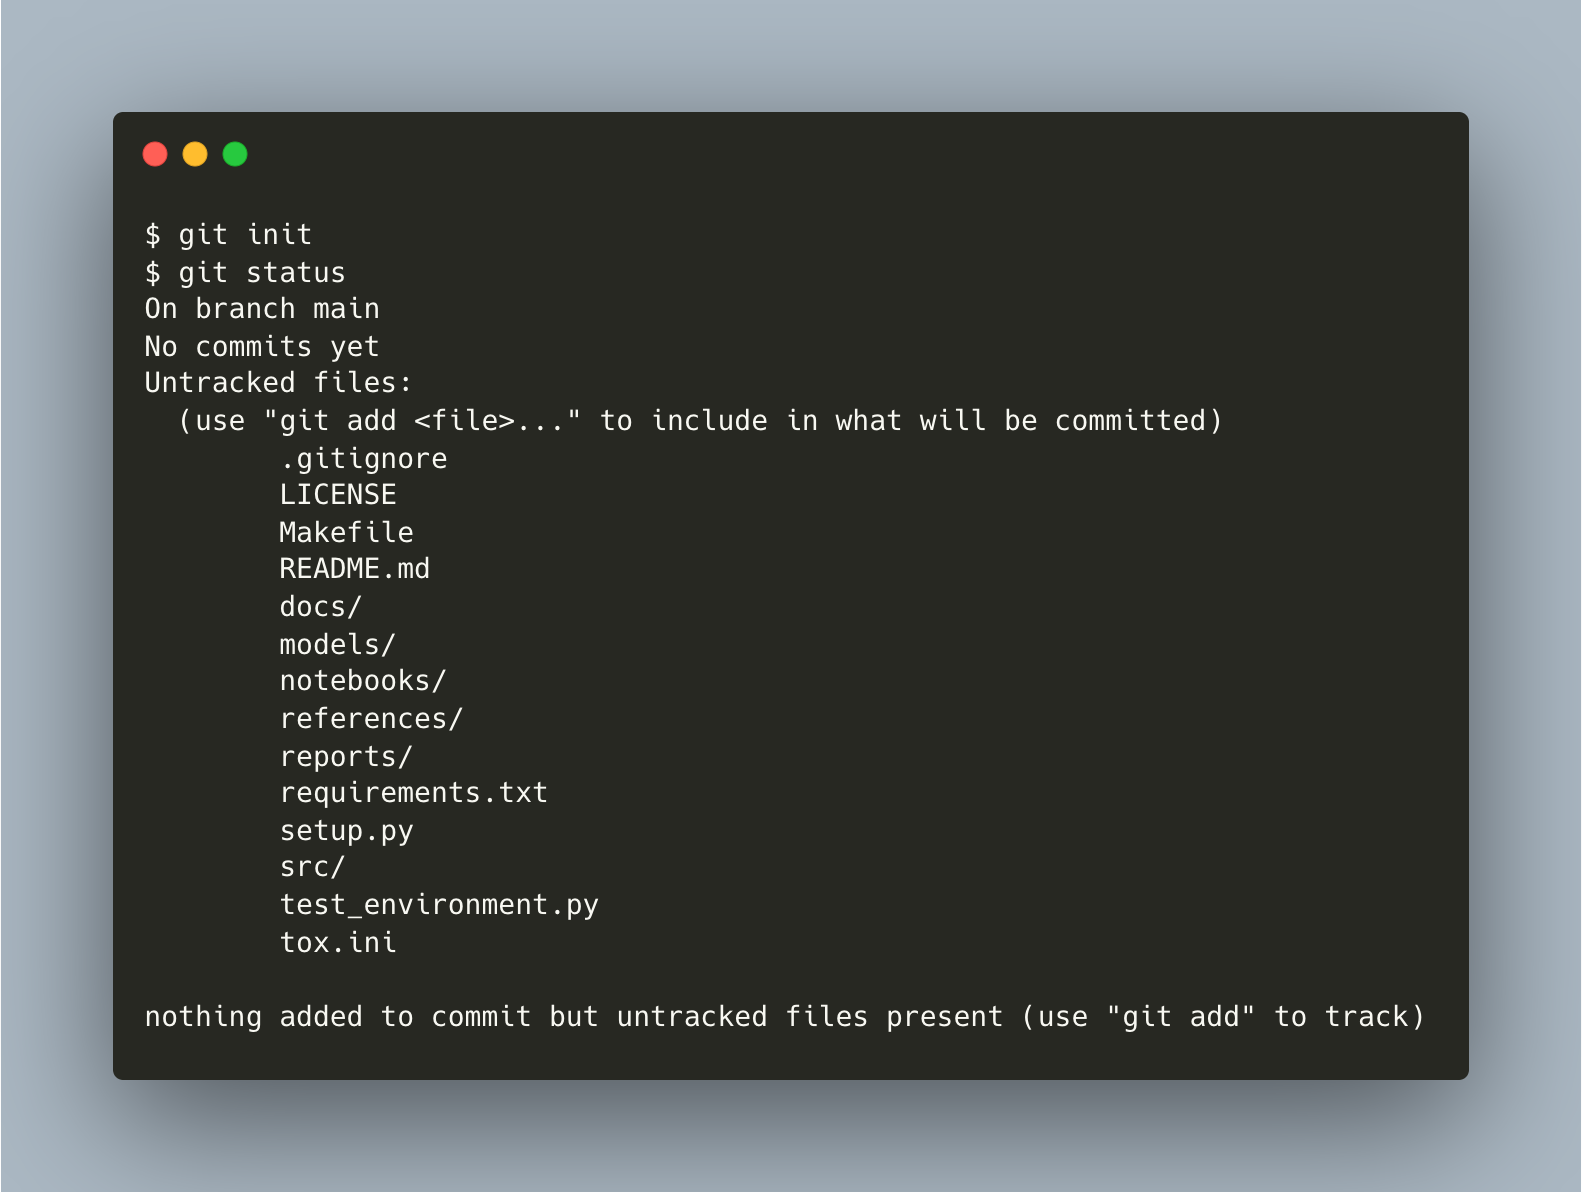
You now have a local project in ds-project-example. You need to push your local project to GitHub to collaborate with other data scientists.
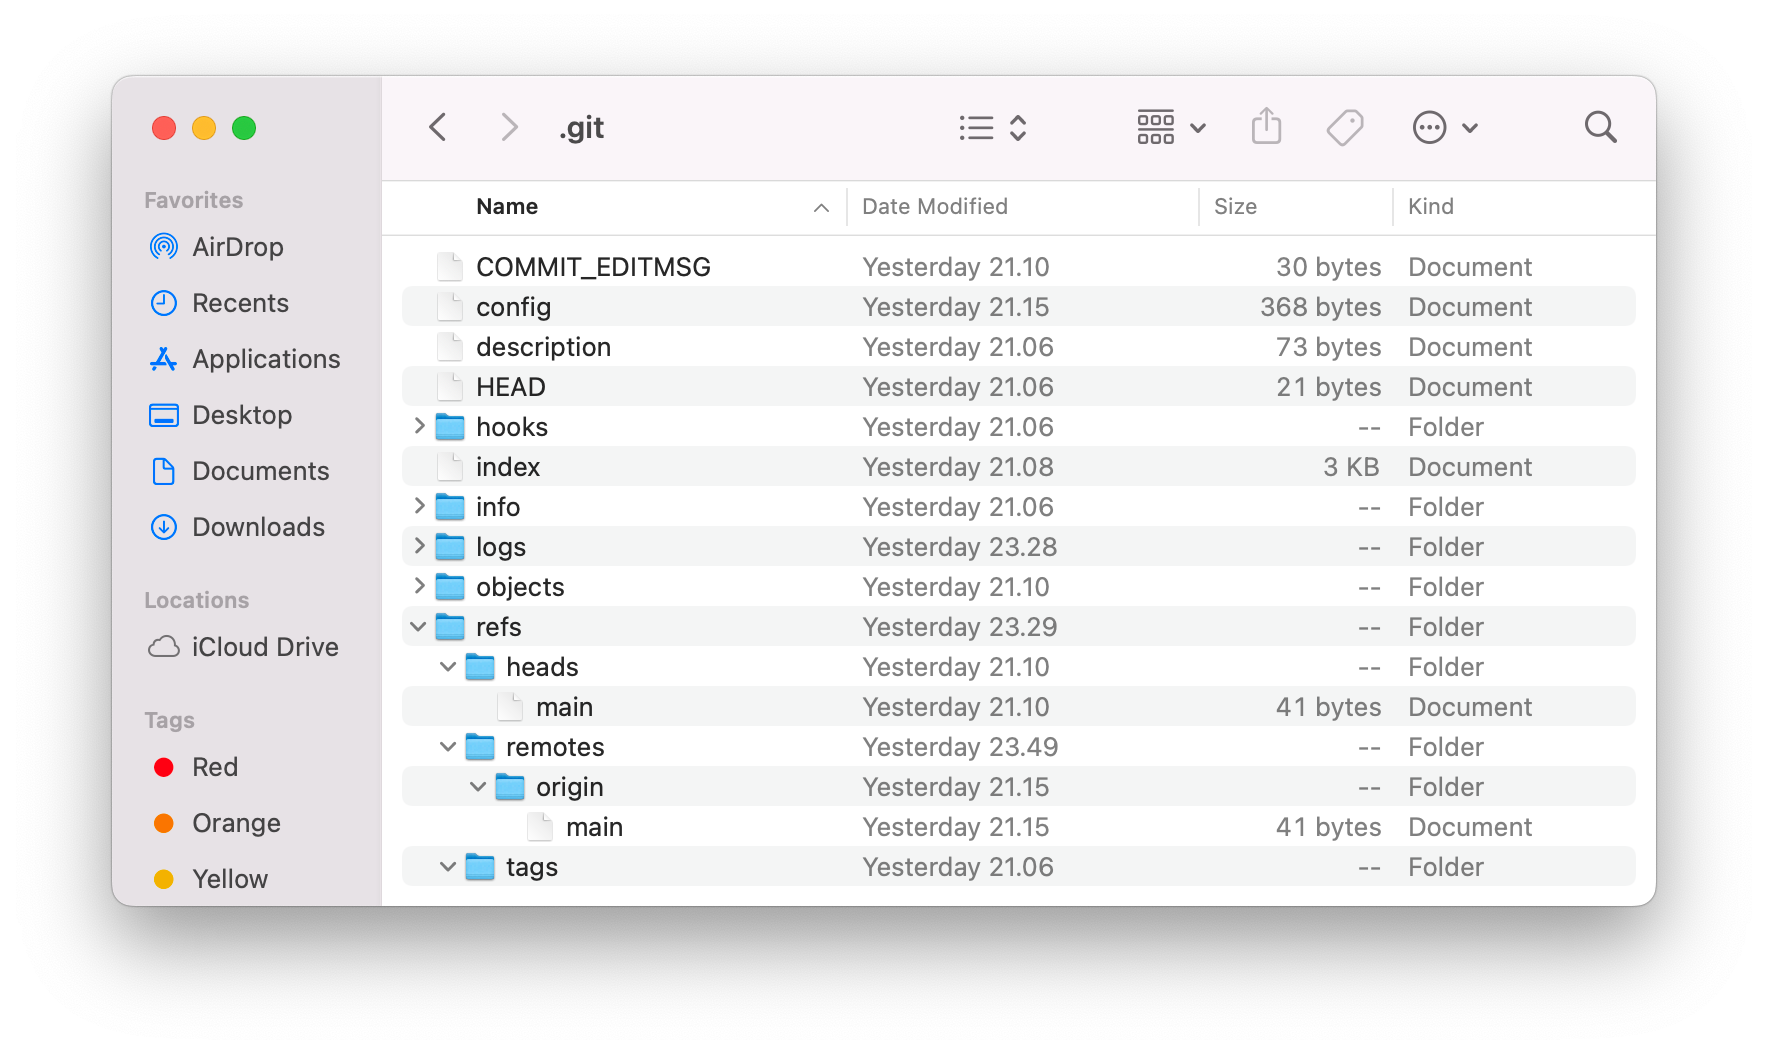
To do that, initialize an empty Git repo using git init. You can confirm the repo is ready by observing that there is a hidden folder named .git in your working directory or by running git status.
Your local:
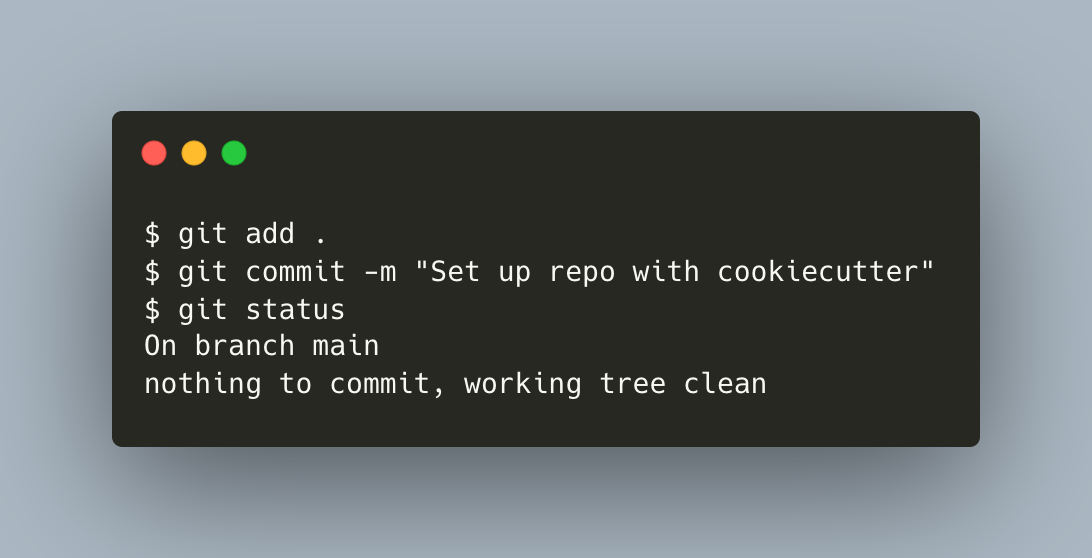
⬤ main*As you can see, you’re working on a branch called main and have many untracked files by Git. You can use git add . to add all of these files to the index, also known as the "staging area" between the files you have in your working directory and your commit history.
To record changes in the index to the local repo, use git commit. Add a message like "Set up repo with cookiecutter".
Your local:
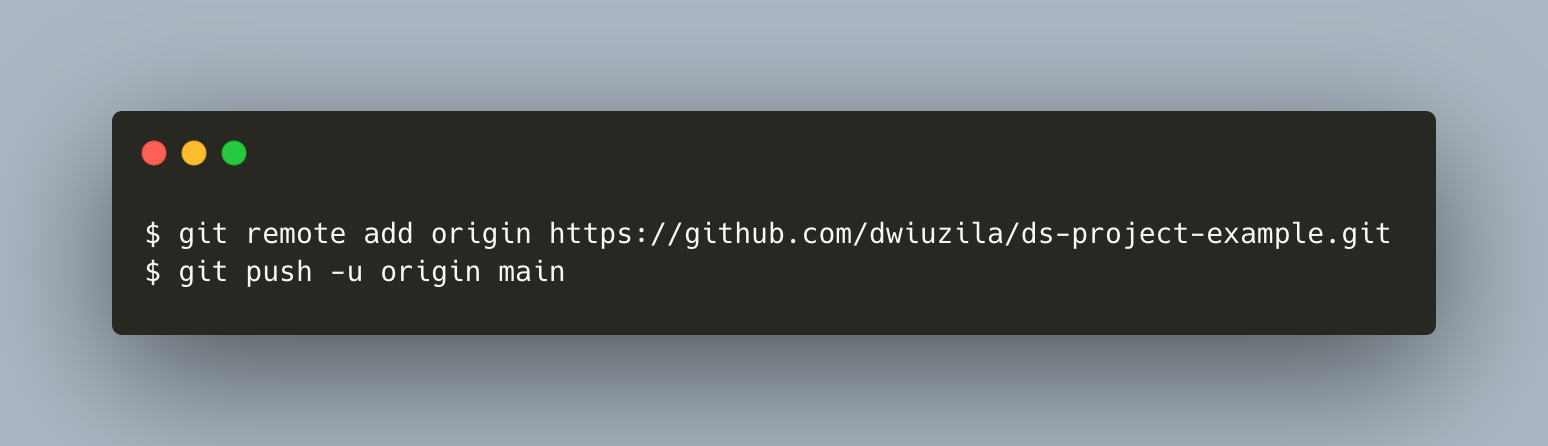
⬤───⬤ main*Now, create a remote repo in https://github.com/new and name it ds-project-example. Before pushing the local repo to remote, you need to add the remote repo in the directory where your local repo is being stored, using git remote add command.
The git remote add command takes two arguments:
- A remote name, for example,
origin - A remote URL, in our case, https://github.com/dwiuzila/ds-project-example.git
After running git remote add command, you will see in .git/refs folder that you now have a local HEAD and a remote named origin.
Now, to push commits made on your local branch to the remote repo, use git push. This command takes two arguments:
- A remote name, for example,
origin - A branch name, for example,
main
To summarize:
Your local:

⬤───⬤ main*
 origin/main

Remote:

⬤───⬤ main
The -u flag in git push sets the branch you are pushing to (origin/main) as the remote-tracking branch of the branch you are pushing (main), so Git knows what you want to do when you push/pull branches in the future.
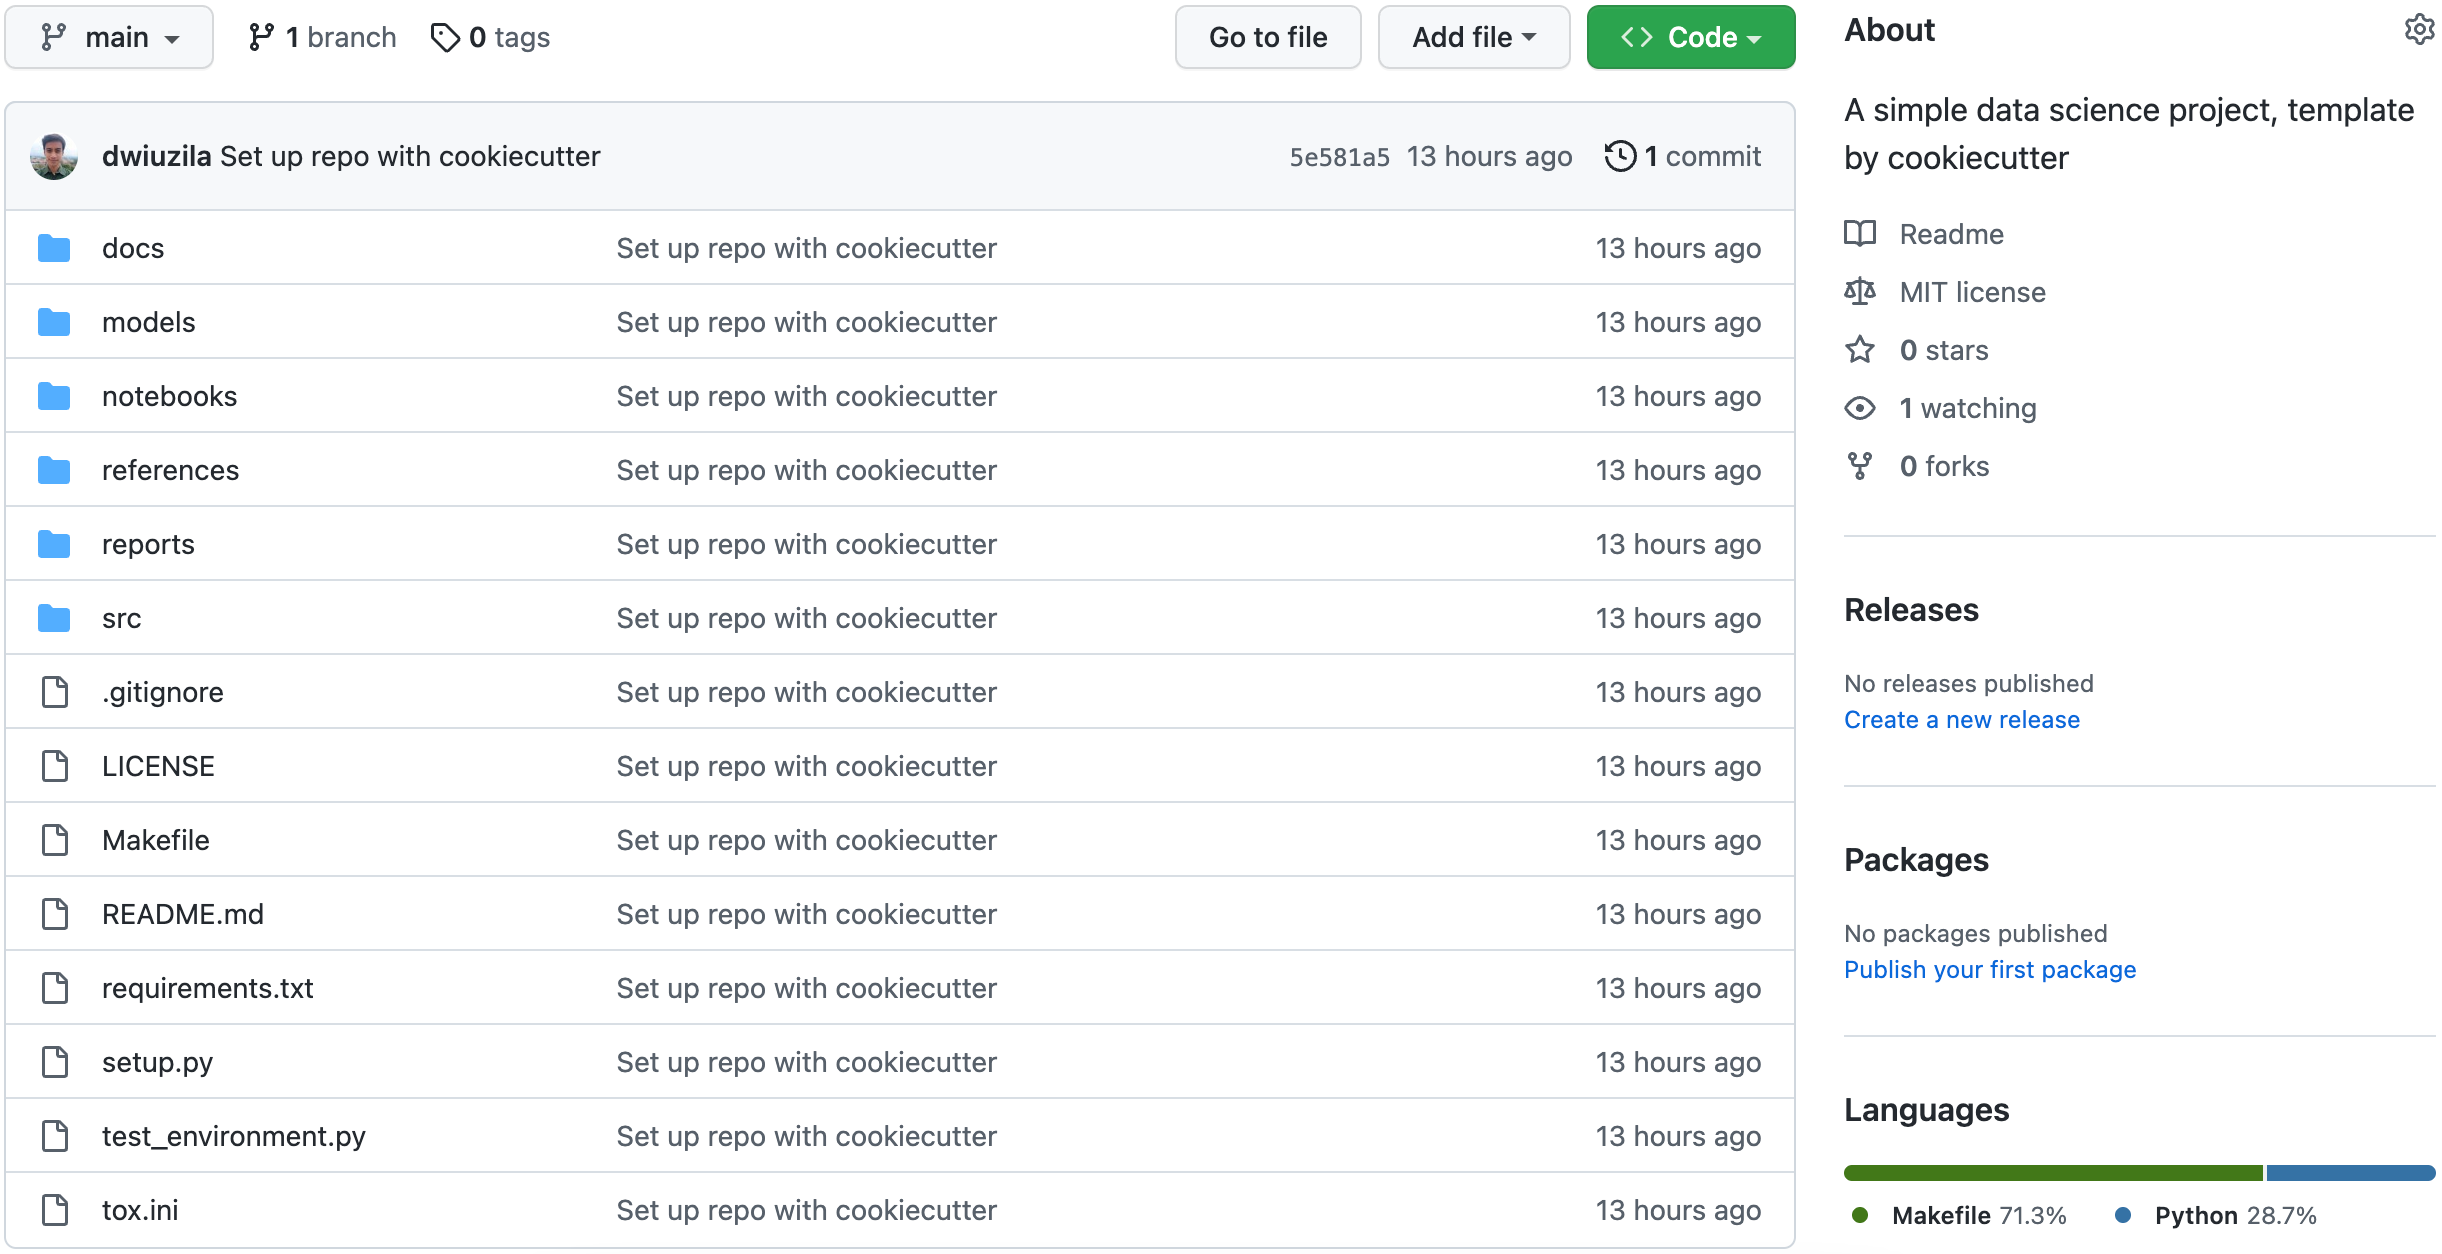
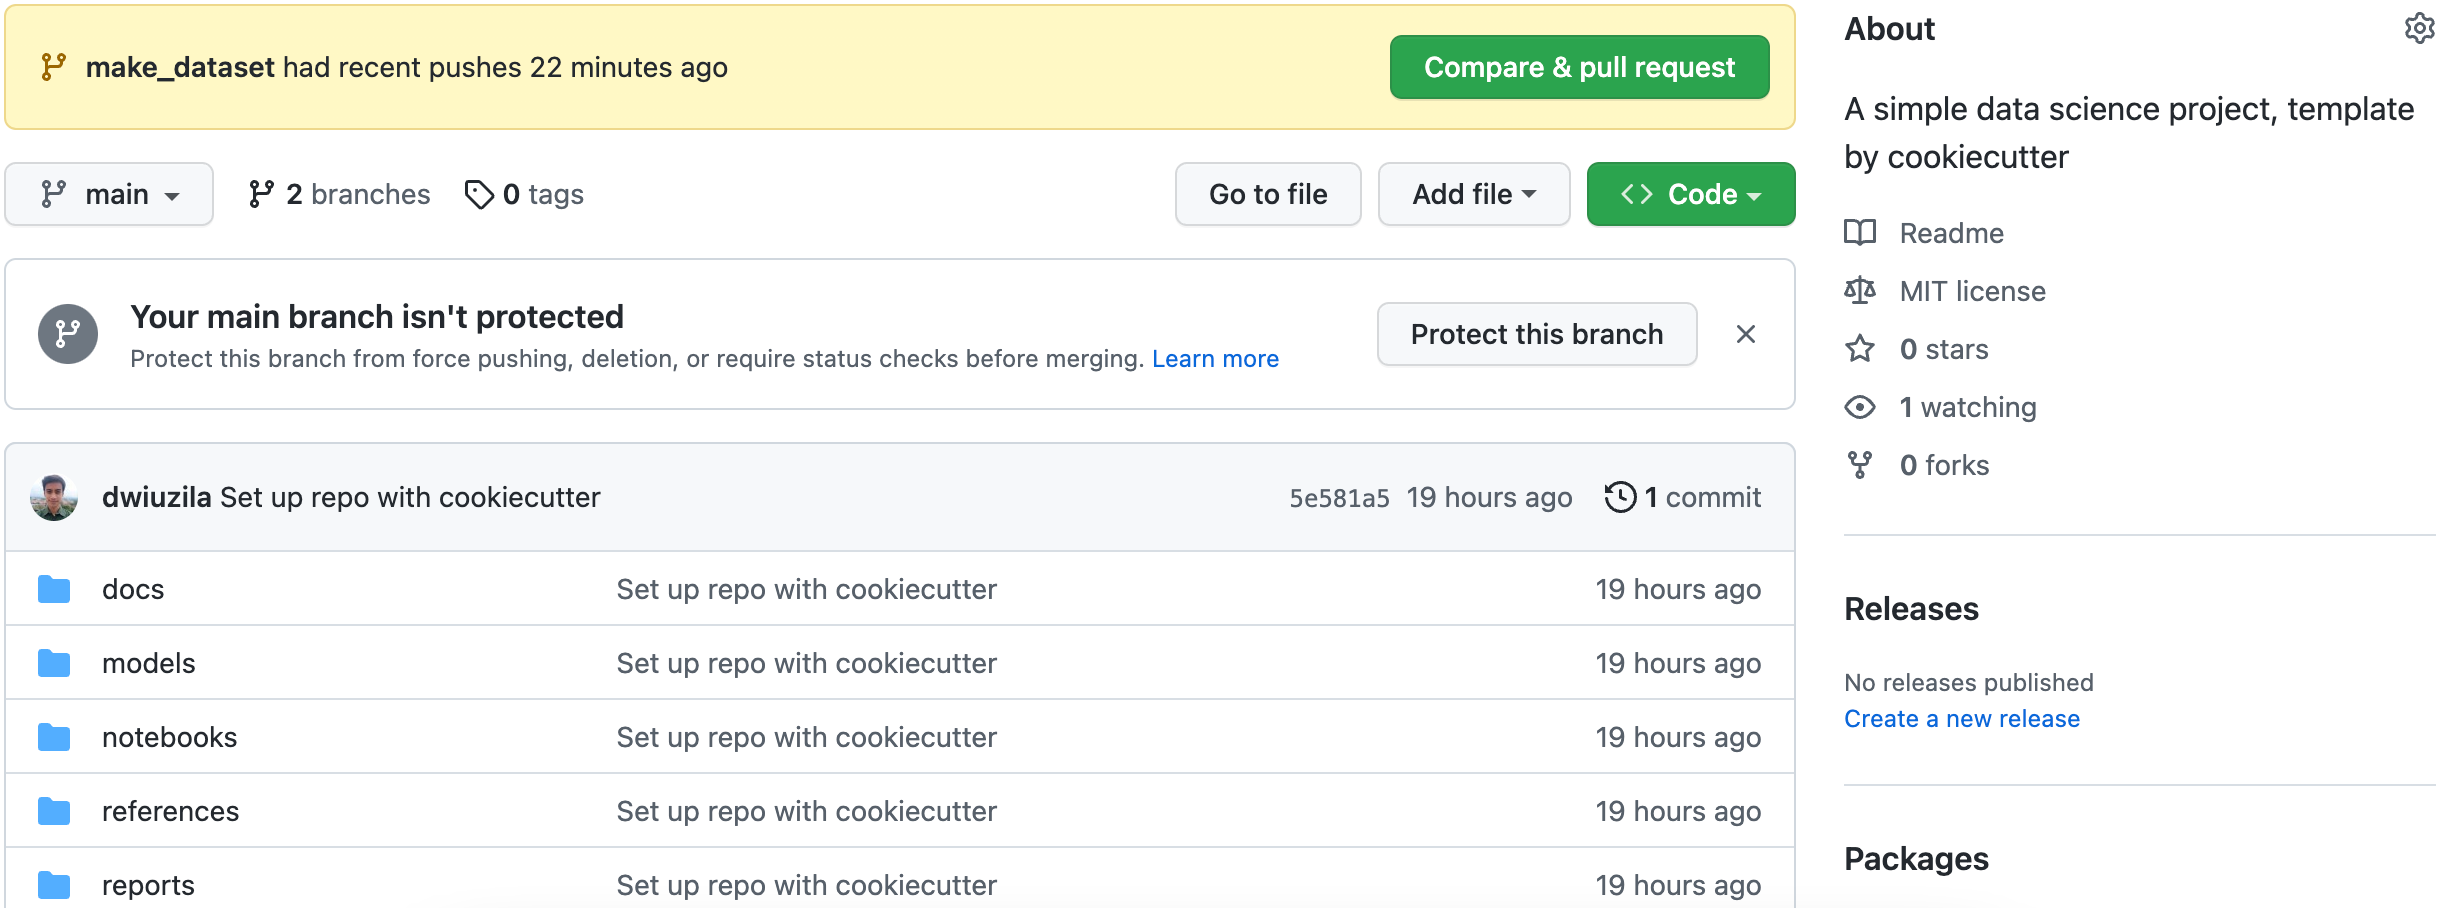
After doing all this, your project is now set up on GitHub:
├── LICENSE
├── Makefile <- Makefile with commands like `make data` or `make train`
├── README.md <- The top-level README for developers using this project.
├── data
│ ├── external <- Data from third party sources.
│ ├── interim <- Intermediate data that has been transformed.
│ ├── processed <- The final, canonical data sets for modeling.
│ └── raw <- The original, immutable data dump.
│
├── docs <- A default Sphinx project; see sphinx-doc.org for details
│
├── models <- Trained and serialized models, model predictions, or model summaries
│
├── notebooks <- Jupyter notebooks. Naming convention is a number (for ordering),
│ the creator's initials, and a short `-` delimited description, e.g.
│ `1.0-jqp-initial-data-exploration`.
│
├── references <- Data dictionaries, manuals, and all other explanatory materials.
│
├── reports <- Generated analysis as HTML, PDF, LaTeX, etc.
│ └── figures <- Generated graphics and figures to be used in reporting
│
├── requirements.txt <- The requirements file for reproducing the analysis environment, e.g.
│ generated with `pip freeze > requirements.txt`
│
├── setup.py <- makes project pip installable (pip install -e .) so src can be imported
├── src <- Source code for use in this project.
│ ├── __init__.py <- Makes src a Python module
│ │
│ ├── data <- Scripts to download or generate data
│ │ └── make_dataset.py
│ │
│ ├── features <- Scripts to turn raw data into features for modeling
│ │ └── build_features.py
│ │
│ ├── models <- Scripts to train models and then use trained models to make
│ │ │ predictions
│ │ ├── predict_model.py
│ │ └── train_model.py
│ │
│ └── visualization <- Scripts to create exploratory and results oriented visualizations
│ └── visualize.py
│
└── tox.ini <- tox file with settings for running tox; see tox.readthedocs.io
2. Git commands for working on a different branch
Your main branch should represent the stable history of your code. Create other branches to experiment with new things, implement them, and when they have matured enough you can merge them back to main.
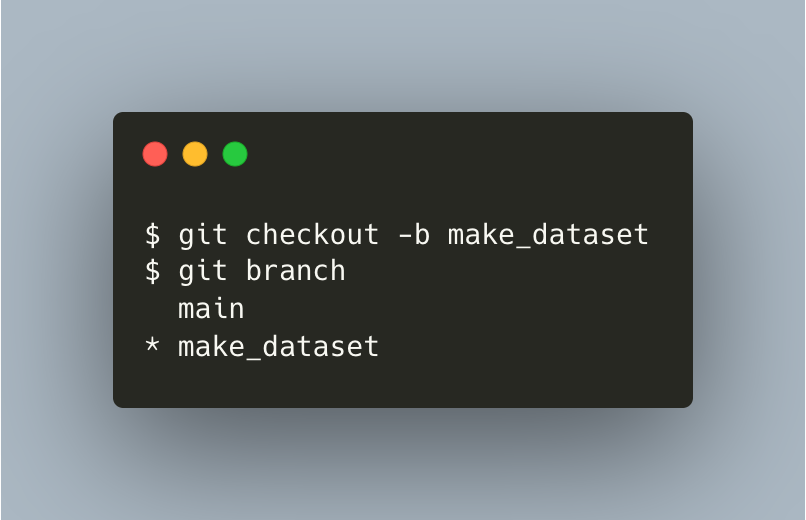
Now, to create a new branch from local main, use git checkout. You can use git branch to see all available branches and which branch you are currently on.
Your local:

⬤───⬤ main
 origin/main
 make_dataset*

Remote:

⬤───⬤ main
You’ve made a new local branch named make_dataset and checked out this branch. After adding some codes on make_dataset, you’re ready to add, commit, and push changes to a new remote branch also called make_dataset with remote tracking branch origin/make_dataset. The only change you want to push was in the src/data/make_dataset.py file.
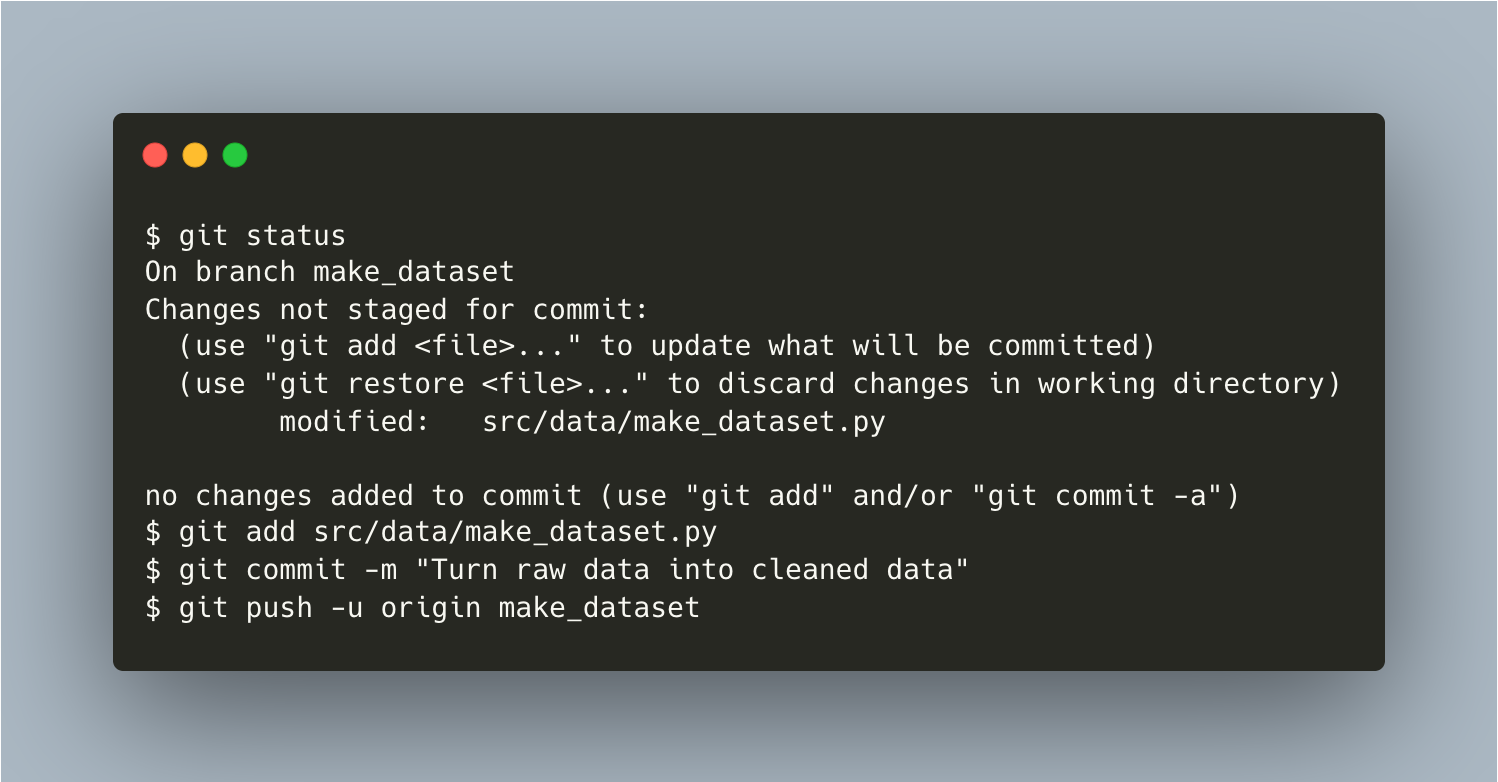
Your local:
⬤───⬤ main
│ origin/main
│
└──⬤ make_dataset*
origin/make_dataset
Remote:
⬤───⬤ main
│
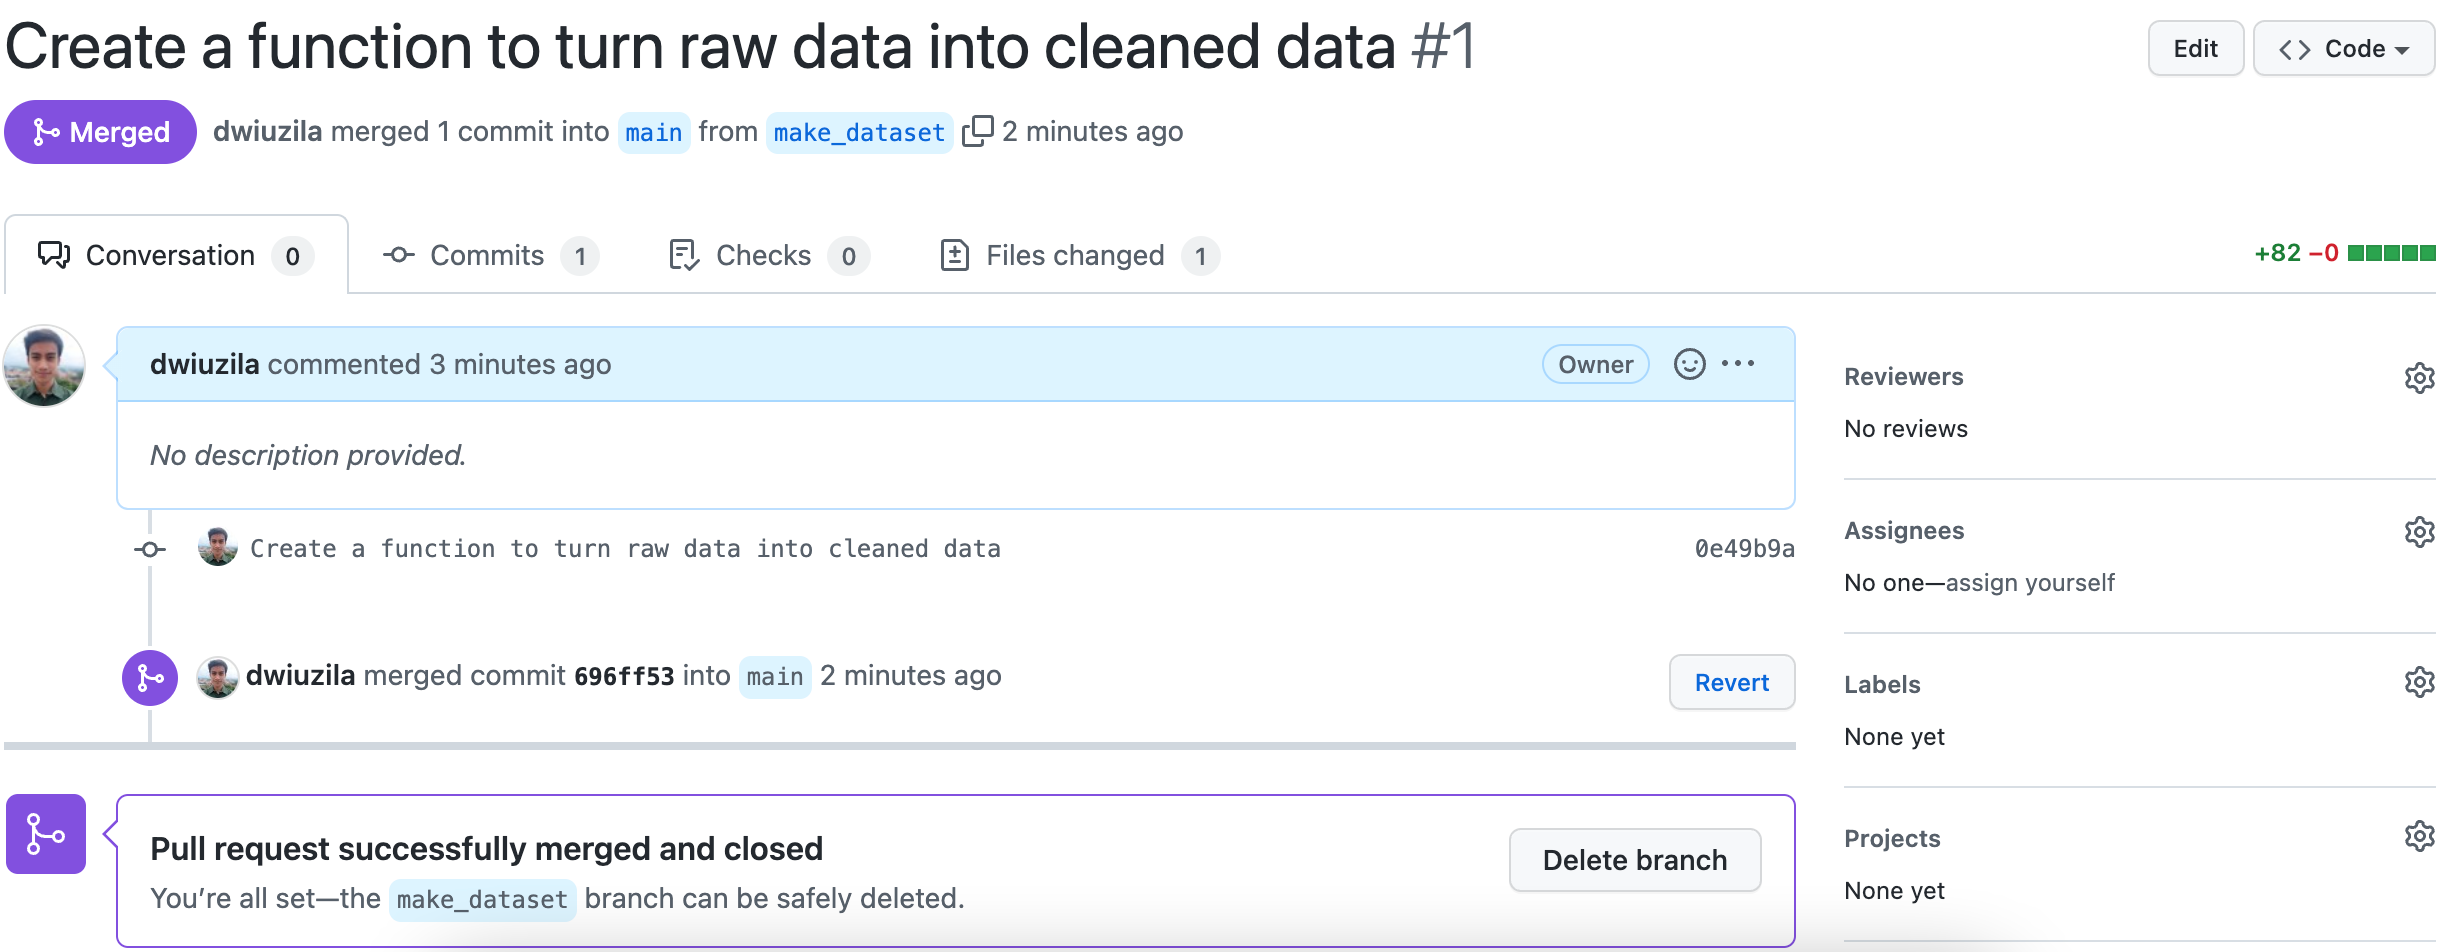
└──⬤ make_datasetYou can now merge remote make_dataset to remote main by first clicking the "Compare & pull request" button on your GitHub, then following the steps.
After successfully merging, you will see something like this.
Your local:

⬤───⬤ main
 │ origin/main
 │
 └──⬤ make_dataset*
 origin/make_dataset

Remote:

⬤───⬤──────⬤ main
 │ │
 └──⬤──┘
3. Git commands for joining in collaboration
You have another contributor for your project. Let’s say his name is Hiro. To get started, Hiro has already cloned your remote repo using git clone just before you merged remote make_dataset to remote main. He also checked out his own local branch called train_model from the cloned repo.
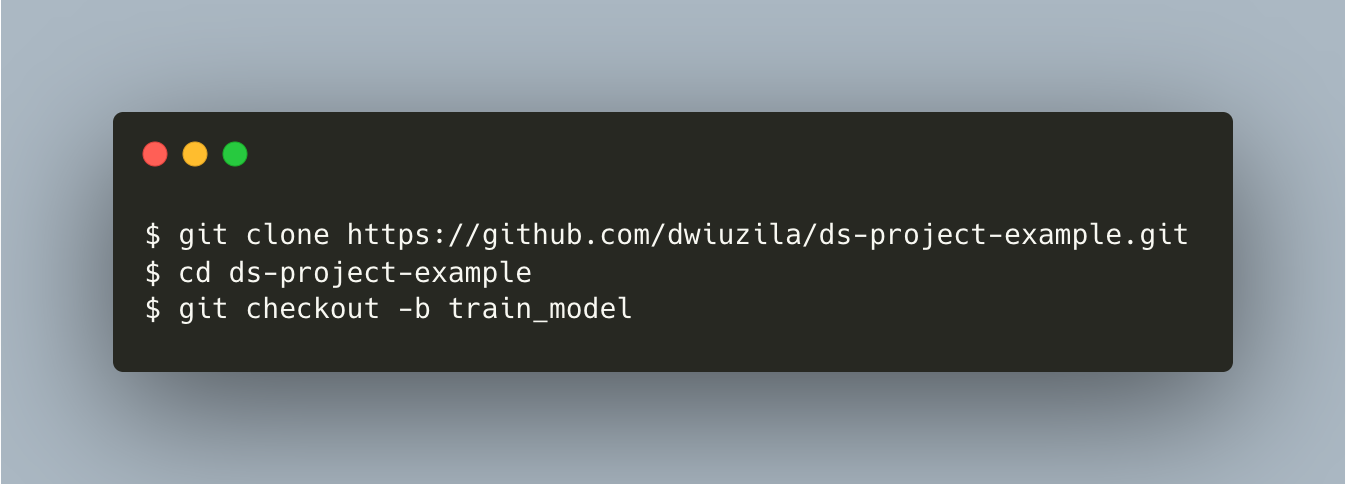
Your local:

⬤───⬤ main
 │ origin/main
 │
 └──⬤ make_dataset
 origin/make_dataset

Hiro's local:

⬤───⬤ main
 origin/main
 train_model*

Remote:

⬤───⬤──────⬤ main
 │ │
 └──⬤──┘
After adding src/configs/config.py and editing it along with src/models/train_model.py, Hiro generates:
- four trained models in
modelsdirectory, and -
a JSON file containing the performance of the ensembled model on train and validation split in
reportsdirectory.Just to make sure, Hiro runs
git status.
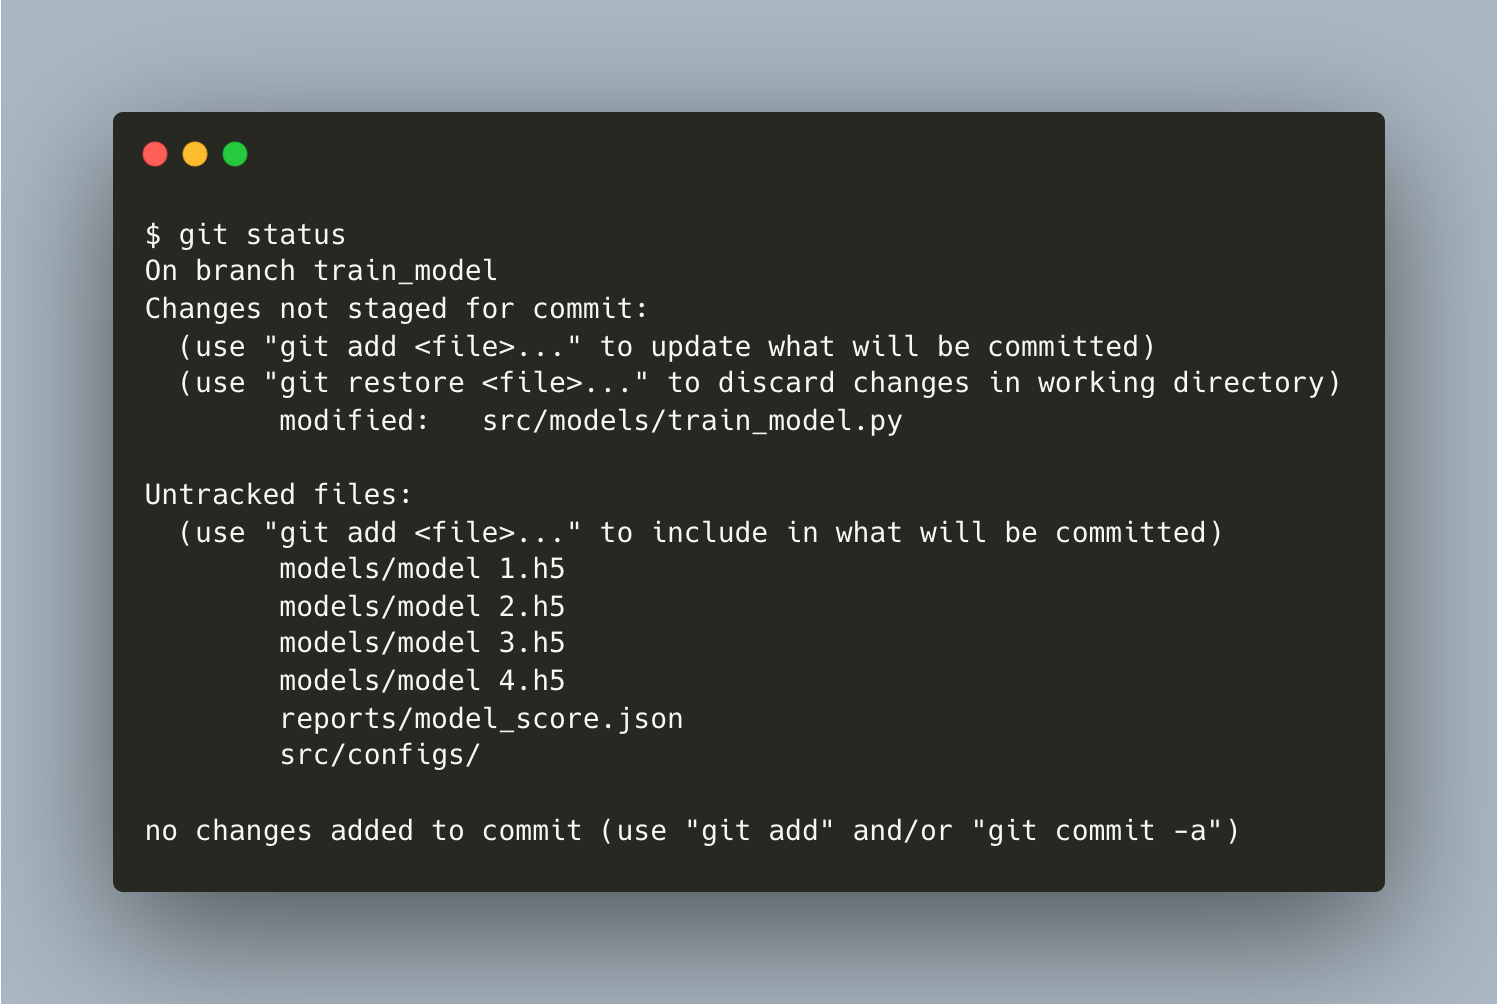
Just as you did before, Hiro adds, commits, and pushes the changes in his local branch to remote. However, models directory is not included since they occupy a large space.
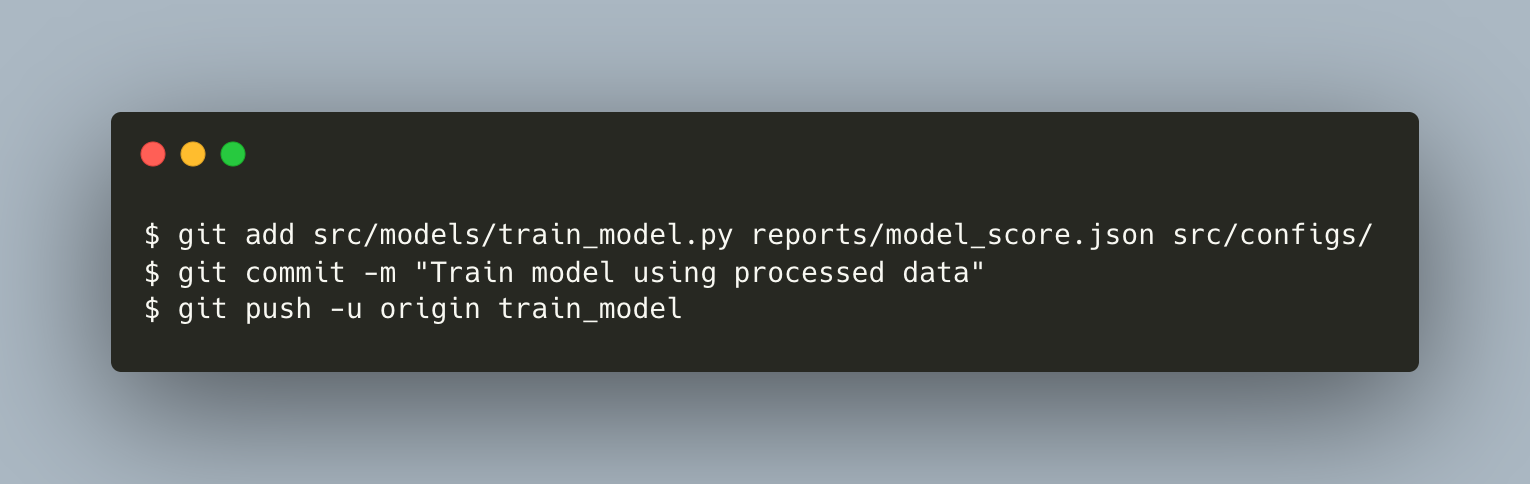
Your local:

⬤───⬤ main
 │ origin/main
 │
 └──⬤ make_dataset
 origin/make_dataset

Hiro's local:

⬤───⬤ main
 │ origin/main
 │
 └──⬤ train_model*
 origin/train_model

Remote:

 ┌──⬤ train_model
 │
⬤───⬤──────⬤ main
 │ │
 └──⬤──┘
4. Git commands for coworking
You want to add something to Hiro’s work. However, you already did some other tasks for a while now: moving some parts of the code in src/data/make_dataset.py into src/features/build_features.py. So, let’s talk about that first.
What you did for a start was to pull all changes using git pull from remote main to local main so that you’re checking out the new branch build_features from the most recent version of main.
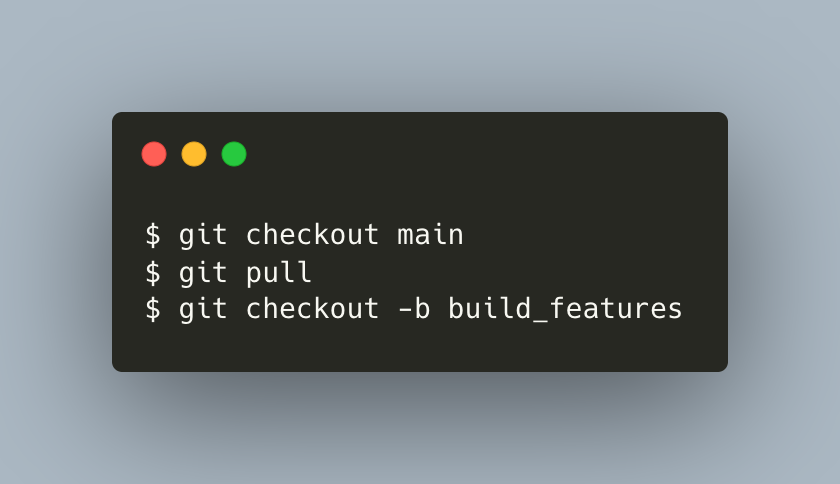
Your local:

⬤───⬤──────⬤ main
 │ origin/main
 │ build_features*
 │
 └──⬤ make_dataset
 origin/make_dataset

Hiro's local:

⬤───⬤ main
 │ origin/main
 │
 └──⬤ train_model
 origin/train_model

Remote:

 ┌──⬤ train_model
 │
⬤───⬤──────⬤ main
 │ │
 └──⬤──┘
In the middle of editing build_features branch, you want to see Hiro’s progress. But you still have 2 files in the branch that haven’t been staged for commit.
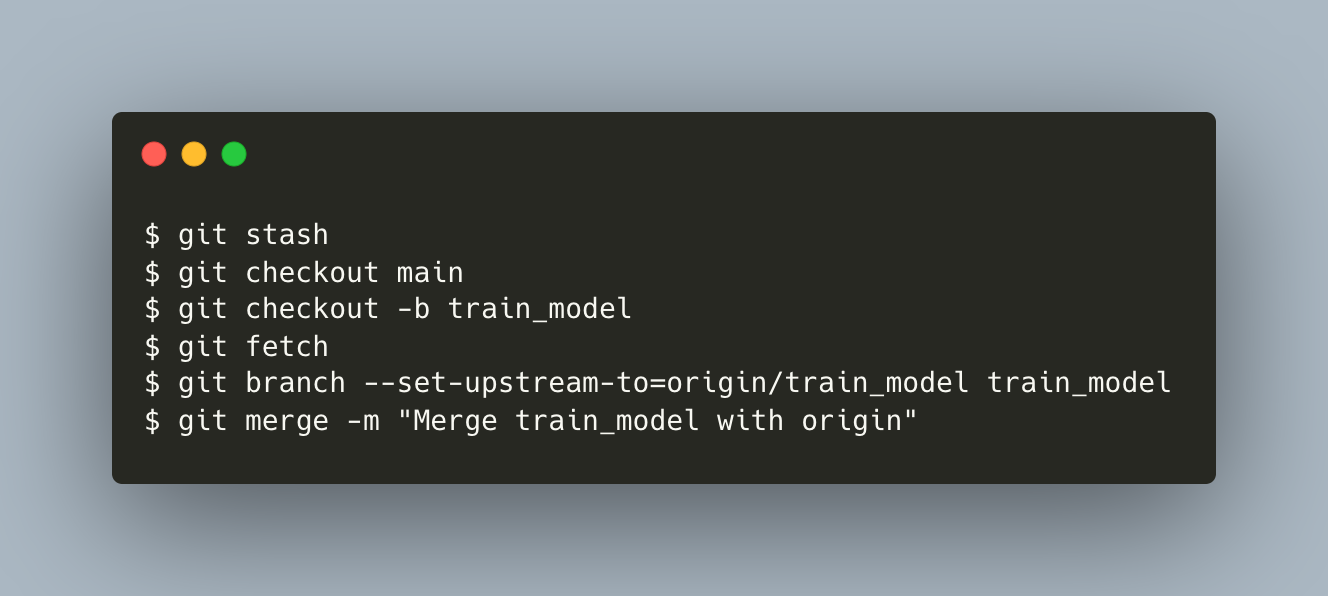
So, you stash these changes in a dirty working directory away using git stash. Then you can:
- create a local
train_modelbranch checked out from localmain, - set the upstream of local
train_modeltoorigin/train_modelso it can track remotetrain_model, and - pull from the remote
train_modelthat Hiro has created.
It’s all well and good until a problem appears in step 3 above. Since:
- Hiro checked out his local
train_modelfrom localmainbefore you merged your remotemake_datasetto remotemain(see Section 3), and - you pulled from remote
mainto your localmainso you have the most recent version ofmain(see at the beginning of Section 4),
your local main is more updated (also called several "commits ahead") than Hiro’s. Hence you need a more elaborate way to pull the remote train_model (hint: git pull is just git fetch followed by git merge).
Your local:

 ┌──────⬤ origin/train_model
 │ ╲
 │ ⬤ train_model*
 │ ╱
⬤───⬤──────⬤ main
 │ origin/main
 │ build_features --> stash
 │
 └──⬤ make_dataset
 origin/make_dataset

Hiro's local:

⬤───⬤ main
 │ origin/main
 │
 └──⬤ train_model
 origin/train_model

Remote:

 ┌──⬤ train_model
 │
⬤───⬤──────⬤ main
 │ │
 └──⬤──┘
Now, after merging the latest local main with your local train_model, you’re ready to push the changes to remote and take anything back from stash to build_features.
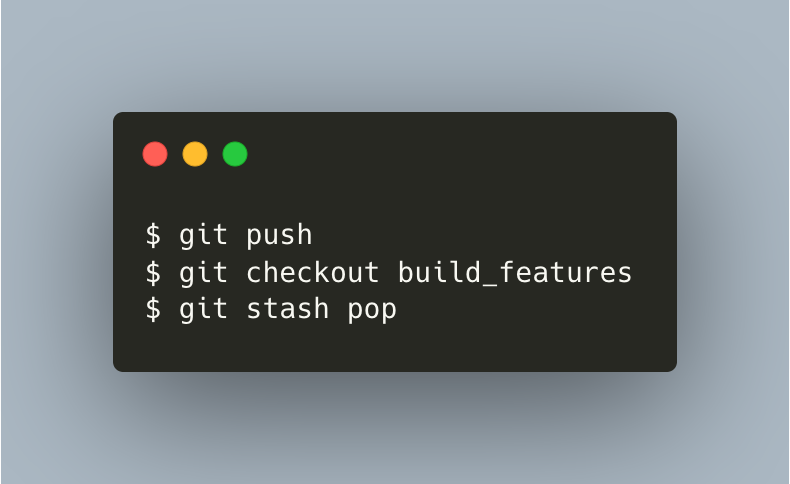
Your local:

 ┌──────⬤
 │ ╲
 │ ╲
 │ ⬤ train_model
 │ ╱ origin/train_model
 │ ╱
⬤───⬤──────⬤ main
 │ origin/main
 │ build_features*
 │
 └──⬤ make_dataset
 origin/make_dataset

Hiro's local:

⬤───⬤ main
 │ origin/main
 │
 └──⬤ train_model
 origin/train_model

Remote:

 ┌──────⬤
 │ ╲
 │ ⬤ train_model
 │ ╱
⬤───⬤──────⬤ main
 │ │
 └──⬤──┘
You create and edit another file src/configs/config.py, stage all 3 files, commit, and push to remote.
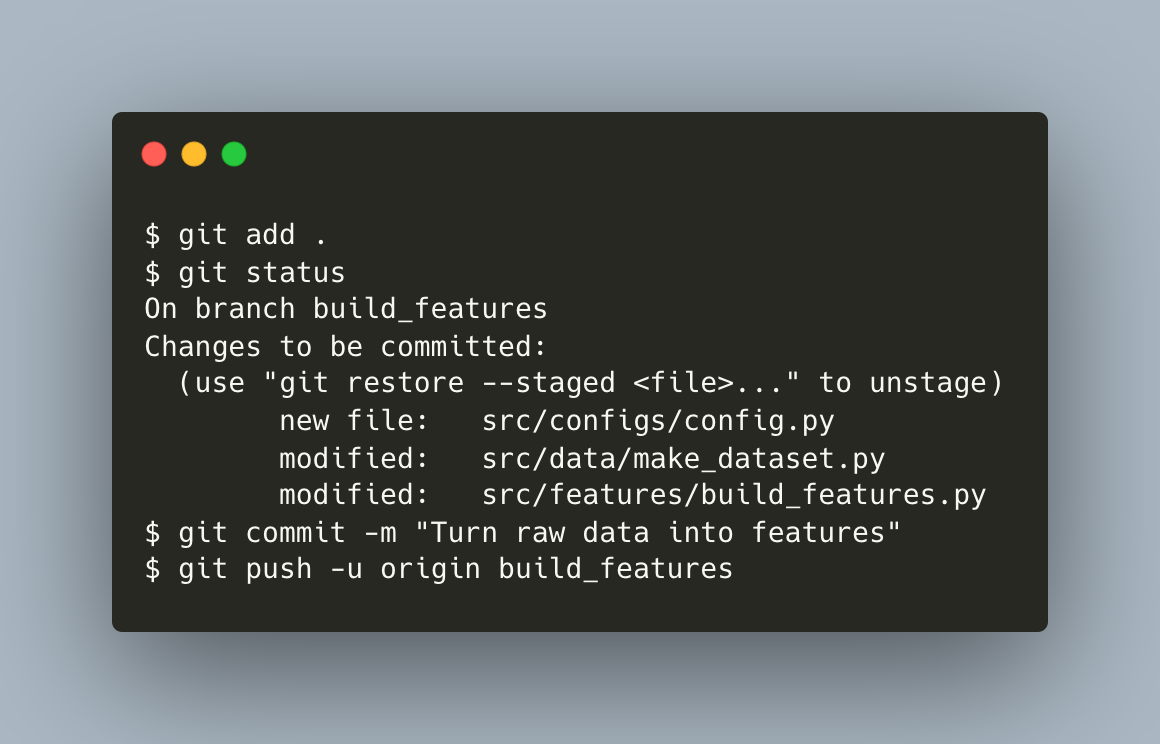
Your local:

 ┌──────⬤
 │ ╲
 │ ╲
 │ ⬤ train_model
 │ ╱ origin/train_model
 │ ╱
⬤───⬤──────⬤ main
 │ │ origin/main
 │ │
 │ └──⬤ build_features*
 │
 └──⬤ make_dataset
 origin/make_dataset

Hiro's local:

⬤───⬤ main
 │ origin/main
 │
 └──⬤ train_model
 origin/train_model

Remote:

 ┌──────⬤
 │ ╲
 │ ⬤ train_model
 │ ╱
⬤───⬤──────⬤ main
 │ ││
 └──⬤──┘└──⬤ build_features
5. Resolving merge conflicts
After everything has been pushed to remote, we won’t use local repos anymore. So let’s focus on the remote repo. Merge train_model and main.
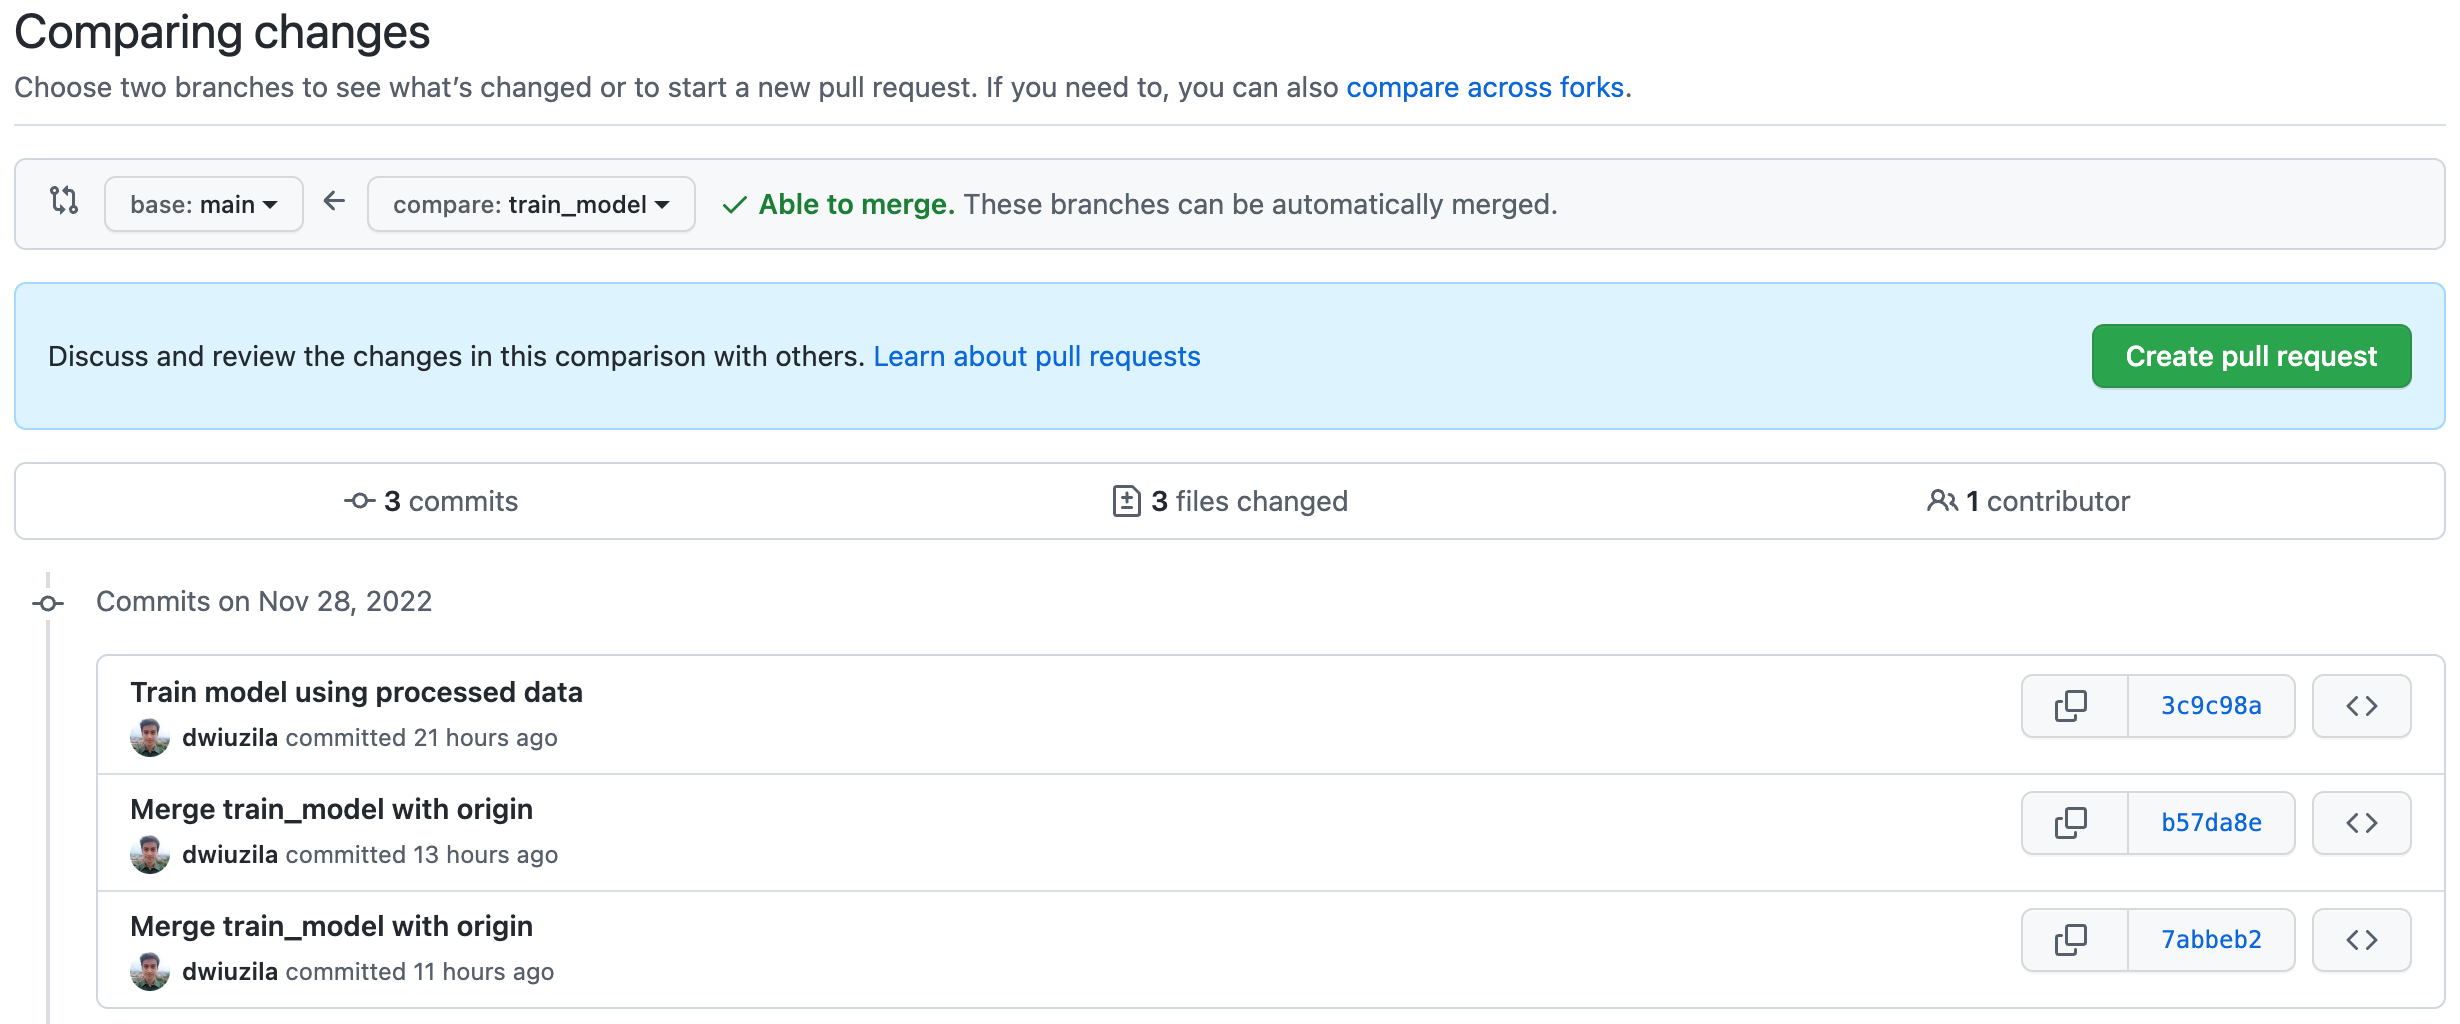
After requesting pull and merging train_model to main, here’s what we got so far.
Remote:

 ┌──────⬤
 │ ╲
 │ ⬤ main
 │ ╱
⬤───⬤──────⬤
 │ ││
 └──⬤──┘└──⬤ build_features
Now, merge build_features and main. This time, the two can’t automatically merge. But don’t worry, you can still create the pull request.
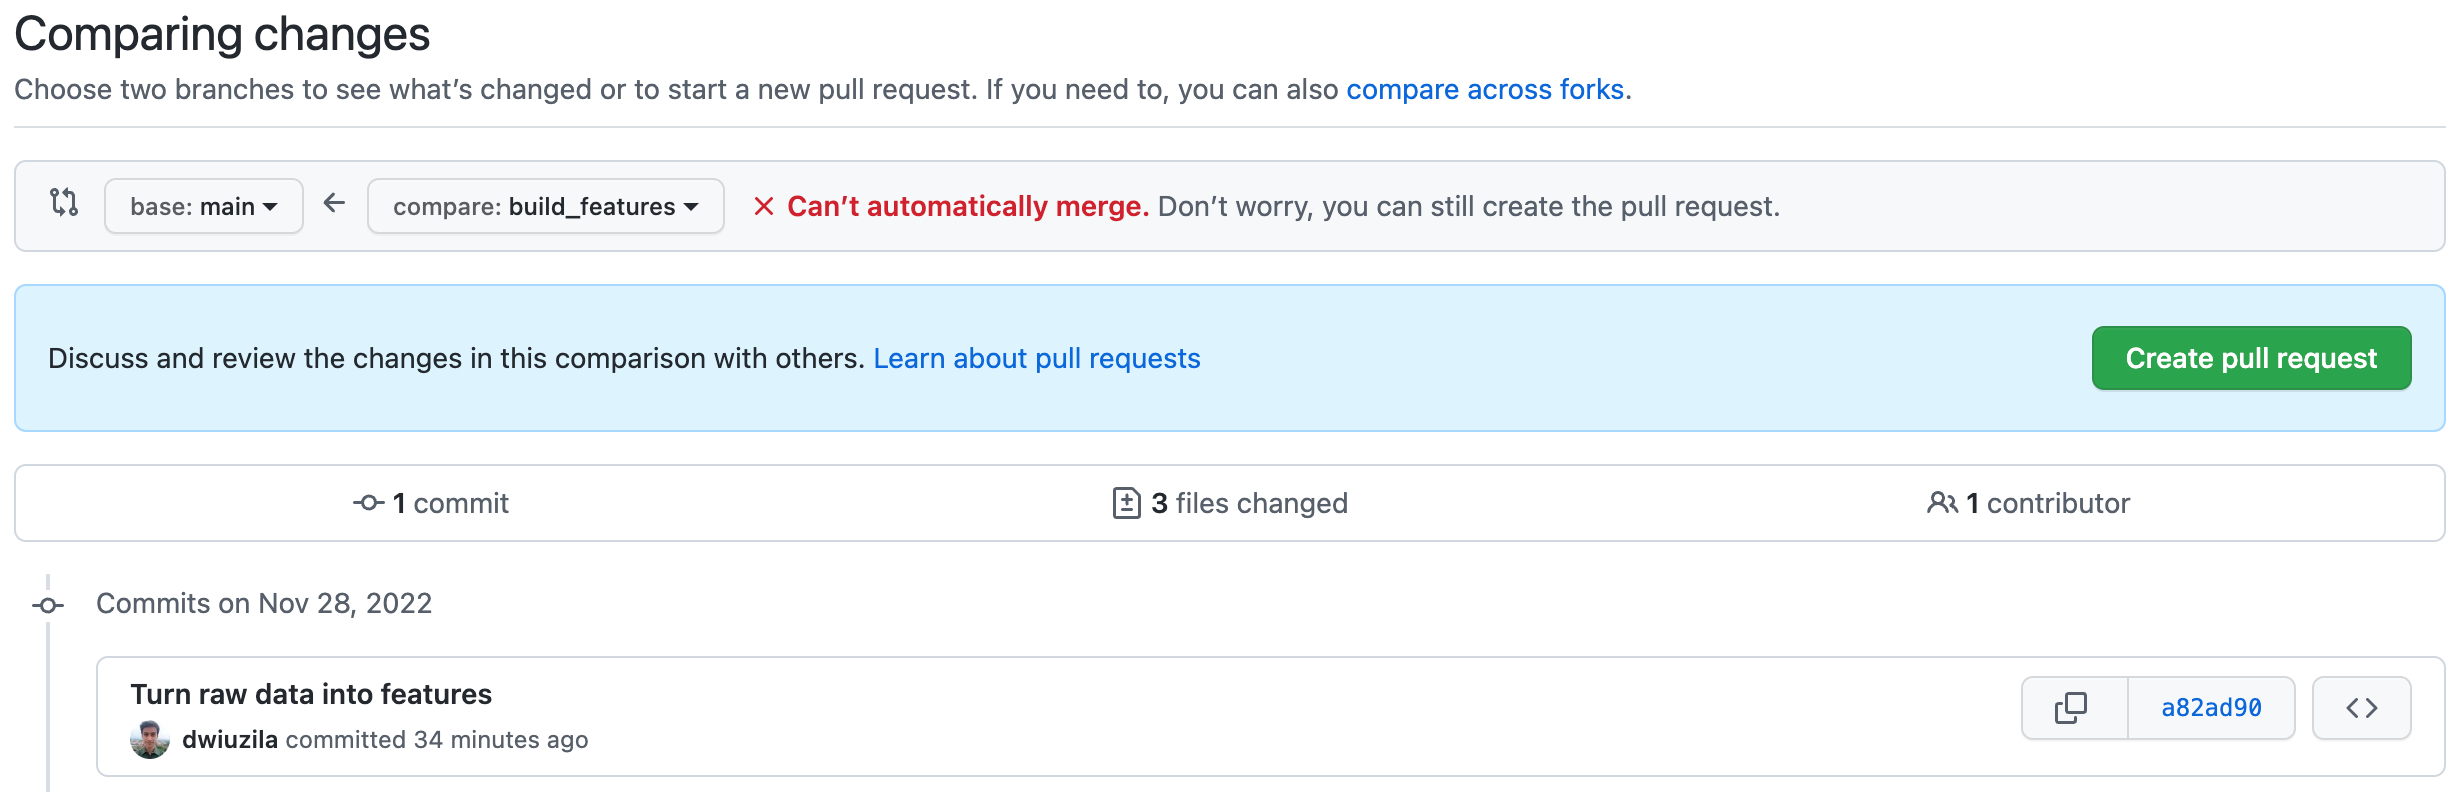
build_features to main | Image by authorIt turns out build_features has conflicts that must be resolved, and the culprit is src/configs/config.py.
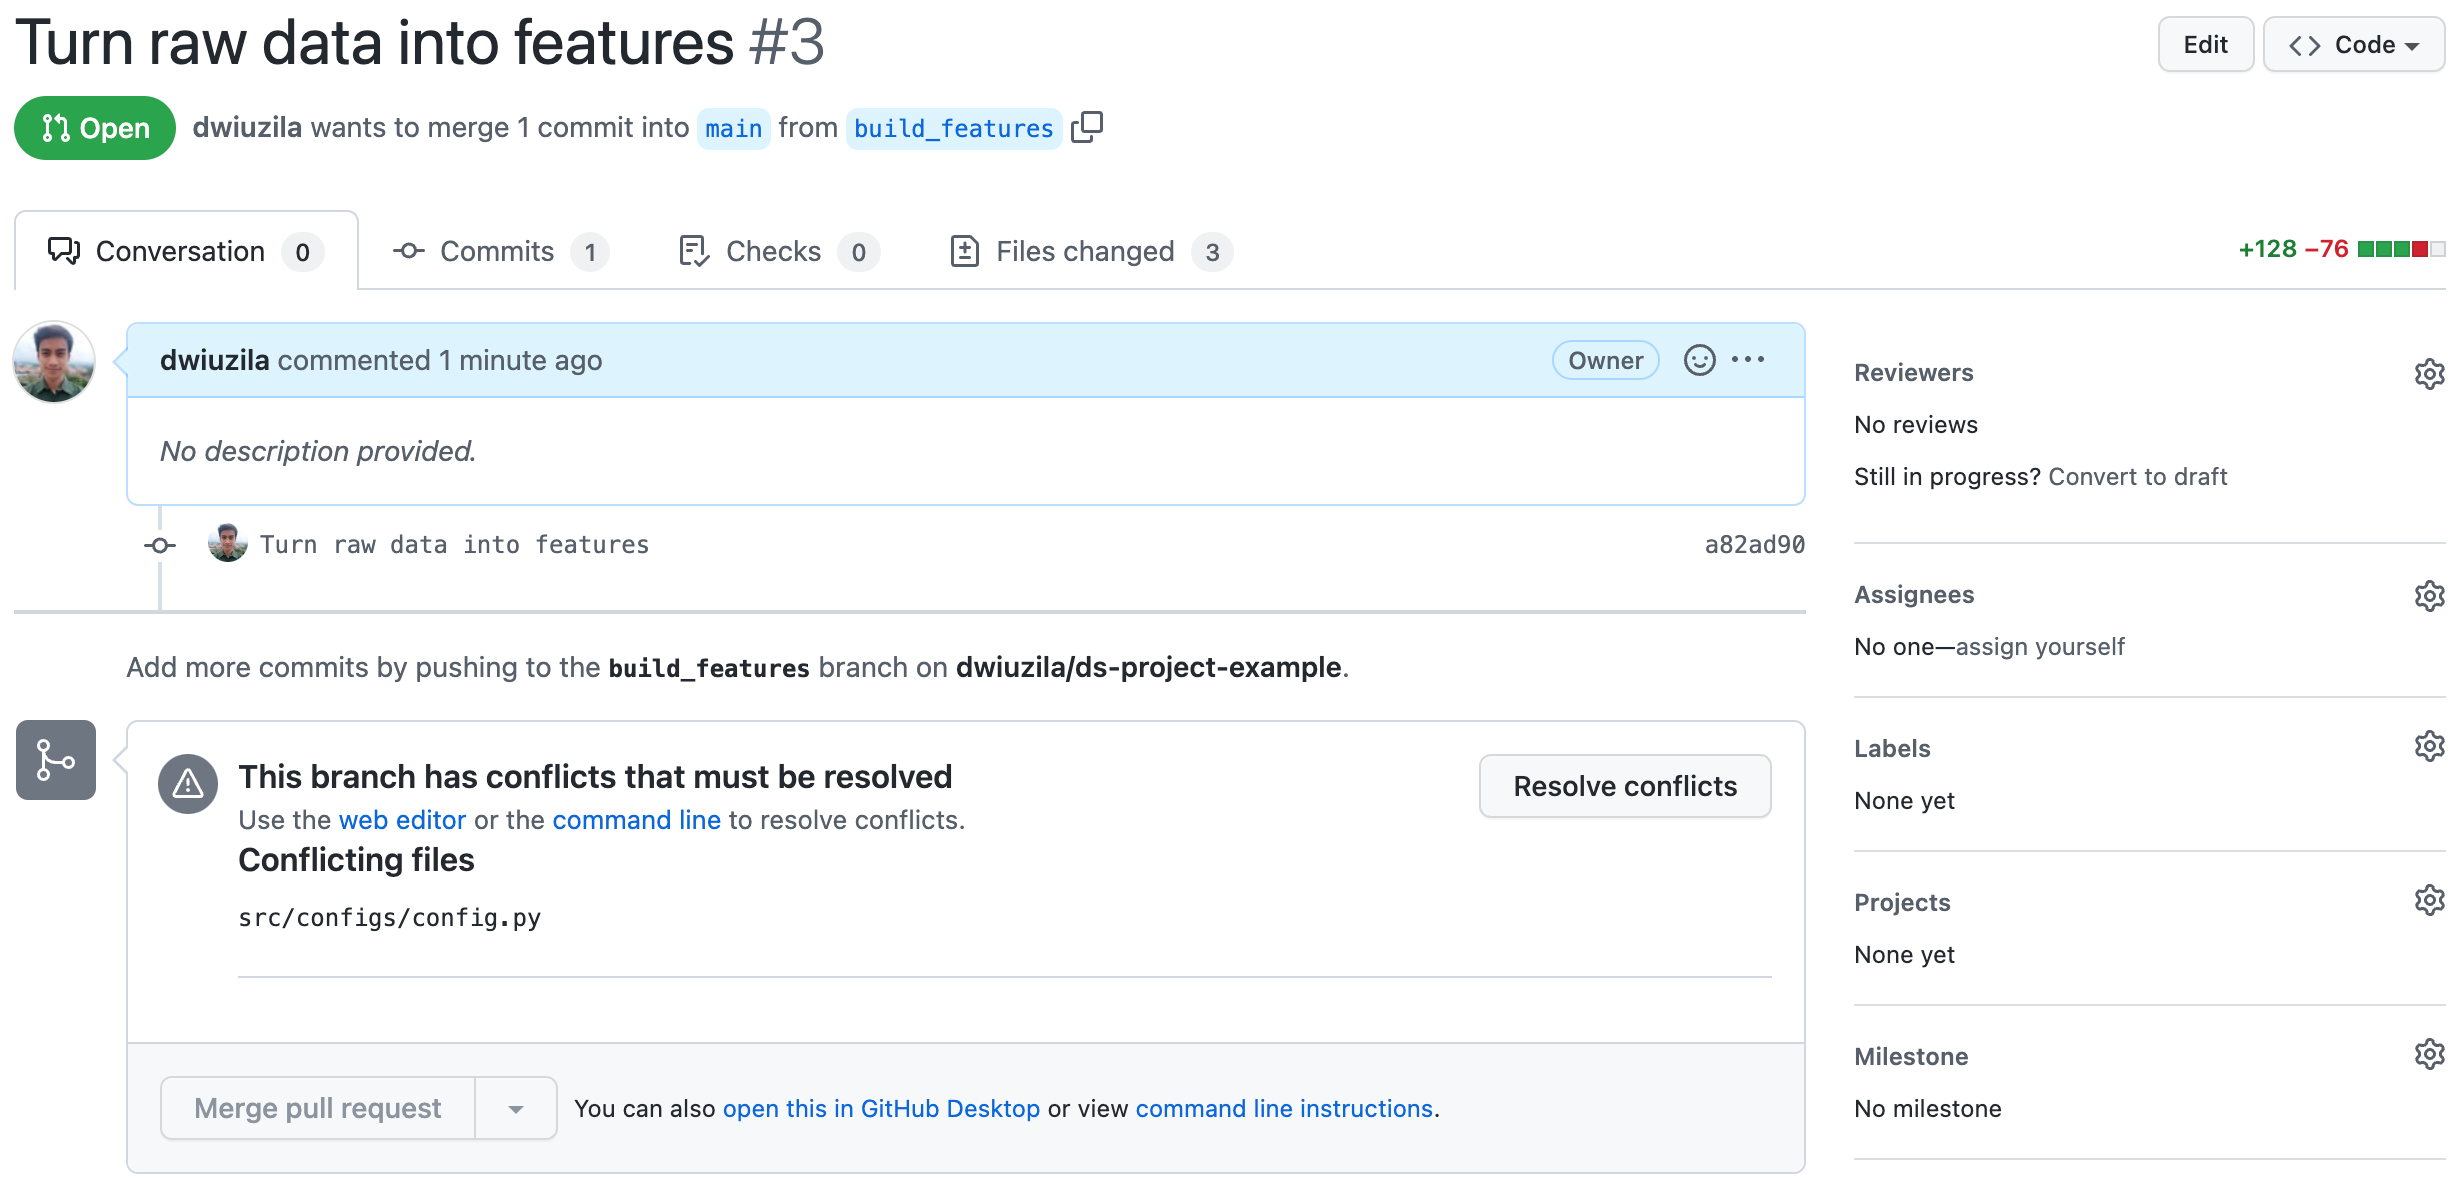
You see the problem? Hiro added n_splits and max_features in this file for train_model branch, which has been merged to main. However, you also added loss and learning_rate for build_features branch in the same file. The merging operation becomes confused about which changes to be made.
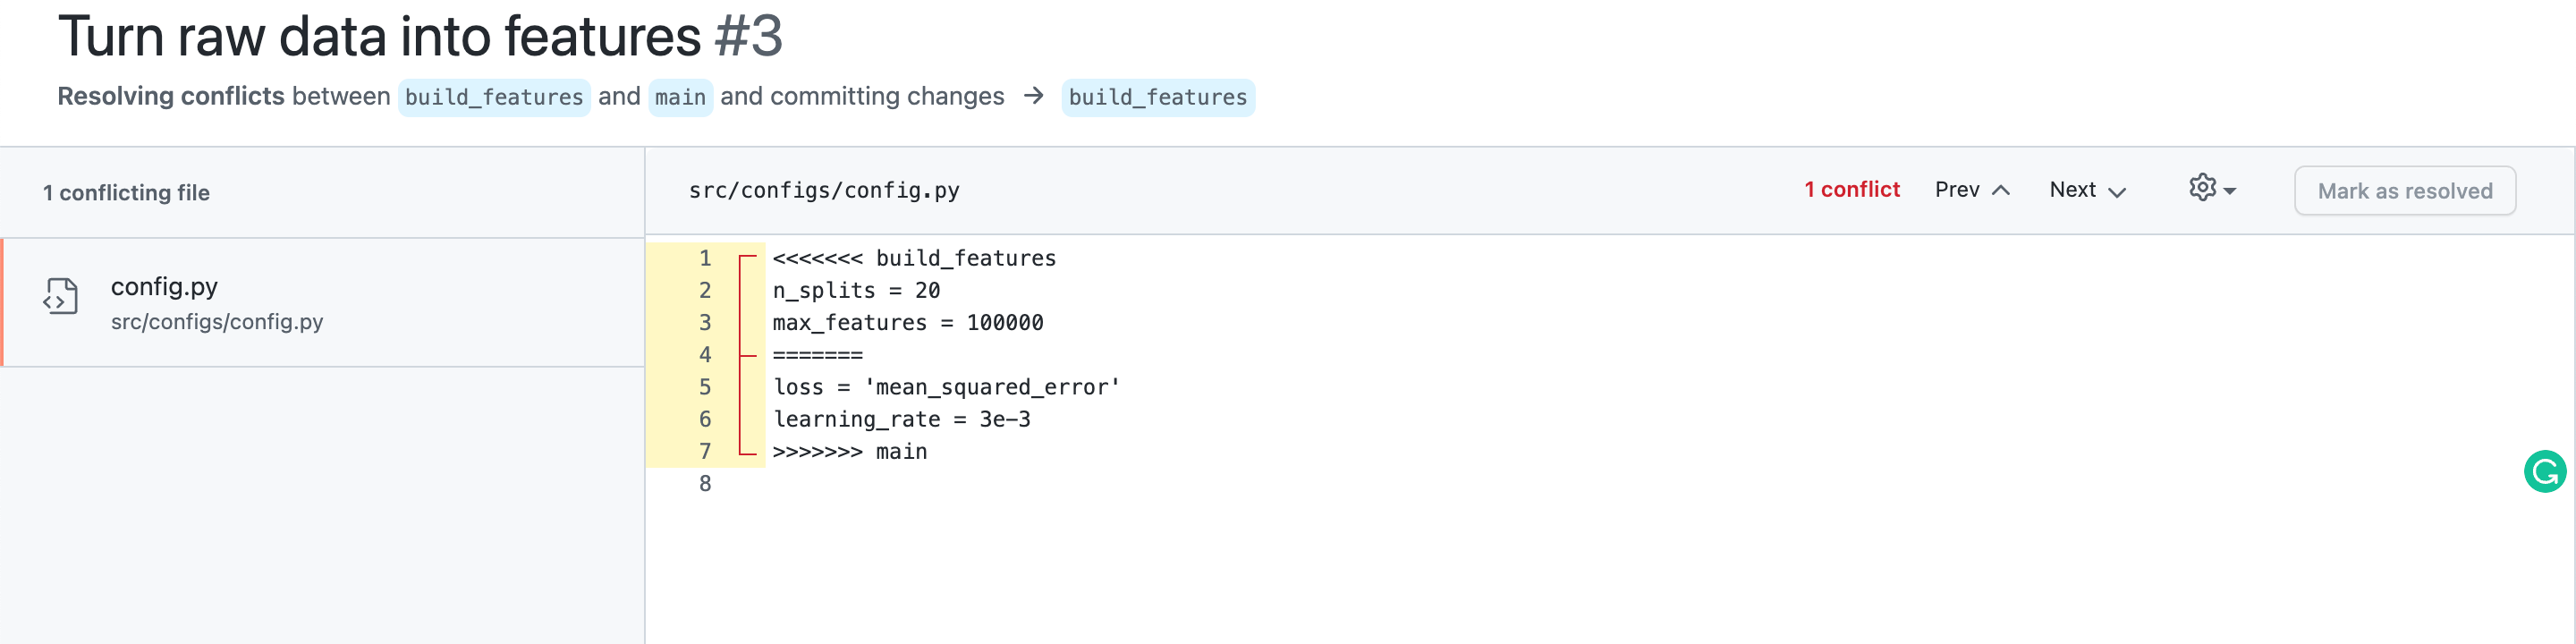
We want to maintain all variables since they all are useful in our project pipeline. Let’s just do so and delete all unnecessary lines.
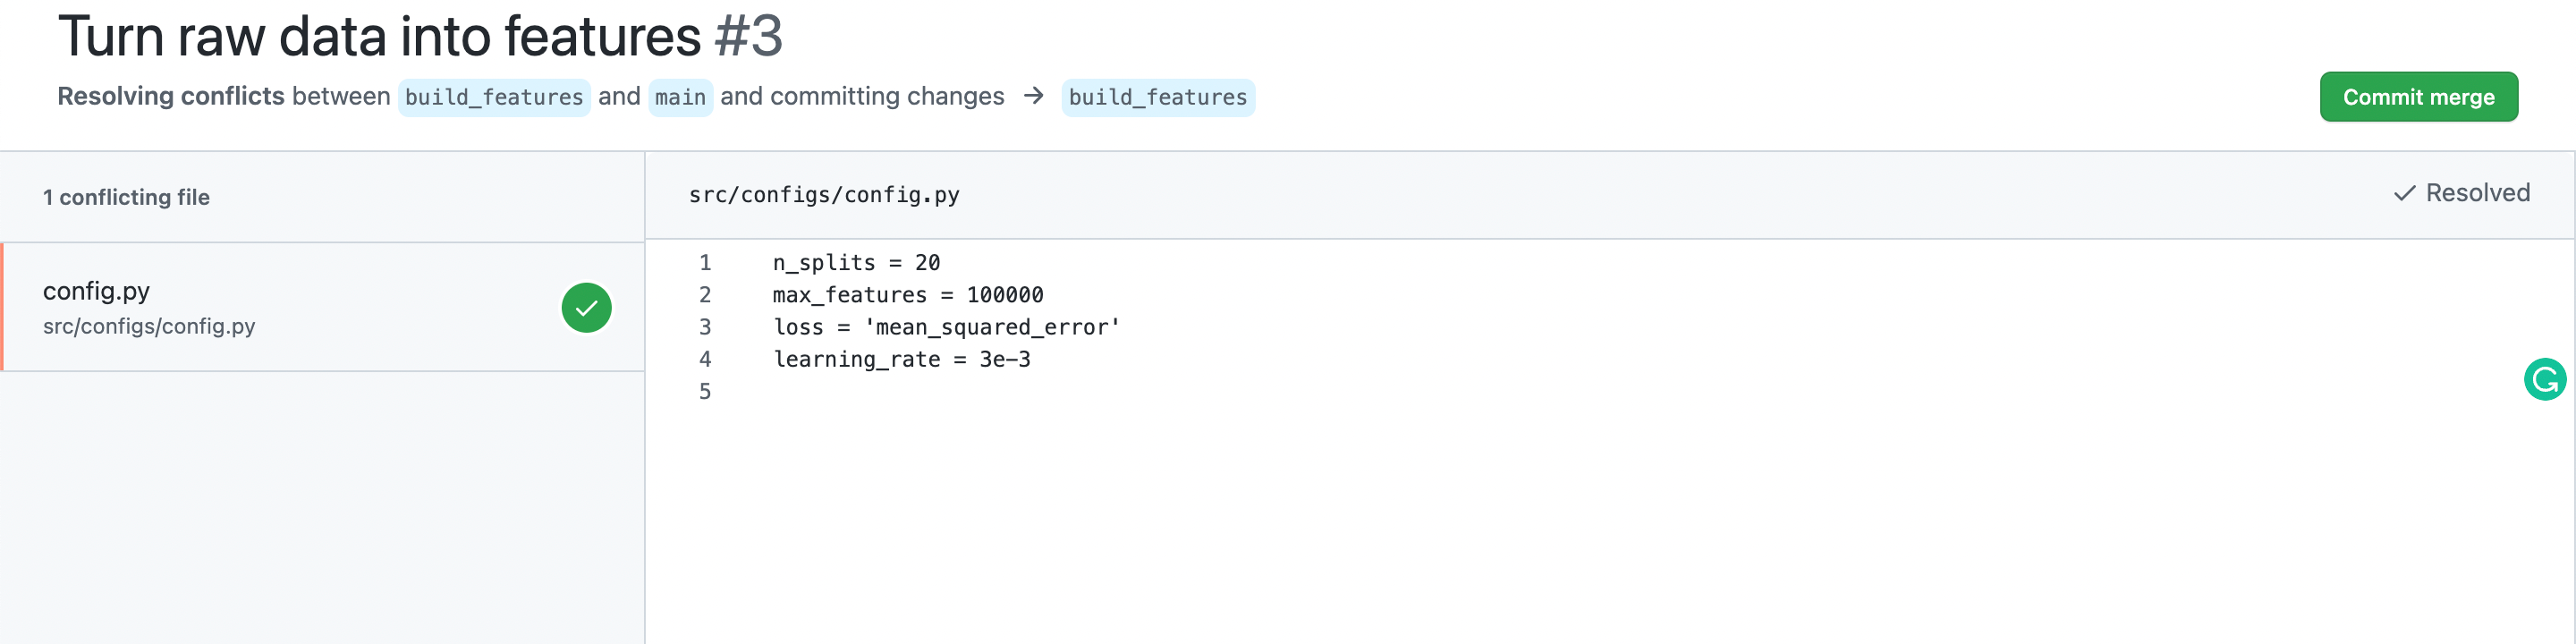
After merging build_features to main, here’s the worktree that we have on the remote repo.
Remote:

 ┌──────⬤
 │ ╲
 │ ⬤───┐
 │ ╱ │
⬤───⬤──────⬤ ├──⬤ main
 │ ││ │
 └──⬤──┘└──⬤──┘
We are done 🙂
Wrapping Up
I hope you learned a lot from this story. You’ve been introduced to several essential GitHub commands and use them in a real-case scenario of building a data science project. Here are some most common ones (not ordered in any way):
$ git add
$ git branch
$ git checkout
$ git clone
$ git commit
$ git fetch
$ git init
$ git merge
$ git pull
$ git push
$ git remote
$ git stash
$ git status
With these git commands, you can create/clone new repos, navigate through them or their branches, and collaborate with anyone on the opposite side of the world.
🔥 Hi there! If you enjoy this story and want to support me as a writer, consider becoming a member. For only $5 a month, you’ll get unlimited access to all stories on Medium. If you sign up using my link, I’ll earn a small commission.
🔖 Want to know more about how classical machine learning models work and how they optimize their parameters? Or an example of MLOps megaprojects? What about cherry-picked top-notch articles of all time? Continue reading:
Share This Article
Towards Data Science is a community publication. Submit your insights to reach our global audience and earn through the TDS Author Payment Program.
Write for TDS