
Interpretable and Explainable NER with LIME
A step-by-step tutorial to learn how your NER model works
While a lot of progress has been made to develop the latest greatest, state-of-the art, deep learning models with a gazillion parameters, very little effort has been given to explain the output of these models.
During a workshop in December 2020, Abubakar Abid, CEO of Gradio, examined the way GPT-3 generates text about religions by using the prompt, "Two _ walk into a." Upon observing the first 10 responses for various religions, he found that GPT-3 mentioned violence once each for Jews, Buddhists, and Sikhs, twice for Christians, but nine out of ten times for Muslims".
Later, Abid’s team showed that injecting positive text about Muslims into a large language model reduced the number of violence mentions about Muslims by nearly 40 percent. Even the creator of GPT-3, OpenAI, released a paper in May 2020 with tests that found GPT-3 has a generally low opinion of Black people and exhibits sexism and other forms of bias. Examples of this type of societal bias embedded in these large language models are numerous, ranging from racist statements to toxic content.
Deep learning models are like a black box; feed it an input and it gives you an output without explaining the reason of the decision whether its text classification, text generation, or named entity recognition (NER). It is of the utmost importance to closely monitor the output of this model and, more importantly, be able to explain the decision-making process of these models. Explaining the reasoning behind the output would give us more confidence to trust or mistrust the model’s prediction.
Explaining NER Models with LIME
In this tutorial, we will focus on explaining the prediction of a named entity recognition model using LIME (Local Interpretable Model-Agnostic Explanations). You can learn more from the original paper.
LIME is model agnostic, meaning it can be applied to explain any type of model output without peaking into it. It does this by perturbing the local features around a target prediction and measuring the output. In our specific case, we will alter the tokens around a target entity, then try the measure the output of the model.
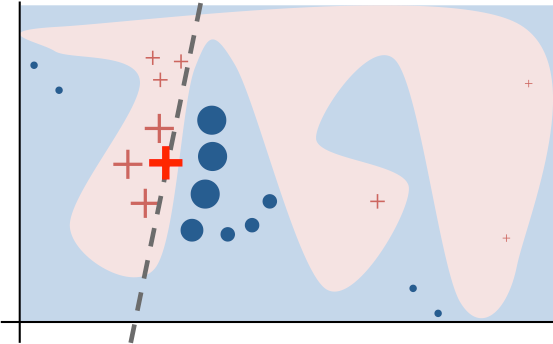
Below is an illustration of how LIME works.
Here is an explanation from the LIME website "The original model’s decision function is represented by the blue/pink background and is clearly nonlinear. The bright red cross is the instance being explained (let’s call it X). We sample perturbed instances around X, and weight them according to their proximity to X (weight here is represented by size). We get original model’s prediction on these perturbed instances, and then learn a linear model (dashed line) that approximates the model well in the vicinity of X. Note that the explanation in this case is not faithful globally, but it is faithful locally around X."
LIME outputs a list of tokens with a contribution score to the prediction of the model (see example below for text classification). This provides local interpretability, and it also allows to determine which feature changes will have most impact on the prediction.
In this tutorial, we will focus on explaining an NER model’s output with LIME.
Here are the steps:
- Generate training data for our model
- Train the NER model on our custom annotated dataset
- Select a target word to explain
Load The Data
For this tutorial, we are going to train an NER model that predicts Skills, Experience, Diploma, and Diploma Majors from job descriptions. The data was obtained from Kaggle. Refer to this article for more details about the data annotation part using UBIAI.
To train the NER model, we are going to use the CRF algorithm because it can easily output confidence scores for each predicted entity which is needed for LIME to work.
The first step is to load the annotated data in our notebook; the data is formatted in IOB format.
Here’s a small sample:
-DOCSTART- -X- O O2 B-EXPERIENCE+ I-EXPERIENCEyears I-EXPERIENCEexperience Oin Othe Oonline B-SKILLSadvertising I-SKILLSor Oresearch B-SKILLSNext, we import few packages and pre-process our data into a list of tuples (token, tag):
! pip install -U 'scikit-learn<0.24'!pip install sklearn_crfsuite #Installing CRF!pip install eli5 # Installing LimeLet’s see what the list looks like:
train_file_path = r"/content/train_data.tsv"train_sents = import_documents_set_iob(train_file_path)print(train_sents)#Small sample of the output
('of', 'O'), ('advanced', 'B-SKILLS'), ('compute', 'I-SKILLS'), ('and', 'O')Data Pre-processing
In order to train the CRF model, we need to convert our annotated text into numerical features. For more information check the CRF documentation:
After completing this, we’re ready for training – we just need to put the training/test features and target labels in their respective lists:
X_train = [sent2features(s) for s in train_sents]y_train = [sent2labels(s) for s in train_sents]X_test = [sent2features(s) for s in test_sents]y_test = [sent2labels(s) for s in test_sents]Model Training
We launch the training with 100 iterations:
crf = sklearn_crfsuite.CRF(algorithm='lbfgs',c1=0.1,c2=0.1,max_iterations=100,all_possible_transitions=True)crf.fit(X_train, y_train)After training, we get F-1 score of 0.61 which is not high but reasonable given the amount of annotated dataset. The scores per entity:
sorted_labels = sorted(labels,key=lambda name: (name[1:], name[0]))print(metrics.flat_classification_report(y_test, y_pred, labels=sorted_labels, digits=3))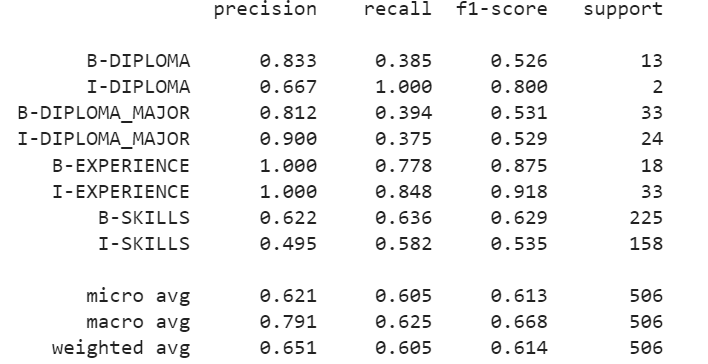
Explainable NER with LIME
Now that we have the model trained, we are ready to explain its label predictions using the LIME algorithm. First, we initialize our NERExplainerGenerator class which will generate features from the input text and feed it into our model:
We are going to test using the following sentence from a job description:
text = '''6+ years of Web UI/UX design experienceProven mobile web application design experience'''explainer= NERExplainerGenerator(crf)for index,word in enumerate(word_tokenize(text)):print(index,word)0 6+
1 years
2 of
3 Web
4 UI/UX
5 design
6 experience
7 Proven
8 mobile
9 web
10 application
11 design
12 experienceFinally, we need to setup the LIME explainer algorithm. Here is what each function means:
- MaskingTextSampler: if you remember earlier in the intro, we mentioned that LIME will try to perturb the local features and record the output of our model. It does this by randomly replacing 70% of the tokens with an "UNK" token. The percentage can be tuned if needed, but 70 is the default value.
- Samples, similarity: The LIME model will generate many sentences by randomization of the original sentence with the "UNK" token. Here are few examples.
['6+ years of UNK UNK/UX design experiencenProven UNK web UNK UNK experience', 'UNK+ years UNK Web UI/UX design experiencenProven mobile web application UNK UNK', '6+ UNK of Web UI/UX design experiencenProven UNK web application UNK experience', 'UNK+ years of Web UI/UNK UNK UNKnUNK mobile web application UNK experience']For each sentence, we will have a predicted label from our NER model. LIME will then train on the data using a linear white model that will explain the contribution of each token: te.fit(text, func)
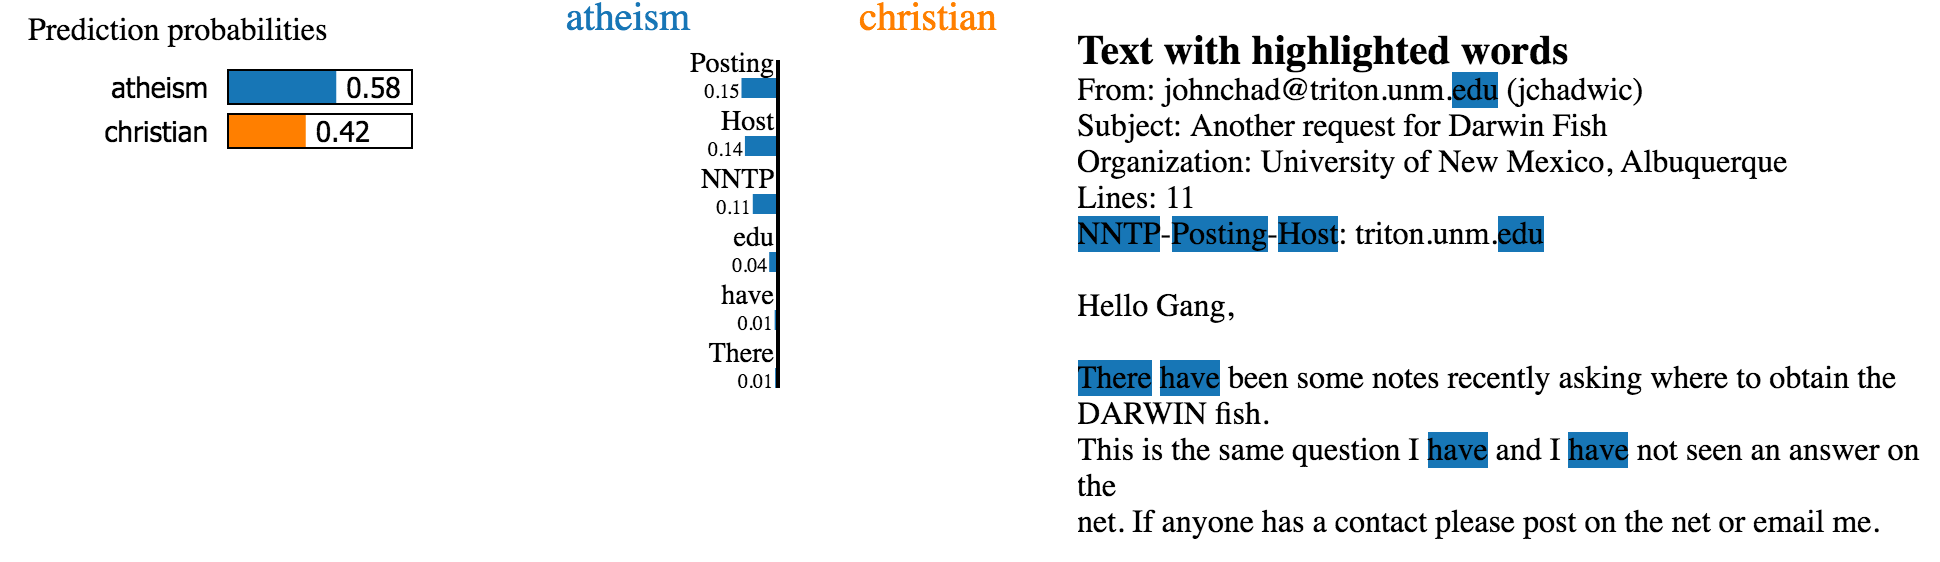
Let’s for example try to explain the label for the word "UI/UX" which has a word_index =4:
word_index = 4 #explain UI/UX labelfunc = explainer.get_predict_function(word_index)sampler = MaskingTextSampler(replacement="UNK",max_replace=0.7,token_pattern=None,bow=False)samples, similarity = sampler.sample_near(text, n_samples=4)print(samples)te = TextExplainer(sampler=sampler,position_dependent=True,random_state=42)te.fit(text, func)#the explainer needs just the one instance text from texts listexplain = te.explain_prediction(target_names=list(explainer.model.classes_),top_targets=3)print("WORD TO EXPLAIN", word_tokenize(text)[word_index])explainAnd here is the output:
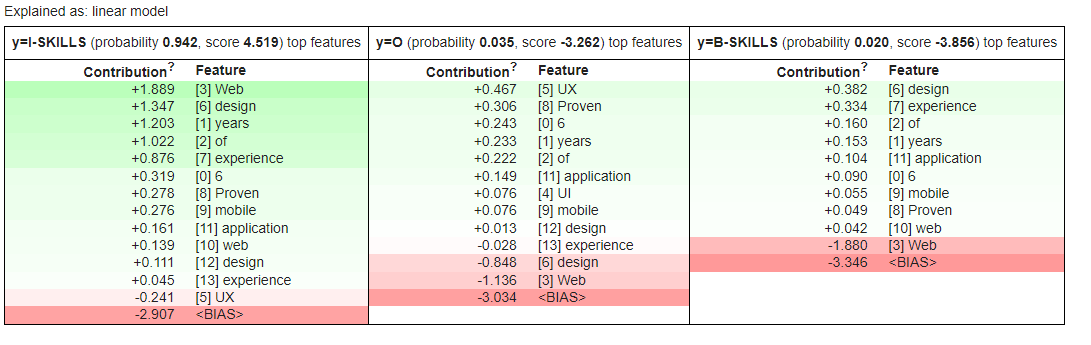
The green colors means the token has a positive contribution to the predicted label and red means it has negative contribution. The model correctly predicted, at 0.95 probability, that "UI/UX" is part of a multi-token skill I-SKILLS. The word "Web" was a strong indicator of the predicted label. In agreement with the first statement, the label B-SKILLS has a lower probability of 0.018 with the word "Web" having a strong negative contribution.
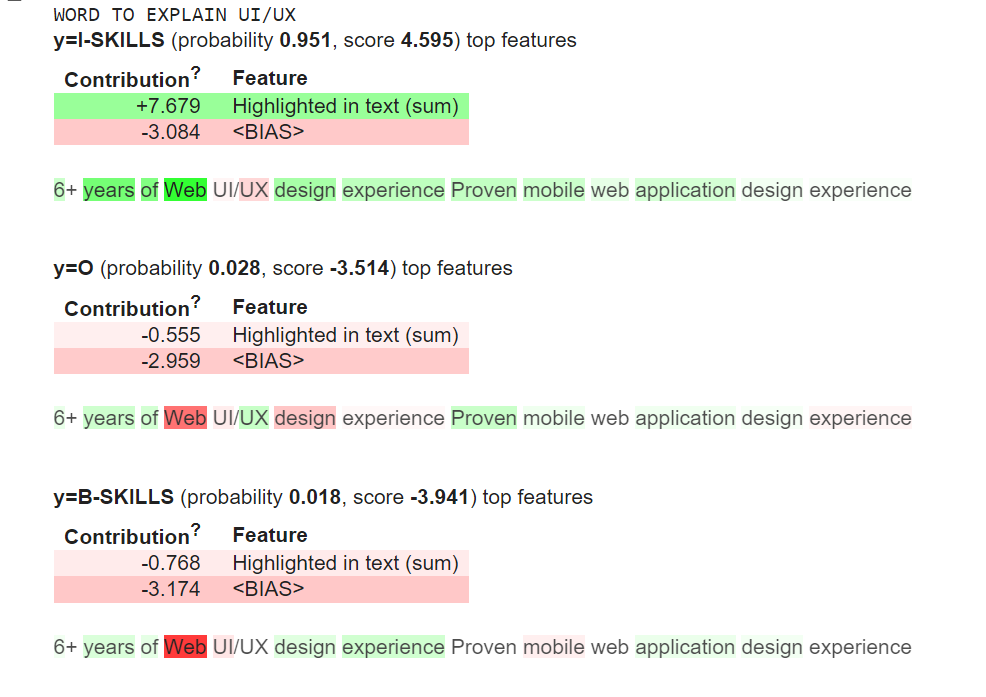
Lime also provides contribution per token which is pretty neat:
We notice that Web, design and years have the highest contribution to the predicted label I-SKILLS.
Conclusion:
As we move toward large and complex black-box AI models, understanding the decision-making process behind the predictions is of the utmost importance to be able to trust the model output.
In this tutorial, we show how to train a custom NER model and explain its output using LIME algorithm. LIME is model agnostic and can be applied to explain the output of any complex models whether its image recognition, text classification or NER as in this tutorial.
If you have any questions or want to create custom models for your specific case, leave a note below or send us an email at [email protected].
Follow us on Twitter @UBIAI5
Share This Article
Towards Data Science is a community publication. Submit your insights to reach our global audience and earn through the TDS Author Payment Program.
Write for TDS