
1. Overview
Multi-tenancy refers to an architecture in which a single instance of a software application serves multiple tenants or customers. It enables the required degree of isolation between tenants so that the data and resources used by tenants are separated from the others. In this tutorial, we’ll see how to configure multi-tenancy in a Spring Boot application with Spring Data JPA. Also, we add security to tenants using JWT.
2. Multi-Tenancy Models
There are three main approaches to multi-tenant systems:
- Separate Database
- Shared Database and Separate Schema
- Shared Database and Shared Schema
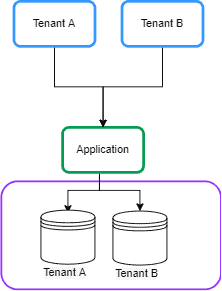
2.1. Separate Database
In this approach, each tenant’s data is kept in a separate database instance and is isolated from other tenants. This is also known as Database per Tenant: 👁 Separate Database
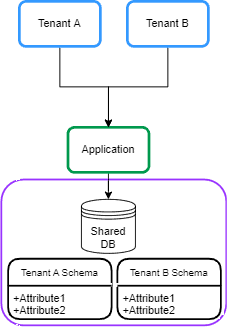
2.2. Shared Database and Separate Schema
In this approach, each tenant’s data is kept in a distinct schema on a shared database. This is sometimes called Schema per Tenant: 👁 separate schema
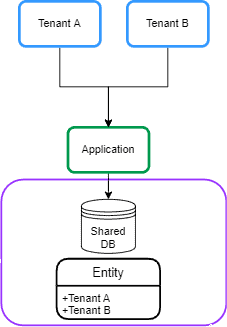
2.3. Shared Database and Shared Schema
In this approach, all tenants share a database, and every table has a column with the tenant identifier: 👁 shareddatabase
3. Maven Dependencies
Let’s start by declaring spring-boot-starter-data-jpa dependency in a Spring Boot application in the pom.xml:
<dependency>
 <groupId>org.springframework.boot</groupId>
 <artifactId>spring-boot-starter-data-jpa</artifactId>
</dependency>
Also, we’ll be using a PostgreSQL database, so let’s also add postgresql dependency to the pom.xml file:
<dependency>
 <groupId>org.postgresql</groupId>
 <artifactId>postgresql</artifactId>
 <scope>runtime</scope>
</dependency>
The Separate Database and Shared Database and Separate Schema approaches are similar in the configuration in a Spring Boot application. In this tutorial, we focus on the Separate Database approach.
4. Dynamic DataSource Routing
In this section, we’ll describe the general idea behind the Database per Tenant model.
4.1. AbstractRoutingDataSource
The general idea to implement multi-tenancy with Spring Data JPA is routing data sources at runtime based on the current tenant identifier. In order to do that, we can use AbstractRoutingDatasource to dynamically determine the actual DataSource based on the current tenant. Let’s create a MultitenantDataSource class that extends the AbstractRoutingDataSource class:
public class MultitenantDataSource extends AbstractRoutingDataSource {

 @Override
 protected String determineCurrentLookupKey() {
 return TenantContext.getCurrentTenant();
 }
}
The AbstractRoutingDataSource routes getConnection calls to one of the various target DataSources based on a lookup key. The lookup key is usually determined through some thread-bound transaction context. So, we create a TenantContext class for storing the current tenant in each request:
public class TenantContext {

 private static final ThreadLocal<String> CURRENT_TENANT = new ThreadLocal<>();

 public static String getCurrentTenant() {
 return CURRENT_TENANT.get();
 }

 public static void setCurrentTenant(String tenant) {
 CURRENT_TENANT.set(tenant);
 }
}
We use a ThreadLocal object for keeping the tenant ID for the current request. Also, we use the set method to store the tenant ID and the get() method to retrieve it.
4.2. Setting Tenant ID per Request
After this configuration setup, when we perform any tenant operation, we need to know the tenant ID before creating any transaction. So, we need to set the tenant ID in a Filter or Interceptor before hitting controller endpoints. Let’s add a TenantFilter for setting the current tenant in TenantContext:
@Component
@Order(1)
class TenantFilter implements Filter {

 @Override
 public void doFilter(ServletRequest request, ServletResponse response,
 FilterChain chain) throws IOException, ServletException {

 HttpServletRequest req = (HttpServletRequest) request;
 String tenantName = req.getHeader("X-TenantID");
 TenantContext.setCurrentTenant(tenantName);

 try {
 chain.doFilter(request, response);
 } finally {
 TenantContext.setCurrentTenant("");
 }
 }
}
In this filter, we get the tenant ID from the request header X-TenantID and set it in TenantContext. We pass control down the chain of filters. Our finally block ensures that the current tenant is reset before the next request. This avoids any risk of cross-tenant request contamination. In the next section, we’ll implement the tenants and data source declaration in the Database per Tenant model.
5. Database Approach
In this section, we’ll implement multi-tenancy based on a Database per Tenant model.
5.1. Tenants Declaration
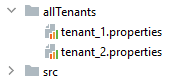
We have multiple databases in this approach, so we need to declare multiple data sources in the Spring Boot application. We can configure the DataSources in separate tenant files. So, we create the tenant_1.properties file in allTenants directory and declare the tenant’s data source:
name=tenant_1
datasource.url=jdbc:postgresql://localhost:5432/tenant1
datasource.username=postgres
datasource.password=123456
datasource.driver-class-name=org.postgresql.Driver
Moreover, we create a tenant_2.properties file for another tenant:
name=tenant_2
datasource.url=jdbc:postgresql://localhost:5432/tenant2
datasource.username=postgres
datasource.password=123456
datasource.driver-class-name=org.postgresql.Driver
We will end up with a file for each tenant: 👁 all tenants
5.2. DataSource Declaration
Now we need to read the tenant’s data and create DataSource using the DataSourceBuilder class. Also, we set DataSources in the AbstractRoutingDataSource class. Let’s add a MultitenantConfiguration class for that:
@Configuration
public class MultitenantConfiguration {

 @Value("${defaultTenant}")
 private String defaultTenant;

 @Bean
 @ConfigurationProperties(prefix = "tenants")
 public DataSource dataSource() {
 File[] files = Paths.get("allTenants").toFile().listFiles();
 Map<Object, Object> resolvedDataSources = new HashMap<>();

 for (File propertyFile : files) {
 Properties tenantProperties = new Properties();
 DataSourceBuilder dataSourceBuilder = DataSourceBuilder.create();

 try {
 tenantProperties.load(new FileInputStream(propertyFile));
 String tenantId = tenantProperties.getProperty("name");

 dataSourceBuilder.driverClassName(tenantProperties.getProperty("datasource.driver-class-name"));
 dataSourceBuilder.username(tenantProperties.getProperty("datasource.username"));
 dataSourceBuilder.password(tenantProperties.getProperty("datasource.password"));
 dataSourceBuilder.url(tenantProperties.getProperty("datasource.url"));
 resolvedDataSources.put(tenantId, dataSourceBuilder.build());
 } catch (IOException exp) {
 throw new RuntimeException("Problem in tenant datasource:" + exp);
 }
 }

 AbstractRoutingDataSource dataSource = new MultitenantDataSource();
 dataSource.setDefaultTargetDataSource(resolvedDataSources.get(defaultTenant));
 dataSource.setTargetDataSources(resolvedDataSources);

 dataSource.afterPropertiesSet();
 return dataSource;
 }

}
First, we read the tenants’ definitions from allTenants directory and create the DataSource bean using the DataSourceBuilder class. After that, we need to set a default data source and target source for the MultitenantDataSource class to connect to using setDefaultTargetDataSource and setTargetDataSources, respectively. We set one of the tenant’s names as a default data source from the application.properties file using defaultTenant attribute. To finalize the initialization of the data source, we call the afterPropertiesSet() method. Now that our setup is ready.
6. Test
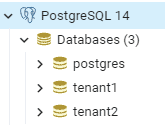
6.1. Creating Databases for Tenants
First, we need to define two databases in PostgreSQL: 👁 tenants-db
After that, we create an employee table in each database using the below script:
create table employee (id int8 generated by default as identity, name varchar(255), primary key (id));6.2. Sample Controller
Let’s create an EmployeeController class for creating and saving the Employee entity in the specified tenant in the request header:
@RestController
@Transactional
public class EmployeeController {

 @Autowired
 private EmployeeRepository employeeRepository;

 @PostMapping(path = "/employee")
 public ResponseEntity<?> createEmployee() {
 Employee newEmployee = new Employee();
 newEmployee.setName("Baeldung");
 employeeRepository.save(newEmployee);
 return ResponseEntity.ok(newEmployee);
 }
}
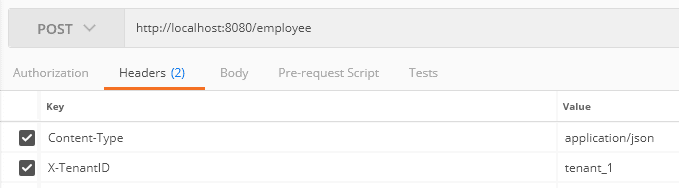
6.3. Sample Request
Let’s create a post request for inserting an employee entity in tenant ID tenant_1 using Postman: 👁 tenant 1
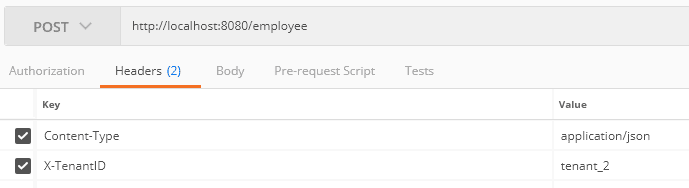
Moreover, we send a request to tenant_2: 👁 tenant2
After that, when we check the database, we see that each request has been saved in the related tenant’s database.
7. Security
Multi-tenancy should protect customers’ data within a shared environment. This means each tenant can only access their data. Therefore, we need to add security to our tenants. Let’s build a system where the user has to log into the application and get a JWT, which is then used to prove the right to access the tenancy.
7.1. Maven Dependencies
Let’s start by adding the spring-boot-starter-security dependency in the pom.xml:
<dependency>
 <groupId>org.springframework.boot</groupId>
 <artifactId>spring-boot-starter-security</artifactId>
</dependency>
Also, we need to generate and verify the JWT. To do that, we add the jjwt to our pom.xml:
<dependency>
 <groupId>io.jsonwebtoken</groupId>
 <artifactId>jjwt-api</artifactId>
 <version>0.12.3</version>
</dependency>
7.2. Security Configuration
First, we need to provide the authentication capability for the tenant’s user. For simplicity, let’s use the in-memory user declaration in the SecurityConfiguration class. Starting with Spring Security 5.7.0-M2 the class WebSecurityConfigurerAdapter was deprecated and is encouraged to move towards a component-based security configuration. Let’s create a bean with UserDetails:
@Bean
public InMemoryUserDetailsManager userDetailsService() {
 UserDetails user1 = User
 .withUsername("user")
 .password(passwordEncoder().encode("baeldung"))
 .roles("tenant_1")
 .build();

 UserDetails user2 = User
 .withUsername("admin")
 .password(passwordEncoder().encode("baeldung"))
 .roles("tenant_2")
 .build();
 return new InMemoryUserDetailsManager(user1, user2);
}
We added two users for two tenants. Moreover, we consider the tenant as a role. According to the above code, the username user and admin have access to tenant_1 and tenant_2, respectively. Now, we create a filter for the authentication of users. Let’s add the LoginFilter class:
public class LoginFilter extends AbstractAuthenticationProcessingFilter {

 public LoginFilter(String url, AuthenticationManager authManager) {
 super(new AntPathRequestMatcher(url));
 setAuthenticationManager(authManager);
 }

 @Override
 public Authentication attemptAuthentication(HttpServletRequest req, HttpServletResponse res)
 throws AuthenticationException, IOException, ServletException {

 AccountCredentials creds = new ObjectMapper().
 readValue(req.getInputStream(), AccountCredentials.class);

 return getAuthenticationManager().authenticate(
 new UsernamePasswordAuthenticationToken(creds.getUsername(),
 creds.getPassword(), Collections.emptyList())
 );
 }
The LoginFilter class extends AbstractAuthenticationProcessingFilter. The AbstractAuthenticationProcessingFilter intercepts a request and attempts to perform authentication using the attemptAuthentication() method. In this method, we map the user credentials to the AccountCredentials DTO class and authenticate the user against the in-memory authentication manager:
public class AccountCredentials {

 private String username;
 private String password;

 // getter and setter methods
}
7.3. JWT
Now we need to generate the JWT and add the tenant ID. To do that, we override successfulAuthentication() method. This method executes after successful authentication:
@Override
protected void successfulAuthentication(HttpServletRequest req, HttpServletResponse res,
 FilterChain chain, Authentication auth) throws IOException, ServletException {

 Collection<? extends GrantedAuthority> authorities = auth.getAuthorities();
 String tenant = "";
 for (GrantedAuthority gauth : authorities) {
 tenant = gauth.getAuthority();
 }

 AuthenticationService.addToken(res, auth.getName(), tenant.substring(5));
}
According to the above code, we get the user’s role and add it to the JWT. To do that, we create the AuthenticationService class and addToken() method:
public class AuthenticationService {

 private static final long EXPIRATIONTIME = 864_000_00; // 1 day in milliseconds
 private static final String SECRETKEY = "q3t6w9zCFJNcQfTjWnq3t6w9zCFJNcQfTjWnZr4u7xADGKaPd";
 private static final SecretKey SIGNINGKEY = Keys.hmacShaKeyFor(SECRETKEY.getBytes(StandardCharsets.UTF_8));
 private static final String PREFIX = "Bearer";

 public static void addToken(HttpServletResponse res, String username, String tenant) {
 String JwtToken = Jwts.builder()
 .subject(username)
 .audience().add(tenant).and()
 .issuedAt(new Date(System.currentTimeMillis()))
 .expiration(new Date(System.currentTimeMillis() + EXPIRATIONTIME))
 .signWith(SIGNINGKEY)
 .compact();
 res.addHeader("Authorization", PREFIX + " " + JwtToken);
 }
}
The addToken method generated the JWT that contains tenant ID as an audience claim and added it to the Authorization header in the response. Finally, we add the LoginFilter in SecurityConfiguration class. As we mentioned above regarding the deprecation of WebSecurityConfigurerAdapter. In this way, we will create a bean with all the configurations:
@Bean
public SecurityFilterChain filterChain(HttpSecurity http) throws Exception {
 final AuthenticationManager authenticationManager = authenticationManager(http.getSharedObject(AuthenticationConfiguration.class));
 http
 .authorizeHttpRequests(authorize ->
 authorize.requestMatchers("/login").permitAll().anyRequest().authenticated())
 .sessionManagement(securityContext -> securityContext.sessionCreationPolicy(SessionCreationPolicy.STATELESS))
 .addFilterBefore(new LoginFilter("/login", authenticationManager), UsernamePasswordAuthenticationFilter.class)
 .addFilterBefore(new AuthenticationFilter(), UsernamePasswordAuthenticationFilter.class)
 .csrf(csrf -> csrf.disable())
 .headers(header -> header.frameOptions(HeadersConfigurer.FrameOptionsConfig::disable))
 .httpBasic(Customizer.withDefaults());

 return http.build();
}
Moreover, we add the AuthenticationFilter class for setting the Authentication in the SecurityContextHolder class:
public class AuthenticationFilter extends GenericFilterBean {

 @Override
 public void doFilter(ServletRequest req, ServletResponse res, FilterChain chain)
 throws IOException, ServletException {

 Authentication authentication = AuthenticationService.getAuthentication((HttpServletRequest) req);
 SecurityContextHolder.getContext().setAuthentication(authentication);

 chain.doFilter(req, res);
 }
}
7.4. Getting Tenant ID from JWT
Let’s modify the TenantFilter for setting the current tenant in TenantContext:
String tenant = AuthenticationService.getTenant((HttpServletRequest) req);
TenantContext.setCurrentTenant(tenant);
In this situation, we get the tenant ID from the JWT using the getTenant() method from the AuthenticationService class:
public static String getTenant(HttpServletRequest req) {
 String token = req.getHeader("Authorization");
 if (token == null) {
 return null;
 }
 String tenant = Jwts.parser()
 .setSigningKey(SIGNINGKEY)
 .build().parseClaimsJws(token.replace(PREFIX, "").trim())
 .getBody()
 .getAudience()
 .iterator()
 .next();
 return tenant;
}
8. Security Test
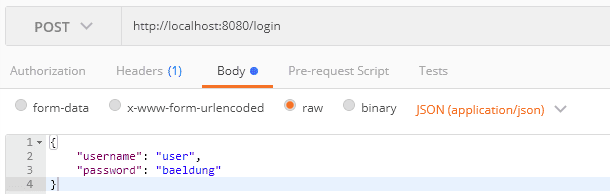
8.1. JWT Generation
Let’s generate the JWT for the username user. To do that, we post the credentials to /login endpoints: 👁 jwt
Let’s check the token:
eyJhbGciOiJIUzUxMiJ9.eyJzdWIiOiJ1c2VyIiwiYXVkIjoidGVuYW50XzEiLCJleHAiOjE2NTk2MDk1Njd9.When we decode the token, we find out the tenant ID sets as the audience claim:
{
 "sub": "user",
 "aud": [
 "tenant_1"
 ],
 "iat": 1705473402,
 "exp": 1705559802
}
8.2. Sample Request
Let’s create a post request for inserting an employee entity using the generated token: 👁 sample token for
We set the generated token in the Authorization header. The tenant ID has been extracted from the token and set in the TenantContext.
9. Conclusion
In this article, we looked at different multi-tenancy models. We described the required class for adding multi-tenancy in the Spring Boot application using Spring Data JPA for Separate Databases Shared Database and Separate Schema models. Then, we set up the required environment for testing the multi-tenancy in the PostgreSQL database. Finally, we added security to the tenants using JWT.