
eBook – Guide Spring Cloud – NPI EA (cat=Spring Cloud)
eBook – Mockito – NPI EA (tag = Mockito)
👁 announcement - icon
Mocking is an essential part of unit testing, and the Mockito library makes it easy to write clean and intuitive unit tests for your Java code.
Get started with mocking and improve your application tests using our Mockito guide:
eBook – Java Concurrency – NPI EA (cat=Java Concurrency)
👁 announcement - icon
Handling concurrency in an application can be a tricky process with many potential pitfalls. A solid grasp of the fundamentals will go a long way to help minimize these issues.
Get started with understanding multi-threaded applications with our Java Concurrency guide:
eBook – Reactive – NPI EA (cat=Reactive)
👁 announcement - icon
Spring 5 added support for reactive programming with the Spring WebFlux module, which has been improved upon ever since. Get started with the Reactor project basics and reactive programming in Spring Boot:
eBook – Java Streams – NPI EA (cat=Java Streams)
👁 announcement - icon
Since its introduction in Java 8, the Stream API has become a staple of Java development. The basic operations like iterating, filtering, mapping sequences of elements are deceptively simple to use.
But these can also be overused and fall into some common pitfalls.
To get a better understanding on how Streams work and how to combine them with other language features, check out our guide to Java Streams:
eBook – Jackson – NPI EA (cat=Jackson)
eBook – HTTP Client – NPI EA (cat=Http Client-Side)
eBook – Maven – NPI EA (cat = Maven)
eBook – Persistence – NPI EA (cat=Persistence)
eBook – RwS – NPI EA (cat=Spring MVC)
Course – LS – NPI EA (cat=Jackson)
👁 announcement - icon
Get started with Spring and Spring Boot, through the Learn Spring course:
>> LEARN SPRINGCourse – RWSB – NPI EA (cat=REST)
👁 announcement - icon
Explore Spring Boot 3 and Spring 6 in-depth through building a full REST API with the framework:
Course – LSS – NPI EA (cat=Spring Security)
👁 announcement - icon
Yes, Spring Security can be complex, from the more advanced functionality within the Core to the deep OAuth support in the framework.
I built the security material as two full courses - Core and OAuth, to get practical with these more complex scenarios. We explore when and how to use each feature and code through it on the backing project.
You can explore the course here:
Course – LSD – NPI EA (tag=Spring Data JPA)
👁 announcement - icon
Spring Data JPA is a great way to handle the complexity of JPA with the powerful simplicity of Spring Boot.
Get started with Spring Data JPA through the guided reference course:
Partner – Moderne – NPI EA (cat=Spring Boot)
👁 announcement - icon
Refactor Java code safely — and automatically — with OpenRewrite.
Refactoring big codebases by hand is slow, risky, and easy to put off. That’s where OpenRewrite comes in. The open-source framework for large-scale, automated code transformations helps teams modernize safely and consistently.
Each month, the creators and maintainers of OpenRewrite at Moderne run live, hands-on training sessions — one for newcomers and one for experienced users. You’ll see how recipes work, how to apply them across projects, and how to modernize code with confidence.
Join the next session, bring your questions, and learn how to automate the kind of work that usually eats your sprint time.
Course – LJB – NPI EA (cat = Core Java)
1. Overview
In this tutorial, we’ll introduce client-side service discovery via “Spring Cloud Netflix Eureka.”
Client-side service discovery allows services to find and communicate with each other without hard-coding the hostname and port. The only ‘fixed point’ in such an architecture is the service registry, with which each service has to register.
One drawback is that all clients must implement a certain logic to interact with this fixed point. This assumes an additional network round trip before the actual request.
With Netflix Eureka, each client can simultaneously act as a server to replicate its status to a connected peer. In other words, a client retrieves a list of all connected peers in a service registry, and makes all further requests to other services through a load-balancing algorithm.
To be informed about the presence of a client, they have to send a heartbeat signal to the registry.
To achieve the goal of this tutorial, we’ll implement three microservices:
- a service registry (Eureka Server)
- a REST service, which registers itself at the registry (Eureka Client)
- a web application, which is consuming the REST service as a registry-aware client (Spring Cloud Netflix Feign Client)
Further reading:
A Guide to Spring Cloud Netflix - Hystrix
The article shows how to set up a fallback in application logic using Spring Cloud Hystrix.Spring REST with a Zuul Proxy
Exploring the use of the Zuul proxy for a Spring REST API, working around CORS and the same-origin policy constraint of the browser.
2. Eureka Server
Implementing a Eureka Server for service registry is as easy as:
- adding spring-cloud-starter-netflix-eureka-server to the dependencies
- enabling the Eureka Server in a @SpringBootApplication by annotating it with @EnableEurekaServer
- configuring some properties
Let’s do it step by step.
First, we’ll create a new Maven project and put the dependencies in it. Notice that we’re importing the spring-cloud-starter-parent to all the projects described in this tutorial:
<dependency>
 <groupId>org.springframework.cloud</groupId>
 <artifactId>spring-cloud-starter-netflix-eureka-server</artifactId>
</dependency>

<dependencyManagement>
 <dependencies>
 <dependency>
 <groupId>org.springframework.cloud</groupId>
 <artifactId>spring-cloud-starter-parent</artifactId>
 <version>2023.0.0</version>
 <type>pom</type>
 <scope>import</scope>
 </dependency>
 </dependencies>
</dependencyManagement>
We can check the latest Spring Cloud releases in the Spring’s Projects documentation.
Then we’ll create the main application class:
@SpringBootApplication
@EnableEurekaServer
public class EurekaServerApplication {
 public static void main(String[] args) {
 SpringApplication.run(EurekaServerApplication.class, args);
 }
}
Finally, we’ll configure the properties in YAML format, so an application.yml will be our configuration file:
server:
 port: 8761
eureka:
 client:
 registerWithEureka: false
 fetchRegistry: false
Here we’re configuring an application port; the default one for Eureka servers is 8761. We’re telling the built-in Eureka Client not to register with itself because our application should be acting as a server.
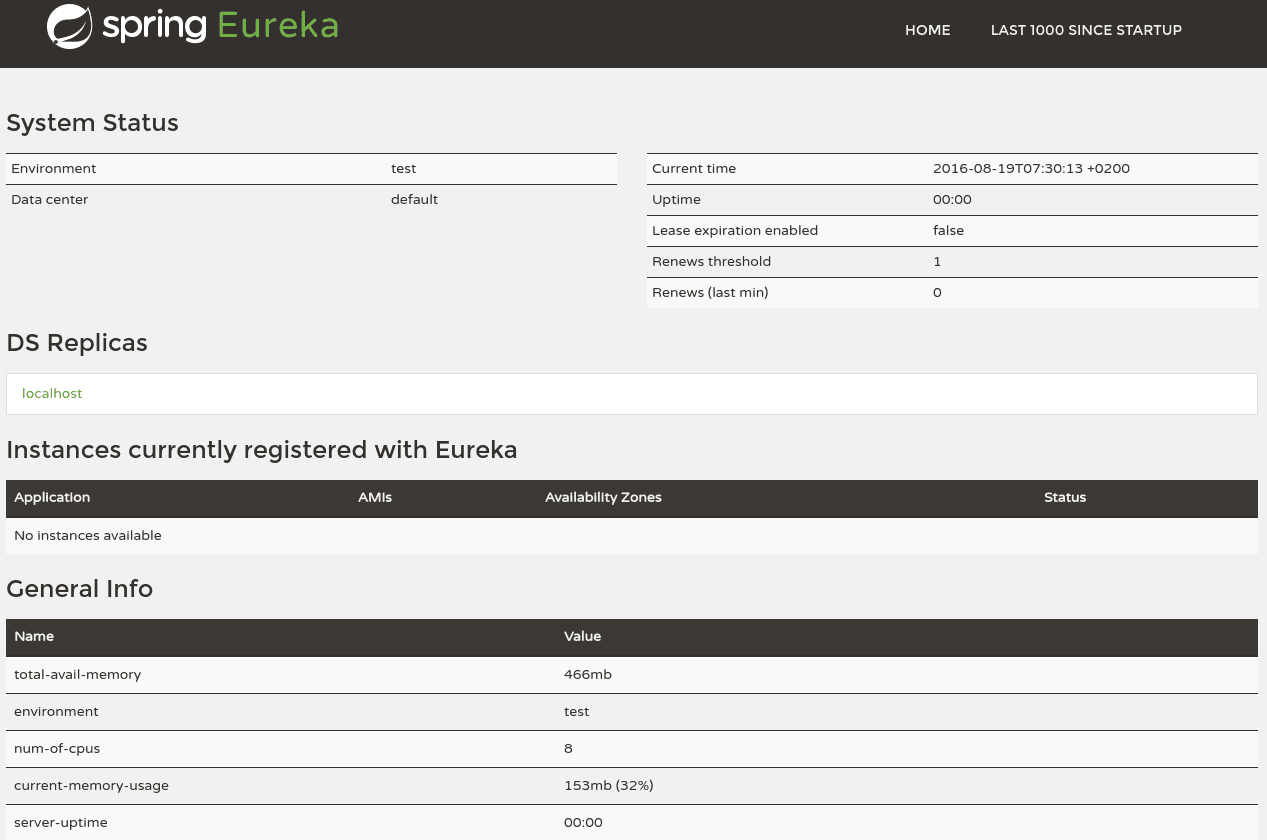
Now we’ll point our browser to http://localhost:8761 to view the Eureka dashboard, where we’ll later inspect the registered instances.
At the moment, we can see basic indicators, such as status and health indicators:
👁 Screenshot_20160819_073151
3. Eureka Client
For a @SpringBootApplication to be discovery-aware, we have to include a Spring Discovery Client (for example, spring-cloud-starter-netflix-eureka-client) into our classpath.
Then we need to annotate a @Configuration with either @EnableDiscoveryClient or @EnableEurekaClient. Note that this annotation is optional if we have the spring-cloud-starter-netflix-eureka-client dependency on the classpath.
The latter tells Spring Boot to use Spring Netflix Eureka for service discovery explicitly. To fill our client application with some sample-life, we’ll also include the spring-boot-starter-web package in the pom.xml and implement a REST controller.
But first, we’ll add the dependencies. Again, we can leave it to the spring-cloud-starter-parent dependency to figure out the artifact versions for us:
<dependency>
 <groupId>org.springframework.cloud</groupId>
 <artifactId>spring-cloud-starter-netflix-eureka-client</artifactId>
</dependency>
<dependency>
 <groupId>org.springframework.boot</groupId>
 <artifactId>spring-boot-starter-web</artifactId>
</dependency>
Here we’ll implement the main application class:
@SpringBootApplication
@RestController
public class EurekaClientApplication implements GreetingController {

 @Autowired
 @Lazy
 private EurekaClient eurekaClient;

 @Value("${spring.application.name}")
 private String appName;

 public static void main(String[] args) {
 SpringApplication.run(EurekaClientApplication.class, args);
 }

 @Override
 public String greeting() {
 return String.format(
 "Hello from '%s'!", eurekaClient.getApplication(appName).getName());
 }
}
And the GreetingController interface:
public interface GreetingController {
 @RequestMapping("/greeting")
 String greeting();
}
Instead of the interface, we could also simply declare the mapping inside the EurekaClientApplication class. The interface can be useful though if we want to share it between server and client.
Next, we have to set-up an application.yml with a configured Spring application name to uniquely identify our client in the list of registered applications.
We can let Spring Boot choose a random port for us because later we’ll access this service with its name.
Finally, we have to tell our client where it has to locate the registry:
spring:
 application:
 name: spring-cloud-eureka-client
server:
 port: 0
eureka:
 client:
 serviceUrl:
 defaultZone: ${EUREKA_URI:http://localhost:8761/eureka}
 instance:
 preferIpAddress: true
We decided to set up our Eureka Client this way because this kind of service should be easily scalable later on.
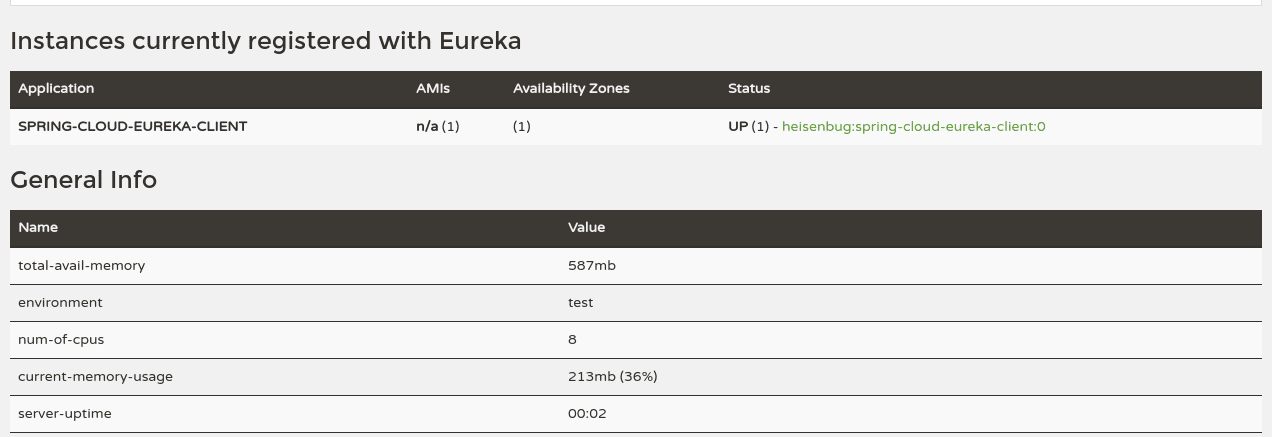
Now we’ll run the client, and point our browser to http://localhost:8761 again to see its registration status on the Eureka Dashboard. By using the Dashboard, we can do further configuration, like link the homepage of a registered client with the Dashboard for administrative purposes. The configuration options, however, are beyond the scope of this article:
👁 Screenshot_20160819_101810
4. Feign Client
To finalize our project with three dependent microservices, we’ll now implement a REST-consuming web application using Spring Netflix Feign Client.
Think of Feign as a discovery-aware Spring RestTemplate using interfaces to communicate with endpoints. These interfaces will be automatically implemented at runtime, and instead of service-urls, it’s using service-names.
Without Feign, we would have to autowire an instance of EurekaClient into our controller with which we could receive service-information by service-name as an Application object.
We would use this Application to get a list of all instances of this service, pick a suitable one, and then use this InstanceInfo to get the hostname and port. With this, we could do a standard request with any http client:
@Autowired
private EurekaClient eurekaClient;

@RequestMapping("/get-greeting-no-feign")
public String greeting(Model model) {

 InstanceInfo service = eurekaClient
 .getApplication(spring-cloud-eureka-client)
 .getInstances()
 .get(0);

 String hostName = service.getHostName();
 int port = service.getPort();

 // ...
}
A RestTemplate can also be used to access Eureka client-services by name, but this topic is beyond this article.
To set up our Feign Client project, we’ll add the following four dependencies to its pom.xml:
<dependency>
 <groupId>org.springframework.cloud</groupId>
 <artifactId>spring-cloud-starter-feign</artifactId>
</dependency>
<dependency>
 <groupId>org.springframework.cloud</groupId>
 <artifactId>spring-cloud-starter-netflix-eureka-client</artifactId>
</dependency>
<dependency>
 <groupId>org.springframework.boot</groupId>
 <artifactId>spring-boot-starter-web</artifactId>
</dependency>
<dependency>
 <groupId>org.springframework.boot</groupId>
 <artifactId>spring-boot-starter-thymeleaf</artifactId>
</dependency>
The Feign Client is located in the spring-cloud-starter-feign package. To enable it, we have to annotate a @Configuration with @EnableFeignClients. To use it, we simply annotate an interface with @FeignClient(“service-name”) and auto-wire it into a controller.
A good method for creating such Feign Clients is to create interfaces with @RequestMapping annotated methods and put them into a separate module. This way they can be shared between server and client. On the server-side, we can implement them as @Controller, and on the client-side, they can be extended and annotated as @FeignClient.
Furthermore, the spring-cloud-starter-eureka package needs to be included in the project and enabled by annotating the main application class with @EnableEurekaClient.
The spring-boot-starter-web and spring-boot-starter-thymeleaf dependencies are used to present a view containing fetched data from our REST service.
This will be our Feign Client interface:
@FeignClient("spring-cloud-eureka-client")
public interface GreetingClient {
 @RequestMapping("/greeting")
 String greeting();
}
Here we’ll implement the main application class, which simultaneously acts as a controller:
@SpringBootApplication
@EnableFeignClients
@Controller
public class FeignClientApplication {
 @Autowired
 private GreetingClient greetingClient;

 public static void main(String[] args) {
 SpringApplication.run(FeignClientApplication.class, args);
 }

 @RequestMapping("/get-greeting")
 public String greeting(Model model) {
 model.addAttribute("greeting", greetingClient.greeting());
 return "greeting-view";
 }
}
This will be the HTML template for our view:
<!DOCTYPE html>
<html xmlns:th="http://www.thymeleaf.org">
 <head>
 <title>Greeting Page</title>
 </head>
 <body>
 <h2 th:text="${greeting}"/>
 </body>
</html>
The application.yml configuration file is almost the same as in the previous step:
spring:
 application:
 name: spring-cloud-eureka-feign-client
server:
 port: 8080
eureka:
 client:
 serviceUrl:
 defaultZone: ${EUREKA_URI:http://localhost:8761/eureka}
Now we can build and run this service. Finally, we’ll point our browser to http://localhost:8080/get-greeting and it should display something like the following:
Hello from SPRING-CLOUD-EUREKA-CLIENT!5. ‘TransportException: Cannot Execute Request on Any Known Server’
While running Eureka servers, we often run into exceptions like:
com.netflix.discovery.shared.transport.TransportException: Cannot execute request on any known serverBasically, this happens due to the wrong configuration in application.properties or application.yml. Eureka provides two properties for the client that can be configurable:
- registerWithEureka: If we set this property as true, then while the server starts, the inbuilt client will try to register itself with the Eureka server.
- fetchRegistry: If we configure this property as true, the inbuilt client will try to fetch the Eureka registry.
Now when we start up the Eureka server, we don’t want to register the inbuilt client to configure itself with the server.
If we mark the above properties as true (or just don’t configure them, as they’re true by default), then while starting the server, the inbuilt client tries to register itself with the Eureka server and also tries to fetch the registry, which isn’t available yet. As a result, we get TransportException.
So we should never configure these properties as true in the Eureka server applications. The correct settings that should be put in application.yml are:
eureka:
 client:
 registerWithEureka: false
 fetchRegistry: false
6. Conclusion
In this article, we learned how to implement a service registry using Spring Netflix Eureka Server and register some Eureka Clients with it.
Since our Eureka Client from step 3 listens on a randomly chosen port, it doesn’t know its location without the information from the registry. With a Feign Client and our registry, we can locate and consume the REST service, even when the location changes.
Finally, we saw the big picture of using service discovery in a microservice architecture.
The code backing this article is available on GitHub. Once you're logged in as a Baeldung Pro Member, start learning and coding on the project.