👁 announcement - icon
If you're working on a Spring Security (and especially an OAuth) implementation, definitely have a look at the Learn Spring Security course:
>> LEARN SPRING SECURITY |
VOOZH | about |
Mocking is an essential part of unit testing, and the Mockito library makes it easy to write clean and intuitive unit tests for your Java code.
Get started with mocking and improve your application tests using our Mockito guide:
Handling concurrency in an application can be a tricky process with many potential pitfalls. A solid grasp of the fundamentals will go a long way to help minimize these issues.
Get started with understanding multi-threaded applications with our Java Concurrency guide:
Spring 5 added support for reactive programming with the Spring WebFlux module, which has been improved upon ever since. Get started with the Reactor project basics and reactive programming in Spring Boot:
Since its introduction in Java 8, the Stream API has become a staple of Java development. The basic operations like iterating, filtering, mapping sequences of elements are deceptively simple to use.
But these can also be overused and fall into some common pitfalls.
To get a better understanding on how Streams work and how to combine them with other language features, check out our guide to Java Streams:
Get started with Spring and Spring Boot, through the Learn Spring course:
>> LEARN SPRINGExplore Spring Boot 3 and Spring 6 in-depth through building a full REST API with the framework:
Yes, Spring Security can be complex, from the more advanced functionality within the Core to the deep OAuth support in the framework.
I built the security material as two full courses - Core and OAuth, to get practical with these more complex scenarios. We explore when and how to use each feature and code through it on the backing project.
You can explore the course here:
Spring Data JPA is a great way to handle the complexity of JPA with the powerful simplicity of Spring Boot.
Get started with Spring Data JPA through the guided reference course:
Refactor Java code safely — and automatically — with OpenRewrite.
Refactoring big codebases by hand is slow, risky, and easy to put off. That’s where OpenRewrite comes in. The open-source framework for large-scale, automated code transformations helps teams modernize safely and consistently.
Each month, the creators and maintainers of OpenRewrite at Moderne run live, hands-on training sessions — one for newcomers and one for experienced users. You’ll see how recipes work, how to apply them across projects, and how to modernize code with confidence.
Join the next session, bring your questions, and learn how to automate the kind of work that usually eats your sprint time.
Spring Security 5 introduces a new OAuth2LoginConfigurer class that we can use for configuring an external Authorization Server.
In this tutorial, we’ll explore some of the various configuration options available for the oauth2Login() element.
In a Spring Boot project, we just need to add the starter spring-boot-starter-oauth2-client:
<dependency>
 <groupId>org.springframework.boot</groupId>
 <artifactId>spring-boot-starter-oauth2-client</artifactId>
 <version>2.3.3.RELEASE</version>
</dependency>
In a non-Boot project, in addition to the standard Spring and Spring Security dependencies, we’ll also need to explicitly add the spring-security-oauth2-client and spring-security-oauth2-jose dependencies:
<dependency>
 <groupId>org.springframework.security</groupId>
 <artifactId>spring-security-oauth2-client</artifactId>
 <version>5.3.4.RELEASE</version>
</dependency>
<dependency>
 <groupId>org.springframework.security</groupId>
 <artifactId>spring-security-oauth2-jose</artifactId>
 <version>5.3.4.RELEASE</version>
</dependency>In a Spring Boot project, all we need to do is add a few standard properties for each client we want to configure.
Let’s set up our project for login with clients registered with Google and Facebook as authentication providers.
To obtain client credentials for Google OAuth2 authentication, head on over to the Google API Console, “Credentials” section.
Here we’ll create credentials of type “OAuth2 Client ID” for our web application. This results in Google setting up a client id and secret for us.
We also have to configure an authorized redirect URI in the Google Console, which is the path that users will be redirected to after they successfully log in with Google.
By default, Spring Boot configures this redirect URI as /login/oauth2/code/{registrationId}.
So, for Google we’ll add this URI:
http://localhost:8081/login/oauth2/code/googleTo obtain the client credentials for authentication with Facebook, we need to register an application on the Facebook for Developers website and set up the corresponding URI as a “Valid OAuth redirect URI”:
http://localhost:8081/login/oauth2/code/facebookNext, we need to add the client credentials to the application.properties file.
The Spring Security properties are prefixed with spring.security.oauth2.client.registration followed by the client name and then the name of the client property:
spring.security.oauth2.client.registration.google.client-id=<your client id>
spring.security.oauth2.client.registration.google.client-secret=<your client secret>

spring.security.oauth2.client.registration.facebook.client-id=<your client id>
spring.security.oauth2.client.registration.facebook.client-secret=<your client secret>
Adding these properties for at least one client will enable the Oauth2ClientAutoConfiguration class, which sets up all the necessary beans.
The automatic web security configuration is equivalent to defining a simple oauth2Login() element:
@Configuration
public class SecurityConfig {

 @Bean
 public SecurityFilterChain filterChain(HttpSecurity http) throws Exception {
 http.authorizeRequests()
 .anyRequest().authenticated()
 .and()
 .oauth2Login();
 return http.build();
 }
}
Here we can see the oauth2Login() element is used in a similar manner to already known httpBasic() and formLogin() elements.
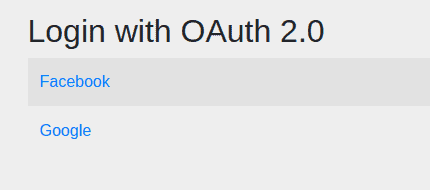
Now, when we try to access a protected URL, the application will display an auto-generated login page with two clients:
👁 oauth login defaultNote that the Spring Security project also contains default configurations for GitHub and Okta in addition to Google and Facebook. These default configurations provide all the necessary information for authentication, which is what allows us to only enter the client credentials.
If we want to use a different authentication provider not configured in Spring Security, we’ll need to define the full configuration, with information such as authorization URI and token URI. Here’s a look at the default configurations in Spring Security to get an idea of the properties needed.
If we’re not working with a Spring Boot application, we’ll need to define a ClientRegistrationRepository bean that contains an internal representation of the client information owned by the authorization server:
@Configuration
@EnableWebSecurity
@PropertySource("classpath:application.properties")
public class SecurityConfig {
 private static List<String> clients = Arrays.asList("google", "facebook");

 @Bean
 public ClientRegistrationRepository clientRegistrationRepository() {
 List<ClientRegistration> registrations = clients.stream()
 .map(c -> getRegistration(c))
 .filter(registration -> registration != null)
 .collect(Collectors.toList());

 return new InMemoryClientRegistrationRepository(registrations);
 }
}
Here we’re creating an InMemoryClientRegistrationRepository with a list of ClientRegistration objects.
Let’s see the getRegistration() method that builds these objects:
private static String CLIENT_PROPERTY_KEY
 = "spring.security.oauth2.client.registration.";

@Autowired
private Environment env;

private ClientRegistration getRegistration(String client) {
 String clientId = env.getProperty(
 CLIENT_PROPERTY_KEY + client + ".client-id");

 if (clientId == null) {
 return null;
 }

 String clientSecret = env.getProperty(
 CLIENT_PROPERTY_KEY + client + ".client-secret");

 if (client.equals("google")) {
 return CommonOAuth2Provider.GOOGLE.getBuilder(client)
 .clientId(clientId).clientSecret(clientSecret).build();
 }
 if (client.equals("facebook")) {
 return CommonOAuth2Provider.FACEBOOK.getBuilder(client)
 .clientId(clientId).clientSecret(clientSecret).build();
 }
 return null;
}
Here we’re reading the client credentials from a similar application.properties file. Then we use the CommonOauth2Provider enum already defined in Spring Security for the rest of the client properties for Google and Facebook clients.
Each ClientRegistration instance corresponds to a client.
Finally, we have to create an OAuth2AuthorizedClientService bean based on the ClientRegistrationRepository bean and register both with the oauth2Login() element:
@Bean
public SecurityFilterChain filterChain(HttpSecurity http) throws Exception {
 http.authorizeRequests().anyRequest().authenticated()
 .and()
 .oauth2Login()
 .clientRegistrationRepository(clientRegistrationRepository())
 .authorizedClientService(authorizedClientService());
 return http.build();
}

@Bean
public OAuth2AuthorizedClientService authorizedClientService() {

 return new InMemoryOAuth2AuthorizedClientService(
 clientRegistrationRepository());
}
As we can see, we can use the clientRegistrationRepository() method of oauth2Login() to register a custom registration repository.
We’ll also have to define a custom login page, as it won’t be automatically generated anymore. We’ll see more information on this in the next section.
Let’s continue with further customization of our login process.
There are several elements that the OAuth 2 process uses and that we can customize with oauth2Login() methods.
Note that all these elements have default configurations in Spring Boot and explicit configuration isn’t required.
Let’s see how we can customize these in our configuration.
Even though Spring Boot generates a default login page for us, we’ll usually want to define our own customized page.
Let’s start with configuring a new login URL for the oauth2Login() element by using the loginPage() method:
@Bean
public SecurityFilterChain filterChain(HttpSecurity http) throws Exception {
 http.authorizeRequests()
 .antMatchers("/oauth_login")
 .permitAll()
 .anyRequest()
 .authenticated()
 .and()
 .oauth2Login()
 .loginPage("/oauth_login");
 return http.build();
}
Here we’ve set up our login URL to be /oauth_login.
Next, let’s define a LoginController with a method that maps to this URL:
@Controller
public class LoginController {

 private static String authorizationRequestBaseUri
 = "oauth2/authorization";
 Map<String, String> oauth2AuthenticationUrls
 = new HashMap<>();

 @Autowired
 private ClientRegistrationRepository clientRegistrationRepository;

 @GetMapping("/oauth_login")
 public String getLoginPage(Model model) {
 // ...

 return "oauth_login";
 }
}
This method has to send a map of the clients available and their authorization endpoints to the view, which we’ll obtain from the ClientRegistrationRepository bean:
public String getLoginPage(Model model) {
Iterable<ClientRegistration> clientRegistrations = null;
ResolvableType type = ResolvableType.forInstance(clientRegistrationRepository)
.as(Iterable.class);
if (type != ResolvableType.NONE &&
ClientRegistration.class.isAssignableFrom(type.resolveGenerics()[0])) {
clientRegistrations = (Iterable<ClientRegistration>) clientRegistrationRepository;
}
clientRegistrations.forEach(registration ->
oauth2AuthenticationUrls.put(registration.getClientName(),
authorizationRequestBaseUri + "/" + registration.getRegistrationId()));
model.addAttribute("urls", oauth2AuthenticationUrls);
return "oauth_login";
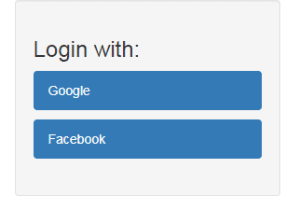
}Finally, we need to define our oauth_login.html page:
<h3>Login with:</h3>
<p th:each="url : ${urls}">
 <a th:text="${url.key}" th:href="${url.value}">Client</a>
</p>
This is a simple HTML page that displays links to authenticate with each client.
After adding some styling to it, we can change the look of the login page:
👁 loginWe can control the post-authentication behavior with different methods:
Let’s see how we can set custom URLs to redirect the user to:
.oauth2Login()
 .defaultSuccessUrl("/loginSuccess")
 .failureUrl("/loginFailure");
If the user visited a secured page before authenticating, they will be redirected to that page after logging in. Otherwise, they will be redirected to /loginSuccess.
If we want the user to always be sent to the /loginSuccess URL regardless if they were on a secured page before or not, we can use the method defaultSuccessUrl(“/loginSuccess”, true).
To use a custom handler, we would have to create a class that implements the AuthenticationSuccessHandler or AuthenticationFailureHandler interfaces, override the inherited methods and then set the beans using the successHandler() and failureHandler() methods.
The authorization endpoint is the endpoint that Spring Security uses to trigger an authorization request to the external server.
First, let’s set new properties for the authorization endpoint:
.oauth2Login()
 .authorizationEndpoint()
 .baseUri("/oauth2/authorize-client")
 .authorizationRequestRepository(authorizationRequestRepository());
Here we’ve modified the baseUri to /oauth2/authorize-client instead of the default /oauth2/authorization.
We’re also explicitly setting an authorizationRequestRepository() bean that we have to define:
@Bean
public AuthorizationRequestRepository<OAuth2AuthorizationRequest>
 authorizationRequestRepository() {

 return new HttpSessionOAuth2AuthorizationRequestRepository();
}
We’ve used the Spring-provided implementation for our bean, but we could also provide a custom one.
The token endpoint processes access tokens.
Let’s explicitly configure the tokenEndpoint() with the default response client implementation:
.oauth2Login()
 .tokenEndpoint()
 .accessTokenResponseClient(accessTokenResponseClient());
And here’s the response client bean:
@Bean
public OAuth2AccessTokenResponseClient<OAuth2AuthorizationCodeGrantRequest>
 accessTokenResponseClient() {

 return new NimbusAuthorizationCodeTokenResponseClient();
}
This configuration is the same as the default one, and it uses the Spring implementation, which is based on exchanging an authorization code with the provider.
Of course, we could also substitute a custom response client.
This is the endpoint to redirect to after authentication with the external provider.
Let’s see how we can change the baseUri for the redirection endpoint:
.oauth2Login()
 .redirectionEndpoint()
 .baseUri("/oauth2/redirect")
The default URI is login/oauth2/code.
Note that if we change it, we also have to update the redirectUriTemplate property of each ClientRegistration and add the new URI as an authorized redirect URI for each client.
The user info endpoint is the location we can leverage to obtain user information.
We can customize this endpoint using the userInfoEndpoint() method. For this, we can use methods such as userService() and customUserType() to modify the way user information is retrieved.
A common task we may want to achieve is finding information about the logged-in user. For this, we can make a request to the user information endpoint.
First, we’ll have to get the client corresponding to the current user token:
@Autowired
private OAuth2AuthorizedClientService authorizedClientService;

@GetMapping("/loginSuccess")
public String getLoginInfo(Model model, OAuth2AuthenticationToken authentication) {
 OAuth2AuthorizedClient client = authorizedClientService
 .loadAuthorizedClient(
 authentication.getAuthorizedClientRegistrationId(),
 authentication.getName());
 //...
 return "loginSuccess";
}
Next, we’ll send a request to the client’s user info endpoint and retrieve the userAttributes Map:
String userInfoEndpointUri = client.getClientRegistration()
 .getProviderDetails().getUserInfoEndpoint().getUri();

if (!StringUtils.isEmpty(userInfoEndpointUri)) {
 RestTemplate restTemplate = new RestTemplate();
 HttpHeaders headers = new HttpHeaders();
 headers.add(HttpHeaders.AUTHORIZATION, "Bearer " + client.getAccessToken()
 .getTokenValue());
 HttpEntity entity = new HttpEntity("", headers);
 ResponseEntity <map>response = restTemplate
 .exchange(userInfoEndpointUri, HttpMethod.GET, entity, Map.class);
 Map userAttributes = response.getBody();
 model.addAttribute("name", userAttributes.get("name"));
}
By adding the name property as a Model attribute, we can display it in the loginSuccess view as a welcome message to the user:
👁 welcomeBesides the name, the userAttributes Map also contains properties such as email, family_name, picture and locale.
In this article, we saw how to use the oauth2Login() element in Spring Security to authenticate with different providers such as Google and Facebook.
We also went through some common scenarios of customizing this process.
Baeldung Pro comes with both absolutely No-Ads as well as finally with Dark Mode, for a clean learning experience:
Once the early-adopter seats are all used, the price will go up and stay at $33/year.
The Apache HTTP Client is a very robust library, suitable for both simple and advanced use cases when testing HTTP endpoints. Check out our guide covering basic request and response handling, as well as security, cookies, timeouts, and more:
Handling concurrency in an application can be a tricky process with many potential pitfalls. A solid grasp of the fundamentals will go a long way to help minimize these issues.
Get started with understanding multi-threaded applications with our Java Concurrency guide:
Since its introduction in Java 8, the Stream API has become a staple of Java development. The basic operations like iterating, filtering, mapping sequences of elements are deceptively simple to use.
But these can also be overused and fall into some common pitfalls.
To get a better understanding on how Streams work and how to combine them with other language features, check out our guide to Java Streams:
Get started with Spring Boot and with core Spring, through the Learn Spring course:
Modern Java teams move fast — but codebases don’t always keep up. Frameworks change, dependencies drift, and tech debt builds until it starts to drag on delivery. OpenRewrite was built to fix that: an open-source refactoring engine that automates repetitive code changes while keeping developer intent intact.
The monthly training series, led by the creators and maintainers of OpenRewrite at Moderne, walks through real-world migrations and modernization patterns. Whether you’re new to recipes or ready to write your own, you’ll learn practical ways to refactor safely and at scale.
If you’ve ever wished refactoring felt as natural — and as fast — as writing code, this is a good place to start.