👁 announcement - icon
If you're working on a Spring Security (and especially an OAuth) implementation, definitely have a look at the Learn Spring Security course:
>> LEARN SPRING SECURITY |
VOOZH | about |
Mocking is an essential part of unit testing, and the Mockito library makes it easy to write clean and intuitive unit tests for your Java code.
Get started with mocking and improve your application tests using our Mockito guide:
Handling concurrency in an application can be a tricky process with many potential pitfalls. A solid grasp of the fundamentals will go a long way to help minimize these issues.
Get started with understanding multi-threaded applications with our Java Concurrency guide:
Spring 5 added support for reactive programming with the Spring WebFlux module, which has been improved upon ever since. Get started with the Reactor project basics and reactive programming in Spring Boot:
Since its introduction in Java 8, the Stream API has become a staple of Java development. The basic operations like iterating, filtering, mapping sequences of elements are deceptively simple to use.
But these can also be overused and fall into some common pitfalls.
To get a better understanding on how Streams work and how to combine them with other language features, check out our guide to Java Streams:
Get started with Spring and Spring Boot, through the Learn Spring course:
>> LEARN SPRINGExplore Spring Boot 3 and Spring 6 in-depth through building a full REST API with the framework:
Yes, Spring Security can be complex, from the more advanced functionality within the Core to the deep OAuth support in the framework.
I built the security material as two full courses - Core and OAuth, to get practical with these more complex scenarios. We explore when and how to use each feature and code through it on the backing project.
You can explore the course here:
Spring Data JPA is a great way to handle the complexity of JPA with the powerful simplicity of Spring Boot.
Get started with Spring Data JPA through the guided reference course:
Refactor Java code safely — and automatically — with OpenRewrite.
Refactoring big codebases by hand is slow, risky, and easy to put off. That’s where OpenRewrite comes in. The open-source framework for large-scale, automated code transformations helps teams modernize safely and consistently.
Each month, the creators and maintainers of OpenRewrite at Moderne run live, hands-on training sessions — one for newcomers and one for experienced users. You’ll see how recipes work, how to apply them across projects, and how to modernize code with confidence.
Join the next session, bring your questions, and learn how to automate the kind of work that usually eats your sprint time.
In this tutorial, we’ll show how to externalize Spring Security’s authorization decisions to OPA – the Open Policy Agent.
A common requirement across applications is to have the ability to make certain decisions based on a policy. When this policy is simple enough and unlikely to change, we can implement this policy directly in code, which is the most common scenario.
However, there are other cases where we need more flexibility. Access control decisions are typical: as the application grows in complexity, granting access to a given functionality might depend not only on who you are but also on other contextual aspects of the request. Those aspects might include the IP address, time of day, and login authentication method (ex: “remember me”, OTP), among others.
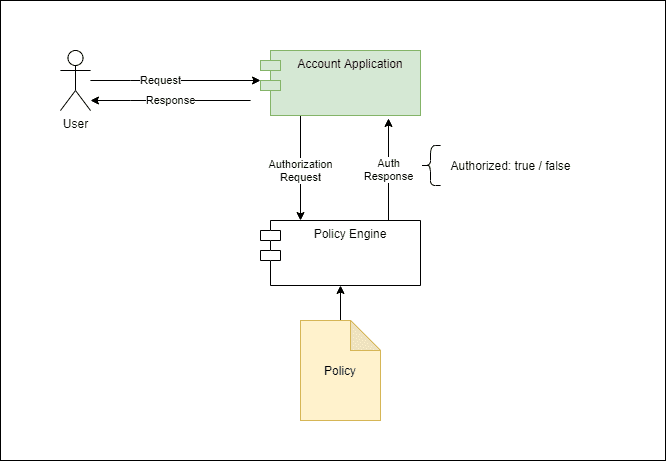
Moreover, the rules compounding that contextual information with the user’s identity should be easy to change, preferably with no application downtime. This requirement naturally leads to an architecture where a dedicated service handles policy evaluation requests.
👁 bael 5584 spring opa Page 1Here, the tradeoff for this flexibility is the added complexity and the performance penalty incurred for making the call to the external service. On the other hand, we can evolve or even replace the authorization service entirely without affecting the application. Furthermore, we can share this service with multiple applications, thus allowing a consistent authorization model across them.
The Open Policy Agent, or OPA for short, is an open-source policy evaluation engine implemented in Go. Styra first developed this project, but it is now a CNCF-graduated project. Here’s a list of some typical uses of this tool:
Installing OPA is quite simple: see their official documentation for the most recent version. Additionally, we’ll make it available by putting it on the operating system’s PATH variable. We can verify it’s correctly installed with a simple command:
$ opa version
Version: 0.39.0
Build Commit: cc965f6
Build Timestamp: 2022-03-31T12:34:56Z
Build Hostname: 5aba1d393f31
Go Version: go1.18
Platform: windows/amd64
WebAssembly: available
OPA evaluates policies written in REGO, a declarative language optimized to run queries on complex object structures. Client applications then use the result of those queries according to the specific use case. In our case, the object structure is an authorization request, and we’ll use the policy to query the result to grant access to a given functionality.
It is important to notice that OPA’s policies are generic and not tied in any way to express authorization decisions. In fact, we can use it in other scenarios that traditionally are dominated by rule engines like Drools and others.
This is what a simple authorization policy written in REGO looks like:
package baeldung.auth.account

# Not authorized by default
default authorized = false

authorized = true {
 count(deny) == 0
 count(allow) > 0
}

# Allow access to /public
allow["public"] {
 regex.match("^/public/.*",input.uri)
}

# Account API requires authenticated user
deny["account_api_authenticated"] {
 regex.match("^/account/.*",input.uri)
 regex.match("ANONYMOUS",input.principal)
}

# Authorize access to account
allow["account_api_authorized"] {
 regex.match("^/account/.+",input.uri)
 parts := split(input.uri,"/")
 account := parts[2]
 role := concat(":",[ "ROLE_account", "read", account] )
 role == input.authorities[i]
}
The first thing to notice is the package statement. OPA policies use packages to organize rules, and they also play a key role when evaluating incoming requests, as we’ll show later. We can organize policy files across multiple directories.
Next, we define the actual policy rules:
A complete description of OPA’s policy language is beyond the scope of this article, but the rules themselves are not hard to read. There are a few things to keep in mind when looking at them:
Other than that, OPA comes with a rich built-in function library optimized for querying deeply nested data structures, along with more familiar features such as string manipulation, collections, and so forth.
Let’s use the policy defined in the previous section to evaluate an authorization request. In our case, we’ll build this authorization request using a JSON structure containing some pieces from the incoming request:
{
 "input": {
 "principal": "user1",
 "authorities": ["ROLE_account:read:0001"],
 "uri": "/account/0001",
 "headers": {
 "WebTestClient-Request-Id": "1",
 "Accept": "application/json"
 }
 }
}
Notice that we’ve wrapped the request attributes in a single input object. This object becomes the input variable during the policy evaluation, and we can access its properties using a JavaScript-like syntax.
To test if our policy works as expected, let’s run OPA locally in server mode and manually submit some test requests:
$ opa run -w -s src/test/regoThe option -s enables running in server mode, while -w enables automatic rule file reloading. The src/test/rego is the folder containing policy files from our sample code. Once running, OPA will listen for API requests on local port 8181. If needed, we can change the default port using the -a option.
Now, we can use curl or some other tool to send the request:
$ curl --location --request POST 'http://localhost:8181/v1/data/baeldung/auth/account' \
--header 'Content-Type: application/json' \
--data-raw '{
 "input": {
 "principal": "user1",
 "authorities": [],
 "uri": "/account/0001",
 "headers": {
 "WebTestClient-Request-Id": "1",
 "Accept": "application/json"
 }
 }
}'
Notice the path part after the /v1/data prefix: It corresponds to the policy’s package name, with dots replaced by forward slashes.
The response will be a JSON object containing all results produced by evaluating the policy against input data:
{
 "result": {
 "allow": [],
 "authorized": false,
 "deny": []
 }
}
The result property is an object containing the results produced by the policy engine. We can see that, in this case, the authorized property is false. We can also see that allow and deny are empty arrays. This means that no specific rule matched the input. As a result, the main authorized rule didn’t match either.
Now that we’ve seen the way OPA works, we can move forward and integrate it into the Spring Authorization framework. Here, we’ll focus on its reactive web variant, but the general idea applies to regular MVC-based applications, too.
First, we need to implement the ReactiveAuthorizationManager bean that uses OPA as its backend:
@Bean
public ReactiveAuthorizationManager<AuthorizationContext> opaAuthManager(WebClient opaWebClient) {
 return (auth, context) -> {
 return opaWebClient.post()
 .accept(MediaType.APPLICATION_JSON)
 .contentType(MediaType.APPLICATION_JSON)
 .body(toAuthorizationPayload(auth,context), Map.class)
 .exchangeToMono(this::toDecision);
 };
}
Here, the injected WebClient comes from another bean, where we pre-initialize its properties from a @ConfigurationPropreties class.
The processing pipeline delegates to the toAuthorizationRequest method the duty of gathering information from the current Authentication and AuthorizationContext and then building an authorization request payload. Similarly, toAuthorizationDecision takes the authorization response and maps it to an AuthorizationDecision.
Now, we use this bean to build a SecurityWebFilterChain:
@Bean
public SecurityWebFilterChain accountAuthorization(ServerHttpSecurity http, @Qualifier("opaWebClient") WebClient opaWebClient) {
 return http.httpBasic(Customizer.withDefaults())
 .authorizeExchange(exchanges -> exchanges.pathMatchers("/account/*")
 .access(opaAuthManager(opaWebClient)))
 .build();
}
We’re applying our custom AuthorizationManager to the /account API only. The reason behind this approach is that we could easily extend this logic to support multiple policy documents, thus making them easier to maintain. For instance, we could have a configuration that uses the request URI to select an appropriate rule package and use this information to build the authorization request.
In our case, the /account API itself is just a simple controller/service pair that returns an Account object populated with a fake balance.
Last but not least, let’s build an integration test to put everything together. First, let’s ensure the “happy path” works. This means that an authenticated user is able to access their account:
@Test
@WithMockUser(username = "user1", roles = { "account:read:0001"} )
void testGivenValidUser_thenSuccess() {
 rest.get()
 .uri("/account/0001")
 .accept(MediaType.APPLICATION_JSON)
 .exchange()
 .expectStatus()
 .is2xxSuccessful();
}
Secondly, we must also verify that an authenticated user is only able to access their account:
@Test
@WithMockUser(username = "user1", roles = { "account:read:0002"} )
void testGivenValidUser_thenUnauthorized() {
 rest.get()
 .uri("/account/0001")
 .accept(MediaType.APPLICATION_JSON)
 .exchange()
 .expectStatus()
 .isForbidden();
}
Finally, let’ also test the case where the authenticated user has no authority:
@Test
@WithMockUser(username = "user1", roles = {} )
void testGivenNoAuthorities_thenForbidden() {
 rest.get()
 .uri("/account/0001")
 .accept(MediaType.APPLICATION_JSON)
 .exchange()
 .expectStatus()
 .isForbidden();
}
We can run those tests from the IDE or the command line. Please notice that, in either case, we must first start the OPA server pointing to the folder containing our authorization policy file.
In this article, we’ve shown how to use OPA to externalize authorization decisions of a Spring Security-based application.
Baeldung Pro comes with both absolutely No-Ads as well as finally with Dark Mode, for a clean learning experience:
Once the early-adopter seats are all used, the price will go up and stay at $33/year.
The Apache HTTP Client is a very robust library, suitable for both simple and advanced use cases when testing HTTP endpoints. Check out our guide covering basic request and response handling, as well as security, cookies, timeouts, and more:
Handling concurrency in an application can be a tricky process with many potential pitfalls. A solid grasp of the fundamentals will go a long way to help minimize these issues.
Get started with understanding multi-threaded applications with our Java Concurrency guide:
Since its introduction in Java 8, the Stream API has become a staple of Java development. The basic operations like iterating, filtering, mapping sequences of elements are deceptively simple to use.
But these can also be overused and fall into some common pitfalls.
To get a better understanding on how Streams work and how to combine them with other language features, check out our guide to Java Streams:
Get started with Spring Boot and with core Spring, through the Learn Spring course:
Modern Java teams move fast — but codebases don’t always keep up. Frameworks change, dependencies drift, and tech debt builds until it starts to drag on delivery. OpenRewrite was built to fix that: an open-source refactoring engine that automates repetitive code changes while keeping developer intent intact.
The monthly training series, led by the creators and maintainers of OpenRewrite at Moderne, walks through real-world migrations and modernization patterns. Whether you’re new to recipes or ready to write your own, you’ll learn practical ways to refactor safely and at scale.
If you’ve ever wished refactoring felt as natural — and as fast — as writing code, this is a good place to start.