
How to configure Zendesk AI agent API channels: A complete guide
Last edited February 26, 2026
Table of Contents
- What you'll need
- Understanding Zendesk AI agent channels
- Step 1: Access your AI agent settings
- Step 2: Configure the brand
- Step 3: Configure messaging channels
- Step 4: Configure email, web form, and API channels
- Step 5: Publish your changes
- Advanced AI agent channel configuration
- Best practices and common mistakes
- An alternative approach: eesel AI for channel flexibility
- Getting started with Zendesk AI agent channels
Configuring AI agent channels in Zendesk is how you control where your automated support shows up. Whether customers reach out via email, your help center form, or messaging apps, the channel configuration determines whether your AI agent responds (or hands off to a human).
Here's the short version: Zendesk AI agents support four channel types (messaging, email, web form, and API). The API channel auto-enables when you activate email or web form channels. This guide walks through configuring these channels for both AI Agents Essentials and Advanced tiers.
If you're looking for an alternative that handles multiple knowledge sources and channels with more flexibility, eesel AI offers a different approach. We'll cover that later.
What you'll need
Before diving into channel configuration, make sure you have:
- Zendesk Suite or Support plan (Team level or higher) AI agents aren't available on the basic Support Team plan without add-ons
- Admin permissions in your Zendesk account
- An AI agent already created if you haven't set one up yet, start with Zendesk's getting started guide
- Channels configured in Zendesk email addresses, web forms, or messaging channels must exist before the AI agent can use them
- Understanding of your tier Essentials and Advanced have different configuration paths
Understanding Zendesk AI agent channels
Let's break down what channels actually are and how they work in Zendesk's AI agent system.
The four channel types
Zendesk AI agents can operate across four distinct channel types:
Messaging includes your web widget, mobile SDK integrations, and social messaging platforms like WhatsApp, Facebook Messenger, and Instagram. When customers chat through these interfaces, the AI agent can respond in real time.
Email covers your support email addresses. The AI agent generates replies to incoming emails, either sending them automatically or drafting them for agent review depending on your settings.
Web Form refers to ticket submission forms on your help center. When customers submit tickets through these forms, the AI agent can provide immediate responses or automated acknowledgments.
API is the channel that often confuses people. It doesn't appear as a standalone checkbox because it auto-enables when you activate email or web form channels. The API channel enables programmatic access to your AI agent, allowing custom integrations and ticket creation via API calls.
Essentials vs Advanced differences
The configuration experience differs significantly between tiers:
| Feature | AI Agents Essentials | AI Agents Advanced |
|---|---|---|
| Configuration location | Admin Center | Sunshine Conversations / Channel Manager |
| Knowledge sources | Single help center | Multiple sources (Guide, websites, CSV) |
| API actions | Not available | Available with custom integrations |
| Routing complexity | Simple | Complex multi-agent routing |
| Pricing | Included in Suite | Add-on (contact sales) |
Essentials works well for straightforward setups where you want AI responses based on your help center content. Advanced adds the ability to orchestrate multiple AI agents, integrate with external systems via API, and handle more sophisticated routing scenarios.
Step 1: Access your AI agent settings
Start by navigating to the right place in Zendesk's Admin Center.
- Log into Zendesk as an admin
- Click the Admin Center icon (gear icon) in the left sidebar
- Select AI from the menu
- Click AI agents, then AI agents again
- Find your AI agent in the list and click its name
- Open the Settings tab
- Expand the Brand and channels section
You'll see configuration options for brand selection and channel activation. The interface shows which channels are currently enabled and which are available for activation.
Step 2: Configure the brand
The brand selection determines which knowledge base your AI agent pulls from.
Select your brand from the dropdown menu. If you run multiple brands in Zendesk, choose the one whose help center content you want the AI to use for generating responses. The AI agent can only access help center articles from the selected brand.
There's an optional setting: "Always show title and preview for restricted articles." Enable this if you want customers to see article titles and previews even for content they don't have permission to access. This can help them understand what information exists and prompt them to sign in if needed.
Important note on multi-brand setups: If you change the brand after configuring channels, your channel selections reset. This is because channel availability depends on which brand's channels are configured in your Zendesk instance.
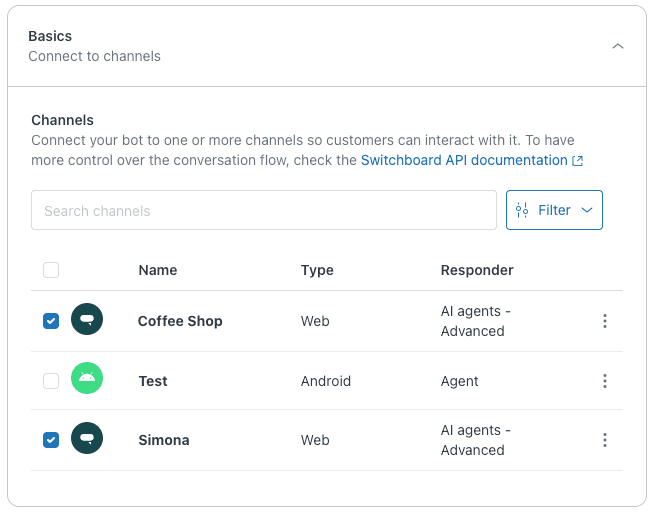
Step 3: Configure messaging channels
Messaging channels include web widgets, mobile SDKs, and social platforms.
In the Messaging subsection, you'll see checkboxes for available messaging channels. These depend on what you've configured for your selected brand:
- Web widget your embedded chat widget on websites
- Mobile SDK in-app messaging in your iOS or Android apps
- Social messaging WhatsApp, Facebook Messenger, Instagram, and other social platforms
Check the boxes for the channels where you want the AI agent active. Remember that the AI agent will respond to all conversations on enabled channels unless you set up specific routing rules (which requires the Advanced tier).
If you're using AI Agents Advanced, messaging channel configuration happens through Sunshine Conversations rather than directly in this interface. You'll need to use the Channel Manager or work with the Switchboard API for routing configuration.
Step 4: Configure email, web form, and API channels
This is where the API channel comes into play.
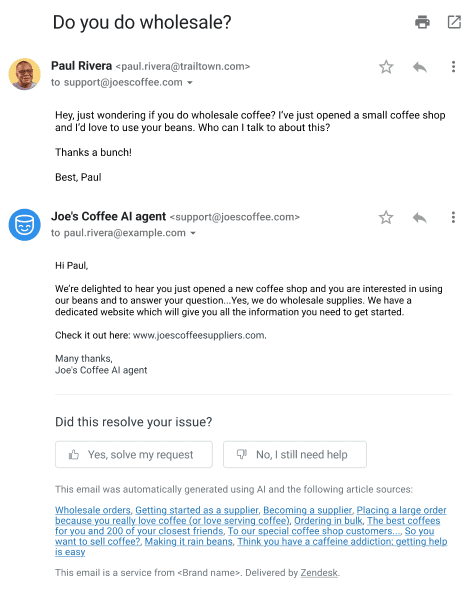
Enable Email channels if you want the AI agent to respond to incoming support emails. The AI generates replies based on your help center content and sends them directly to customers (or drafts them for review, depending on your settings).
Enable Web form channels if you want the AI agent to respond to tickets submitted through your help center forms. This typically involves automated responses acknowledging receipt and providing relevant help center articles.
About the API channel: You won't see a separate checkbox for the API channel. It automatically enables when you activate either email or web form channels. This channel allows programmatic access to your AI agent through Zendesk's APIs, enabling:
- Creating tickets via API with AI-generated responses
- Building custom integrations that leverage the AI agent
- Automating workflows that involve AI-powered ticket handling
The API channel uses the same authentication and rate limits as your other Zendesk API access. If you need extensive API integration, consider the Advanced tier which offers more robust API action capabilities.
Step 5: Publish your changes
Here's a critical step many people miss: your changes don't go live until you publish them.
Zendesk auto-saves your channel configuration as you work, but the AI agent won't actually use these settings until you click Publish. This safety feature prevents accidental changes from affecting live customer interactions.
After publishing:
- Changes take effect immediately
- The AI agent begins responding on newly enabled channels
- Disabled channels stop receiving AI responses
Testing tip: If you're enabling channels for the first time, test during a low-traffic period. Start with a single channel, verify the AI responses look correct, then expand to additional channels.
Advanced AI agent channel configuration
For teams using AI Agents Advanced, channel configuration gets more sophisticated.
Advanced AI agents use the Sunshine Conversations platform as middleware for messaging channels. This adds a layer of routing and orchestration that Essentials doesn't provide.
You have two main approaches for Advanced channel configuration:
Channel Manager is the newer, simplified interface for linking Advanced AI agents to channels. It provides a visual way to manage which agents handle which channels without diving into API configuration.
Switchboard API is the legacy approach that gives you granular control over routing logic. Use this if you need complex routing rules, like sending VIP customers to one AI agent and general inquiries to another.
When to choose Advanced over Essentials:
- You need multiple AI agents with different specializations
- You want to integrate with external systems via API actions
- You need sophisticated routing based on customer data or conversation context
- You're running AI agents across many brands or complex channel setups
Best practices and common mistakes
After configuring dozens of Zendesk AI agent setups, here are the patterns that lead to success (and the pitfalls to avoid):
Start narrow, expand gradually. Enable one or two channels first, monitor performance, then add more. This lets you catch issues before they affect all your support volume.
Match brand to customer expectations. If customers email support@company.com, make sure your AI agent's brand selection aligns with the help center content they're expecting. Mismatched branding creates confusion.
Monitor per-channel performance. AI agents often perform differently across channels. Messaging conversations might have higher resolution rates than email because the context is clearer. Use Zendesk's automated resolution reporting to identify which channels need tuning.
Common mistakes to avoid:
- Forgetting to publish the most common issue. You configure everything, test, and wonder why nothing changed. Click Publish.
- Wrong brand selection selecting Brand A's channels but training the AI on Brand B's help center content
- Mixing up Essentials/Advanced paths trying to use Channel Manager when you're on Essentials, or configuring in Admin Center when you should be in Sunshine Conversations
- Enabling all channels at once without testing, you risk the AI responding inappropriately across your entire support surface
An alternative approach: eesel AI for channel flexibility
Zendesk's AI agents work well if you're already invested in the Zendesk ecosystem and your needs fit their structure. But the single-brand limitation in Essentials and the per-agent pricing can be restrictive for some teams.
eesel AI takes a different approach to channel configuration and AI deployment:
Multi-source knowledge instead of limiting you to one help center per brand, eesel AI trains simultaneously on your help center, past tickets, Confluence, Google Docs, Notion, PDFs, and more. You're not constrained by Zendesk's brand boundaries.
Interaction-based pricing rather than paying per agent per month, eesel AI charges based on interactions. The Team plan starts at $239/month (annual) for up to 1,000 interactions, and Business at $639/month for 3,000 interactions. For teams with fluctuating volume or many part-time agents, this can be more predictable than per-seat pricing.
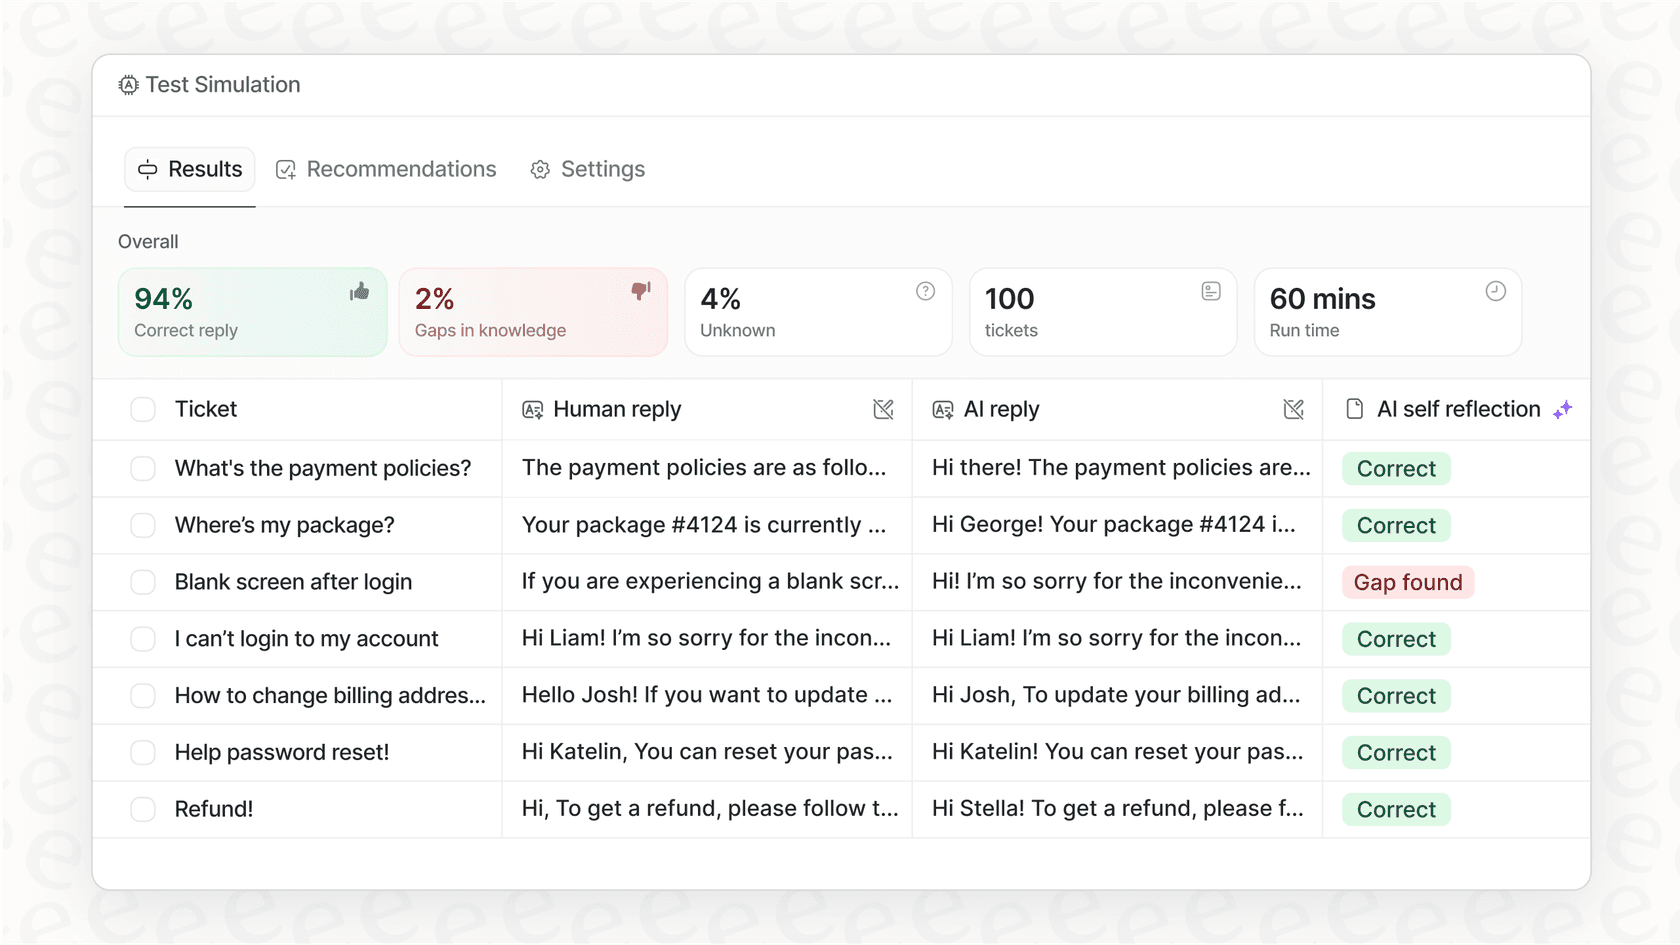
Simulation before deployment eesel AI lets you run simulations on historical tickets before going live. You can see exactly how the AI would have handled past conversations, measure quality, and adjust prompts before customers see a single automated response.
Gradual rollout with plain-English instructions instead of complex routing rules, you describe in plain text what the AI should handle and when it should escalate. No need to learn Sunshine Conversations or Switchboard API.
If your team uses multiple knowledge sources, needs more flexible channel handling, or wants to test AI responses thoroughly before deployment, our Zendesk integration might be worth exploring. We plug directly into your existing Zendesk setup while offering a different approach to AI configuration.
Getting started with Zendesk AI agent channels
Configuring Zendesk AI agent channels comes down to a few key steps: choose your brand, enable the channels you want (messaging, email, web form), remember that the API channel auto-enables with email or web form, and publish your changes.
The Essentials tier works for straightforward setups with a single help center. Advanced adds the complexity (and flexibility) of Sunshine Conversations routing and API actions.
For official documentation and the latest feature updates, check Zendesk's AI agent help center.
If you find Zendesk's channel limitations restrictive, or you want to train your AI on more than just help center content, try eesel AI and see how a different approach to channel configuration and knowledge sourcing might work for your team.
Frequently Asked Questions
Share this article
Article by
Stevia Putri
Stevia Putri is a marketing generalist at eesel AI, where she helps turn powerful AI tools into stories that resonate. She’s driven by curiosity, clarity, and the human side of technology.