
Zendesk views permissions explained: Who sees what and how to configure access
Last edited February 25, 2026
Table of Contents
- Understanding the different types of Zendesk views
- Who can see Zendesk views: A complete breakdown by role
- How to configure view permissions in Zendesk
- Best practices for organizing views with proper permissions
- Troubleshooting common view visibility issues
- Going beyond static views with AI-powered ticket management
If you're managing a support team in Zendesk, you've probably run into questions about who can see which views. Maybe an agent is complaining they can't find a shared view, or you're wondering if light agents can access the same ticket lists as full agents. Getting view permissions right matters because it directly affects what work your team can see and how efficiently they can operate.
Views are the primary way agents access tickets in Zendesk. They're filtered lists that organize tickets based on criteria like status, assignee, or priority. But not everyone sees the same views, and understanding these permission levels is key to keeping your support operation running smoothly.
At eesel AI, we work alongside Zendesk to help support teams automate ticket management. We've seen firsthand how confusing view permissions can be, so let's break down exactly who sees what and how to configure access properly.
Understanding the different types of Zendesk views
Before diving into permissions, it's worth clarifying what we mean by "views" in Zendesk. Views are filtered lists of tickets that help agents find and prioritize their work. Instead of scrolling through an endless inbox, agents open a view and see only the tickets that match specific criteria.
There are three types of views in Zendesk:
-
Default views: Pre-defined by Zendesk and always available (like "Your unsolved tickets" and "Unassigned tickets"). You cannot edit the "Suspended tickets" and "Deleted tickets" views. These appear at the bottom of the views list and don't count toward your view limits.
-
Shared views: Created by admins for team-wide use. They're visible to multiple agents based on permissions you set. You can create up to 100 shared views per account, though only 12 appear in the sidebar by default.
-
Personal views: Created by individual agents for their own workflow. Each agent can have up to 10 personal views accessible in their views list.
It's important to note that we're talking about ticket views here (what agents work from), not help center article view permissions. Those are a separate system for controlling who can see knowledge base content.
Who can see Zendesk views: A complete breakdown by role
View visibility in Zendesk depends entirely on user roles and how views are configured. Here's exactly who can see what.
Administrators
Admins have the broadest view access in Zendesk. They can:
- See and manage all shared views
- View all personal views in the Admin Center (and clone them if needed)
- Create, edit, and delete shared views
- Reorder both shared and personal views for the entire team
- Access the Views admin page at Admin Center > Workspaces > Agent tools > Views
This means admins have full visibility into what views exist in the system, even personal views created by individual agents. However, admins can't directly edit an agent's personal view. They can only clone it to create a shared version.
Standard agents
Standard agents have more limited view access:
- Can see shared views they're granted access to (either "All agents" or their specific group)
- Can see their own personal views (up to 10)
- Cannot see other agents' personal views
- Can create and edit only their own personal views
- Cannot create shared views unless they're in a custom role with that permission
Agents see views in their sidebar based on availability settings. If a view is restricted to specific groups, only agents in those groups will see it.
Light agents
Light agents have significantly restricted view permissions. According to Zendesk's documentation, light agents can:
- See views
- Filter views
But they cannot:
- Create views
- Edit views
- Be assigned to tickets
- Change ticket status (unless they're the ticket requester)
- Use the @mention feature
Light agents are designed for internal collaboration. They can view tickets and add private comments, but they're not meant for full ticket ownership. This limited view access reflects their role as internal advisors rather than frontline support agents.
End users and customers
End users and customers cannot see ticket views at all. Views are strictly an agent-facing feature. Customers interact with their tickets through the help center, where they can only see tickets they created or are CC'd on.
View visibility summary
| Role | Shared Views | Personal Views | Create Views | Edit Views |
|---|---|---|---|---|
| Administrator | All | Can view all, clone only | Yes | All shared |
| Standard Agent | Group-assigned only | Own only | Personal only | Own personal only |
| Light Agent | Group-assigned only | Cannot create | No | No |
| End User | None | None | No | No |
How to configure view permissions in Zendesk
Setting up view permissions happens during view creation or editing. Here's the step-by-step process.
Step 1: Access the views management page
This page shows all views in your Zendesk account. By default, you'll see active views shared with all agents. Use the Filter button to see inactive views, personal views, or views shared with specific groups.
Step 2: Create or edit a view
When creating a view, you'll set:
- Title (you can use emojis or the double colon syntax for folders)
- Description
- Conditions (what tickets appear in the view)
- Formatting (columns, grouping, ordering)
- Availability (who can see it)
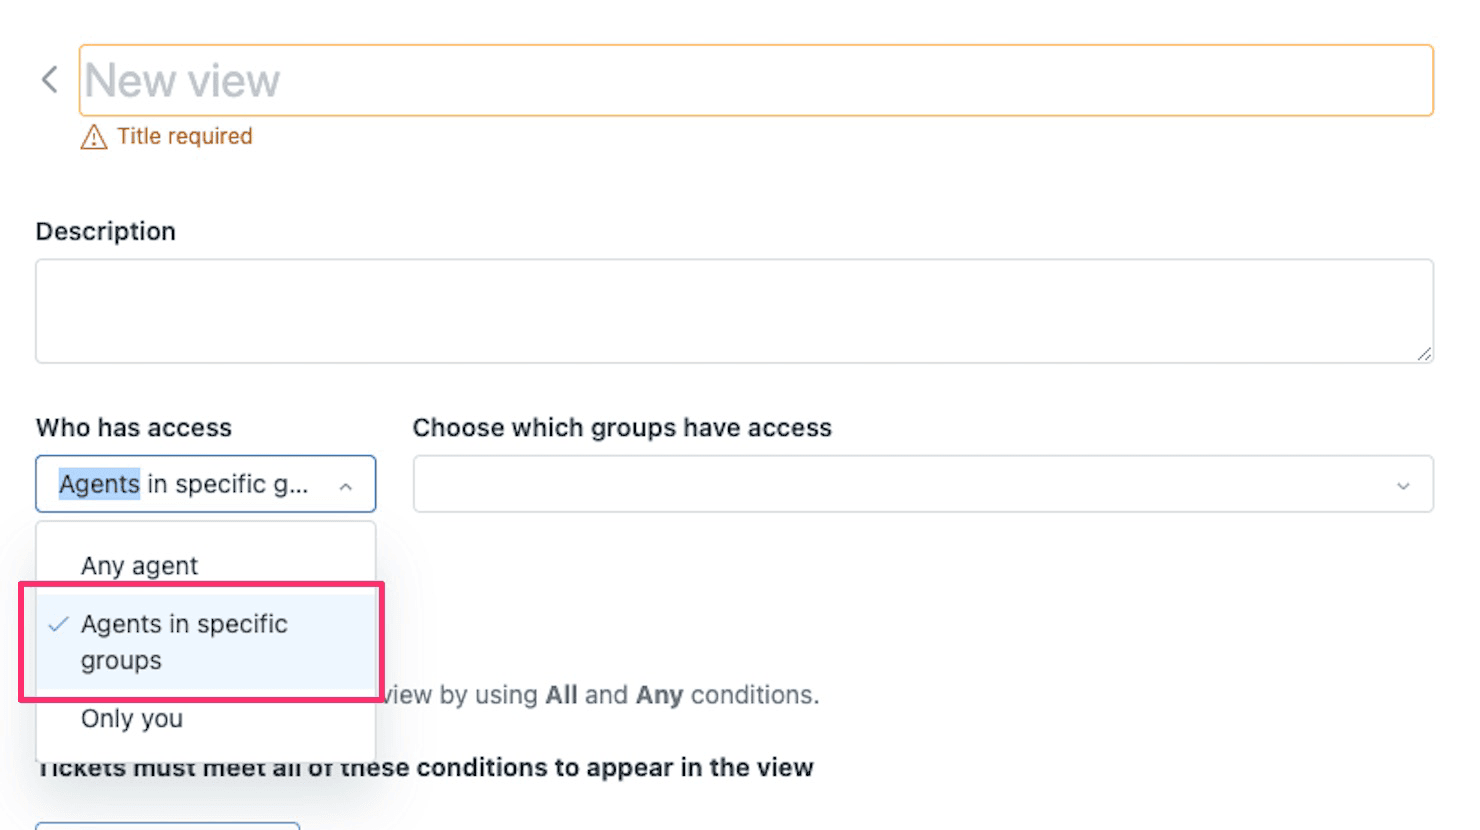
Step 3: Set view availability
Under "Who has access," choose one of three options:
- Any agent: Makes the view available to your entire team
- Agents in specific groups: Restricts the view to certain agent groups
- Only you: Creates a personal view
A settings panel showing access options for a new view, allowing selection of specific agent groups.
The "Agents in specific groups" option is useful when you have specialized teams. For example, you might create refund-related views only your billing team should see.
Step 4: Configure group permissions
Remember that agents will only see tickets in the view that they have permission to access based on their group membership and ticket permissions.
Step 5: Save and verify
Click "Save" to create or update the view. The view appears immediately for users with access. To verify, have an agent in the target group refresh their Zendesk workspace and check if the view appears in their sidebar.
Best practices for organizing views with proper permissions
A well-organized view setup reduces confusion and keeps agents focused on the right work. Here are practices that help:
Use the double-colon naming convention for folders
In the Agent Workspace, you can create folder structures by using double colons (::) in view titles. For example:
- "Tier 1 :: Open Tickets"
- "Tier 1 :: Pending Follow-ups"
- "Billing :: Refunds"
This creates expandable folders that make finding the right view much faster. You can nest up to three levels deep.
Scope views to "current user's groups"
When building conditions for shared views, use "Group is current user's groups" rather than specifying a particular group name. This means one shared view works for all teams. An agent in the Tier 1 group sees only Tier 1 tickets. An agent in both Tier 1 and Tier 2 sees both. One view handles it all.
Regularly audit and deactivate unused views
Views accumulate over time. Every quarter, review your active views and deactivate those that aren't being used. You can reactivate them later if needed. To delete a view permanently, you must first deactivate it, then delete it from the inactive views list.
Convert effective personal views to shared views
When you spot a personal view that multiple agents could benefit from, clone it and make it a shared view. This spreads good workflows across your team. Just remember that once converted, any admin can edit the shared version.
Document which views are for which teams
Create a simple reference document listing your shared views and which teams should use them. This helps new agents understand what's available and prevents confusion about which views to work from.
Troubleshooting common view visibility issues
Even with proper setup, view visibility issues can arise. Here's how to diagnose and fix them.
Agent can't see a shared view
- Check if the view is active (not deactivated). Inactive views don't appear in the sidebar.
- Verify the agent's group membership. If the view is restricted to specific groups, the agent must belong to one of those groups.
- Confirm the agent has the proper role permissions. Light agents have limited view access.
- Check if the view limit has been reached. Only 12 shared views appear in the sidebar by default. Additional views are accessible through "Manage Views."
View appears but shows no tickets
This usually means the view conditions are too restrictive or the agent doesn't have permission to see the tickets that match. Check:
- View conditions aren't excluding all tickets (avoid broad "NOT" statements)
- Agent has permission to view tickets in the groups the view filters for
- Tickets matching the conditions actually exist
Personal views disappeared
Personal views are tied to the agent's account. If an agent leaves the organization, their personal views are removed unless an admin cloned them as shared views. This is why it's worth periodically reviewing personal views for gems that should be shared.
Can't reorder views
Agents can only reorder personal views. Admins and agents in custom roles with permission can reorder both shared and personal views. If you have many views, you can only reorder views on the same page of the list. Use the three-dot menu on a specific view to "Move to first position" or "Select position" for views on different pages.
Going beyond static views with AI-powered ticket management
Views organize tickets into static lists based on fixed criteria. A view shows the same list regardless of the specific details in each ticket. This is where AI can complement your view strategy.
At eesel AI, we've built an AI teammate that works alongside Zendesk to intelligently route and prioritize tickets. Our AI Triage product automatically tags, routes, and categorizes tickets based on their content. Instead of manually sorting tickets into views, the AI analyzes each ticket and ensures it lands in the right queue with the right priority.
Here's how it works:
- Our AI learns from your past tickets, help center articles, and existing views
- When a ticket arrives, the AI analyzes its content, intent, and sentiment
- Tickets are automatically tagged, routed to the right team, and prioritized
- Agents see properly organized work without complex view configurations
Unlike static views, the AI can handle variations it hasn't seen before. It doesn't need rigid criteria for every possible scenario. It learns what matters from your team's history and makes intelligent decisions on demand.
Our AI Agent can even handle frontline tickets autonomously, and our AI Copilot drafts personalized responses for agents to review. Both integrate directly with Zendesk. For teams drowning in view management, or those handling complex issues where every ticket is different, this approach can reduce the overhead of maintaining a massive view library while improving ticket routing accuracy.
Frequently Asked Questions
Share this article
Article by
Stevia Putri
Stevia Putri is a marketing generalist at eesel AI, where she helps turn powerful AI tools into stories that resonate. She’s driven by curiosity, clarity, and the human side of technology.