 |
VOOZH | about |
|
VOOZH | about |
MySQL is one of the most widely used relational database management systems (RDBMS) Known for its reliability, speed, and scalability. MySQL is used for data operations like querying, filtering, sorting, grouping, modifying, and joining the tables present in the database. It is the backbone of many modern applications, powering everything from small websites to large-scale enterprise systems. In this article, we’ll walk explain the process of installing MySQL on Linux, starting from the prerequisites to verifying the installation.
Before diving into the installation process, it’s important to understand the features that make MySQL a popular choice for database management:
The installation process of MySQL on Linux involves using the terminal and running a series of commands. This articles covers the installation on Ubuntu and other Debian-based distributions, but the steps are similar for other Linux distributions as well.
Before installing any software, it’s always a good idea to update your package list to ensure you’re getting the latest version available from the repository.
sudo apt updateNow, let’s install the MySQL server using the following command. Open terminal using Ctrl+Alt+T then copy and paste the following command in the terminal to install MySQL in Linux.
sudo apt install mysql-serverOnce you run the command, it will prompt you for your password. Enter it and press Enter then Press "y" to continue.
It will take some time to download and install MySQL in Linux.
To verify that MySQL is installed correctly or to know the version enter the following commands in your Terminal.
mysql --version
This confirms that MySQL is installed and ready to use.
By default, MySQL is installed with some security vulnerabilities, so it's important to secure your installation. MySQL provides a command to set up basic security settings, such as configuring a password for the root user and removing insecure default settings.
Now we will set the VALIDATE PASSWORD component to improve Security
sudo mysql_secure_installation👁 Protecting-and-Securing-MySQL_1
Then press "y" to set the password. Next press "0" for the low-level password or choose as you want to set the password.
👁 Protecting-and-Securing-MySQL_2
Create a password. Then Re-enter the password, then to continue press "y".
👁 Protecting-and-Securing-MySQL_3-(1)
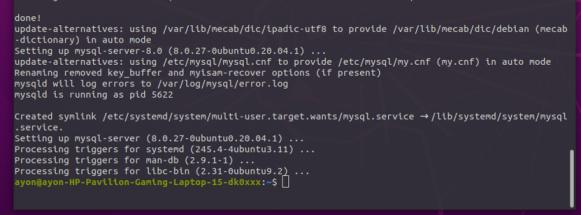
Now the whole setup is done. Hence, MySQL installaion is successfully done!
👁 MySQL-Successful-Installed-(1)
This script will guide you through several security settings:
Once the security configuration is complete, test whether MySQL is running properly:
sudo systemctl status mysqlIf MySQL is running correctly, you should see output indicating that the service is active and running. If not, you can start the MySQL service using:
sudo systemctl start mysqlOnce MySQL is installed and secured, let’s log into the MySQL shell to start using it.
To get started with MySQL, type the following command to go to the root directory.
sudo mysql -u rootYou’ll be prompted to enter the root password you set earlier. Once entered correctly, you’ll be logged into the MySQL shell.
To ensure everything is set up properly, let’s create a database and verify that MySQL is working as expected.
To create a new database, run the following command within the MySQL shell:
CREATE DATABASE database_name;To view the databases on your system, you can use the following command:
SHOW DATABASES;To exit the MySQL shell, simply type:
EXIT;Hence, we have successfully created a database using create database command. You are now ready to start using MySQL. MySQL is the best relational database that will keep all your data secure. Many Companies use MySQL because of its solid data security and is supported by multiple applications. So Install MySQL in Linux now and learn SQL in 30 Days - From Basic to Advanced Level!
Congratulations! You’ve successfully installed MySQL on your Linux system and verified its functionality by creating a database. MySQL is now ready for you to start managing your data, running SQL queries, and building robust applications. By following this guide, you’ve also learned how to secure your MySQL installation, which is a crucial step for keeping your data safe. With MySQL installed, you’re now ready to dive deeper into SQL, optimize your databases, and build more sophisticated applications.
.jpg)
.jpg)
.jpg)
.jpg)
.jpg)
.jpg)
.jpg)
.jpg)