 |
VOOZH | about |
|
VOOZH | about |
Netcat is one of the most powerful networking tools, security tools, and network monitoring tools. It is even considered a Swiss army knife of networking tools. It acts like a cat command over a network. It is generally used for the following reasons:
It is designed by keeping in mind that it should be a flexible "back-end" tool that can be used directly or driven by any other program.
To install the Netcat tool use the following commands as per your Linux distribution.
sudo apt-get install netcatsudo yum install nc sudo dnf install ncNote: To verify that it is successfully installed in our system, we run the following command "nc -h". This will display the help menu of Netcat, indicating that it is installed and ready to be used.
The basic syntax for the nc command as follows.
nc [options] [hostname] [port]It offers various options that help us in enhancing its functionality. Some commonly used options include:
| Options | Description |
|---|---|
| -l | Listen mode, used to create a server that listens for incoming connections. |
| -p | Specifies the source port number. |
| -v | Verbose mode, provides more detailed output. |
| -z | Scans for open ports. |
| -w | Sets a timeout for connections. |
| -q | Specifies the delay before closing the connection. |
We have two primary working modes:
In this mode Netcat works as a client. Which means that it establishes a connection to a remote server or servers. To work in this mode, we have to provide the `<host>` and `<port>` parameters.
For example: If we want to establish a connection to the HTTP (web) service running on domain name (example.com) or IP address (e.g., 192.168.0.1) on port 80. We use the following command.
nc example.com 80In this mode Netcat works as a server. Which means that it waits and listens for incoming connections from clients. To work in this mode, we have to use Netcat in Listen mode and provide the `<host>` (optional) and `<port>` parameters.
For example: If we want to listen to the IP address (e.g., 192.168.0.1) on port 8080. We use the following command.
nc -l 192.168.0.1 8080We can use `-lv` option to view verbose (-v)
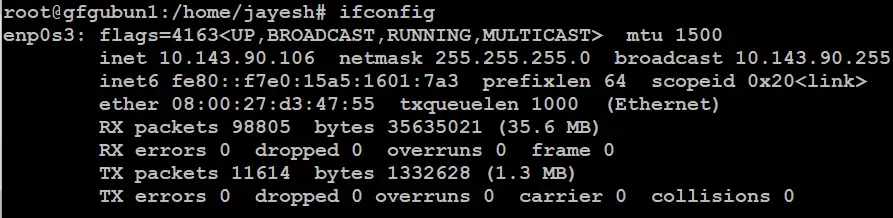
We have two systems running on same network, To know there IP address:
ifconfigifconfigHere our system 1 will act as a server (listens) and system 2 will act as a client (connects)
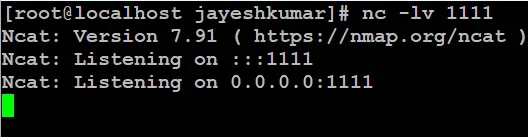
We are running `nc` command in listen mode and providing a port number.
nc -lv 1111You can replace port number `1111` with your desired port number.
Here we have used `-l` to make our system 1 a server and used `-v` for verbose to see if it was successful or not.
We are running `nc` command with IP address of System 1 and a port number on which system 1 is listening.
nc -v 10.143.90.24 1111used `-v` for verbose to see if it was successful or not And mentioned IP address of System1.
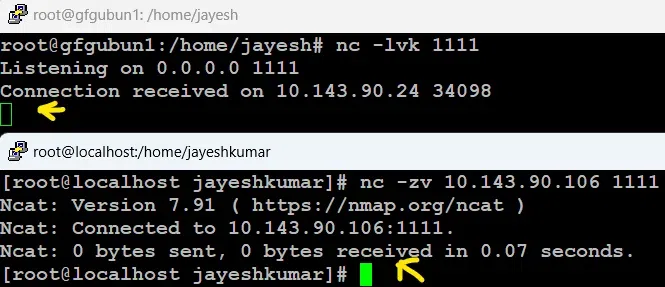
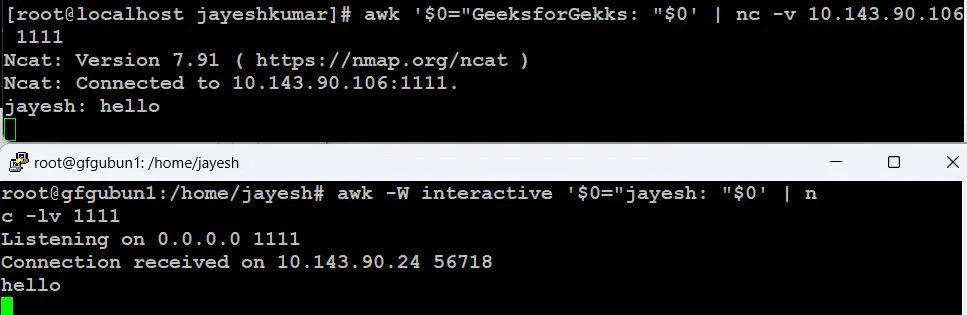
IF we send message from any System we will see that message on both the systems.
nc -lvk 1111used `-v` for verbose to see if it was successful or not and used `-k` so that our connection doesn't stop in case of disconnect.
Here we will check for port number 1111, if this port is open, we will see successful in connection. (used `-v` for verbose to see if it was succeeded)
nc -zv 10.143.90.106 1111Here we have used `-z` option, to scan for open ports.
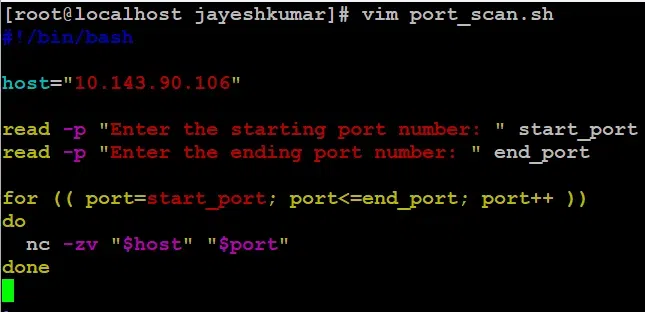
IF we want to search in between the range of ports that are Open, we can write a small script as follows.
vim port_scan.shYou can replace file name 'port_scan.sh' with your requirements. Here you have to replace the "10.143.90.106" with you requirement, we are taking start port and end port as a input from user itself.
#!/bin/bash
host="10.143.90.106"
read -p "Enter the starting port number: " start_port
read -p "Enter the ending port number: " end_port
for (( port=start_port; port<=end_port; port++ ))
do
 nc -zv "$host" "$port"
doneMaking our script executable.
chmod +x port_scan.shRunning script.
./port_scan.shThen enter the starting port and ending port.
If this port is open, we will see success in connection. Here we can see port `1111` is open.
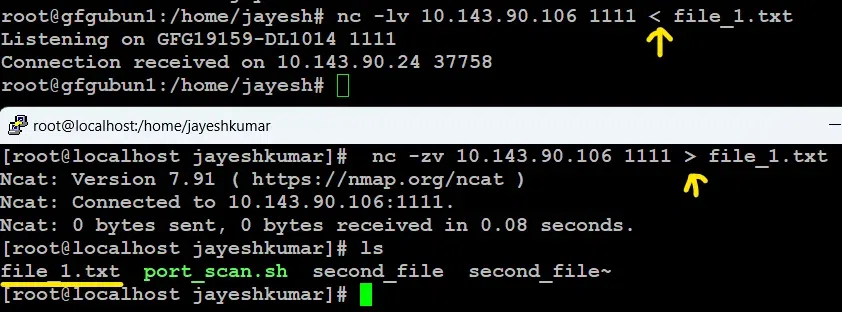
If we have a file name "file_1.txt" in our system 2 and want to transfer that file in system 1, we use the following command.
a. In system 2
nc -lv 10.143.90.106 1111 < file_1.txtb. In system 1
nc -zv 10.143.90.106 1111 > file_1.txtThen we use `ls` command to confirm that we have received file in our system 1.
On system 2
First Open 2 terminal windows.
Terminal 1 for listening
$nc -l -p 1234Terminal 2 sending request
$nc 127.0.0.1 1234Note: Here the port number is 1234 and by default host is the localhost.
👁 using netcat command to send message between two terminals
It will not display anything but will start listening to port 1234 at the localhost from terminal 1. And anything entered in terminal 2 will be reflected back in terminal 1 as well which confirms that the connection is established successfully.
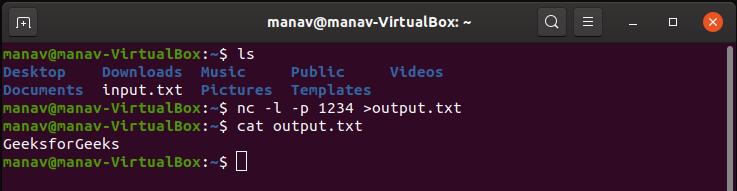
Open 2 terminal windows.
Terminal 1 for listening
$nc -l -p 1234 >output.txtTerminal 2 for sending request
$echo "GeeksforGeeks" >input.txt
$nc 127.0.0.1 1234 <input.txt
Note: Here the port number is 1234 and by default host is localhost. It will send the input.txt file's data from terminal 2 to the output.txt file at terminal 1.
Enter the following command on the terminal.
Scanning a single port
$netcat -z -v 127.0.0.1 1234Scanning multiple ports
$nc -z -v 127.0.0.1 1234 1235Scanning a range of ports
$nc -z -v 127.0.0.1 1233-1240Note: Here the port numbers are 1234, 1235, 1233, and 1240 you may change them as per your need. It will display the port number with the status(open or not).
$printf "GET /nc.1 HTTPs/1.1\r\nHost: www.geeksforgeeks.org\r\n\r\n" | nc www.geeksforgeeks.org 80Note: Here the website is www.geeksforgeeks.org, you may choose any. It will send a HTTP Request to www.geeksforgeeks.org.
Open 2 terminal as shown below:
Terminal 1 for listening
$nc -l -p 1234Terminal 2 sending request
$nc -i 5 127.0.0.1 1234Note: Here the port number is 1234 and by default host is localhost. The time taken is 5 seconds. Each will be sent after 5 seconds of time.
👁 To delay the interval for lines sent using netcat command in Linux
'Netcat' is an indispensable tool for anyone involved in network management or IT security. Its simplicity and versatility make it an excellent choice for a wide range of networking tasks from troubleshooting to testing network functionalities.