 |
VOOZH | about |
|
VOOZH | about |
A REST (Representational State Transfer) API allows communication between a client and a server through HTTP requests. PHP, a widely used server-side scripting language, is well-suited for creating REST APIs due to its simplicity and rich ecosystem. This article provides a step-by-step guide on building a REST API in PHP, covering various approaches, detailed explanations, syntax, examples, and output. Additionally, we'll discuss the prerequisites, provide a structured folder setup, demonstrate the process of creating and testing a basic REST API, and include steps for creating a database with sample data.
These are the following topics that we are going to discuss:
Table of Content
A REST API (Representational State Transfer Application Programming Interface) is an architectural style that allows communication between different software applications over the HTTP protocol. REST APIs use standard HTTP methods such as GET, POST, PUT, DELETE, etc., to perform operations on resources, which are typically represented in formats like JSON or XML. REST APIs are stateless, meaning each request from a client must contain all the information needed to understand and process the request, with no session state stored on the server
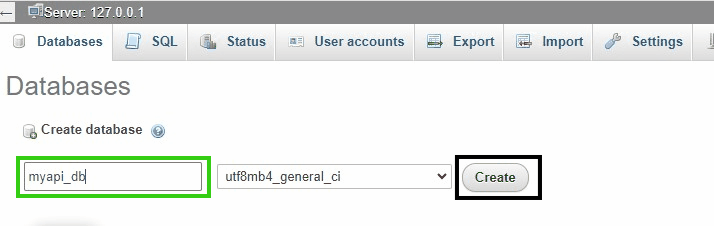
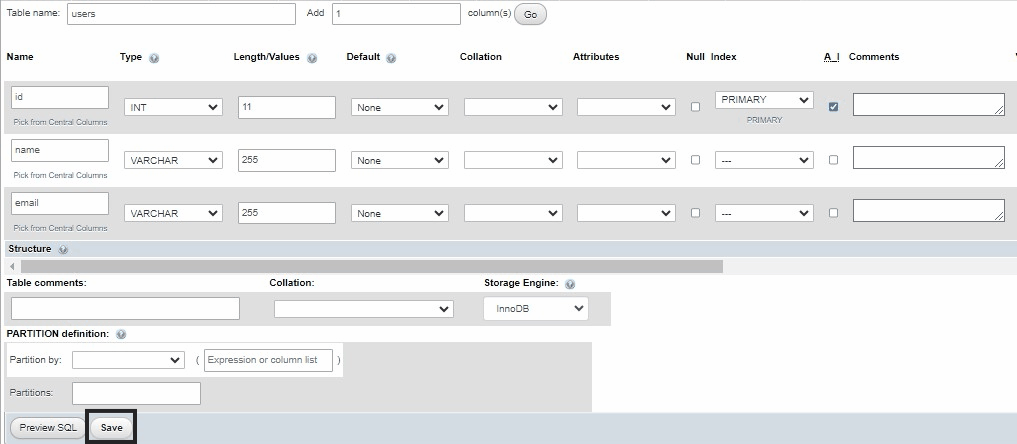
Access phpMyAdmin
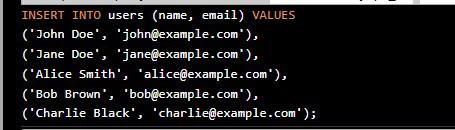
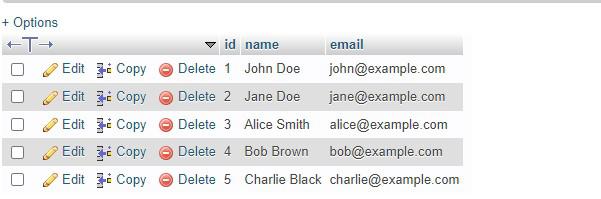
INSERT INTO users (name, email) VALUES
('John Doe', 'john@example.com'),
('Jane Doe', 'jane@example.com'),
('Alice Smith', 'alice@example.com'),
('Bob Brown', 'bob@example.com'),
('Charlie Black', 'charlie@example.com');
Step 1: Create Project Folder
Command:
mkdir my-php-apiStep 2: Create a Database Connection File
Step 3: Create the API File
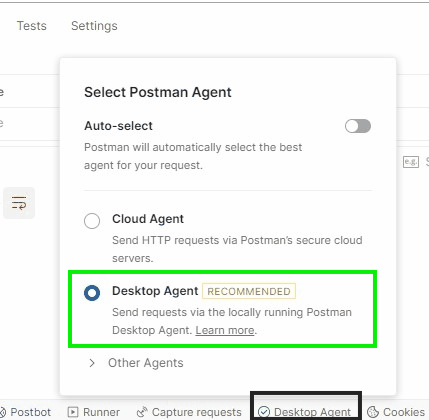
Now that the API is ready, we can test the CRUD operations using Postman. Before sending request using postman we have to set up desktop agent because we are testing locally so follow the given below steps:
{
 "name": "New User",
 "email": "newuser@example.com"
}
{
 "id": 1,
 "name": "Updated User",
 "email": "updated@example.com"
}
{
 "id": 1
}
In this article, we demonstrated how to build a simple REST API using PHP and MySQL, covering basic CRUD operations. We used XAMPP to run our local server and MySQL database, and Postman to test the API endpoints. By following the steps outlined in this guide, you can easily extend the API and add more functionalities based on your project requirements.