
The Google Nest integrationIntegrations connect and integrate Home Assistant with your devices, services, and more. [Learn more] allows you to integrate a few supported Google Nest devices in Home Assistant. This integration uses the Smart Device Management API and Google’s Cloud Pubsub to efficiently listen for changes in device state or other events. See Supported Devices for all devices supported by the SDM API.
There is currently support for the following device types within Home Assistant:
Cameras and doorbells use Automation and device triggers for events and a media source for capturing media images on supported devices. Other device types like Smoke and CO Alarms or Security systems are not currently supported by the SDM API.
You are in control of the information and capabilities exposed to Home Assistant. You can authorize a single device, multiple devices, or different levels of functionality such as motion events, live streams, for any particular device. The integration is flexible enough to adapt based on what you allow.
Prerequisites
-
The Nest Device Access Console Pub/Sub setup process has changed as of January 23rd 2025. Please make sure you are using the latest version of Home Assistant.
-
The Nest Smart Device Management (SDM) API requires a US$5 fee. Before buying, make sure your device is supported.
-
The SDM API is also incompatible with some Google Account types or Security settings, including Google Workspace and the Advanced Protection Program. See Known limitations below.
Configuration
To add the Nest integration to your Home Assistant, use this My Button:
👁 Image
The integration setup steps will walk you through the process of configuring a Google Cloud Project, Device Access Project, and finally link your account to Home Assistant. Make sure you are running the most recent version of Home Assistant.
Climate
All Google Nest Thermostat models are exposed as a climate entity that use the Thermostat Traits in the SDM API. State changes to the thermostat are reported to Home Assistant through the Cloud Pubsub subscriber.
Given a thermostat named Upstairs then the climate entity is created with a name such as climate.upstairs
Note
This feature is enabled by the following permissions:
-
Allow Home Assistant to access and control your thermostat
Sensor
All Google Nest Thermostat models have traits exposed from the SDM API. The initial values of the sensors are fetched on startup, then updated regularly using the Cloud Pubsub subscriber. The following traits are supported with sensors:
Given a thermostat named Upstairs then sensors are created with names such as sensor.upstairs_temperature or sensor.upstairs_humidity.
Note
This feature is enabled by the following permissions:
-
Allow Home Assistant to access and control your thermostat
Camera
Home Assistant supports all SDM API features. However, every Camera or Doorbell device has a different set of built-in capabilities. A Camera device has one of the following live stream types:
-
RTSP: These devices have an HLS stream served by the Home Assistant Core. These cameras support server-side
cameraactions like stream recording or image preview. See Low Latency HLS as a great option to enable to reduce stream latency. -
WebRTC: These devices support direct browser to camera communication and a super low latency stream. A Picture Glance Card can show the live stream in the grid with the Camera View set to
live(not recommended for battery-powered cameras).cameraactions like stream recording are not supported.
Given a camera named Front Yard, then the camera is created with a name such as camera.front_yard.
Note
This feature is enabled by the following permissions:
-
Allow Home Assistant to see and display your camera’s livestream
-
Other permissions in the Nest or Google Home apps.
All cameras also expose event entities for automation. Some camera models also support capturing media (snapshots or clips) through device triggers. The table below summarizes the supported SDM API features for each device.
| Device | Live stream | Event entities / triggers | Media source for triggers |
|---|---|---|---|
| Nest Cam (indoor, wired) Nest Cam (outdoor, battery) |
WebRTC | Motion Person |
N/A |
| Nest Cam Indoor Nest Cam IQ Indoor Nest Cam IQ Outdoor Nest Cam Outdoor |
RTSP Recording |
Motion Person Sound |
Snapshot (jpg) |
| Nest Cam with floodlight | WebRTC | Motion Person |
N/A |
| Nest Doorbell (battery) | WebRTC | Motion Person Chime |
Clip Preview (mp4, gif) |
| Nest Doorbell (wired, 1st gen) | RTSP Recording |
Motion Person Sound Chime |
Snapshot (jpg) |
| Nest Doorbell (wired, 2nd gen) | WebRTC | Motion Person Chime |
Clip Preview (mp4, gif) |
| Nest Hub Max | RTSP Recording |
Motion Person Sound |
Snapshot (jpg) |
Event
All doorbells and cameras support event entities. See the Event integration documentation for more about how to use event entities in automations.
There are two classes of event entities that are available based on the above camera features:
-
motionfor cameras that support any of the event typescamera_motion,camera_person, orcamera_sound -
doorbellfor all cameras that are doorbells and supportringevents. In the camera feature table above, this capability is listed as “Chime”.
Nest event entities are updated immediately when an event message is received without waiting for any media to be fetched. See Device Triggers for media support.
List of actions
The Google Nest integrationIntegrations connect and integrate Home Assistant with your devices, services, and more. [Learn more] provides the following actions. Each link below opens a dedicated page with examples, parameters, and a step-by-step UI walkthrough.
-
Set fan timer (
nest.set_fan_timer) Sets the Nest thermostat fan to run for a specific duration.
For an overview of every action across all integrations, see the actions reference.
Device Triggers
The Nest integration provides device triggers to enable automation in Home Assistant. You should review the Automating Home Assistant getting started guide on automations or the Automation documentation for full details.
Device triggers will wait to fire after any media associated with the event is downloaded. Use an event entity for immediate notifications without media.
Continue reading below to Media Source Attachments to see how to use media with notification actions.
Note
This feature is enabled by the following permissions:
-
Allow Home Assistant to know when there’s a camera event
-
Allow Home Assistant to know when there’s a doorbell event
-
Other permissions and notification settings in the Nest or Google Home apps.
Google Home App Notification Settings
The Google Home App Notifications settings control not only which notifications are sent to your phone, but also what gets published to the Pub/Sub feed.
For example, if you enable Away-only notifications, Home Assistant will only receive events when your phone is away from home.
Another thing that may not be intuitive, is that seeing the event in your device history does not mean it was published to the feed. However, if you are getting push notifications, the settings are likely working.
Note: The exact settings and effect they have on the feed may vary by camera model or app version.
If you are still not getting notifications, you can read this [troubleshooting guide from Google] (https://support.google.com/googlenest/answer/9230439#zippy=%2Cyour-camera-detected-something-but-you-didnt-get-a-camera-alert)
Media source
The Nest media source platform allows you to browse clips for recent camera events. Home Assistant is not intended to be a Network Video Recorder (NVR) platform, however, basic support for capturing recent events is supported.
The table above describes which devices support image snapshots or 10-frame mp4 video clips.
Media Attachments
The Media Source APIs can be used in Companion App Attachments for Notifications as actions for Device Triggers above like Doorbell Pressed. You will need to be familiar with both the Media Sources supported for your camera, as well as the media capabilities of the companion apps.
-
/api/nest/event_media/DEVICE_ID/EVENT_ID: Media for the event, which supports image snapshots (jpg) or clip previews (mp4) depending on the camera type. -
/api/nest/event_media/DEVICE_ID/EVENT_ID/thumbnail: A thumbnail preview of the media, which supports image snapshots (jpg) or clip previews (gif) depending on the camera type.
You can use the Nest Device Trigger payload fields attachment.image or attachment.videoin an automation to send a notification from an actions as shown in the examples below.
Note
This feature is enabled by the following permissions:
-
Based on the events you’ve selected to share from this device, allow Home Assistant to access camera video clips
-
Based on the events you’ve selected to share from this device, allow Home Assistant to access camera snapshots
-
Other permissions in the Nest or Google Home apps.
Known limitations
Google account types
There are limitations to which Google accounts can use the SDM API. See the Device Access Registration documentation for details.
The primary limitations are the following:
- Google Workspace accounts are not supported. Only consumer accounts (for example, gmail.com) can be used.
- Once a Google Account is associated with your Device Access Project, it cannot be changed. Be sure you are signed in to the correct Google Account before continuing.
Keep in mind, the US$5 registration fee is non-refundable.
Google Advanced Protection Program
The “Restricted” API scopes required for device control are automatically blocked for Google Advanced Protection Program users.
Important
Workaround: If you have enabled AP, create and use a secondary, standard Google Account (non-AP) to host the devices:
-
Create a new Google Account without Advanced Protection (if you don’t have one already).
-
Create a new Home in the Google Home app using this new account.
-
Remove your Nest devices from your main account and re-add them to this new Home. Note that this may delete saved video history or settings for some devices.
-
Invite your main account (the one with AP) as a Family Member to the new Home. This allows you to retain control in the Google Home app on your phone.
-
Connect Home Assistant using the new standard account credentials.
*[AP]: Advanced Protection Program
Google Home App migration and cameras
Migrating your cameras to the Google Home App converts cameras from RTSP to WebRTC, which results in the loss of snapshot functionality. Additionally, there is a known issue where media is not currently published for these events; this has been reported to the Nest SDM team and is an unexpected side effect of their migration.
Temperature sensors partially supported
Additional Nest temperature sensors are not supported by the SDM API. The temperature reported by the API will be pulled from whichever device is currently configured as the Active Sensor, which can be adjusted via manual selection or the schedule offered in the Nest App. If multiple sensors are available, only the temperature from the active sensor will be displayed.
Troubleshooting
Can’t link Google account
Symptom: Can’t link to [Project Name]: Please contact [Project Name] if the issue persists
Description
The error Can’t link to [Project Name] typically means that the OAuth Client ID used is mismatched in Home Assistant Application Credentials.
Resolution
The simplest approach is to remove Application Credentials from Home Assistant and then verify that the OAuth Client ID used must be consistent across these three places:
-
Google Cloud Console - See instructions above to create new Web Auth OAuth Credentials if needed.
-
Device Access Project - The OAuth Client ID for your Device Access Project must refer to the Web Auth OAuth Client ID in the Google Cloud Console.
-
Make sure you are using the same Google Account in the Device Access Console and Google Cloud Console. For example, double-check the photo and account name in the top right of the screen.
-
Application Credentials - Home Assistant needs to be configured with the same credentials. Delete any existing entries if they do not match, then either manually enter or re-enter as part of the setup.
Symptom: No access to partner information or Information could not be retrieved
Description
The error No access to partner information or Information could not be retrieved shown during the account linking process means that the Google Account used cannot access the Google Home.
Resolution
- You can organize your homes and devices in the Google Home App and share homes and devices across accounts. Ensure the account being used has access to the Home.
- If you formerly had a Nest account, ensure that it is migrated successfully to a Google Account. If your Google Home has multiple members, the individual who initially set up the home must complete the migration of their Nest Account to a Google Account before you can establish a connection with Home Assistant.
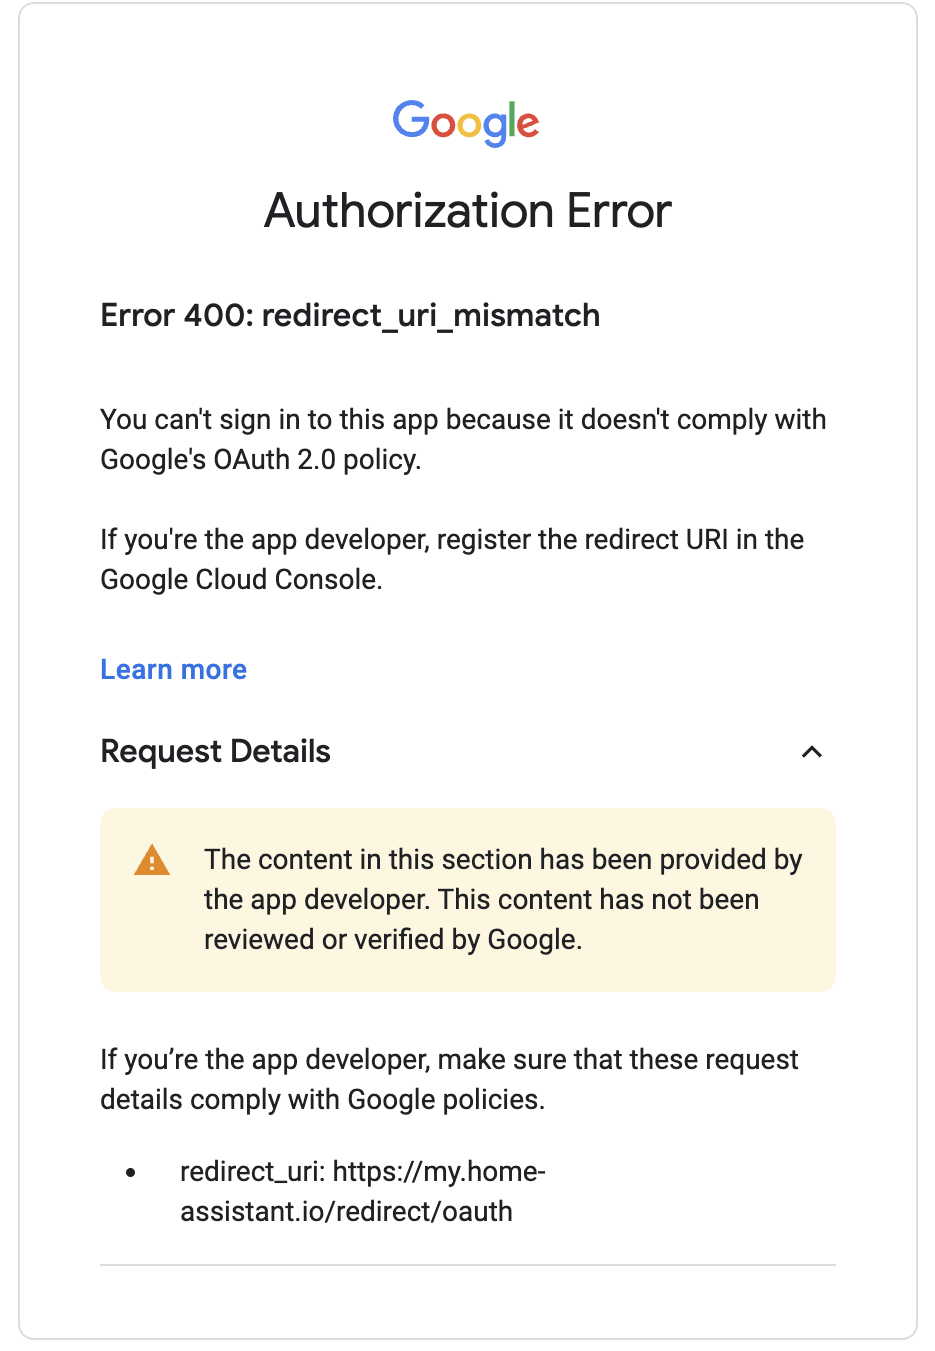
Symptom: Error 400: redirect_uri_mismatch
Description
This error Error 400: redirect_uri_mismatch means that your OAuth Client ID is not configured to match the My Home Assistant callback URL. Home Assistant’s redirect URL behavior may have changed since you initially set this up!
Resolution
For users with a default configuration:
-
This should show the redirect URI
https://my.home-assistant.io/redirect/oauthin the error message. If the error message has a different URL, then you are running an older version of Home Assistant need to upgrade or manually disabled My Home Assistant (see below). -
Go back to the API Console and select your OAuth 2.0 Client ID.
-
Add the URL
https://my.home-assistant.io/redirect/oauthto the list of Authorized redirect URIs and click Save and start the flow over.
For users who have manually disabled My Home Assistant:
-
Google applies strict Redirect URI validation rules to keep your login credentials secure. In practice, this means that you must access Home Assistant over SSL and a public top-level domain. See the documentation on Securing and note that you don’t actually need to enable remote access.
-
If you don’t have My Home Assistant on your installation, you can use
<HOME_ASSISTANT_URL>/auth/external/callbackas the redirect URI instead. -
The
<HOME_ASSISTANT_URL>must be the same as used during the configuration/ authentication process.
Symptom: Something went wrong: Please contact the developer of this app if the issue persists
Description
This typically means you are using the wrong type of credential or have credentials mixed up between accounts.
Resolution
Make sure the credential in the Google Cloud Console is a Web Application credential following the instructions above. If you have multiple Google accounts logged into the current browser session, Google may default to the first logged in account while switching between pages. To avoid this, log out of other accounts or use a private/incognito browser window with only the desired Google account logged in.
Symptom: Something went wrong, please try again in a few minutes
Description
According to Google’s Partner Connections Manager Error Reference, this error covers all other undocumented internal errors within Partner Connections. One of the issues that cause this error is synchronization problems between the Nest and Google Home apps.
Resolution
Confirm that your Nest device is visible within the Google Home App and Nest App under the same Home. If it is missing within Google Home, create a new dummy home on the Nest app, which triggers the synchronization process. (This is the workaround recommended by the Google support team). The dummy entry can be deleted once the Nest device is visible within the Google Home app.
Symptom: Error 403: access_denied or Access blocked: home-assistant.io has not completed Google’s verification process
Description
The error Error 403: access_denied means that the OAuth Consent screen may be misconfigured, either because it does not allow access to your Google Account or because you have entered extra information that triggered Google’s verification process. Google will require verification when you add extra information to the branding page.
Resolution
Visit the OAuth Verification Center and confirm the Verification Status is Verification not required. If verification is required:
- Navigate to the Branding page.
- Remove additional fields that are not required and Save. See the set up instruction above and make sure not to enter extra fields.
- Go back to the Verification Center and confirm the status is correct.
Additionally you need to make sure the Audience configuration is correct by following these steps:
- Visit the OAuth Audience page.
- Make sure the account is set to In production.
You may now repeat the integration setup and account linking steps.
Symptom: Error: invalid_client no application name
Description
The error Error: invalid_client no application name means the OAuth Consent screen has not been fully configured for the project and needs additional information.
Resolution
Visit the OAuth Consent Screen and enter the required fields (App Name, Support Email, Developer Email) and leave everything else as default.
Can’t find devices
Symptom: Devices do not appear in Home Assistant
Description
This typically means that Home Assistant does not have access to the device because it was not returned from the SDM API.
Resolution
You can manage the devices and permissions shared with Home Assistant in the Nest Partner Connections Manager. Home Assistant automatically updates to reflect any changes you make. For more details, refer to the SDM API Troubleshooting documentation.
Symptom: Thermostats do not appear in Home Assistant or are unavailable
There have been reports that Thermostats may not appear or are unavailable due to a bug in the SDM API. A common fix to get the API to work again is to try these steps:
- Restart the Thermostat device. See How to restart or reset a Nest thermostat for more details.
- In the official Nest app or on https://home.nest.com: Move the Thermostat to a different or fake/temporary room.
- Home Assistant automatically updates to reflect any changes you make and will discover new devices that appear in the API.
Symptom: Devices do not appear when the API is disabled
Description
The SDM API may not return devices for the authorized account when the SDM API is disabled.
Resolution
Double-check that GCP is configured correctly and Enable the API and authorize at least one device in the OAuth setup flow. If you have trouble here, then you may want to walk through the Google instructions and issue commands directly against the API until you successfully get back the devices.
Authentication problems
Symptom: Re-authentication required often
Description
You may be asked to reauthenticate more often than you expect, such as every 7 days. This means an OAuth Consent Screen is misconfigured, or your authentication token was revoked by Google for some other reason.
Resolution
- This most likely reason is the OAuth Consent Screen is set to Testing by default which expires the token after 7 days.
- Follow the steps above to set it to Production to resolve this and reauthorize your integration one more time to get a new token.
- You may also see this as the error message invalid_grant: Token has been expired or revoked.
- See Google Identity: Refresh token expiration for more reasons on why your token may have expired.
Integration set up failure
Symptom: Configuration error: Failed to create subscriber subscription/name was not found
Description
The integration fails to start because it attempts to create a subscriber with a subscription name that is not found in your Google Account. By default, Google pub/sub subscriptions will be deleted after 31 days of inactivity (reference). If this happens, then the integration will fail, and you will see the preceding log line in your Home Assistant logs.
Resolution.
To repair the subscriber:
- Go to the Device Access Console and re-enable the Pub/Sub topic.
- The Nest integration may need to be recreated to pick up the new Pub/Sub topic.
- (Optional) To prevent future expirations, go to your Google Cloud Console Pub/Sub subscription page and edit the Pub/Sub subscription created by Nest to not expire by default.
Nest integration data issues
Symptom: Not receiving camera motion and person events
The Nest integration subscribes a Google Pub/sub subscription to listen for camera motion or person events. The settings in the Google Home app also control which events are published, so if they are not set properly you may not receive events.
Resolution
- Verify that you have allowed Home Assistant to access camera streams, and permissions are correctly set in Partner Connections Manager.
- If you are then still not seeing events, it’s possible you need to adjust the Google Home App settings. Refer to the Google Home App Notification Settings for details.
Symptom: Devices not receiving updated information
Description
You may see changes in Google Home that are unexpectedly not reflected in Home Assistant. The Nest integration subscribes to updates from a Google Pub/sub subscription and problems with stale information usually indicate a problem with subscriber configuration.
Changes for things like sensors or thermostat temperature set points should be instantly published to a topic and received by the Home Assistant subscriber when everything is configured correctly.
Resolution
-
To learn more about how Google Pub/Sub works see the Pull subscription workflow documentation. The steps in the following section will:
- Verify the Nest Device Access Console is configured with a Pub/Sub topic for publishing messages
- (Optional) Verify topic message publishing. These steps are available for some topic configurations.
- Verify Pub/Sub subscription message routing
- Verify Home Assistant is receiving messages on the Pub/Sub subscription
-
Verify the Nest Device Access Console configuration
- Visit the Device Access Console
- Click the Home Assistant device access project
- Verify the Pub/Sub topic is Enabled. If not, follow the integration configuration instructions.
- If the Pub/Sub topic starts with
projects/<your cloud project>/topics/home-assistant-then you are using a topic created by Home Assistant. You may follow the steps in the next section to verify the topic. - If the Pub/Sub topic starts with
projects/sdm-prod/topicsthen you are using a topic created by the Device Access console. This is the old way, but works completely fine. You should skip the next section.
-
(Optional) Verify topic message publishing. Skip this section if using a topic name starting with
projects/sdm-prod/topics- Visit the Pub/Sub Topics Cloud Console
- Click the Home Assistant Topic ID matching the Device Access Console configuration.
- View the Subscriptions tab and confirm there is a Subscription ID. This will be verified in the next section.
- Click the Metrics tab and set the zoom to 6 hours or 1 day.
- View the Published message count. This counts messages published by the device to the topic. If the number of messages is not what you expect then it indicates:
- A problem with the device connecting to Google: Verify the device works in the Google Home App.
- An issue with the SDM API: This requires Device Access Support to diagnose or address.
-
Verify Pub/Sub subscription message routing
- Visit the Pub/Sub Subscriptions Cloud Console
- Click the Home Assistant Subscription ID
- Confirm the Topic name is the same as in the Nest Device Access Console above.
- View the Metrics tab in the bottom panel, which includes:
- Delivery metrics: The Publish message count shows messages are published on the topic that are routed to the subscription. You may need to scroll down to see this.
- Oldest unacked message age shows messages not being fully received by the Home Assistant nest integration. See the next section for diagnosing this.
- Click the Messages tab
- Click Pull to see a sample of received messages published on the topic. These correspond to messages optionally verified by the Published message count in the previous section. If there are no messages published then it indicates either:
- A Subscription misconfiguration: Confirm the Topic ID matches the Device Access Console. If they do not match, then follow the integration configuration instructions to resolve this.
- A problem with the device connecting to Google: Verify the device works in the Google Home App.
- An issue with the SDM API: This requires Device Access Support to diagnose or address.
- Click the arrow for a received message to View all row content to make it easier to see the full contents of the received messages. You may confirm the message contains the information you expect to see and corresponds with messages received by Home Assistant in the next section.
-
Verify Home Assistant is receiving messages
- Enable debug logs for the Nest integration. See Debug logs and diagnostics for instructions.
- View the raw logs
- Successfully received event messages will appear in debug logs similar to the following:
- Subscription pull requests are long running, and reconnect every few minutes. This is normal and you will see debug messages like
API error in streaming pulland thenEvent stream connection established. The Pull subscription workflow documentation describes how this works in more detail. The following debug logs indicate the Subscription connection is working properly.
- Confirm the Subscription ID from the
Sending streaming pull requestmessage in the debug logs match the Subscription ID verified above in the cloud console. If they do not match, then follow the integration configuration instructions to resolve this.
- When reporting issues for the Nest integration please include details such as messages published by the device and details from the debug log.
Removing the integration
This integration follows standard integration removal. No extra steps are required.
To remove an integration instance from Home Assistant
- Go to Settings > Devices & services and select the integration card.
- From the list of devices, select the integration instance you want to remove.
- Next to the entry, select the three dots menu. Then, select Delete.
After deleting the integration, you may also want to remove any unused information in your Google Account that was added during the set up process. See the integration configuration instructions for how to find where OAuth credentials and Device Access projects are configured.
Help us improve our documentation
Suggest an edit to this page, or provide/view feedback for this page.