
In this article, we will overview how to resize a partition in a Linux. We will use only built-in tools and commands.
Before you begin with partitions, make sure you have a solid backup solution in place. Check MSP360 Free Backup software for Linux: a command-line based solution designed to automate file-level backups.
The primary way of resizing drive partitions in Linux is to delete the old one and create a new one, using the previous starting sector (you can think about it like “left bound of the new partition”). Then you need to simply modify the file system properties to fit the new bounds. If done carefully, you will not lose your data on the modified element, despite the frightening phrase "delete the partition".
Preparation
Linux has built-in tools (commands) to work with partitions:
- df / lsblk - allows you to list available drives, including block devices.
- mount / umount - simple tools allowing you to detach a partition to change its properties.
- fdisk - management tool. It will recreate partitions with newly specified bounds.
- e2fsck - allows checking of the modified file system for errors.
- resize2fs - modifies existing file system to fit new size bounds.
In this example, we are going to use Ubuntu Server 14 as an instance in Amazon EC2 cloud. So, the disk we are working with is a block EBS device called /dev/xvdb.
Note: depending on your Linux distribution and available storage devices, volume and drive names can be different. You have also use the sudo command if your current account doesn’t have “root” privileges.
- Best practices in system setup and management
- Ways to properly secure your Linux system
- Guide to optimal file structure organization
Shrinking or Extending Linux Partition
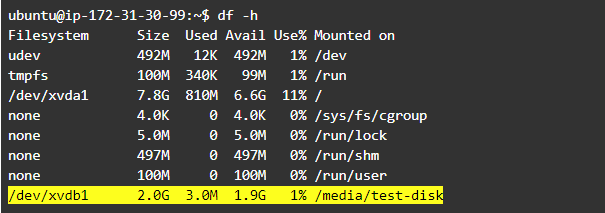
First of all, let’s find the partition we want to resize. Use df -h command to list available elements:
👁 Linux partition resize 1 | MSP360 Blog
The last line contains the device /dev/xvdb1 - it is our working partition. Note that there are actually 2 names:
- /dev/xvdb - it is whole device.
- /dev/xvdb1 - one partition allocated on /dev/xvdb device.
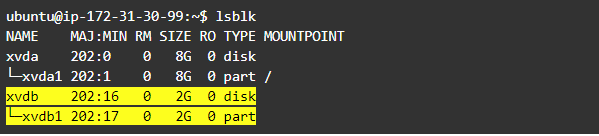
You can check it using, for example, the lsblk tool (for block-level devices only):
👁 Linux partition resize 2 | MSP360 Blog
I have created the file file_should_remain.test to check whether the partition did not lose its data
👁 Linux partition resize 3 | MSP360 Blog
We need to unmount the volume before modifications - just run the umount <mounting point> command, where mounting point is a file system’s representation of the device. And don’t forget sudo to get appropriate permissions:
👁 Linux partition resize 4 | MSP360 Blog
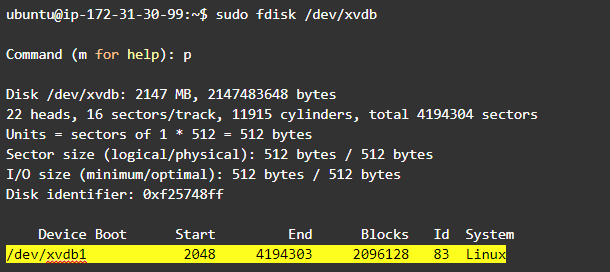
Now run fdisk command with our test disk name as an argument and then type “p” to print the list:
👁 Linux partition resize 5 | MSP360 Blog
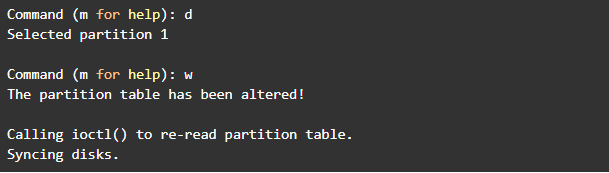
The last line contains important info about the current partition size and its bounds: “Start” and “End”. Remember “Start” value (2048 in this example). Now delete this partition by typing “d” and then type “w” to save these modifications:
👁 Linux partition resize 6 | MSP360 Blog
After the old partition is removed we need to create the new one, either a bigger or smaller size. The following procedure is the same for both actions, but keep in mind that:
- You can extend the partition only to the space available at the “right” side. Simply saying, free space should be at the end of the resizing.
- You cannot shrink the current element to a size smaller than the actual data stored.
- It is a must to specify the same starting point as the previous partition while creating the new one. Otherwise, you may lose your data!
In our example, the new partition will be a smaller size so the Shrink operation will be performed. Let’s run fdisk again and type “n” - creating the new one:
👁 Linux partition resize 7 | MSP360 Blog
You may use default values in most fdisk questions, but carefully check these highlighted on the picture above: first sector (starting point) and last sector. You can use the +<size>G format to specify the desired partition size in Gigabytes (use “M” for Megabytes). Finish by typing “w” to save changes.
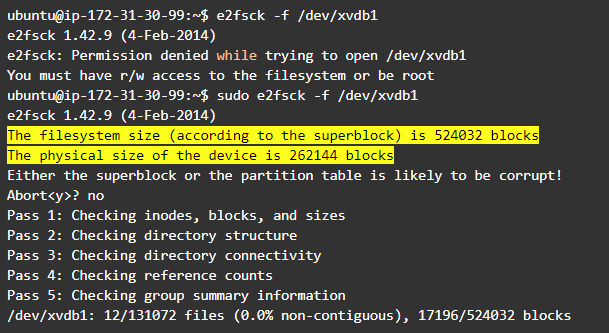
Now we need to verify consistency by running e2fsck:
👁 Linux partition resize 8 | MSP360 Blog
Note the highlighted line - the tool shows that there is a mismatch in the file system configuration and current size. This is due to shrinking the partition with no changes made to the file system metadata. Just answer “no” to continue checking.
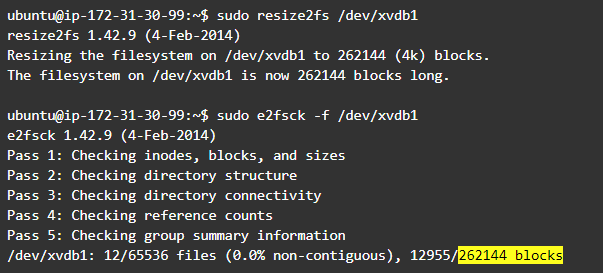
Let’s fix the error using resize2fs and then check the filesystem again:
👁 Linux partition resize 9 | MSP360 Blog
Now the file system block size is the same as for partition configuration. Finally, let’s mount the resized volume and check that our data is still here:
👁 Linux partition resize 10 | MSP360 Blog
As you can see, our test file is still here and the partition has a new size.
Conclusion
That's it. Now you have fresh-new partitions.
Keep reading on how to find your AWS access key ID and secret access key, why Amazon's EC2 and S3 are fundamentally different types of service, Exchange Online vs. Exchange On-Premises, immutable backups, what is RMM, cost-effective backup solutions, what is backup software, and an overview of SQL Server backup types. If you have any questions or comments regarding the article, let us know.