
- What is Flowsta Auth?
- Why Decentralized Authentication Matters
- What We're Building
- Step 1: Register Your Application
- Step 2: Install the SDK
- Step 3: Configure the SDK
- Step 4: Create the Callback Route
- Step 5: Add the Sign-In Button
- Step 6: Configure Redirect URIs
- Step 7: Check Authentication Status
- Step 8: Gate Content
- Step 9: Add Logout Functionality
- Advanced: User Profile Display
- Using AI Assistants to Speed Development
- Security Considerations
- Testing Your Integration
- Production Deployment
- Performance Considerations
- Comparison with Traditional Auth
- What's Next?
- Watch the Integration in Action
- Learn More
- Conclusion
How to Add Decentralized Authentication to Your Web App with Flowsta Auth
Share this article
- Premium Results
- Publish articles on SitePoint
- Daily curated jobs
- Learning Paths
- Discounts to dev tools
7 Day Free Trial. Cancel Anytime.
Adding authentication to a web application has traditionally meant choosing between building your own system (with all its security complexities) or integrating with a centralized provider like Auth0, Firebase, or OAuth services from Big Tech companies.
But there's a third option that's gaining traction: decentralized authentication. And with Flowsta Auth, you can add it to your web app in under 30 minutes.
What is Flowsta Auth?
Flowsta Auth is a zero-knowledge, decentralized authentication system built on Holochain. It provides a "Sign in with Flowsta" button similar to OAuth providers, but with one crucial difference: true user privacy.
Key Features
- Zero-Knowledge Architecture: User data is encrypted and distributed across a peer-to-peer network. Even Flowsta itself cannot access user information—it's cryptographically impossible without the user's keys.
- No Backend Required: Unlike traditional auth systems, you don't need to manage user databases, sessions, or passwords. Flowsta handles identity verification through decentralized cryptographic proofs.
- W3C DID Standards: Flowsta identities use W3C Decentralized Identifiers (DIDs), making them interoperable with other systems that support the standard.
- One Account, Multiple Sites: Users create one Flowsta account and use it across all integrated websites—no repeated registration forms, no password reuse risks.
Why Decentralized Authentication Matters
In an era of data breaches and privacy concerns, centralized authentication creates honeypots of user data. Decentralized systems like Flowsta distribute data across a network, eliminating single points of failure and making mass data breaches practically impossible.
For developers, this means:
- Reduced liability: You're not storing sensitive user data
- GDPR/Privacy compliance: Built-in by design
- Better UX: Single sign-on without tracking
- Lower costs: No auth infrastructure to maintain
What We're Building
In this tutorial, we'll integrate Flowsta Auth into an existing web application. Our example uses a Qwik/React news site called The NOW Times, but the principles apply to any JavaScript framework.
We'll:
- Set up a Flowsta application and get credentials
- Install and configure the Flowsta Auth SDK
- Create authentication flows (login, callback handling)
- Gate content behind authentication
- Display user information
By the end, you'll have a working authentication system with zero backend code.
Prerequisites
- Node.js 16+ and npm/yarn
- An existing web application (any modern JS framework works)
- Basic understanding of OAuth flow concepts
- 20-30 minutes
Step 1: Register Your Application
Before writing code, register your application with Flowsta:
- Visit dev.flowsta.com and create an account
- Click "Create New App"
- Give your app a descriptive name (e.g., "My News Site")
- Copy your Client ID (format: flowsta_app_...)
Note: We'll return here later to add redirect URIs once we know them.
Step 2: Install the SDK
Install the Flowsta Auth SDK:
npm install @flowsta/authOr with Yarn:
yarn add @flowsta/authThe SDK is framework-agnostic and works with React, Vue, Svelte, Angular, Qwik, or vanilla JavaScript.
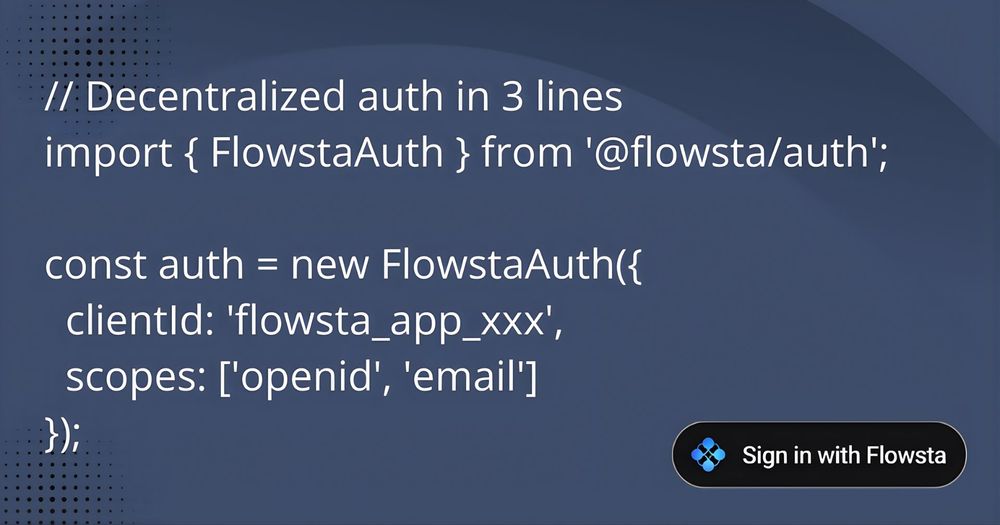
Step 3: Configure the SDK
Create a utility file to initialize and manage the SDK instance. This singleton pattern ensures we don't re-initialize unnecessarily:
// src/lib/flowsta.ts
import { FlowstaAuth } from '@flowsta/auth';
const CLIENT_ID = import.meta.env.VITE_FLOWSTA_CLIENT_ID || 'your_client_id_here';
let authInstance: FlowstaAuth | null = null;
export const getAuth = () => {
 if (typeof window === 'undefined') return null; // SSR safety
 if (!authInstance) {
 authInstance = new FlowstaAuth({
 clientId: CLIENT_ID,
 redirectUri: `${window.location.origin}/auth/callback`,
 scopes: ['openid', 'email', 'display_name']
 });
 }
 return authInstance;
};
Configuration breakdown:
- clientId: Your app identifier from dev.flowsta.com
- redirectUri: Where Flowsta sends users after authentication (we'll build this route next)
- scopes: What user data you're requesting (openid is required, others are optional)
Environment variable setup:
Create a .env file:
VITE_FLOWSTA_CLIENT_ID=flowsta_app_your_actual_id_hereStep 4: Create the Callback Route
When users authenticate, Flowsta redirects them back to your app with an authorization code. You need a route to handle this exchange:
// src/routes/auth/callback/index.tsx (or your framework's equivalent)
import { component$, useVisibleTask$ } from '@builder.io/qwik';
import { useNavigate } from '@builder.io/qwik-city';
import { getAuth } from '~/lib/flowsta';
export default component$(() => {
 const nav = useNavigate();
 useVisibleTask$(async () => {
 const auth = getAuth();
 if (!auth) return;
 try {
 // Exchange authorization code for access token
 await auth.handleCallback();
 // Redirect to home or original destination
 window.location.href = '/';
 } catch (error) {
 console.error('Authentication failed:', error);
 // Handle error (show message, redirect to login, etc.)
 }
 });
 return (
 <div style={{ textAlign: 'center', padding: '2rem' }}>
 <h2>Authenticating...</h2>
 <p>Please wait while we log you in.</p>
 </div>
 );
});
For React apps, use useEffect:
useEffect(() => {
 const auth = getAuth();
 if (!auth) return;
 auth.handleCallback()
 .then(() => window.location.href = '/')
 .catch(err => console.error('Auth failed:', err));
}, []);
Step 5: Add the Sign-In Button
Flowsta provides official button designs. Visit the Button Gallery to download SVG assets in various styles (Dark, Light, Neutral) and shapes (Pill, Rectangle).
Download your preferred style and place it in your public folder (e.g., public/flowsta_signin.svg).
Create a button component:
// src/components/FlowstaButton.tsx
import { component$, $ } from '@builder.io/qwik';
import { getAuth } from '~/lib/flowsta';
export default component$(() => {
 const handleLogin = $(async () => {
 const auth = getAuth();
 if (auth) {
 await auth.login(); // Redirects to login.flowsta.com
 }
 });
 return (
 <button
 onClick$={handleLogin}
 style={{
 background: 'none',
 border: 'none',
 cursor: 'pointer',
 padding: 0
 }}
 aria-label="Sign in with Flowsta"
 >
 <img
 src="/flowsta_signin.svg"
 alt="Sign in with Flowsta"
 width="175"
 height="40"
 />
 </button>
 );
});
Step 6: Configure Redirect URIs
Now that you know your callback URL, add it to your Flowsta app settings:
- Go back to dev.flowsta.com
- Select your application
- Navigate to "Allowed Redirect URIs"
- Add both:
- http://localhost:5173/auth/callback (development)
- https://yourdomain.com/auth/callback (production)
Security note: Flowsta will only redirect to URIs on this whitelist, preventing redirect attacks.
Step 7: Check Authentication Status
To check if a user is logged in:
import { getAuth } from '~/lib/flowsta';
const auth = getAuth();
const isAuthenticated = auth?.isAuthenticated() ?? false;
To get user information:
const user = auth?.getUser();
console.log(user?.displayName); // User's display name
console.log(user?.email); // User's email (if scope granted)
Step 8: Gate Content
Here's a practical example: showing preview content to anonymous users, but full content to authenticated users.
import { component$, useStore, useVisibleTask$ } from '@builder.io/qwik';
import { getAuth } from '~/lib/flowsta';
import FlowstaButton from '~/components/FlowstaButton';
export default component$(() => {
 const store = useStore({
 isAuthenticated: false,
 userName: ''
 });
 // Check auth status on mount
 useVisibleTask$(() => {
 const auth = getAuth();
 if (auth?.isAuthenticated()) {
 store.isAuthenticated = true;
 store.userName = auth.getUser()?.displayName || 'User';
 }
 });
 return (
 <div>
 {/* Always show first 4 articles */}
 <ArticleGrid articles={articles.slice(0, 4)} />
 {/* Gate remaining content */}
 {!store.isAuthenticated ? (
 <div style={{
 textAlign: 'center',
 padding: '3rem',
 background: '#f9fafb',
 borderRadius: '8px',
 margin: '2rem 0'
 }}>
 <h3>Want to read more?</h3>
 <p>Sign in with Flowsta to access all articles</p>
 <FlowstaButton />
 <p style={{ marginTop: '1rem', fontSize: '14px', color: '#6b7280' }}>
 Free account • No credit card • 30 seconds to sign up
 </p>
 </div>
 ) : (
 <>
 <p style={{ textAlign: 'center', color: '#059669' }}>
 Welcome back, {store.userName}!
 </p>
 <ArticleGrid articles={articles.slice(4)} />
 </>
 )}
 </div>
 );
});
Step 9: Add Logout Functionality
To log users out:
const handleLogout = $(async () => {
 const auth = getAuth();
 if (auth) {
 await auth.logout();
 window.location.reload(); // Refresh to update UI
 }
});
// In your component
<button onClick$={handleLogout}>Sign Out</button>
Advanced: User Profile Display
Create a user profile component:
export const UserProfile = component$(() => {
 const store = useStore({
 user: null as any,
 loading: true
 });
 useVisibleTask$(() => {
 const auth = getAuth();
 if (auth?.isAuthenticated()) {
 store.user = auth.getUser();
 }
 store.loading = false;
 });
 if (store.loading) return <div>Loading...</div>;
 if (!store.user) return null;
 return (
 <div style={{ padding: '1rem', border: '1px solid #e5e7eb', borderRadius: '8px' }}>
 <h3>Profile</h3>
 <p><strong>Name:</strong> {store.user.displayName}</p>
 <p><strong>Email:</strong> {store.user.email}</p>
 <p><strong>DID:</strong> {store.user.did.substring(0, 20)}...</p>
 </div>
 );
});
Using AI Assistants to Speed Development
While this tutorial demonstrates manual integration, you can accelerate the process using AI-powered editors like Cursor or GitHub Copilot.
Tip: Reference the Flowsta documentation directly in your AI assistant by providing the URL as context. This allows the AI to generate framework-specific code that follows Flowsta's best practices.
For example, in Cursor, you can use @https://docs.flowsta.com/ to give the AI access to the full documentation while it generates integration code for your specific tech stack.
Security Considerations
Token Storage: The SDK stores tokens securely in browser storage. Never expose tokens in client-side code or logs.
- HTTPS Required: In production, your redirect URIs must use HTTPS. Flowsta will reject insecure connections.
- Scope Permissions: Only request scopes your application needs. Users see what data you're requesting and can deny access.
- Session Management: Implement proper session timeouts and refresh token handling for long-lived sessions.
Testing Your Integration
Development testing:
npm run dev # Start your dev server
- Navigate to your app
- Click the Flowsta sign-in button
- Create a test account or log in at login.flowsta.com
- Verify you're redirected back and authenticated
Common issues:
- "Redirect URI mismatch": Ensure your callback URL exactly matches what's registered at dev.flowsta.com
- "Invalid client ID": Double-check your environment variable is loaded correctly
- Callback doesn't trigger: Verify your route path matches the redirectUri configuration
Production Deployment
Before deploying:
- Add production redirect URI to dev.flowsta.com
- Set VITE_FLOWSTA_CLIENT_ID in production environment
- Test authentication flow in staging
- Verify HTTPS is enabled
- Test logout functionality
- Monitor error logs for auth failures
Performance Considerations
The Flowsta SDK is lightweight (~15KB gzipped) and doesn't impact page load significantly. For optimal performance:
- Lazy load the auth check on routes that need it
- Cache authentication status in state management (Redux, Zustand, etc.)
- Prefetch the SDK bundle on pages with sign-in buttons
Comparison with Traditional Auth
Traditional OAuth (Auth0, Firebase):
- Centralized (single point of failure)
- Company has access to user data
- Expensive
- Privacy concerns
Flowsta Auth:
- Decentralized (no single point of failure)
- Zero-knowledge (mathematically private)
- Generous Free Tier and then affordable
- Users own their identity
What's Next?
You now have a working decentralized authentication system. Consider these enhancements:
- Role-based access control: Store user roles in your database, keyed by their Flowsta DID
- Profile customization: Let users update preferences and settings
- Progressive disclosure: Request additional scopes only when needed
- Multi-device sync: Flowsta handles session sync across devices automatically
Watch the Integration in Action
Want to see this integration process in real-time? Watch this video walkthrough showing how Flowsta Auth was added to The NOW Times using AI-assisted development:
This video demonstrates the integration using Cursor AI, showing how the concepts in this tutorial can be accelerated with AI-powered development tools.
Learn More
- Flowsta Documentation: Complete SDK reference and guides
- Developer Portal: Manage your apps and view analytics
- Flowsta Discord: Get help from the community
- Example Implementation: See it live on The NOW Times
Conclusion
Decentralized authentication represents a paradigm shift in how we handle digital identity. With Flowsta Auth, you can offer users true privacy without sacrificing developer experience or user convenience.
The integration process is straightforward—comparable to any OAuth provider—but the benefits are substantial: no backend auth infrastructure, no user data liability, built-in privacy compliance, and a better user experience.
As the web moves toward decentralization and user sovereignty, tools like Flowsta Auth provide a practical bridge between today's UX expectations and tomorrow's privacy standards.
Ready to get started? Create your free Flowsta app and integrate privacy-first authentication in your next project.
Have questions about integrating Flowsta Auth? Join the Flowsta Discord community or check out the documentation.
SitePoint Sponsors
Sponsored posts are provided by our content partners. Thank you for supporting the partners who make SitePoint possible.
- Premium Results
- Publish articles on SitePoint
- Daily curated jobs
- Learning Paths
- Discounts to dev tools
7 Day Free Trial. Cancel Anytime.