
How to do video processing in the browser with WebCodecs
Share this article
- Premium Results
- Publish articles on SitePoint
- Daily curated jobs
- Learning Paths
- Discounts to dev tools
7 Day Free Trial. Cancel Anytime.
How to do video processing in the browser with WebCodecs
WebCodecs is a new-ish browser API that enables frontend web applications to access hardware-accelerated video encoding and decoding.
This not only makes it possible to build performant browser-based video editing or live streaming apps, it also enables entirely new use cases like programmatic video generation.
If you're doing, or considering doing anything with video in the browser, you should definitely be aware of WebCodecs and the kinds of things you can do with it.
In this article we will cover:
- What WebCodecs actually is
- Review major use cases for WebCodecs
- Go over the basics of WebCodecs
- Build a simple video editing application
What is WebCodecs
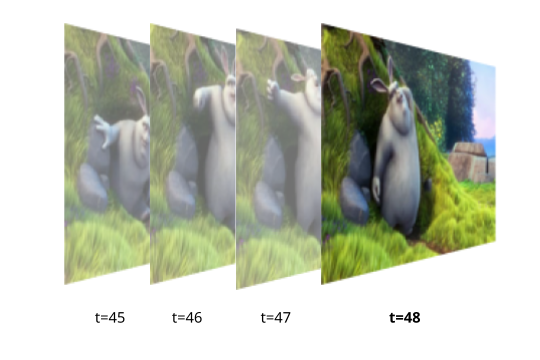
Before we get into WebCodecs, you should first be aware of what codecs are. You're likely already aware that a video is just a series of images:
👁 Video Frames
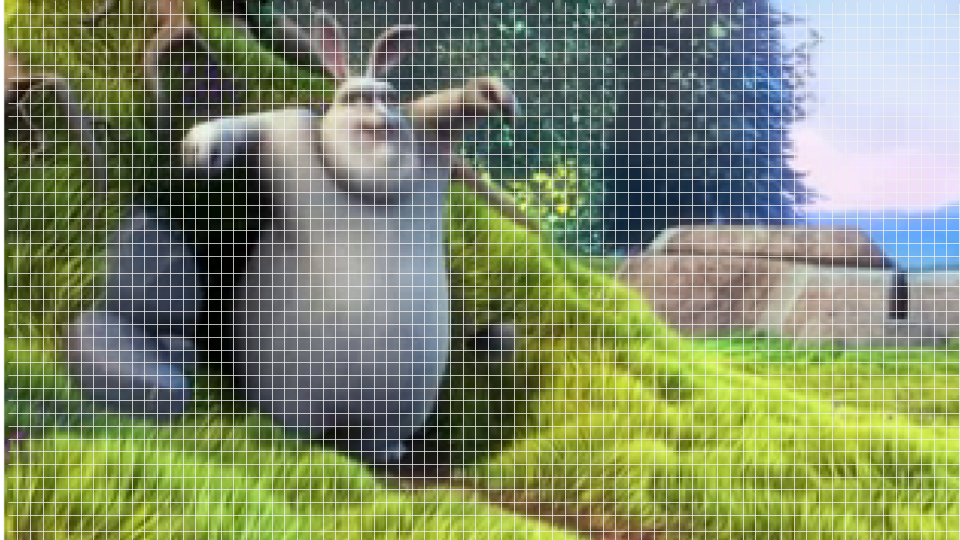
Moreover, every video frame is made up of pixels, so that each frame of a 1080p video has 1920x1080= 2,073,600 pixels. Each pixel also has 3 bytes, denoting the RGB value.
If you do the math, a raw, hour-long 1080p video (at 30 frames per second) would be about 625 GB. If you've ever downloaded large videos before, you'd know that actual video files are ~100x smaller than that.
A codec is an algorithm for compressing video (or audio) data. Some common codecs include h264, vp9 and av1. If you ever download an mp4 file, it's most often compressed with the 'h264' codec.
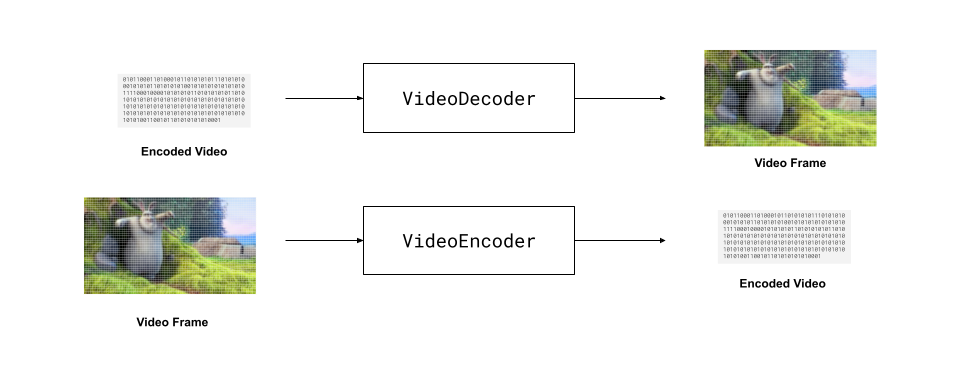
The core of WebCodecs is to allow to decode compressed video into raw video frames, and to compress raw video frames into encoded video.
Other browser APIs like HTMLVideoElement and MediaRecorder also enable decoding and encoding video in the browser, but they are high level APIs which are easy to use but lack low level control.
WebCodecs gives much lower level control, enabling you to decode and encode video on a per-frame basis, which is necessary for some use cases like video editing and programmatic video generation.
Use cases for WebCodecs
The low-level control over video encoding/decoding enables developers to build high performance browser-based video applications that were previously either the domain of desktop software or which required server-side video processing.
A few categories of WebCodecs applications include:
Video Editing: Browser based video editing tools like Capcut and ClipChamp allow users to edit video with as much flexibility and performance as desktop software like Adobe Premiere Pro, but without the need to install or configure anything.
Live Streaming: Browser based recording studios like Streamyard or Riverside use WebCodecs to record and stream higher-quality video streams than would be possible with WebRTC alone, providing content creators with the quality and performance of desktop studio software like OBS without the need for installation or configuration.
Video Utilities: Many companies (like Veed, Canva) use free video utilities as a lead-generation mechanism. Whereas previously free video utilities had usage limits or ads (to account for server processing costs), WebCodecs enables 100% client-side video processing, making it much easier to build free video utilities. A good example is free.upscaler.video, an open-source video enhancement tool which upscales thousands of hours of video a day with zero server costs thanks to WebCodecs.
Programmatic Video Generation: WebCodecs is increasingly used to create programmatic videos, enabling developers to code animated videos, or generate parameterized videos on the fly. Tools like Remotion enable developers to programmatically construct video with React.
In this article, we'll use WebCodecs to create a simple video editing application to generate a portrait clip from a landscape talking head video, along with a logo and captions. Clipping is both a very common type of video editing utility, and touches a bit of all the above mentioned use cases.
Basics of WebCodecs
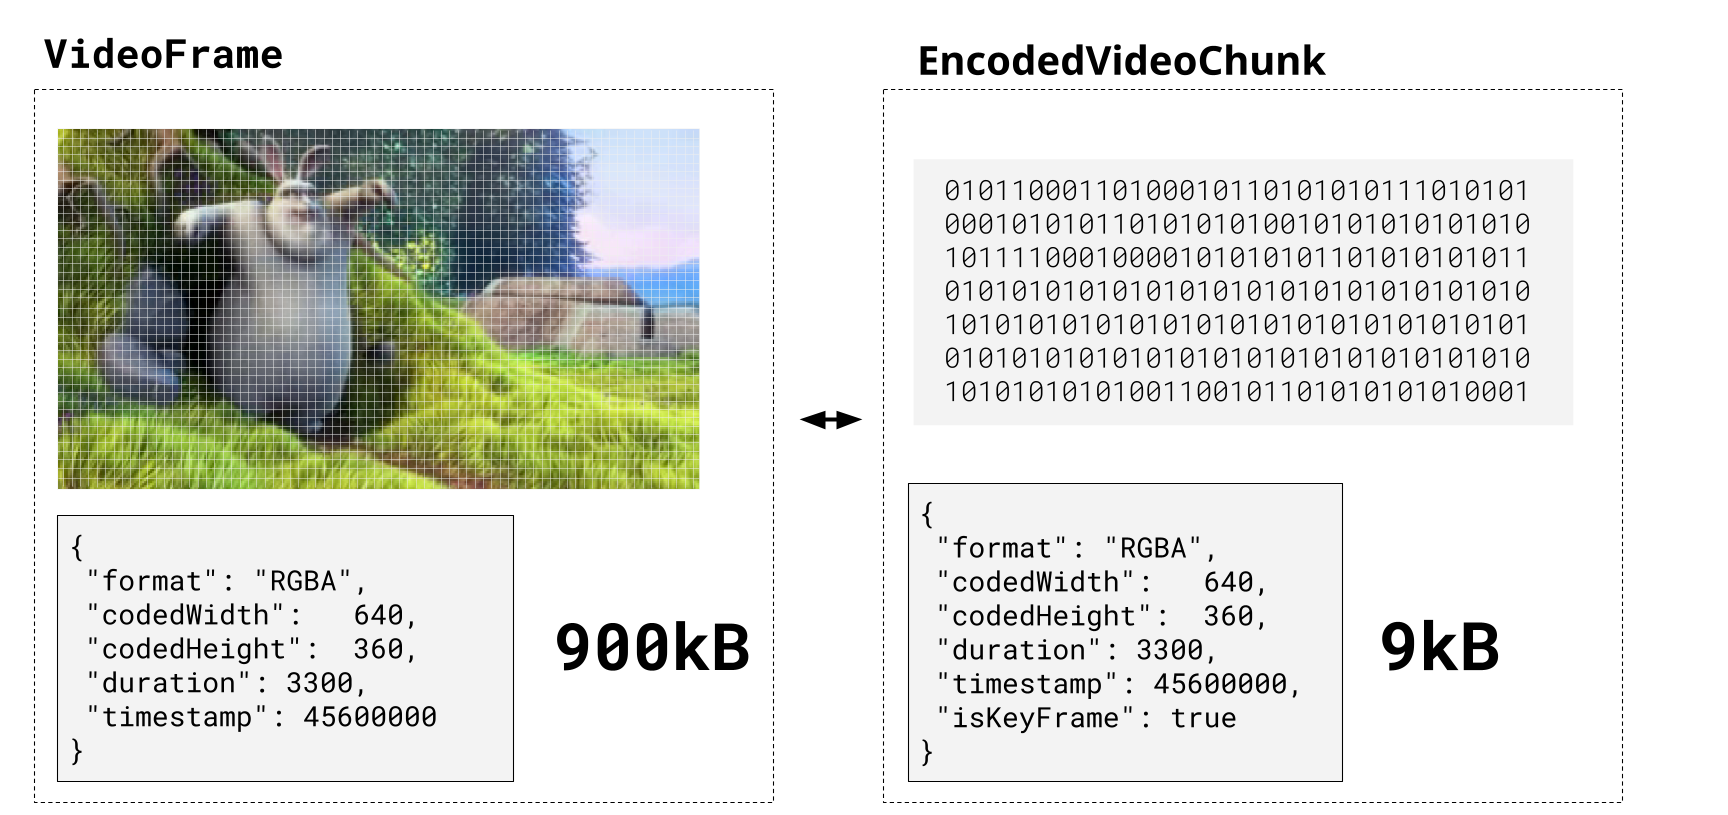
The two main data types we'll be working with in WebCodecs are the VideoFrame object and EncodedVideoChunk object.
Video Frames
VideoFrame objects contain the image data for a video frame, as well as key metadata like format, timestamp and duration.
When decoding video, a VideoDecoder will generate VideoFrame objects and we can then render these to a canvas as so:
const canvas = new OffscreenCanvas(640, 480);
const ctx = canvas.getContext('2d');
const decoder = new VideoDecoder({
 output(frame: VideoFrame) {
 ctx.drawImage(frame, 0, 0);
 frame.close()
 },
 error(e) {}
});
When encoding, you can construct raw video frames from a canvas, which you would then feed to an encoder:
const videoFrame = new VideoFrame(canvas, { timestamp }); //time is in µs
encoder.encode(videoFrame, {keyFrame: frameIndex%60==0});
You can also grab raw video frames from an HTMLVideoElement, which can be useful if you want the browser to handle playback, audio & demuxing, while still manipulating the video frame in a canvas (we'll do this for our demo).
const videoFrame = new VideoFrame(video,{ timestamp: video.currentTime*1e6 });Keep in mind that VideoFrame objects take up a lot of memory (10 MB for a 1080p frame), and when playing 30fps video, that memory quickly adds up.
You'll need to close each VideoFrame after you are done with it to avoid memory issues:
videoFrame.close()EncodedVideoChunk
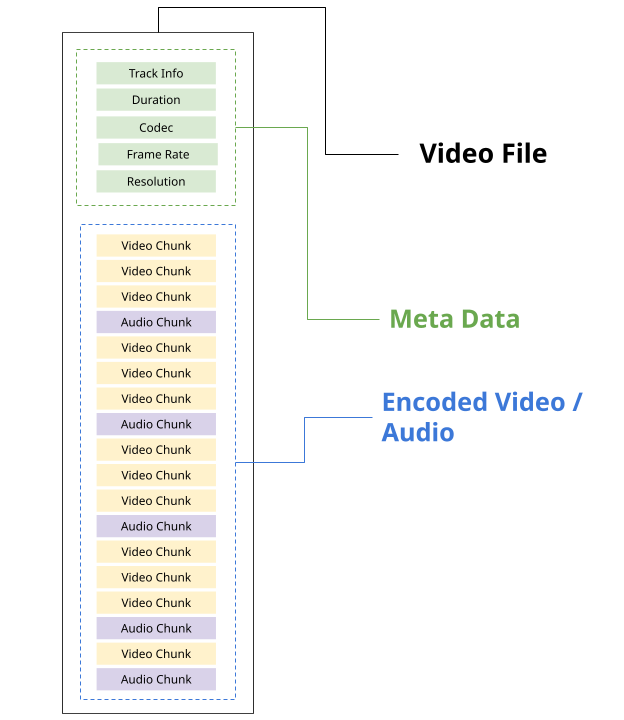
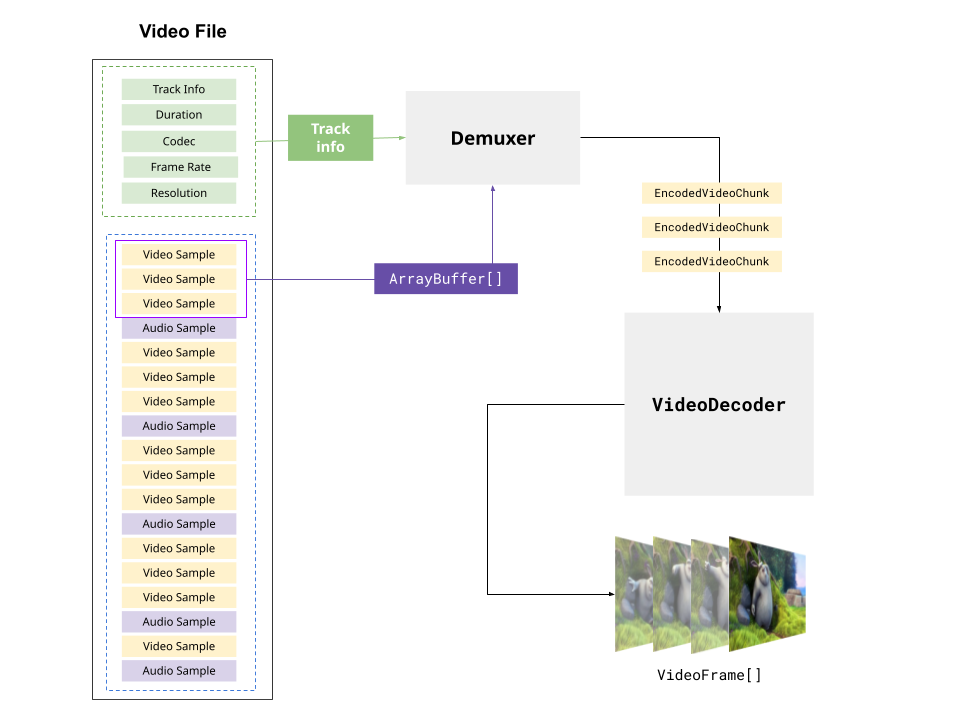
EncodedVideoChunks are compressed versions of each VideoFrame. A video file itself is composed of metadata, as well as encoded audio and video.
You will need to use a library like MediaBunny to read EncodedVideoChunks from a file, or write EncodedVideoChunks to a file. Here's a demo example:
import { getVideoChunks, ExampleMuxer } from 'webcodecs-utils'
// Read EncodedVideoChunks from a video file
const chunks = <EncodedVideoChunk[]> await getVideoChunks(<File> file);
//Write EncodedVideoChunks to a video file
const muxer = new ExampleMuxer();
for (const chunk of chunks){
 muxer.addChunk(chunk);
}
const arrayBuffer = await muxer.finish();
const blob = new Blob([arrayBuffer], {type: 'video/mp4'}); // Your output file
Decoding
The VideoDecoder turns EncodedVideoChunks into VideoFrames. A proper 'decode' loop would involve reading EncodedVideoChunks from a file, feeding them to a VideoDecoder, and then rendering the result to a canvas.
You would start by defining a new video decoder:
const decoder = new VideoDecoder({
 output: function(frame: VideoFrame){
 //do something with the VideoFrame
 },
 error: function(e: any)=> console.warn(e);
});
You need then configure the decoder:
decoder.configure(config)There are several libraries that can extract the decoderConfig for a specific file:
import { MP4Demuxer } from 'webcodecs-utils'
const demuxer = new MP4Demuxer(file);
await demuxer.load();
const config = demuxer.getVideoDecoderConfig();
Finally, you can send chunks to the decoder, and the decoder will start generating VideoFrame objects:
for (const chunk of chunks){
 decoder.decode(chunk);
}
A full working demuxing + decoding "hello world", rendering the video to a canvas would look like this:
import { MP4Demuxer } from 'webcodecs-utils'
const canvas = new OffscreenCanvas(640, 480);
const ctx = canvas.getContext('2d');
const demuxer = new MP4Demuxer(file);
await demuxer.load();
const config = demuxer.getVideoDecoderConfig();
const chunks = await demuxer.extractSegment('video', 0);
const decoder = new VideoDecoder({
 output: function(frame: VideoFrame){
 ctx.drawImage(frame, 0, 0);
 frame.close()
 },
 error: function(e: any)=> console.warn(e);
});
decoder.configure(config)
for (const chunk of chunks){
 decoder.decode(chunk);
}
Encoding
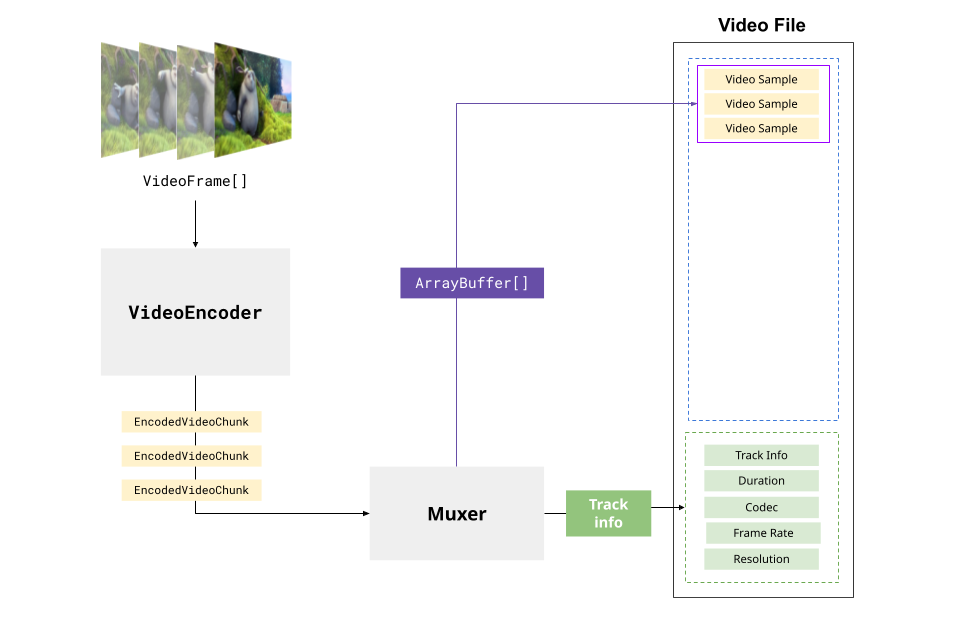
The VideoEncoder turns VideoFrame objects into EncodedVideoChunk objects, and this is what you'd use to "render" a video, turning a canvas animation into a video file.
You'd start by defining a video encoder:
const encoder = new VideoEncoder({
 output: function(chunk: EncodedVideoChunk, meta: any){
 // Do something with the chunk
 },
 error: function(e: any)=> console.warn(e);
});
You'd then encode a video. Here you actually decide how to configure the encoder based on your codec choice. Here we'll just choose one of the most common for H264 (the most common codec for MP4 files).
encoder.configure({
 'codec': 'avc1.4d0034',
 width: 1280,
 height: 720,
 bitrate: 1000000 //1 MBPS,
 framerate: 25
});
You can find a full list of codecs here. Presumably you know what the width, height and framerate of your video will be. As for bitrate, here is a handy function:
function getBitrate(width, height, fps, quality = 'good') {
 const pixels = width * height;
 const qualityFactors = {
 'low': 0.05,
 'good': 0.08,
 'high': 0.10,
 'very-high': 0.15
 };
 const factor = qualityFactors[quality] || qualityFactors['good'];
 return pixels * fps * factor;
}
To showcase how to encode video, we can start with creating a canvas:
const canvas = new OffscreenCanvas(640, 360);
const ctx = canvas.getContext('2d');
const TOTAL_FRAMES=300;
let frameNumber = 0;
let chunksMuxed = 0;
const fps = 30;
We'll then create a render function to draw something to the canvas:
function renderFrame(){
 ctx.fillStyle = '#000';
 ctx.fillRect(0, 0, canvas.width, canvas.height);
 // Draw frame number
 ctx.fillStyle = 'white';
 ctx.font = `bold ${Math.min(canvas.width / 10, 72)}px Arial`;
 ctx.textAlign = 'center';
 ctx.textBaseline = 'middle';
 ctx.fillText(`Frame ${frameNumber}`, canvas.width / 2, canvas.height / 2);
}
We'll then define the encoder:
const encoder = new VideoEncoder({
 output: function(chunk, meta){
 muxVideoChunk(chunk, meta) // we'll define this later
 },
 error: function(e){}
})
encoder.configure({
 'codec': 'avc1.4d0034',
 width: 1280,
 height: 720,
 bitrate: 1000000 //1 MBPS,
 framerate: 25
});
Then we do the encode loop, which will render each frame and encode the contents of canvas:
let flushed = false;
async function encodeLoop(){
 renderFrame();
 const frame = new VideoFrame(canvas, {timestamp: frameNumber/fps*1e6});
 encoder.encode(frame, {keyFrame: frameNumber %60 ===0});
 frame.close();
 frameNumber++;
 if(frameNumber === TOTAL_FRAMES) {
 if (!flushed) encoder.flush();
 }
 else return requestAnimationFrame(encodeLoop);
}
Finally, we'll use MediaBunny to mux the video to a file:
import { EncodedPacket, EncodedVideoPacketSource, BufferTarget, Mp4OutputFormat, Output } from 'mediabunny';
const output = new Output({
 format: new Mp4OutputFormat(),
 target: new BufferTarget(),
});
const source = new EncodedVideoPacketSource('avc');
output.addVideoTrack(source);
await output.start();
function muxVideo(chunk, meta){
 source.add(EncodedPacket.fromEncodedChunk(chunk))
 chunksMuxed++;
 if(chunksMuxed === TOTAL_FRAMES) finish(); // Get our file
}
And last we define the finish function:
await output.finalize();
const buffer = <ArrayBuffer> output.target.buffer;
encoder.close();
const blob = new Blob([buffer], { type: 'video/mp4' });
And then to start, all we'll need to do is to start the encodeLoop:
encodeLoop()And you'd be able to render the canvas animation to an mp4 video. You can see a live demo below:
Video Editing Tutorial
Now that we've gotten the basics of encoding and decoding with WebCodecs, we'll walk through building a basic video editing process with WebCodecs.
I'll choose a very common video-editing use case, which is to extract and export a "clip" from a larger user-generated video, adding captions and a logo. For this tutorial, we're going to take in a Zoom recording of one of my podcast episodes, then reframe it to portrait. We'll then add captions and logos, and we'll export a 40 second clip.
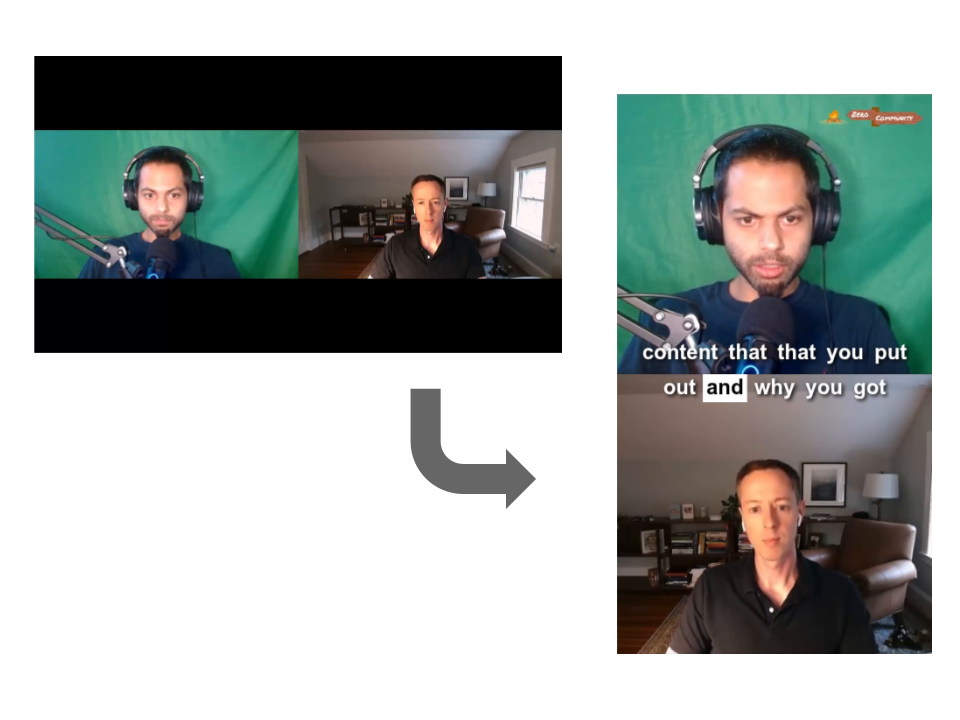
Building a full-fledged video editing software is ambitious. To simplify, we will break this into two steps: (1) The preview, where we have our defined transformations, and (2) The export which will actually use WebCodecs to export this as a video file.
Preview
For a simple demo, we'll simplify our lives a lot by just using the built-in HTMLVideoElement to handle playback and audio.
<video id="video" controls src="demo.mp4"></video>
<canvas id="canvas"></canvas>
We'll then define a render function which will take in our 720p video, and reframe the videos. To reframe, we need to consider the Zoom recording layout as well as the output clip layout, and make sure that we properly map the source coordinates to the destination coordinates:
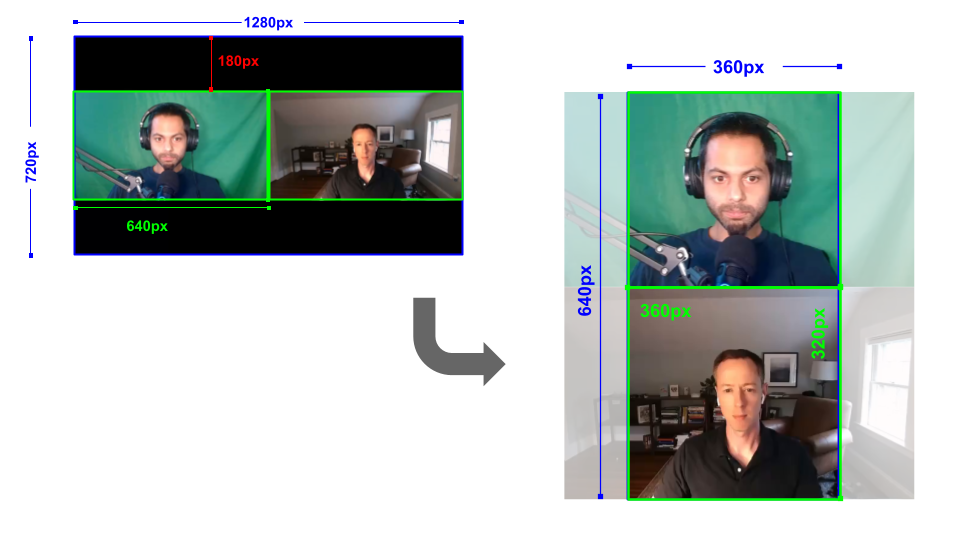
In an actual application this can be calculated dynamically based on source and destination dimensions, but for simplicity we'll just hard-code these values.
function renderFrame(frame, ctx) {
 const cropX = 117;
 const cropWidth = 406; // 360 / (320/360) ≈ 406
 // Top participant (left side of source, green screen)
 ctx.drawImage(
 frame,
 cropX, 180, // source x, y
 cropWidth, 360, // source width, height
 0, 0, // dest x, y
 360, 320 // dest width, height
 );
 // Bottom participant (right side of source, office)
 ctx.drawImage(
 frame,
 640 + cropX, 180, // source x, y
 cropWidth, 360, // source width, height
 0, 320, // dest x, y
 360, 320 // dest width, height
 );
}
In the preview, using the video frame, the render loop is very simple:
// Use requestVideoFrameCallback to grab frames
video.requestVideoFrameCallback(function renderLoop() {
 // Create VideoFrame from video element
 const frame = new VideoFrame(video, { timestamp: video.currentTime * 1e6 });
 renderFrame(frame, ctx);
 frame.close();
 // Continue loop
 video.requestVideoFrameCallback(renderLoop);
});
Pressing play on the video will do the coordinate transformation:
Next, we'll add captions and a logo. For the captions we'll use a transcript with word-level timestamps generated with ElevenLabs.
transcript.json
[
 {
 "speaker": "left",
 "start": 1.4399999,
 "end": 16.465,
 "text": "Welcome everyone to the third episode of the zero to community podcast where we showcase the stories of founders and marketers who have built their own communities around their company's products or services from scratch.",
 "words": [
 {
 "word": "Welcome",
 "start": 1.4399999,
 "end": 1.8399999
 },
 {
 "word": "everyone",
 "start": 1.8399999,
 "end": 2.32
 }
 ]
 }
]
Then, to render the transcript we'll create a CaptionRenderer class which will take in the transcript and the canvas2d context:
export class CaptionRenderer {
 constructor(transcript, ctx) {
 this.transcript = transcript;
 this.ctx = ctx;
 this.fontSize = 24;
 this.lineHeight = 32;
 this.lineGap = 8;
 this.wordGap = 12;
 this.maxLines = 2;
 this.maxWidth = 340; // For 360px portrait width, leave some padding
 // Create sentences from transcript
 this.sentences = this.createSentences();
 }
 createSentences() {
 /// To fill
 }
 getCurrentSentence(time) {
 //to fill
 }
 getCurrentWord(sentence, time) {
 //to fill
 }
 draw(time) {
 //To fill
 }
}
We will first loop through the sentences in createSentences to pre-identify the layout ahead of time using ctx.measureText:
 createSentences() {
 const sentences = [];
 let currentSentence = null;
 let currentLine = null;
 // Flatten all words from transcript
 const allWords = [];
 for (const line of this.transcript) {
 for (const word of line.words) {
 allWords.push({
 text: word.word,
 start: word.start,
 end: word.end,
 speaker: line.speaker
 });
 }
 }
 for (const word of allWords) {
 // Measure word width
 word.width = this.ctx.measureText(word.text).width;
 if (!currentLine) {
 currentLine = {
 words: [word],
 width: word.width,
 start: word.start,
 end: word.end,
 speaker: word.speaker
 };
 } else if (
 word.width + this.wordGap + currentLine.width > this.maxWidth ||
 word.speaker !== currentLine.speaker
 ) {
 // Line is full or speaker changed - start new line
 if (!currentSentence) {
 currentSentence = {
 lines: [currentLine],
 start: currentLine.start,
 end: currentLine.end
 };
 } else if (currentSentence.lines.length >= this.maxLines) {
 // Sentence is full - push and start new
 sentences.push(currentSentence);
 currentSentence = {
 lines: [currentLine],
 start: currentLine.start,
 end: currentLine.end
 };
 } else {
 // Add line to current sentence
 currentSentence.lines.push(currentLine);
 currentSentence.end = currentLine.end;
 }
 // Start new line
 currentLine = {
 words: [word],
 width: word.width,
 start: word.start,
 end: word.end,
 speaker: word.speaker
 };
 } else {
 // Add word to current line
 currentLine.words.push(word);
 currentLine.width += this.wordGap + word.width;
 currentLine.end = word.end;
 }
 }
 // Push remaining line and sentence
 if (currentLine) {
 if (!currentSentence) {
 currentSentence = {
 lines: [currentLine],
 start: currentLine.start,
 end: currentLine.end
 };
 } else {
 currentSentence.lines.push(currentLine);
 currentSentence.end = currentLine.end;
 }
 }
 if (currentSentence) {
 sentences.push(currentSentence);
 }
 return sentences;
 }
We'll then define the render function, which only takes in time as an argument and renders the captions onto the canvas:
 draw(time) {
 const sentence = this.getCurrentSentence(time);
 if (!sentence) return;
 const currentWord = this.getCurrentWord(sentence, time);
 const canvasWidth = this.ctx.canvas.width;
 const canvasHeight = this.ctx.canvas.height;
 // Calculate total height for centering
 const totalHeight = sentence.lines.length * this.lineHeight +
 (sentence.lines.length - 1) * this.lineGap;
 // Position captions near bottom (80% down)
 const startY = canvasHeight * 0.5 - totalHeight / 2;
 this.ctx.font = `700 ${this.fontSize}px Arial`;
 this.ctx.textBaseline = 'top';
 // Draw each line
 for (let i = 0; i < sentence.lines.length; i++) {
 const line = sentence.lines[i];
 const lineY = startY + i * (this.lineHeight + this.lineGap);
 // Center line horizontally
 const lineX = (canvasWidth - line.width) / 2;
 let wordX = lineX;
 // Draw each word
 for (const word of line.words) {
 const isCurrentWord = currentWord &&
 word.start === currentWord.start &&
 word.end === currentWord.end;
 if (isCurrentWord) {
 // Draw background box for current word
 const padding = 4;
 this.ctx.fillStyle = 'white';
 this.ctx.fillRect(
 wordX - padding,
 lineY - padding,
 word.width + padding * 2,
 this.lineHeight
 );
 // Draw black text
 this.ctx.fillStyle = 'black';
 this.ctx.fillText(word.text, wordX, lineY);
 } else {
 // Draw white text with black shadow
 this.ctx.shadowColor = 'black';
 this.ctx.shadowBlur = 4;
 this.ctx.shadowOffsetX = 2;
 this.ctx.shadowOffsetY = 2;
 this.ctx.fillStyle = 'white';
 this.ctx.fillText(word.text, wordX, lineY);
 // Reset shadow
 this.ctx.shadowColor = 'transparent';
 this.ctx.shadowBlur = 0;
 this.ctx.shadowOffsetX = 0;
 this.ctx.shadowOffsetY = 0;
 }
 wordX += word.width + this.wordGap;
 }
 }
 }
And we add some utility functions to get the current sentence/word:
 getCurrentSentence(time) {
 for (const sentence of this.sentences) {
 if (time >= sentence.start && time <= sentence.end) {
 return sentence;
 }
 }
 return null;
 }
 getCurrentWord(sentence, time) {
 for (const line of sentence.lines) {
 for (const word of line.words) {
 if (time >= word.start && time <= word.end) {
 return word;
 }
 }
 }
 return null;
 }
Finally, we'll add a logo (600x170) at the top left of the canvas with a LogoRenderer class:
export class LogoRenderer {
 constructor(logoPath, ctx) {
 this.ctx = ctx;
 this.logo = new Image();
 this.logoLoaded = false;
 this.logoWidth = 120; // Scaled down from 600x170
 this.logoHeight = 34; // Maintain aspect ratio
 this.padding = 10;
 this.logo.src = logoPath;
 }
 draw() {
 const canvasWidth = this.ctx.canvas.width;
 const x = canvasWidth - this.logoWidth - this.padding;
 const y = this.padding;
 this.ctx.drawImage(
 this.logo,
 x, y,
 this.logoWidth,
 this.logoHeight
 );
 }
}
Next, we'll refactor the face renderer to its own operation:
export class FaceRenderer {
 constructor(ctx) {
 this.ctx = ctx;
 this.cropX = 117;
 this.cropWidth = 406;
 }
 draw(frame) {
 this.ctx.drawImage(
 frame,
 this.cropX, 180, // source x, y
 this.cropWidth, 360, // source width, height
 0, 0, // dest x, y
 360, 320 // dest width, height
 );
 this.ctx.drawImage(
 frame,
 640 + this.cropX, 180, // source x, y
 this.cropWidth, 360, // source width, height
 0, 320, // dest x, y
 360, 320 // dest width, height
 );
 }
}
Finally, our main render function looks like this:
function renderFrame(frame, ctx, time) {
 faceRenderer.draw(frame)
 logoRenderer.draw();
 captionRenderer.draw(time);
}
Export
Okay, so we created the render functions to create the outline of a "clip" from the original video. Strictly speaking that could have been done without the WebCodecs API, but to actually export this as a downloadable video we absolutely need the webcodecs API.
We're also going to actually export a clip, not the full source video, so we'll start by defining the start and end timestamps of the video:
// Most "AI clips" features/tools use an LLM with the transcript to identify timestamps for an interesting clip. For this demo we'll hardcode timestamps
const clipStart = 318;
const clipEnd = 360;
Next, we'll use the web-demuxer library to load the video config:
import { WebDemuxer } from 'web-demuxer';
const demuxer = new WebDemuxer({
 wasmFilePath: "https://cdn.jsdelivr.net/npm/web-demuxer@latest/dist/wasm-files/web-demuxer.wasm"
});
await demuxer.load(file);
const mediaInfo = await demuxer.getMediaInfo();
const decoderConfig = await demuxer.getDecoderConfig('video');
const audioConfig = await demuxer.getDecoderConfig('audio');
We'll then create the canvas and context:
const canvas = new OffscreenCanvas(360, 640);
const ctx = canvas.getContext('2d');
ctx.font = '700 24px Arial';
const transcript = await (await fetch('transcript.json')).json();
const captionRenderer = new CaptionRenderer(transcript, ctx);
const logoRenderer = new LogoRenderer('logo.png', ctx);
const faceRenderer = new FaceRenderer(ctx);
To actually process this video, we're going to use the Streams API, to break down the process into different stages in the pipeline (read, decode, render, encode, mux), where the input is our file, and the output is an arraybuffer (for our output file).
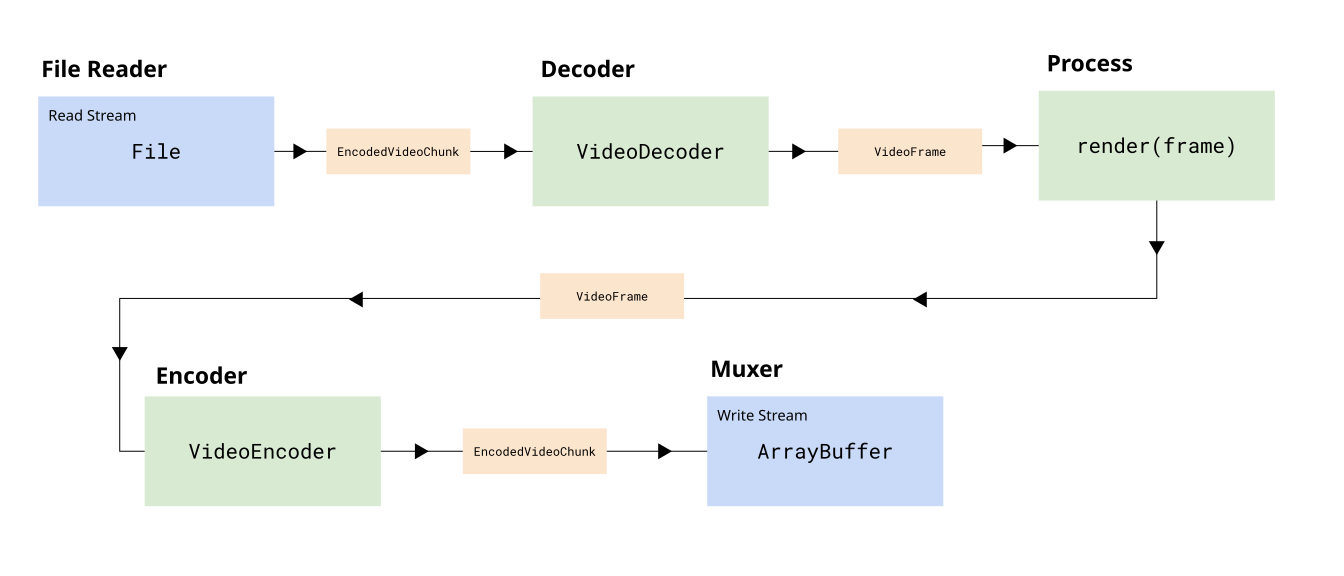
We'll start with the file reader, which will read EncodedVideoChunk objects from our file. Fortunately the Web-demuxer library already exposes a read stream, so the API is very simple:
const chunkStream = demuxer.read('video', clipStart, clipEnd);Next, we'll define a VideoDecoderStream, which turns the VideoDecoder into a transform stream:
class VideoDecoderStream extends TransformStream {
 constructor(config) {
 let decoder;
 let pendingIndices = [];
 super(
 {
 start(controller) {
 decoder = new VideoDecoder({
 output: (frame) => {
 const index = pendingIndices.shift();
 controller.enqueue({ frame, index });
 },
 error: (e) => controller.error(e)
 });
 decoder.configure(config);
 },
 async transform(item, controller) {
 pendingIndices.push(item.index);
 decoder.decode(item.chunk);
 },
 async flush() {
 await decoder.flush();
 if (decoder.state !== 'closed') decoder.close();
 }
 },
 { highWaterMark: 10 }
 );
 }
}
Next, we'll create our render stream, which will just run the renderFrame function we defined in the preview section.
class VideoRenderStream extends TransformStream {
 constructor(canvas, ctx, clipStart) {
 super(
 {
 async transform(item, controller) {
 const time = item.frame.timestamp / 1e6;
 renderFrame(item.frame, ctx, time);
 const newFrame = new VideoFrame(canvas, {
 timestamp: item.frame.timestamp - clipStart*1e6,
 duration: item.frame.duration
 });
 item.frame.close();
 controller.enqueue({
 frame: newFrame,
 index: item.index
 });
 }
 },
 { highWaterMark: 5 }
 );
 }
}
Then we'll define the encoder Stream:
class VideoEncoderStream extends TransformStream {
 constructor(config, clipDuration, progressCallback) {
 let encoder;
 super(
 {
 start(controller) {
 encoder = new VideoEncoder({
 output: (chunk, meta) => {
 controller.enqueue({ chunk, meta });
 },
 error: (e) => controller.error(e)
 });
 encoder.configure(config);
 },
 async transform(item, controller) {
 encoder.encode(item.frame, { keyFrame: item.index % 60 === 0 });
 item.frame.close();
 },
 async flush() {
 await encoder.flush();
 if (encoder.state !== 'closed') encoder.close();
 }
 },
 { highWaterMark: 10 }
 );
 }
}
Finally, we'll create the WriteStream (writing to a destination file). For this we'll use MP4Muxer library:
import { ArrayBufferTarget, Muxer } from 'mp4-muxer'
const muxerOptions = {
 target: new Mp4Muxer.ArrayBufferTarget(),
 video: {
 codec: 'avc',
 width: 360,
 height: 640
 },
 audio: {
 codec: 'aac',
 numberOfChannels: audioConfig.numberOfChannels,
 sampleRate: audioConfig.sampleRate
 },
 firstTimestampBehavior: 'offset',
 fastStart: 'in-memory'
};
const muxer = new Muxer(muxerOptions);
function createMuxerWriter(muxer) {
 return new WritableStream({
 async write(value) {
 muxer.addVideoChunk(value.chunk, value.meta);
 }
 });
}
Perhaps it feels like a lot of work to set up these classes, but it then allows us to use the Streams API to turn this into one single line:
const pipeline = chunkStream
.pipeThrough(new VideoDecoderStream(decoderConfig))
.pipeThrough(new VideoRenderStream(canvas, ctx, clipStart))
.pipeThrough(new VideoEncoderStream(encoderConfig, clipDuration))
.pipeTo(createMuxerWriter(muxer));
await pipeline;
The advantage of this is that it inherently handles memory constraints and if one particular step is a bottleneck (e.g the encoder), it will signal to the upstream steps (decode, render) to slow down, that's what the 'highWatermark' property is doing, it signals to the pipeline that this stage can only handle that many active items in its buffer.
We would also need to make sure we add the audio as well:
function createAudioMuxerWriter(muxer) {
 return new WritableStream({
 async write(chunk) {
 muxer.addAudioChunk(chunk);
 }
 });
}
const audioStream = demuxer.read('audio', clipStart, clipEnd);
await audioStream.pipeTo(createAudioMuxerWriter(muxer));
Once we've awaited both the video and audio pipelines, we can just get our array buffer back from the muxer:
muxer.finalize();
const buffer = muxer.target.buffer;
const blob = new Blob([buffer], { type: 'video/mp4' });
And with those steps, you have an end–to-end pipeline for taking our source video, applying the render transformations, and exporting the output as a clip:
Conclusion
Hopefully the demo gave you an idea of how WebCodecs works as an API. If you're interested in diving deeper into WebCodecs, here are a few resources you can use:
- WebCodecsFundamentals.org – A digital textbook with much deeper explanations of the WebCodecs API, as well as resources like the codec support dataset.
- free.upscaler.video – A free open source video enhancement tool written in WebCodecs, which can give you an idea of what a full production WebCodecs application looks like, with the full processing pipeline documented in the github repo.
- MediaBunny – A library which simplifies a lot of the details of muxing and demuxing when working with the WebCodecs API.
Sam Bhattacharyya
Sam is the CEO of Katana, an AI tool to auto-edit video podcasts. Sam was previously CEO/Co-Founder of Vectorly (AI Filters SDK), acquired by Hopin in 2021. Sam has a background in CS/AI/Robotics from Columbia & MIT, as well as a US patent and several AI papers. Sam is fluent in Mandarin, Spanish, Python and Javascript.
- Premium Results
- Publish articles on SitePoint
- Daily curated jobs
- Learning Paths
- Discounts to dev tools
7 Day Free Trial. Cancel Anytime.