
If you want to get into development, there’s never been a better time to do so. You can use ChatGPT to learn how to code, start software development on affordable Chromebooks, and browse through thousands of easily accessible tutorials and courses. Python is one of the best programming languages to start with, as it’s relatively easy to learn yet powerful in fields like data science, artificial intelligence, and scientific computing.
However, to make the most of Python, you need to be familiar with the concept of Jupyter Notebook, which is a user-friendly, open-source web application that lets you write, execute, and share Python code interactively. In this guide, we’ll teach you how to install and create your first notebook.
What is Jupyter Notebook?
Think of Jupyter Notebook as an interactive web application for creating and sharing documents with live code, equations, visualization, and narrative text. Its user-friendly interface makes it highly accessible, and its robust features make it all the more valuable for seasoned developers. People often use it for the development and presentation of data science projects. A “notebook” is similar to a document that can execute your code, display the output, and show explanations to make the whole process easier to understand.
Jupyter Notebook is not constrained to a specific language or system configuration. It supports over 40 programming languages, including R, Julia, and Scala. You can use it on the best laptops for software development or even on a cheaper Chromebook. On top of all that, Jupyter Notebooks can be easily converted to other formats, such as PDFs or HTML. This makes them a strong tool for presentations.
How to install Jupyter Notebook: PIP vs Anaconda
We've already discussed how to install Jupyter Notebook in a previous guide. There are two primary methods: by using PIP or with Anaconda. PIP is a package manager for Python, and it simplifies the process of installing, upgrading, and managing dependencies or libraries. It’s the default package management system that people use for installing and managing software packages written in Python. If you’re comfortable with Python and its ecosystem and only need Jupyter Notebook without additional packages, installing via PIP is a good choice.
You could also use Anaconda. It’s a free and open-source distribution of the Python and R programming languages. It simplifies package management even further by giving you a sleek graphical user interface. You can use it to launch, update, and manage packages without touching the command line.
If you plan on diving into data science, Anaconda comes bundled with most of the libraries and tools that you need. It all depends on your workflow and what you plan to learn in the future, so we’ll be covering both methods in this guide.
Launching Jupyter Notebook for the first time
Now that you've successfully installed Jupyter Notebook, it's time to put it to good use. We recommend grabbing a comfortable chair, as you'll spend a lot of time getting familiar with Python and Jupyter in the near future.
Now, before you dive into the dozens of tutorials and videos online, you must understand the lay of the land. We can't teach you everything that there is to know about Jupyter Notebook in this section, but we'll break down some of the major components.
First, let's launch Jupyter Notebook for the first time.
- If you installed Jupyter Notebook via PIP, open the Command Prompt app in Windows (or the Terminal on macOS or Linux) and type jupyter notebook. Hit Enter on your keyboard to launch the app.
- If you installed Jupyter via Anaconda, open the Anaconda Navigator, find Jupyter Notebook, and click on Launch.
- Once you're in the notebook dashboard, find and click on the New button. It's usually located at the top right.
- From the dropdown menu, select Python 3 to create a new notebook.
- A new tab will open in your browser with your new notebook. You should see a toolbar at the top and an empty cell below it. This is where you can write your code.
You should now have a blank notebook open in front of you. Now, let's get familiar with cells, command mode, edit mode, markdown, keyboard shortcuts, and everything else you need to know to get accustomed with Jupyter Notebook.
Getting familiar with the Jupyter Notebook interface
With a new notebook in front of you, you're now ready to start experimenting with everything that Jupyter Notebook has to offer. Let's start by exploring the toolbar.
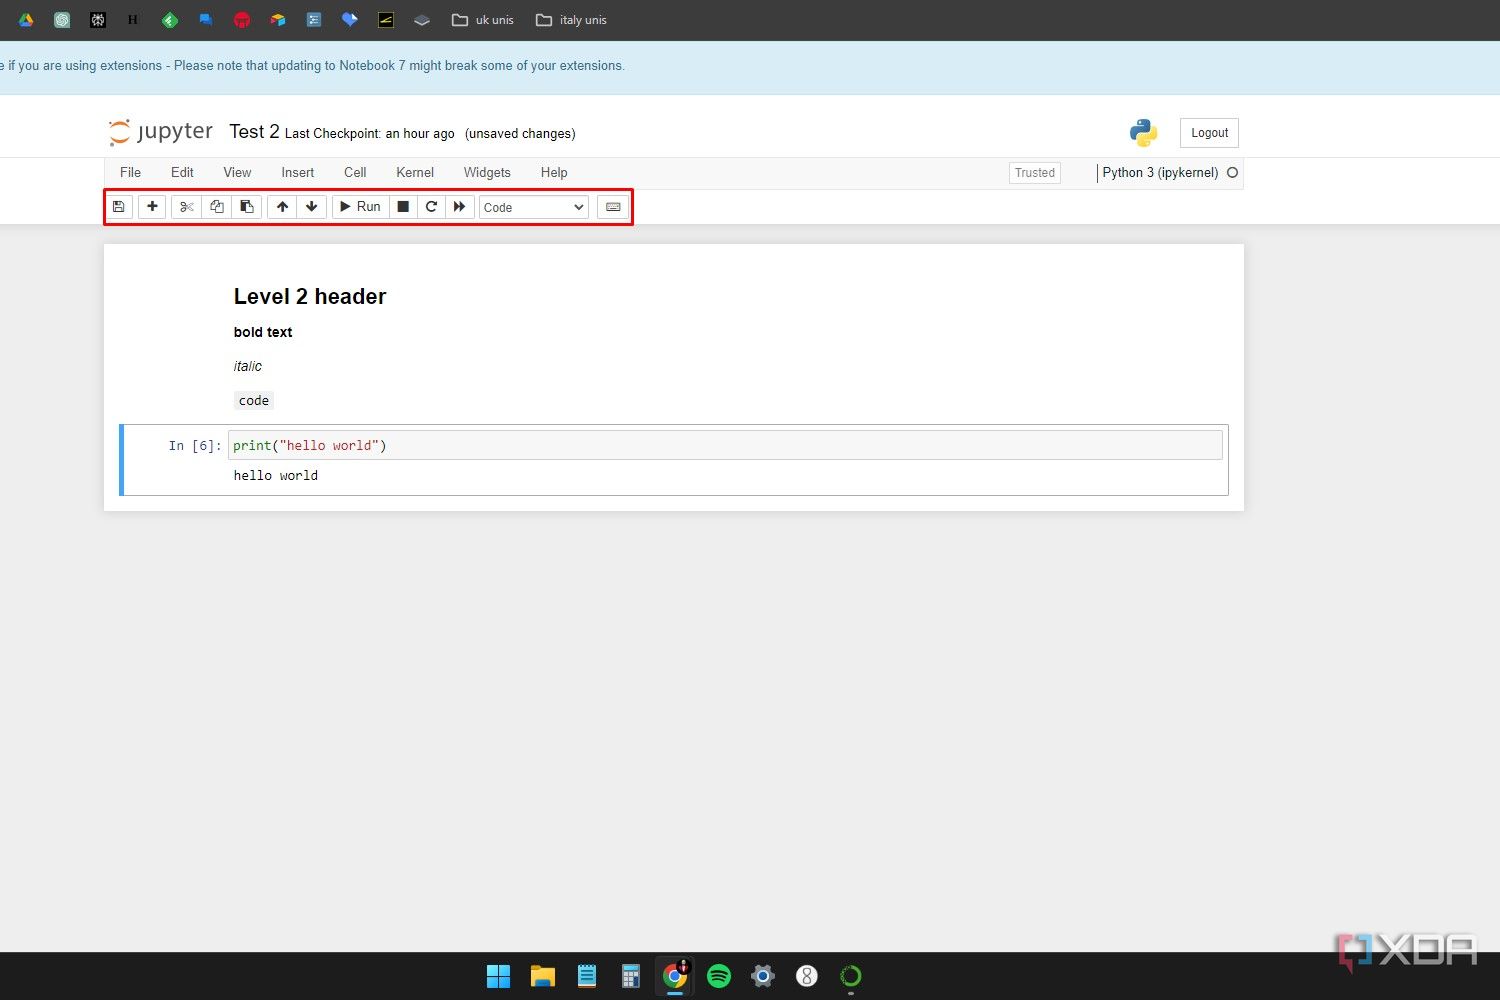
The Toolbar
👁 Windows 11 screenshot that shows an active Jupyter Notebook window highlighting the toolbar.
When you get more used to Jupyter, you'll be using keyboard shortcuts more than the toolbar. However, it still helps to know the function of each available button.
- Starting from the left, you can click on the floppy disk icon to save your progress. Alternatively, you can also press the Ctrl + S (Cmd + S on Mac) keys to save your progress manually. Jupyter Notebook does have an autosave feature, but you should frequently save manually so you don't lose any progress.
- Clicking on the plus (+) icon will allow you to add a new cell below the existing ones.
- The next button features a scissor icon, and clicking on this will cut or delete a selected cell.
- The next two buttons are for copying and pasting selected cells. You can also just use the traditional Ctrl + C and Ctrl + V keyboard shortcuts for this.
- Next to the copy/paste icons, you'll find two arrow icons that allow you to move cells up or down depending on how you want to arrange them.
- The next couple of icons allow you to run, stop, restart, or rerun all the commands or code in the notebook. These actions are indicated by play, stop, restart, and fast-forward icons.
- Finally, there's a drop-down menu that allows you to change the cell type for a selected cell. You can set this to Code, Markdown, or Raw NBConvert. More on all that later.
That's all there is to it for the toolbar. At the very end, there's also a command pallette that displays all the commands and their respective keyboard shortcuts that you can use within the notebook. We recommend going through this when you can, as keyboard shortcuts can save you a lot of time.
What are cells in Jupyter Notebook?
Think of cells as the main body of your notebook. Within each cell, you can write text using the Markdown markup language, or write and execute Python code. Cells can be interacted with in two modes — Command mode and Edit mode.
Command mode allows you to add or delete cells, change cell type, navigate between different cells, and rearrange their position in the notebook. When you're in command mode, a cell will be highlighted with a blue outline. You can also press A on your keyboard to add a new cell above an existing one, press B to add one below it, or press X to delete a highlighted cell.
Edit mode allows you to add, remove, or replace the content within a cell. When in edit mode, the cell that you're working with will be highlighted with a green outline.
You can switch between both modes with ease. To enter command mode, press the Esc key or click outside the cell. Similarly, to enter edit mode, press the Enter key or click inside the cell you want to edit.
Markdown mode and writing text
While programming, it's good practice to leave comments around your code to make it more readable. Markdown is a simple markup language that allows you to write or format text within Jupyter Notebook, and it's a bit more sophisticated compared to comments in traditional code editors like Visual Studio.
If you want to write text within a cell, you can change the cell type from the toolbar. While in command mode, you can also use keyboard shortcuts to speed things up. Select a code cell while in command mode, and simply press M on your keyboard to make it a Markdown cell.
In markdown cells, you can write plain text, but there are quite a few formatting options as well.
- To add a heading, add a # sign before the text to turn it into a header. If you add two # signs before a text, it will turn into a second-level header. Similarly, adding three will turn into a third-level header.
- Add two ** signs before and after a text to make it bold.
- To make the text italic, add a _ sign before and after it.
- Add a ` sign before and after a text to make it an in-line code block. This is also called formatted code in Jupyter.
- For lists, start consecutive lines with the - sign to make bulleted lists. To create numbered lists, start lines with numbers followed by a period.
Here's what all the options should look like while you're writing them as text within the cells:
While you're still in editing mode, press the Shift + Enter keys on your keyboard to run the cell. Here's what the output should look like:
How to write and execute code in Jupyter Notebook
Up to this point, we've discussed cells, markdown mode, and the toolbar. However, let's not forget about one of the most important aspects of Jupyter Notebook: writing and executing code. Follow the steps below to write your first piece of code within Jupyter Notebook.
- Open a new notebook, and click within the empty cell to enter Edit mode.
- To test things out, you can enter any simple piece of code into this cell. Printing something like "Hello World" is always a safe bet. Here's the command for printing "Hello World" in Python:
print("Hello, World!") - To run your code, press Shift + Enter on your keyboard. You should see the words "Hello, World!" as the output displayed below our cell.
- To save the notebook, click the Save icon in the toolbar to save your work. Alternatively, you can also press the Ctrl + S keys on your keyboard to save your progress.
Congrats! You just wrote your first bit of code in Python while using Jupyter Notebook. It's not exactly complex, but it's something to get you started. After saving your notebook, you can close the browser tab to exit Jupyter Notebook.
Making the most of Jupyter Notebook
By now, you should be a bit familiar with the Jupyter Notebook interface and all the features it has to offer. Try creating basic programs like simple arithmetic operations or experimenting with variable assignments to get you started. While you're at it, get familiar with the Markdown features in Jupyter Notebook for making your code more readable. Finally, make a habit of regularly saving your notebook to avoid losing any important work. Happy coding!