
Thanks to my obsession with DIY projects and server experiments, I’ve tinkered with all sorts of virtualization platforms, container runtimes, and hypervisors over the years. These range from popular tools like Docker, Kubernetes, ESXi, and VirtualBox to quirky FreeBSD distros and obscure Unix-like operating systems. Then there’s Microsoft’s Hyper-V, a hypervisor that’s often frowned upon in the home lab community, especially when you run it on a resource-hogging Windows 11 host.
Personally, I’m a staunch member of the Proxmox faction and wouldn’t trade it for anything else. But after falling down the Windows Server rabbit hole a few weeks ago, I tried to set up Hyper-V on a couple of systems just to gauge its utility in a typical consumer-grade experimentation lab. While I wouldn’t recommend basing your entire home lab on Hyper-V, it’s surprisingly fun to tinker with.
Should you use Proxmox, Hyper-V, or ESXi in your home lab?
A three-way battle between popular virtualization platforms
Running Hyper-V on Windows 11 is a solid option for beginners
And I’m willing to defend this statement till my last breath
When it comes to deploying Hyper-V, you have a couple of options. Besides the cloud-based version of the hypervisor on Azure, you could go for Windows Server, which is an abysmally high license cost once your trial period runs out. Or, you could go for Hyper-V Server 2019 if you want to use the latest standalone version of the hypervisor indefinitely without spending a dime. However, the easiest option involves deploying Hyper-V on top of an existing Windows 11 setup, especially if you’ve got a Pro version of the OS.
Let me preface this section by adding that I hate Windows’ intrusive nature, constant ads, and resource-hogging tendencies as much as the next guy. But when you’re a complete newcomer to the home lab ecosystem and have zero experience with Linux distributions, I daresay it’s one of the best starting points. Hyper-V is far more responsive than VirtualBox, VMware Workstation Pro, and other type-2 hypervisors, and has one of the most straightforward UIs out of all virtualization platforms I’ve ever used.
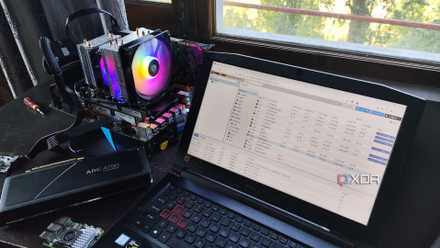
The basic VM deployment options are clearly laid out in the UI, making it useful for beginners who don’t want to read multiple pages of documentation just to provision a virtual machine. However, it also includes SAN management, storage migration, replication, and other hardcore features for tinkerers like yours truly. Heck, Hyper-V can even run Windows Containers, though I still prefer going down the Podman Desktop + WSL2 route. And then there’s Hyper-V Server 2019, which sacrifices the graphical interface for a lightweight, CLI-based “OS.”
Hyper-V Server 2019 gets rid of the typical Windows bloat
It’s a standalone, CLI version of Microsoft’s hypervisor
Considering the 8GB RAM requirement of Windows 11 and the bloatware that ships with the OS, it’s far from optimal for running Hyper-V on an old system. That’s where Hyper-V Server 2019 comes in handy, as this CLI operating system requires at least 4GB of memory. The initial installer is the same as the one you’ll find on typical Windows 11 setups, except it doesn’t let you choose from different versions of the OS, and it’s free from all the ads you’ll find in the OOBE wizard.
It doesn’t take that long to set up, either. I’ve tinkered with the bare-metal Hyper-V Server 2019 setup as well as a Windows 11-based instance on an old 1st-gen Ryzen 5 system, and the former felt a lot more responsive. While I could technically use some PowerShell scripts and CMD commands to control the Hyper-V environment, the lack of a dedicated GUI makes things somewhat complicated. Fortunately, it’s possible to install a barebones graphical interface via CairoDesktop, but I prefer using a different method…
I can access it from another Hyper-V Manager, too
As someone who relies entirely on web UIs to manage containers and virtual machines, I use a separate Hyper-V Manager to deploy VMs on the CLI-only host system. You see, the Hyper-V packages for standard Windows 11 machines (even the Home variant, once you run some batch scripts) include the Hyper-V Manager, which can connect to other instances of the hypervisor.
But I’ll admit that it's a bit complicated to configure due to the way Windows 11 manages permissions, and I had to run a bunch of commands to figure out the right way to connect my Windows 11 client with the Hyper-V Server 2019 node. Once I’d changed the hostname of the latter system and enabled Remote Management for all clients inside the Server Configuration Tool, I ran the powershell command to switch from CMD to PowerShell. Then, I ran Enable-PSRemoting to start the WinRM service and executed Enable-WSManCredSSP -Role server to configure the firewall rules for my remote access needs.
My Windows 11 client, however, needed a lot more tweaks than the Hyper-V server. Since I’ve got Windows 11 Pro instead of Home (and no, these steps work fine on a non-activated instance), I used the Microsoft Features menu to enable the Hyper-V packages, and Hyper-V Manager was ready after a restart. Next, I had to modify the hosts config file in the C:\Windows\System32\drivers\etc directory to add the server’s network credentials. I ran Notepad with admin privileges and appended this line under the first section:
192.168.0.92 ayush-server
I also opened the Group Policy Editor to allow the client to connect to my virtualization server. To be more specific, I opened the Computer Configuration/Administrative Templates/System/Credentials Delegation folder and selected the Allow delegating fresh credentials with NTLM-only server authentication option. Once I’d enabled it, I tapped the Show... button and entered wsman/* inside the pop-up box. Just to avoid running into connectivity issues, I switched the Ethernet driver to a private network within the Network Settings. I also ran the Enable-WSManCredSSP -Role client -DelegateComputer "ayush-server" command within PowerShell to set up the CredSSP process.
With everything configured, I chose the Connect to server… option within Hyper-V Manager. After toggling the Another computer radio button, I entered the hostname of the Hyper-V node and pressed the Set User button after enabling the Connect as another user checkbox. Interestingly, I couldn’t just enter administrator as the Username, and had to type the hostname of the server followed by a backward slash (\) and administrator. With that, my Hyper-V instance was paired with the client system, and I began configuring the network adapter. Although it took me an entire afternoon to find the necessary commands and troubleshoot everything, being able to deploy virtual machines from the comfort of Hyper-V Manager was worth the cost.
Nevertheless, I'll stay on Proxmox for my home server tasks
Hyper-V (especially the Server 2019 variant) may be surprisingly useful for VM-heavy projects, but it’s still far from perfect. Even the barebones CLI variant includes Microsoft’s data-collecting services, let alone a Windows 11 instance running Hyper-V. Plus, I prefer the LXC (and now OCI-compatible image) deployment, ZFS support, and KVM-based virtualization provisions of Proxmox. The Server 2019 version also doesn’t ship with many of the newer features, and Microsoft will end support for the platform in 2029.
I’ll probably keep using Hyper-V on my Windows Server 2025 VM, but that’s because I want to hone my DevOps and sysadmin skills. As for my typical home lab tasks, I’ll stick with my Xeon-based Proxmox workstation and a bunch of cluster nodes.
4 of the coolest things you can do with VirtualBox
Step aside virtualization platforms! Here are some fun projects you can run on your daily driver with VirtualBox