
As a freelancer, I often juggle between managing endless digital files and keeping my thoughts organized. I use Paperless-ngx for my documents, including bills, client contracts, and research PDFs, among others. It’s brilliant at scanning, sorting, and making everything searchable. On the other side, Obsidian is where all my ideas, thoughts, and daily notes live, forming a connected web of information.
Both tools are amazing on their own, but I always felt there was a missing link: how do I easily pull up a specific PDF from Paperless-ngx while I'm deep in my notes in Obsidian? This gap used to create a disconnect in my workflow. I wanted a seamless way to reference my securely stored documents directly from my thoughts, without having to manually search or switch between apps.
While I know Obsidian plugins are the best add-ons to my Obsidian note-taking experience, I didn’t know my search for bridging the gap between Obsidian and Paperless-ngx would end there only! I use a specific Obsidian plugin to connect these two powerhouses. With this solution, I don’t need to fumble around anymore. All the PDFs I manage in Paperless-ngx are just a click away, right within my Obsidian notes. It supercharges my document and knowledge management, making my digital life truly integrated and efficient.
I replaced all productivity tools with Obsidian for a month and here is how it went
My 30-day Obsidian experiment
Installing the plugin and prerequisite
Just a matter of a few minutes!
To connect Obsidian with my Paperless-ngx, the main thing I needed was a working version of Paperless-ngx already running. I self-hosted it on my machine using Docker, which gives me full control. The URL of my Paperless-ngx instance was crucial; I knew I'd need it when setting up the plugin to link Obsidian and Paperless-ngx. The second key thing I made sure to have installed in Obsidian was the PDF++ plugin. It is not strictly mandatory for the Paperless plugin to work, but it's super helpful for actually viewing my PDFs smoothly inside Obsidian.
The connection process starts in Paperless-ngx itself. To let Obsidian safely access my documents, I needed an API authentication token from my Paperless-ngx account. I found this long string of characters in the "My Profile" settings within the Paperless-ngx web interface. It acts like a special password for the plugin, and I copied it and saved it offline for future use.
Next, I headed over to Obsidian. I installed the Paperless plugin directly from the community plugins section and made sure it was active. Then, I opened the Paperless plugin's settings and filled in the required details:
- Paperless URL: Here, I put the full web address of my Paperless instance, making sure to leave off any trailing slash (/).
- Paperless authentication token: I pasted the secret authentication key I had copied from my Paperless instance.
- Document storage path: I entered the specific Obsidian folder path where I wanted the plugin to create references to my Paperless files.
Finally, I clicked on "Test connection" to confirm everything was working. If any errors popped up, I knew I could check the console (using Cmd + Option + I on Mac or Ctrl + Shift + I on Windows) to see what went wrong. With a successful connection, I’m all set to go for playing with the plugin.
This free Obsidian plugin turns my voice into notes, and it all runs on my computer
Using Whisper plugin with its local LLM, I use Obsidian to transcribe my voice notes and audio files to text on my computer.
I can add PDFs to my notes from Paperless-ngx
Obsidian and Paperless perfectly complement each other!
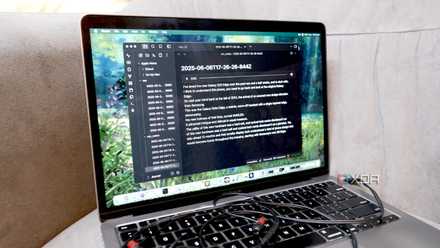
Adding PDFs from Paperless-ngx directly into my Obsidian notes is incredibly straightforward. First, I open the specific note in Obsidian where I want to add the PDF, making sure it's in the editor view. Next, I open the command palette. On Windows, I press Ctrl + P; on Mac, it’s Cmd + P. If I'm on a mobile, a quick swipe down opens the command palette. In the command palette, I simply type "Paperless" to see all the available commands for the plugin.
I use the Paperless: Insert document command most often. This command brings up a list of all the documents in my Paperless-ngx instance directly within Obsidian. From there, I just click on the document I want to insert. The plugin cleverly caches document information (like available files and tags) when first run, so if new documents aren't showing up, I simply use the Paperless: Refresh documents command to update the cache. There's also a handy Paperless: Replace URL with document command, which lets me swap a document's URL in my notes with a proper embed.
I use these 6 CSS snippets to improve my Obsidian experience
These CSS snippets don't just change how Obsidian looks, they transform how you work.
Paperless-ngx and Obsidian combination is really productive
When I first started using Obsidian, easily referencing my documents was a big hurdle. I wasn't sure if there was a simple solution for this. But, discovering the combination of Paperless-ngx and Obsidian changed everything for me. It is super-productive! Now, every piece of research, every invoice, and every important record isn't just stored away; it's instantly accessible and linked directly within my relevant notes. This integrated system has significantly reduced my administrative efforts and provided me with a clear, centralized hub for both my documents and knowledge.