
Summary
- Installing the RAM and cooler properly needs more pressure than what feels right.
- The case fans need to be installed in the right direction.
- You don't need all the PSU cables.
- You need another PC to prepare a Windows installation disk.
PC building may not be rocket science, but it isn't a walk in the park either, especially for a first-timer. Around two decades ago, I was on the cusp of building my first-ever gaming PC. So, I was naturally a bit nervous, worried I might end up messing it up. The level of PC building information available on the internet wasn't as widespread in those days, so I was mostly on my own.
While I managed to scrape through it without causing any irreversible damage, I realized (years later) that there are an awful lot of things no one tells you about. Even if you consume multiple YouTube videos and guides, you might still end up forgetting one or more seemingly obvious things if you're a newbie. I decided to dive into 10 such obvious things that I wish I had known before building my first PC.
5 PC building myths that somehow still exist
PC building has come a long way, but some myths just refuse to die
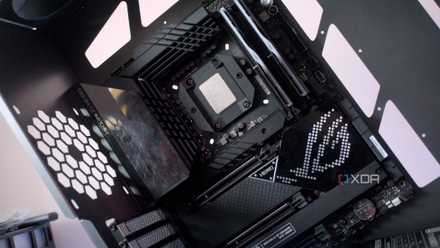
10 Apply pressure when installing the RAM and cooler
RAM sticks are notorious for this
I can't count how many times I've encountered a PC that wasn't booting, and the reason was that one or more sticks of RAM weren't installed all the way. Contrary to the light touch of installing the CPU or GPU, it takes considerable pressure to properly install the RAM. If you don't push it all the way in, the gold contacts at the bottom of the sticks won't completely connect with the slot (yes, even after you hear that click), and you'll think the RAM is faulty or something else is seriously wrong, when all it needs is an extra snug push.
To allow the heatsink to adequately spread the thermal paste on the CPU and form a seamless conductive layer, you need to apply some force.
Similarly, installing the CPU cooler also needs more pressure than you'd think. And to help the heatsink to adequately spread the thermal paste on the CPU and form a seamless conductive layer, you'll also need to apply some force, at least more than what might appear necessary. Not doing this can cause high CPU temperatures, and even thermal throttling and shutdowns.
How to install RAM modules on the motherboard: A beginners guide
It's quick and easy to add memory to your PC.
9 The fans should be facing in the right direction
There's a reason people use the "ugly" side
Another thing that is now second nature wasn't quite obvious back then. It turns out that you can't just install your case fans any way you like — based on your aesthetic preference or what appears correct. Based on the fan blades, the direction that air will flow through will change based on how you install the fan. If you install it the wrong way, you'll turn an intake fan into an exhaust fan and vice versa.
Most fans suck in air from the good-looking side and throw it out the ugly side. That's an easy (but not foolproof) way to remember the directions, unless you have one of the newer models that comes with reversible fan blades, so you can always face the good-looking side, no matter the airflow configuration of your PC.
8 You don't need all the PSU cables
"I've paid for all the cables, I'll use them all"
Back in the day, I only had non-modular PSUs to work with, none of the fancy modular models that kids (and I) use these days. Hence, ending up with unplugged cables coming out of the PSU seemed like something had gone horribly wrong in the build process.
However, someone should have told me that it was completely okay, and that the cables that I didn't need could be tied together and dumped in the cable jungle behind the motherboard. Only when the PC seemed to work just fine without those extra cables did I breathe a sigh of relief.
What is a fully modular power supply (PSU) and why might you want one?
A fully modular PSU can be a great asset for any PC and is the best choice you can make for power management
7 The motherboard needs standoffs
I could have easily broken a motherboard or two
The concept of standoffs was alien to me when I was building my first PC, let alone knowing why one needed to install them before installing the motherboard. Suffice it to say that I ended up installing one or two motherboards without any standoffs. It didn't end badly for me, but it could have.
Your motherboard needs standoffs at the right spots so you don't end up shorting the board (by coming into contact with the case) or applying excessive pressure, breaking the PCB.
5 features to look for in a new motherboard
Planning to buy a new motherboard? Here are some quality-of-life features you should keep an eye out for
6 The I/O shield isn't an optional accessory
I've left it in the motherboard box before
Ah, the beloved I/O shield. I'm sure everyone has forgotten to install it at least once in their PC building career. When I was building my first PC, I didn't know what the heck that thing was, and I happily let it rest inside the motherboard box. Nothing looked "wrong" either, so I never installed it.
Little did I know that the I/O shield is supposed to keep dust from getting inside the PC and also to prevent the motherboard's ports from getting unnecessarily damaged during installation or uninstallation.
10 mistakes you should not make when building a new PC for the first time
Look out for these common mistakes before you start working on your new PC
5 The graphics card slot has a latch, and it's important
Yanking the card out isn't a sane move
This one could be a little less obvious for first-timers, as when installing the graphics card, the latch at the end of the PCIe slot might not come into the picture. It might already be in the open position, so one could simply install the card, hear the reassuring click, and not think about the latch at all.
Not doing this can damage the PCIe slot or rip it out from the motherboard, in extreme cases.
However, if you need to remove the GPU for some reason, it's essential to release the latch before you finally start tugging at the GPU. Not doing this can damage the PCIe slot or rip it out from the motherboard, in extreme cases.
How to remove a GPU from your PC
Need to pull your GPU out of your PC? Here's how to do it without breaking anything.
4 Install some parts on the motherboard before putting it in
I needlessly made my life difficult
These days, every single tutorial will tell you to install the CPU, RAM, SSD, and CPU cooler on the motherboard before even putting the motherboard inside the case. Back in my day, however, I was hell-bent on doing everything on my own without consulting anyone, hence the first thing I did was secure the motherboard inside the case.
This made building the PC a lot harder than it needed to be. Installing the CPU, RAM, and SSD was still fine, but the CPU cooler was a real pain. If you're building your first PC, never make this mistake.
Why a motherboard might be the most important part to future-proof in your PC
Stop ignoring your motherboard.
3 You need another PC to install Windows
A shocker, right?
It's the worst feeling when you've successfully built your PC only to realize you don't have an OS installation disk with you. On top of that, you now need to get hold of another desktop or laptop to create said disk before you can breathe some life into your brand-new PC.
This was the state I found myself in during my first rodeo, scrambling to a friend's house to prepare a bootable Windows disk. In hindsight, it should have been more obvious, but such goes the tale of many a first-time builder.
How to use Rufus to create a bootable USB drive and install Windows
Installing Windows isn't as hard as it once was, and using Rufus makes it even easier
2 The RAM isn't faulty, you need to enable XMP/EXPO
I rarely touched the BIOS in those days
Being a relative novice back then, I had little reason to mess around with the BIOS. That changed pretty quickly after my second build, but the first time around, I had no clue that heading into the BIOS was practically mandatory when setting up a new PC.
I learned this the hard way after running my RAM slower than it was capable of — for months on end.
Often, you'll find your RAM running at a lower speed than it's rated for. You need to enter the BIOS and enable the respective XMP or EXPO profile to get the maximum speed on your memory. I learned this the hard way after running my RAM slower than it was capable of — for months on end.
What are XMP and EXPO and how do they help boost RAM performance?
Enabling XMP and EXPO is an easy way to maximize your RAM performance. But there are some differences in the two approaches.
1 It takes time, just be patient
Impatience was my superpower
As someone tackling PC building for the first time, I should have realized this myself, but for whatever reason, I was frustrated about why it was taking so long to build the PC. There was a lot of back and forth between reading the manuals, staring into the dark corners of the case, and removing components that I had installed incorrectly.
If someone had told me beforehand that this was par for the course, I would have been a lot more relaxed, and the build process would have gone on a lot more smoothly.
10 PC hardware misconceptions you still believe in
Cores, VRAM, PCIe 5.0, or DDR5 — you might be guilty of believing in these 10 PC hardware myths.
Trust yourself, don't rush the process, and learn from your mistakes
That's pretty much the gist of my tryst with the mistakes I made building my first few PCs. Everyone will make one or the other mistake doing something for the first time. The best you can do before building your first PC is to educate yourself, so you don't end up making the really massive mistakes that could cost you dearly (hint: bending CPU pins is one of them).
I built a computer with my kid: The 5 big things that I learned
Building a PC with a kid is a techie's rite of passage and I believe everyone should do it.